
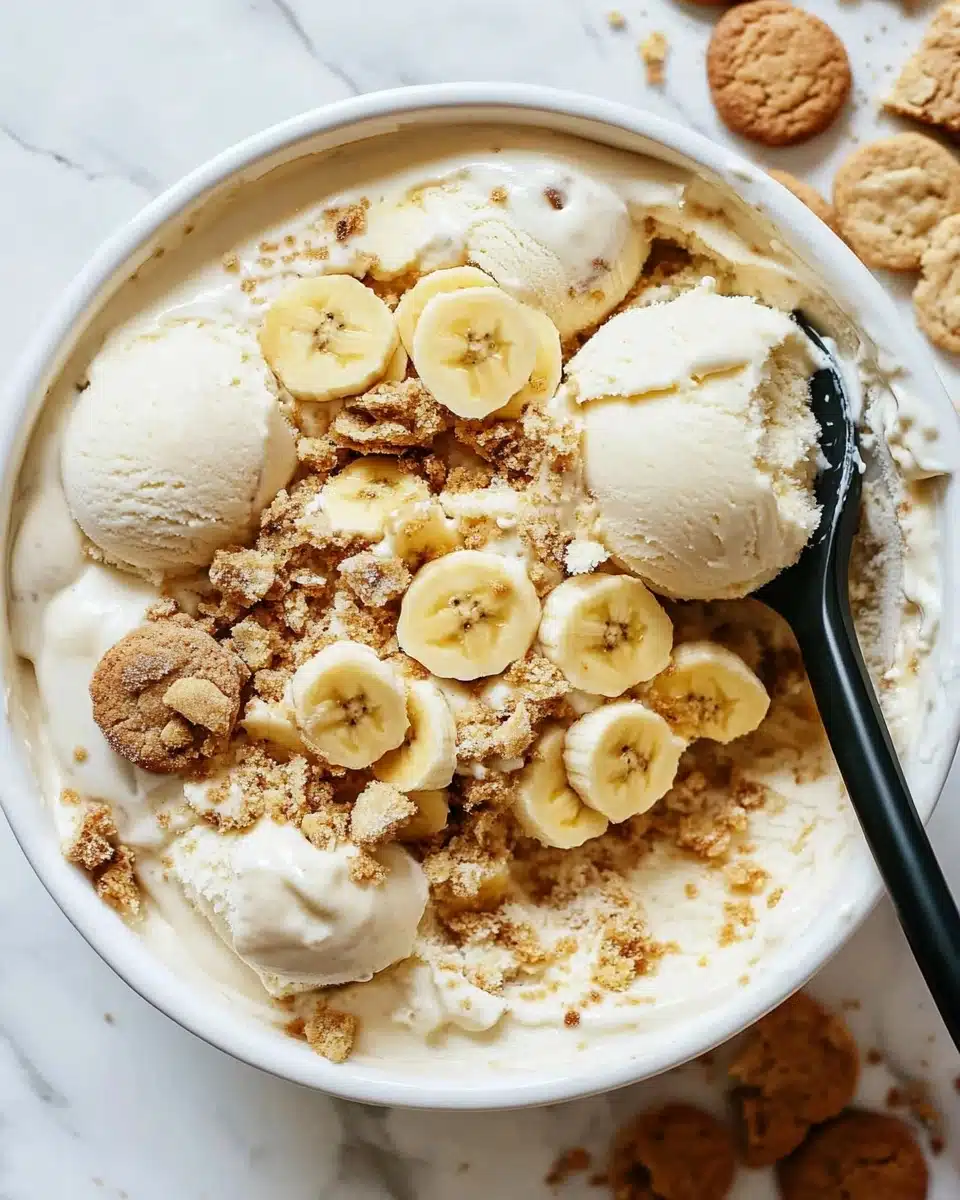
This Banana Pudding Ice Cream is everything you love about the classic Southern dessert—cool, creamy, and loaded with vanilla wafers—all swirled into a dreamy, frozen treat. Each luscious scoop delivers a nostalgia-packed punch, from sweet banana flavor to those irresistible crunchy cookie bits.
Why You’ll Love This Recipe
- No-Churn Convenience: You don’t need an ice cream maker to churn up this rich, creamy dessert—it’s as easy as blend, fold, and freeze!
- Incredible Banana Flavor: The fresh bananas blend perfectly with sweetened condensed milk for a naturally bold, real banana taste.
- Addictively Crunchy Texture: Crushed vanilla wafers and whipped topping swirls bring those signature banana pudding layers straight into every bite.
- Easily Customizable: Whether you’re dairy-free, gluten-free, or just want to tweak the flavors, this Banana Pudding Ice Cream adapts beautifully to your needs.

Ingredients You’ll Need
With just a handful of classic ingredients, this Banana Pudding Ice Cream captures everything you crave from the original dessert. Each component is chosen to make the flavors shine and the texture utterly creamy—don’t skip a thing!
- Yellow bananas (not ripe): Slightly underripe bananas ensure your ice cream has bright, sweet banana flavor without overpowering mushiness or browning.
- Sweetened condensed coconut milk (or traditional sweetened condensed milk): Gives your base that signature richness and luscious, silky sweetness—making it work for both dairy-lovers and plant-based eaters.
- Kosher salt: Just a good pinch balances the sweetness and enhances all those naturally creamy banana notes.
- Vanilla bean paste (or vanilla extract): Deepens the aroma and flavor, bringing a gourmet edge to this homey classic.
- Yellow gel food coloring (optional): Adds a sunny, cheerful hue that mimics classic banana pudding—totally optional, but a fun touch!
- Whipped topping (Cool Whip or plant-based): This is the secret to a light, airy, spoonable texture without an ice cream maker—plus, it swirls in those classic creamy layers.
- Vanilla wafers (regular or gluten/dairy free): For that unmistakable crunch and classic banana pudding vibe, both folded in and sprinkled on top.
Variations
One of the best things about Banana Pudding Ice Cream is just how easy it is to customize! Try out some of these variations to make your batch suit every craving and dietary preference.
- Dairy-Free & Vegan: Stick with sweetened condensed coconut milk and a plant-based whipped topping for a fully non-dairy dessert that’s just as creamy and luscious.
- Gluten-Free: Simply use gluten-free vanilla wafer cookies to keep every crunchy bite safe for all your friends and family.
- Chocolate Banana Pudding Ice Cream: Swap out a cup of vanilla wafers for mini chocolate chips, or drizzle in a little chocolate fudge for an extra decadent twist.
- Classic Southern Style: For extra nostalgia, fold in mini marshmallows or chopped pecans before freezing.
How to Make Banana Pudding Ice Cream
Step 1: Puree the Bananas
Start by peeling your yellow, slightly underripe bananas and tossing them into the food processor. Give them a good blitz until they’re completely smooth and creamy—this base is going to infuse your ice cream with that dreamy, fresh banana flavor and silky texture.
Step 2: Add the Sweetened Condensed Milk & Flavorings
Add the sweetened condensed coconut milk (or regular), a generous pinch of kosher salt, and vanilla bean paste or extract straight into your banana puree. Blend it all together until the mixture looks pale, glossy, and absolutely irresistible—now’s the time to add a drop or two of yellow food coloring if you want that classic, sunny appearance.
Step 3: Fold in the Whipped Topping
Pour the banana mixture into a large bowl, then scoop in about half of your thawed whipped topping. Gently fold together until just combined to keep things light and fluffy. Add the rest of the whipped topping for extra creaminess and those signature silky swirls.
Step 4: Stir in the Vanilla Wafers
Take your vanilla wafers and crumble them right into the bowl, letting some cookie bits stay big and chunky while others get a bit finer. Gently fold everything together—don’t overmix! You want pockets of whipped topping and big cookie treasures in every bite.
Step 5: Freeze & Serve
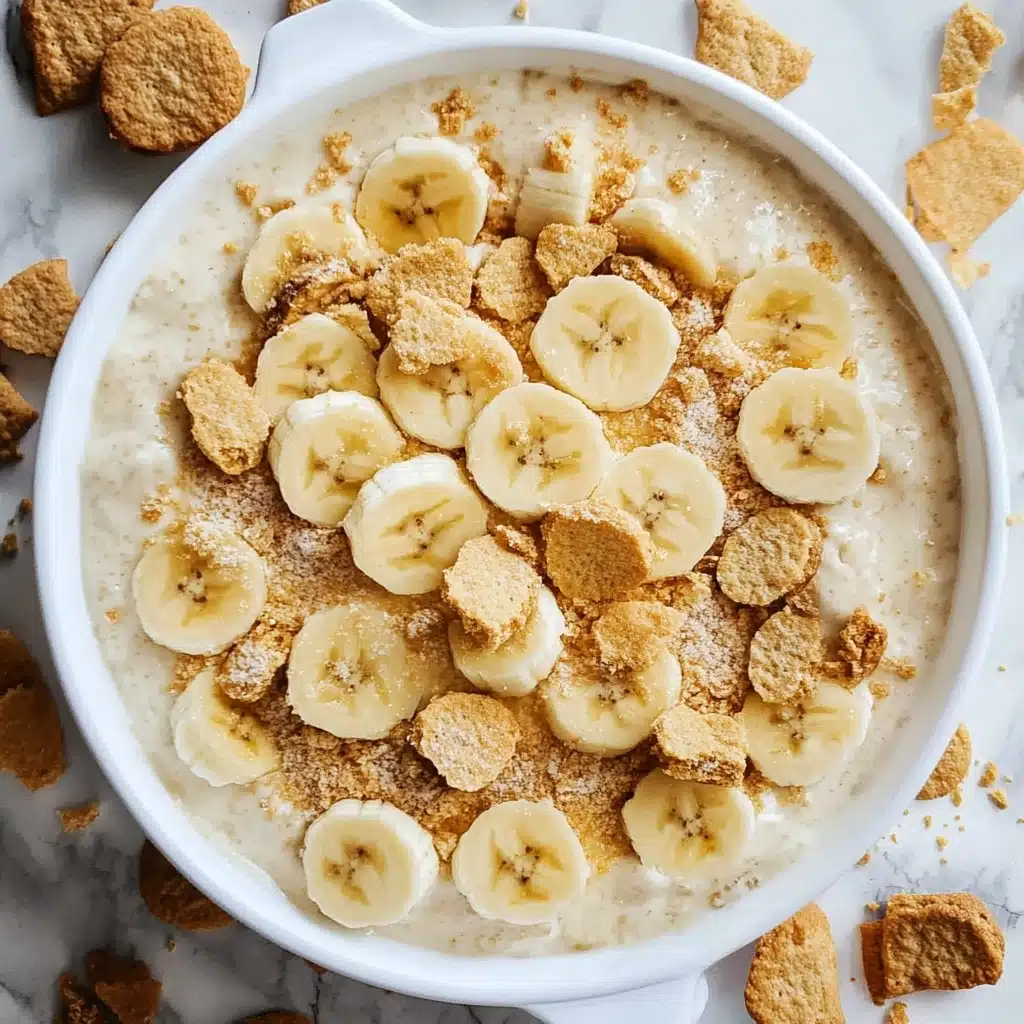
Spoon the decadent banana pudding ice cream mixture into a 9-inch pie dish and scatter even more vanilla wafers over the top for a picture-perfect finish. Cover tightly with plastic wrap and freeze overnight. When you’re ready to serve, give it 10 minutes on the counter to soften just a touch, then scoop and enjoy!
Pro Tips for Making Banana Pudding Ice Cream
- Banana Ripeness Matters: Use yellow, just-ripe bananas for a cheery color and mellow sweetness—overripe bananas will turn your ice cream brown and overly sugary.
- Gentle Folding for Swirls: When mixing in the whipped topping and wafers, fold gently to keep delightful ribbons of cream and big cookie chunks in every scoop.
- Pie Dish Magic: Freezing the mixture in a pie pan lets it chill evenly and makes for super easy scooping once it’s set.
- Soft Serve Shortcut: For softer, easier-to-scoop texture, let the frozen ice cream rest at room temperature for about 10 minutes before serving.
How to Serve Banana Pudding Ice Cream
Garnishes
For an extra-special touch, sprinkle more crushed vanilla wafers over the top, or add a dollop of whipped topping, a drizzle of caramel sauce, and a few fresh banana slices. Even a light dusting of cinnamon sets off the creamy banana flavor perfectly!
Side Dishes
Pair a scoop of Banana Pudding Ice Cream with warm, fudgy brownies, lemon bars, or a batch of snickerdoodles for a true Southern-inspired dessert spread. It’s a fantastic complement to grilled peaches or a simple cup of espresso too.
Creative Ways to Present
Serve your ice cream in vintage mason jars layered with extra wafers, or scoop it into mini pie crusts for banana pudding “ice cream pies.” For parties, try making ice cream sandwiches with vanilla wafers or pressing scoops into popsicle molds for refreshing hand-held treats!
Make Ahead and Storage
Storing Leftovers
Store any leftover Banana Pudding Ice Cream covered tightly with plastic wrap or in an airtight container in the freezer for up to one week. Be sure to press plastic wrap directly against the surface to avoid any pesky ice crystals.
Freezing
This ice cream freezes beautifully! If making ahead for a party or event, prep and freeze it up to five days in advance—just give it a little time to soften at room temperature before scooping for best results.
Reheating
No warmup is needed—simply let your Banana Pudding Ice Cream sit out for about 10 minutes to soften, then scoop and enjoy! If you’re making ice cream sandwiches or pops, assemble just before serving for the best texture.
FAQs
-
Can I make Banana Pudding Ice Cream without dairy?
Absolutely! Use sweetened condensed coconut milk and a plant-based whipped topping—the result is still every bit as creamy and dreamy as the traditional version.
-
How do I keep the bananas from turning brown in the ice cream?
Use just-ripe (yellow, not spotty) bananas, blend them immediately with the sweetened condensed milk, and freeze promptly. A little lemon juice can also help minimize browning if needed.
-
Do I need an ice cream maker for this recipe?
Nope! This Banana Pudding Ice Cream is entirely no-churn—everything comes together with a food processor and a mixing bowl, making it super easy and accessible.
-
Can I use different kinds of cookies instead of vanilla wafers?
Definitely! While vanilla wafers add that classic Southern flair, shortbread cookies, graham crackers, or even gluten-free options work wonderfully and offer fun, new variations.
Final Thoughts
If you adore the flavors of banana pudding, this easy Banana Pudding Ice Cream is simply joy in a bowl—cool, creamy, and guaranteed to disappear in a flash. Give it a try and share a scoop with someone you love; I promise, it’ll become a summertime favorite the very first time you make it!
Print
Banana Pudding Ice Cream Recipe
- Prep Time: 15 minutes
- Cook Time: 0 minutes
- Total Time: Overnight
- Yield: 10 servings
- Category: Dessert
- Method: Chilling, Freezing
- Cuisine: American
- Diet: Vegetarian
Description
Indulge in the creamy, nostalgic flavors of this Banana Pudding Ice Cream. With ripe bananas, sweetened condensed coconut milk, and a hint of vanilla, this frozen treat is a delightful twist on a classic dessert.
Ingredients
For the Banana Pudding Ice Cream:
- 2 yellow bananas (not ripe)
- 1 can (11 oz) sweetened condensed coconut milk (or 14 oz can sweetened condensed milk minus 1/3 cup)
- Good pinch of kosher salt
- 1 tsp vanilla bean paste (or vanilla extract)
- Yellow gel food coloring (optional)
- 8-9 oz container whipped topping, thawed (Cool Whip or plant-based)
- 2 cups vanilla wafers (regular or gluten and dairy free), plus more for topping
Instructions
- Banana Pudding Ice Cream – In a food processor, blitz the bananas until smooth.
- Pour the mixture into a bowl and scoop in about half of the whipped topping. Fold to combine.
- Add in the remaining whipped topping along with the vanilla wafers. Roughly crust them in your hands as you drop them in.
- Gently fold together, allowing some ribbons of whipped topping throughout.
- Pour the mixture into a 9” pie dish and top with more vanilla wafers.
- Cover in plastic wrap and chill overnight.
- The next day, allow to thaw for about 10 minutes then scoop and serve!
Add in the sweetened condensed milk, salt, and vanilla bean paste and blend until smooth. Blend in a drop of yellow food coloring if desired.
Notes
- For a richer flavor, consider adding chopped nuts or chocolate chips.
- Experiment with different flavors of whipped topping for unique variations.
Nutrition
- Serving Size: 1 serving
- Calories: 280
- Sugar: 21g
- Sodium: 180mg
- Fat: 14g
- Saturated Fat: 10g
- Unsaturated Fat: 3g
- Trans Fat: 0g
- Carbohydrates: 35g
- Fiber: 1g
- Protein: 2g
- Cholesterol: 0mg

