
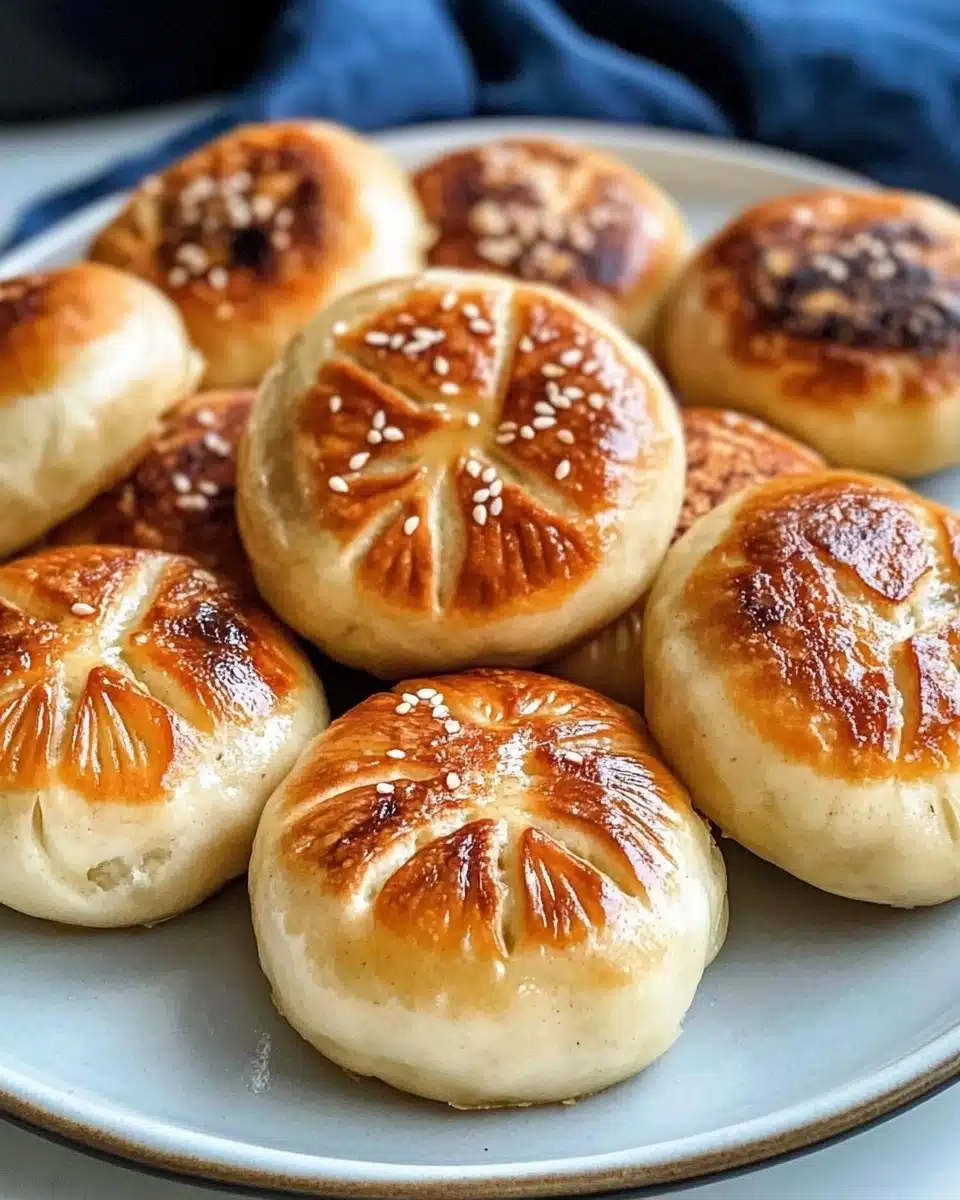
If you’re craving a snack that’s savory, juicy, and perfectly crisp on the outside, these Vegan Pan-Fried Buns are about to become your new obsession! Stuffed with a fragrant veggie filling and wrapped in homemade dough, each golden bun delivers the kind of comfort you’d expect from your favorite street food—minus the animal products.
Why You’ll Love This Recipe
- Crispy & Fluffy Texture: Each Vegan Pan-Fried Bun is gorgeously golden on the outside and pillowy soft inside—utterly satisfying in every bite.
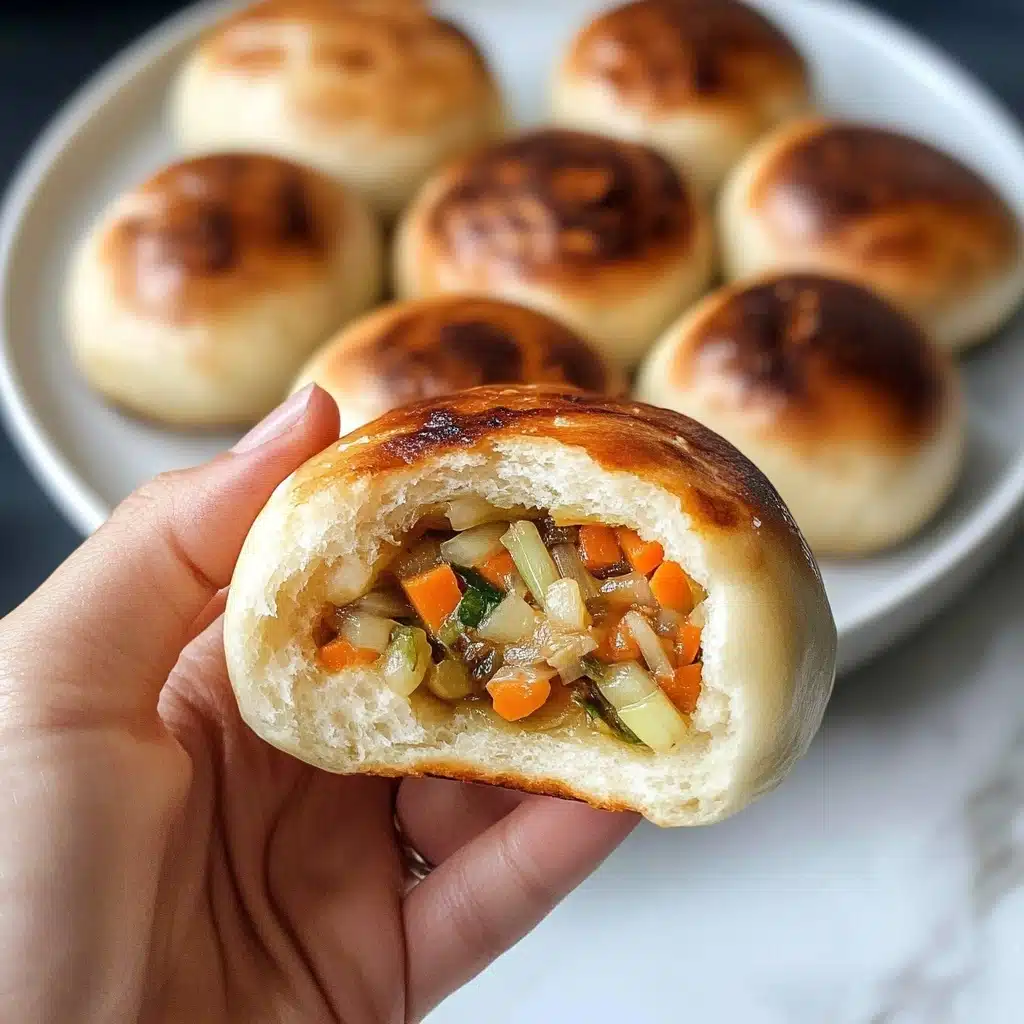
- Hearty, Flavor-Packed Filling: The stuffing bursts with colorful cabbage, carrots, noodles, and scallions, seasoned to perfection for an umami-forward bite.
- Totally Plant-Based: This recipe is 100% vegan, making it an allergy-friendly, feel-good treat you can share with everyone.
- Fun to Make & Freeze: The process is super rewarding, and leftovers freeze like a dream for future snack emergencies.

Ingredients You’ll Need
Don’t be intimidated—these ingredients are common, smartly chosen, and come together for a dough and filling that are all about balance. Each one plays an essential role, from the bounce of noodles to the nutty lift of sesame oil.
- All-Purpose Flour: This gives the bun wrappers their classic chewy, fluffy structure—don’t substitute if you want authentic texture.
- Instant Dry Yeast: Provides crucial lift and elasticity for dough that puffs up in the pan.
- Sugar: Not just for sweetness; it feeds the yeast and helps browning.
- Salt: Sharpens the overall flavor—the right touch is everything here.
- Roasted Sesame Seeds: Bring unexpected little pops of crunch and subtle nuttiness to both the dough and the filling.
- Warm Soy Milk (or other non-dairy milk): Adds gentle flavor and moisture to the dough, for a softer crumb.
- Toasted Sesame Oil (or neutral oil): Adds aromatic depth—sesame oil especially is classic for a toasty finish!
- Shredded Cabbage: This is the star of the filling—juicy, sweet, and a wonderful texture once cooked down.
- Vermicelli Noodles: These glass noodles make the filling extra hearty—you’ll want them in every bite.
- Carrot: Grated or shredded, they lend sweetness and vibrant orange color.
- Scallions or Chives: Essential for a gentle bite of freshness that lifts the whole filling.
- Soy Sauce: Delivers umami, saltiness, and a touch of savoriness to tie the filling together.
- Extra Neutral Oil: For pan-frying and sautéing, keeping the texture perfect and ungreasy.
Variations
Once you’ve mastered these Vegan Pan-Fried Buns, you’ll realize just how easy they are to customize. Play with the fillings to suit what’s in your fridge, your mood, or spice level, and make each batch uniquely yours!
- Swap-In Veggies: Try adding shiitake mushrooms, finely chopped bok choy, or even finely minced bell peppers for a new twist on the classic filling.
- Noodle-Free: Skip the vermicelli if you’d prefer a lighter bun, or sub in thin rice noodles for a fun textural change.
- Extra Protein: Toss in some crumbled tofu or edamame beans for even more plant-based heartiness.
- Spicy Kick: Add chili flakes or a spoonful of chili oil to the filling if you like your buns with a bit of fire.
How to Make Vegan Pan-Fried Buns
Step 1: Make the Dough
In a large bowl, whisk together all your dry ingredients—flour, yeast, sugar, salt, and those wonderful roasted sesame seeds. Make a well in the center and pour in your warm soy milk and oil, mixing gradually to form a slightly shaggy dough. Knead until you’ve got a soft, smooth ball, then cover with a damp towel and let it rest for at least two hours so it can rise and become fluffy.
Step 2: Prepare the Filling
While the dough is rising, soak your vermicelli noodles in boiling water until tender, then drain and roughly chop into short lengths. Sauté the carrots, chives, and cabbage in a splash of oil until just tender, then mix in the noodles, soy sauce, salt, sesame seeds, and toasted sesame oil. Cook everything together until flavors mingle, then transfer to a strainer to drain off extra moisture as the filling cools.
Step 3: Divide and Roll the Dough
Once your dough has doubled in size, punch it down and divide it into 12–16 equal pieces (depending on how big you want your buns). Roll each into a ball, then flatten and roll out to form wrappers, dusting with flour to avoid sticking. They don’t have to be perfect—rustic is part of the charm!
Step 4: Fill and Shape the Buns
Spoon 2–3 tablespoons of your cooling filling into the center of each wrapper. Crease and pinch the edges all around, twisting at the top to completely seal the bun. Gently press down so each bun sits flat (and traps in all that juicy goodness).
Step 5: Pan-Fry the Buns
Heat a nonstick or cast iron skillet over medium. Add a touch of oil and place buns in, creased side down, leaving space between each. Cook until the bottoms are golden and crisp, then flip. Carefully splash in a bit of water (using a lid as a shield!), cover, and let steam until the buns are fluffy and the water evaporates. Repeat in batches until all Vegan Pan-Fried Buns are done!
Pro Tips for Making Vegan Pan-Fried Buns
- Wrappers That Don’t Stick: Dust both your hands and rolling surface liberally with flour, and keep wrappers stacked in small batches—flour between layers—under a dry towel to keep them supple and easy to handle.
- Juicy, Never Soggy Filling: Make sure you cool and drain the cooked veggies and noodles well—too much moisture will make your buns burst or leak.
- Golden Crust, Tender Center: Use medium heat and don’t rush each batch; patience gives you that signature contrast of crispy bottom and fluffy, cooked-through bun.
- Freezer Success: Freeze buns separately on a tray first before bagging—this way, they won’t stick and you can reheat just one or two whenever the craving hits!
How to Serve Vegan Pan-Fried Buns
Garnishes
Sprinkle extra toasted sesame seeds or finely sliced scallions over your Vegan Pan-Fried Buns for a pop of color and flavor. A drizzle of chili crisp or a touch of black vinegar on the side makes each bite even more crave-worthy.
Side Dishes
Serve these buns with a simple Asian slaw, light pickled cucumbers, or a quick miso soup to round out the meal. They’re also fantastic alongside edamame or a punchy dipping sauce made from soy sauce, rice vinegar, sugar, and chili.
Creative Ways to Present
Try serving Vegan Pan-Fried Buns on a rustic wooden board, nestled in parchment paper, or stacked in a bamboo steamer for an authentic touch. For parties, place each bun in a mini paper cupcake liner for grab-and-go cuteness!
Make Ahead and Storage
Storing Leftovers
Pop any leftover Vegan Pan-Fried Buns into an airtight container and refrigerate them for up to five days. A quick reheat brings back their steamy, fluffy goodness, so don’t worry if you make more than you planned!
Freezing
To freeze, arrange cooled buns on a tray so they don’t touch, and freeze until solid. Then, transfer to a reusable bag or container. They’ll keep well for up to three months, making heat-and-eat snacks just a few minutes away.
Reheating
To reheat refrigerated or frozen Vegan Pan-Fried Buns, pop them back into a skillet with a splash of water and a lid to steam/crisp, or use an oven or steam basket for even heat. A microwave with a bowl of water also works well for a soft, hot bun in seconds!
FAQs
-
Can I make Vegan Pan-Fried Buns gluten-free?
While it’s tricky to get exactly the same fluffy texture, you can try using a 1:1 gluten-free flour blend that’s meant for yeast baking. Keep in mind that the results may be slightly denser, but still tasty!
-
What kind of cabbage works best for the filling?
Green cabbage is classic and holds up well during cooking, but napa cabbage or savoy cabbage can also be used for a slightly sweeter, softer filling. Just be sure to squeeze out excess moisture so your buns don’t get soggy.
-
Do I need a special pan to make Vegan Pan-Fried Buns?
Nope! Any heavy skillet with a lid will do—cast iron or nonstick both work beautifully. The trick is the combination of frying and steaming to get that golden bottom and fluffy top.
-
Can I prep the buns in advance and cook them later?
Absolutely! Fill and shape the buns, then cover and refrigerate them for up to a day before pan-frying as directed. For even longer storage, freeze them uncooked and cook straight from the freezer—just add a little extra time in the pan.
Final Thoughts
There’s something delightfully homey about making Vegan Pan-Fried Buns from scratch—and once you taste that crisp, golden crust and savory filling, you’ll want to share them with everyone you love. Don’t be surprised if these become a new staple in your kitchen—give them a try and let the magic happen!
Print
Vegan Pan-Fried Buns Recipe
- Prep Time: 1 hour
- Cook Time: 30 minutes
- Total Time: 2 hours
- Yield: 16 buns
- Category: Appetizer, Snack
- Method: Pan-Frying
- Cuisine: Asian
- Diet: Vegan
Description
These Vegan Pan-Fried Buns are a delightful treat filled with a savory mixture of cabbage, vermicelli noodles, carrots, and scallions, wrapped in a homemade dough and pan-fried to golden perfection. They are perfect for a delicious snack or meal!
Ingredients
Dough
- 3 cups all-purpose flour (375 g)
- 2 tsp instant dry yeast
- 2 tbsp sugar
- 1/2 tsp salt
- 1 tbsp roasted sesame seeds
Wet Ingredients
- 1 cup warm soy milk or other non-dairy milk
- 1 tbsp toasted sesame oil or neutral oil
Filling
- 1 tbsp neutral oil for cooking
- 6 cups raw shredded cabbage
- 3.5 oz uncooked bundles of vermicelli noodles (100g total)
- 1 cup finely shredded or grated carrot
- 1/2 cup chopped scallions or chives
- 1 tbsp soy sauce
- 2 tsp salt or to taste
- 1 tbsp roasted sesame seeds
- 2 tbsp toasted sesame oil
Instructions
- Preparing the Dough – In a large bowl, mix dry ingredients, create a well, add warm milk and oil, mix into a dough. Let it rise for 2 hours.
- Cooking the Filling – Cook noodles, then sauté cabbage, carrots, scallions, add in noodles, soy sauce, salt, and oil. Drain excess liquid.
- Preparing the Wrappers – Divide and roll dough into balls, roll out into wrappers.
- Making the Buns – Fill wrappers, seal and cook in a pan.
- Storing the Cooked Buns – Refrigerate cooked buns for up to 5 days, reheat before serving.
- Freezing the Buns – Freeze on a tray, then store in a bag. Reheat as needed.
Notes
- Store cooked buns in an airtight container and refrigerate for up to 5 days.
- To reheat, pan fry with water, oven-toast, or microwave with water.
- Freeze buns on a tray spaced apart, then store in a bag for easy reheating later.
Nutrition
- Serving Size: 1 bun
- Calories: 180
- Sugar: 2g
- Sodium: 400mg
- Fat: 5g
- Saturated Fat: 0.7g
- Unsaturated Fat: 4.3g
- Trans Fat: 0g
- Carbohydrates: 28g
- Fiber: 3g
- Protein: 5g
- Cholesterol: 0mg


