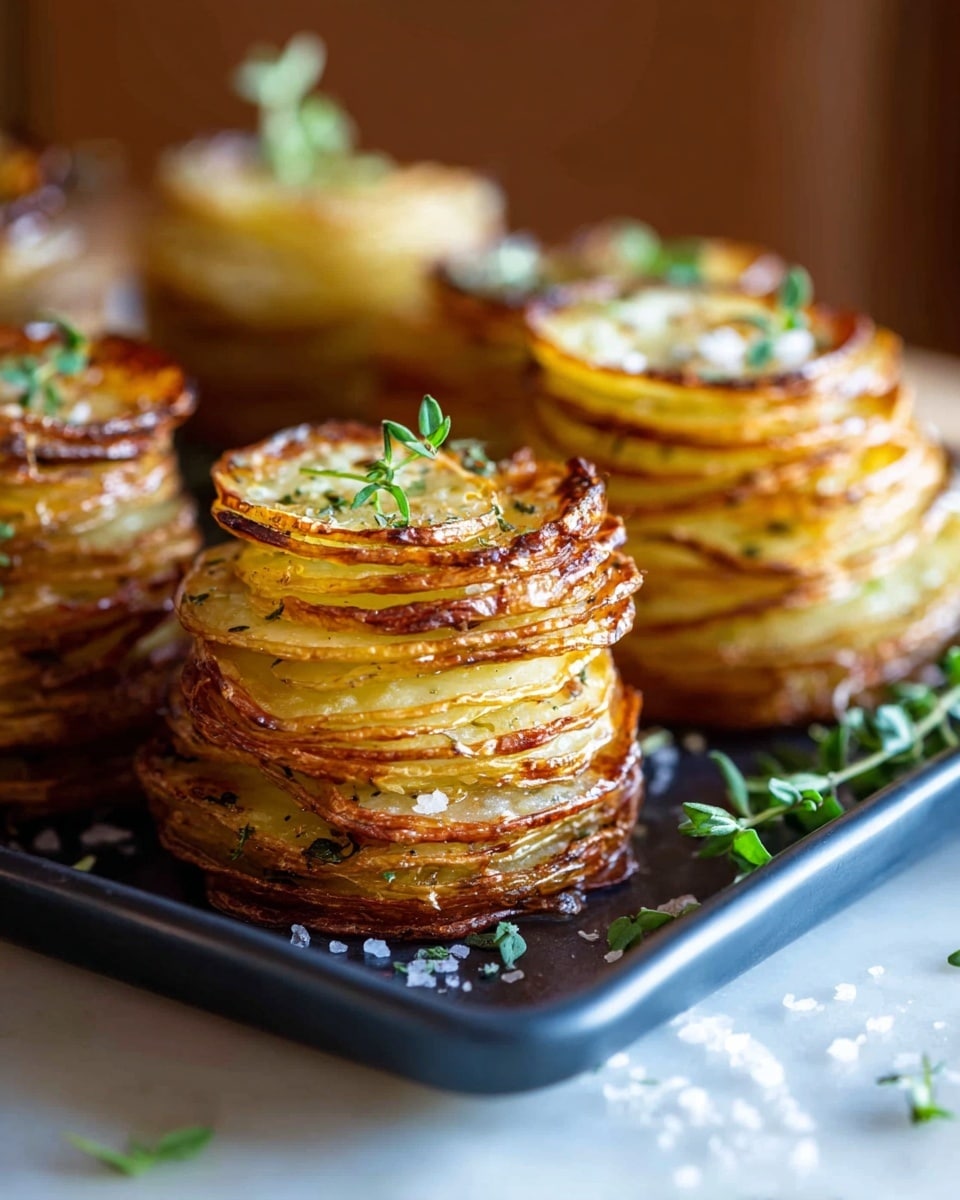
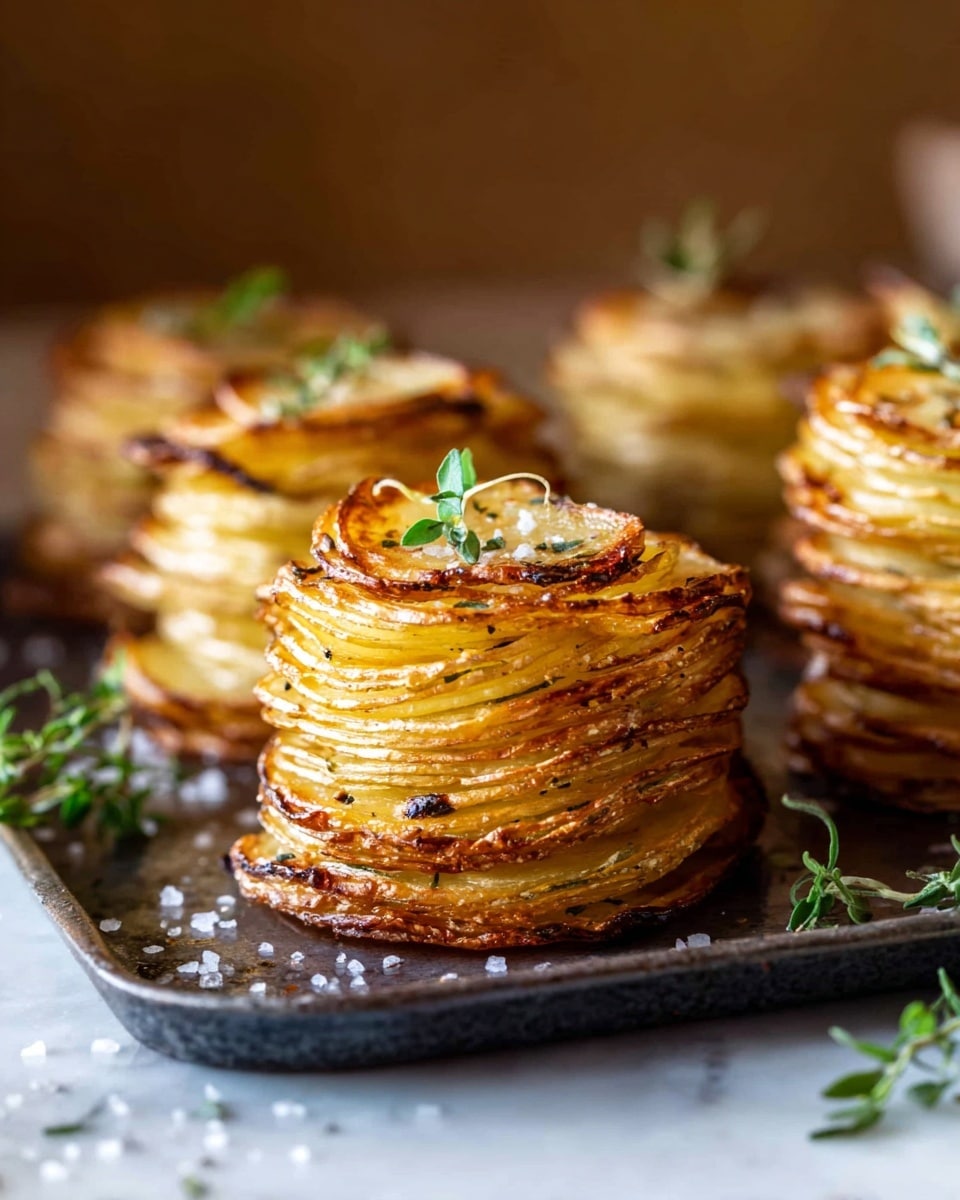
I absolutely love this Crispy Cheesy Potatoes Stacks Recipe because it transforms simple potatoes into an irresistible, golden, and cheesy delight. Every time I make this, it feels like a little celebration on the plate—perfect for family dinners or when guests come over. The thinly sliced potatoes layered with fresh herbs, garlic, and a blend of cheeses crisp up beautifully in muffin tins, giving you perfectly portioned stacks with crispy edges that everyone fights over.
When I first tried this recipe, I struggled with getting the potatoes crispy without drying them out, but once I nailed the technique, the results were consistently fantastic. You’ll find that this Crispy Cheesy Potatoes Stacks Recipe is a total crowd-pleaser whether you serve it for brunch, alongside a roast, or as a fancy weekend treat. It’s easy enough to prep, but it looks so elegant that people assume you slaved over it for hours.
Why You’ll Love This Recipe
- Perfectly Crispy & Cheesy: Each stack crisps on the outside while staying tender and flavorful inside.
- Easy to Make in Muffin Tins: The little stacks come together quickly and cook evenly without fuss.
- Customizable Fresh Herb Flavor: Oregano and thyme add a fresh twist you don’t get with just basic potatoes and cheese.
- Great for Any Occasion: From casual family meals to holiday dinners, it elevates your side dish game.

Ingredients You’ll Need
I like how these ingredients come together to create that rich, comforting flavor with a fresh herbal lift. Using fresh herbs and grated garlic makes all the difference, so I recommend grabbing the freshest you can find.
- Russet or Idaho potatoes: Choose starchy potatoes for that perfect crisp and tender bite.
- Salted butter: Melting it ensures each potato slice is coated evenly and adds delicious richness.
- Fresh oregano: Adds a bright, slightly peppery flavor that pairs beautifully with cheese.
- Fresh thyme: Another herb I love here for its subtle earthiness; use fresh, not dried.
- Garlic: Grated for an even, mellow garlic flavor that permeates the stacks.
- Parmesan cheese: This sharp, nutty cheese crisps nicely on top and throughout the layers.
- Sharp cheddar or gruyere cheese: Both melt well and add gooey cheesy goodness; I switch it up depending on the mood.
- Kosher salt and black pepper: Season generously to bring out all the flavors.
Variations
I love tweaking the herbs and cheeses here depending on the season and what we have on hand. Feel free to experiment so the Crispy Cheesy Potatoes Stacks Recipe becomes your own signature side dish!
- Herb Swap: I sometimes use rosemary or sage in place of oregano and thyme for a more woodsy flavor, which my family really enjoys in the fall.
- Cheese Variations: Try mixing mozzarella with fontina for a creamier stack that’s less sharp but still gooey.
- Meat Add-In: For meaty stacks, I dice cooked bacon or ham and layer it between potato slices.
- Dairy-Free Version: Use olive oil instead of butter and nutritional yeast for cheesy flavor if you’re avoiding dairy.
How to Make Crispy Cheesy Potatoes Stacks Recipe
Step 1: Prep Your Potatoes Thin and Even
Slice your potatoes super thin—about 1/8 inch thick—using a mandoline or a very sharp knife. This step is key because the thinner the slices, the crispier and more tender your stacks will be. I used to eyeball it, which led to uneven cooking, but the mandoline changed the game. Just be sure to handle it carefully!
Step 2: Mix Butter, Herbs, Garlic, and Cheese
In a large bowl, whisk together melted butter, chopped fresh oregano and thyme, grated garlic, parmesan, cheddar, salt, and pepper. This combination creates a rich, flavorful coating for every slice of potato. Toss the potatoes here gently to get them evenly coated without breaking the slices.
Step 3: Stack Potatoes in Muffin Tins and Bake
Distribute the potato slices evenly into a greased 12-cup muffin tin, stacking all the way to the top because the potatoes will shrink as they roast. Cover the tin tightly with foil to help the potatoes steam and cook through. Bake at 400°F for 30 minutes, then remove the foil and bake for another 20-25 minutes until golden and crisp on the edges.
Step 4: Unmold and Serve Immediately
Run a butter knife gently around each stack to loosen it from the tin, then carefully lift them out. I love sprinkling a tiny pinch of flaky sea salt on top right before serving to add an extra crunch and flavor boost. These are best enjoyed hot and crispy!
Pro Tips for Making Crispy Cheesy Potatoes Stacks Recipe
- Use a Mandoline: It ensures uniform thin slices, which cooks evenly and crisps up nicely without sogginess.
- Don’t Skip the Foil Cover: Covering with foil the first 30 minutes steams the potatoes gently, so they’re tender inside before crisping.
- Butter is Your Friend: Melted butter coats the stacks, helping them develop golden edges and rich flavor.
- Avoid Overstacking: Fill muffin cups up to the rim but no higher, so they cook evenly and don’t topple over.
How to Serve Crispy Cheesy Potatoes Stacks Recipe
Garnishes
I love topping these stacks with a sprinkle of flaky sea salt or a little chopped fresh parsley for color right before serving. Adding a dollop of sour cream or a drizzle of garlic aioli on the side never fails to impress my guests.
Side Dishes
This Crispy Cheesy Potatoes Stacks Recipe pairs beautifully with roast chicken, grilled steak, or even a fresh green salad. I often serve it alongside sautéed green beans or a crisp arugula salad tossed with lemon vinaigrette to balance the richness.
Creative Ways to Present
For special occasions, I arrange these potato stacks on a long platter and garnish with edible flowers and microgreens. Turning them into individual servings makes the dinner feel fancy without extra work, perfect for holiday meals or dinner parties.
Make Ahead and Storage
Storing Leftovers
Leftover crispy cheesy potato stacks are great refrigerated in an airtight container for up to 3 days. I find it best to cool them completely before storing to prevent sogginess.
Freezing
I’ve frozen these stacks with decent success—just wrap each stack in plastic wrap and place in a freezer-safe container. When you want to enjoy them again, thaw overnight in the fridge before reheating.
Reheating
To keep them crispy, always reheat leftovers in a 375°F oven for about 15-20 minutes instead of the microwave. I’ve learned this trick to avoid losing that signature crispy edge and cheesy texture that makes this recipe special.
FAQs
-
Can I use other types of potatoes for this recipe?
You can, but Russet or Idaho potatoes work best because of their starchy texture that crisps up nicely. Waxy potatoes like red or fingerlings tend to stay softer and don’t get that golden crisp.
-
Do I need to peel the potatoes before slicing?
I usually peel my potatoes for this recipe to get an even texture and appearance, but you can leave the skins on for added rustic flavor and nutrients if you prefer.
-
How can I make this recipe dairy-free or vegan?
Replace butter with olive or coconut oil and substitute cheeses with vegan cheese alternatives or nutritional yeast for cheesy flavor. The stacks will still cook well but may be less rich.
-
Can I prepare the stacks ahead of time before baking?
Yes! Assemble the stacks in the muffin tin, cover tightly with plastic wrap, and refrigerate for up to 24 hours before baking. Just add a few extra minutes to cook time if baking from chilled.
Final Thoughts
This Crispy Cheesy Potatoes Stacks Recipe is one of those dishes I keep coming back to because it’s deceptively simple yet feels truly special. I love how easy it is to customize and how it elevates any meal with crispy, gooey layers of comfort and flavor. If you’re looking for a new way to enjoy potatoes that will impress your family or guests, give this a try—you won’t regret it!