
If you’re looking to wow your friends with a recipe that’s both fun to make and downright delicious, you’ve got to try this Korean Chicken Steamed Bao Buns Recipe. These fluffy, pillowy buns stuffed with spicy, sticky chicken are seriously addictive—and the best part is, you can make them from scratch right in your own kitchen! At first, the idea of steaming your own bao might feel a bit intimidating, but I promise, you’ll find this recipe straightforward, satisfying, and totally worth the effort.
Why You’ll Love This Recipe
- Irresistibly Fluffy Buns: The steamed bao buns come out light and pillowy every single time, perfect for holding all that flavorful chicken.
- Flavor-Packed Chicken Filling: The gochujang-based sauce balances spicy, sweet, and savory notes for an unforgettable taste.
- Perfect for Using Leftovers: I love this recipe because it’s fantastic with leftover roasted chicken or even store-bought cooked meat.
- Great For Impressing Guests: Whether it’s a casual dinner or a party, these buns always steal the show without tons of fuss.

Ingredients You’ll Need
These ingredients create a beautiful harmony of texture and flavor—with everything from soft dough to sticky, spicy chicken. When shopping, I recommend using good-quality chicken thighs and fresh aromatics like garlic and ginger to get the best results.
- Plain flour: The base for your bao dough; use plain or all-purpose flour for that perfect soft texture.
- Baking powder: This helps give the buns a little extra lift and fluffiness when steamed.
- Instant yeast: Essential for the dough’s rise and that subtle, tasty fermentation flavor.
- Salt: Enhances all the flavors in the dough and chicken.
- Neutral oil: Like sunflower or vegetable oil, keeps the dough tender without overpowering flavors.
- Lukewarm water: Activates the yeast gently for a good rise.
- Chicken thighs: I prefer boneless and skinless for easy shredding, plus they stay juicy and flavorful.
- Olive oil: For roasting the chicken to golden perfection.
- Sesame oil: Adds that unmistakable nutty aroma to the chicken filling.
- Garlic cloves: Crushed fresh garlic amps up the flavor—it’s non-negotiable in my books!
- Ginger: Freshly grated or paste works; it brightens and balances the spicy sauce.
- Gochujang paste: The star Korean chili paste that gives this filling its unique heat and depth.
- Soy sauce: Adds savory umami to the mix.
- Rice vinegar: Brings a touch of acidity to cut through the richness.
- Honey or sweet chili jam: For that perfect sweet contrast to the spicy elements.
- Chili oil: For drizzling at the end to turn up the heat if you like it spicy.
- Toasted sesame seeds: A crunchy, nutty garnish that adds texture.
- Scallions (spring onions): Finely sliced for freshness and color.
- Fresh cilantro (coriander): My personal favorite herb to brighten the buns.
Variations
One of the things I adore about this Korean Chicken Steamed Bao Buns Recipe is how easy it is to make your own. Whether you want to tone down the spice, swap the chicken for something else, or play with different garnishes—go for it. This recipe is your canvas, and I love seeing how different folks make it their own.
- Vegetarian Version: I’ve swapped out chicken for shredded roasted mushrooms or tofu marinated in the same gochujang sauce—it’s surprisingly delicious and hearty.
- Spice Level Adjustment: When I’m prepping for little ones, I cut back the gochujang and add a touch more honey to keep the flavor balanced but mild.
- Sourdough Bao: For sourdough lovers, you can experiment by adding a sourdough starter to the dough for a nuanced tang—just remember your proofing times will change.
- Different Proteins: Leftover pulled pork or even a curried chicken filling works beautifully if you want to mix it up without reinventing the wheel.
How to Make Korean Chicken Steamed Bao Buns Recipe
Step 1: Roast and Shred the Chicken
I usually start by preheating my oven to 480°F (250°C, fan-bake) and lining a baking tray with parchment paper. Then I arrange the chicken thighs, sprinkle them with salt and pepper, drizzle olive oil, and roast until they’re gloriously charred and golden. This process pulls out incredible flavor and juiciness. Once cooled, I shred the meat using two forks—don’t rush this, as pulling apart the chicken really amps up the texture of your bao filling.
Step 2: Mix the Gochujang Sauce and Toss the Chicken
Next, I prepare the sauce in a large mixing bowl—combining gochujang paste, soy sauce, honey (or sweet chili jam), rice vinegar, crushed garlic, and grated ginger. Then I toss the shredded chicken in, ensuring every bit is gloriously coated in that sticky, spicy sauce. This step is where the magic really starts happening in terms of flavor.
Step 3: Make the Bao Dough
If you have a stand mixer, this is where it shines—I toss in my flour, baking powder, instant yeast, salt, oil, and lukewarm water, then knead with the dough hook for about six minutes until the dough is soft, smooth, and not sticky at all. If you’re kneading by hand, I recommend mixing everything until it’s shaggy, then kneading on a floured surface for about seven minutes. The payoff is well worth it: a supple, elastic dough that steams into the soft buns you want.
Step 4: Shape and Fill Your Bao Buns
Roll the dough into a long log and slice it into 12 equal pieces—that’s easier if you have a kitchen scale, but eyeballing works fine too! Keep the unused pieces covered with a tea towel so they don’t dry out. Now comes one of my favorite steps: flatten each ball into a circle, thinner at the edges if you can, and spoon a generous heap of that sticky chicken into the center. Pleating might feel tricky at first, but I discovered the pinch-and-fold technique is a breeze once you get into a rhythm. Just remember the dough sticks to itself, making sealing simpler. Twist the top to lock everything in.
Step 5: Let the Buns Rest
Set your tucked buns aside under a clean towel for about 30 minutes to puff up slightly. This resting time is key to that perfect fluffy texture when steamed. A quick tip I learned? Snap a quick photo before they go into the steamer to keep an eye on how much they rise!
Step 6: Steam or Pan-Fry Your Buns
Steaming is the classic approach. Place your buns in a lined steamer basket set over boiling water, cover, and steam for about 10 minutes. If you don’t have a steamer, pan-frying with a little water and a lid works beautifully: crisp bottoms meet steamed tops—extra delicious! Just add enough water to come up one-third of the buns’ height, cover tightly, and steam-fry for about 10 minutes.
Step 7: Garnish and Serve
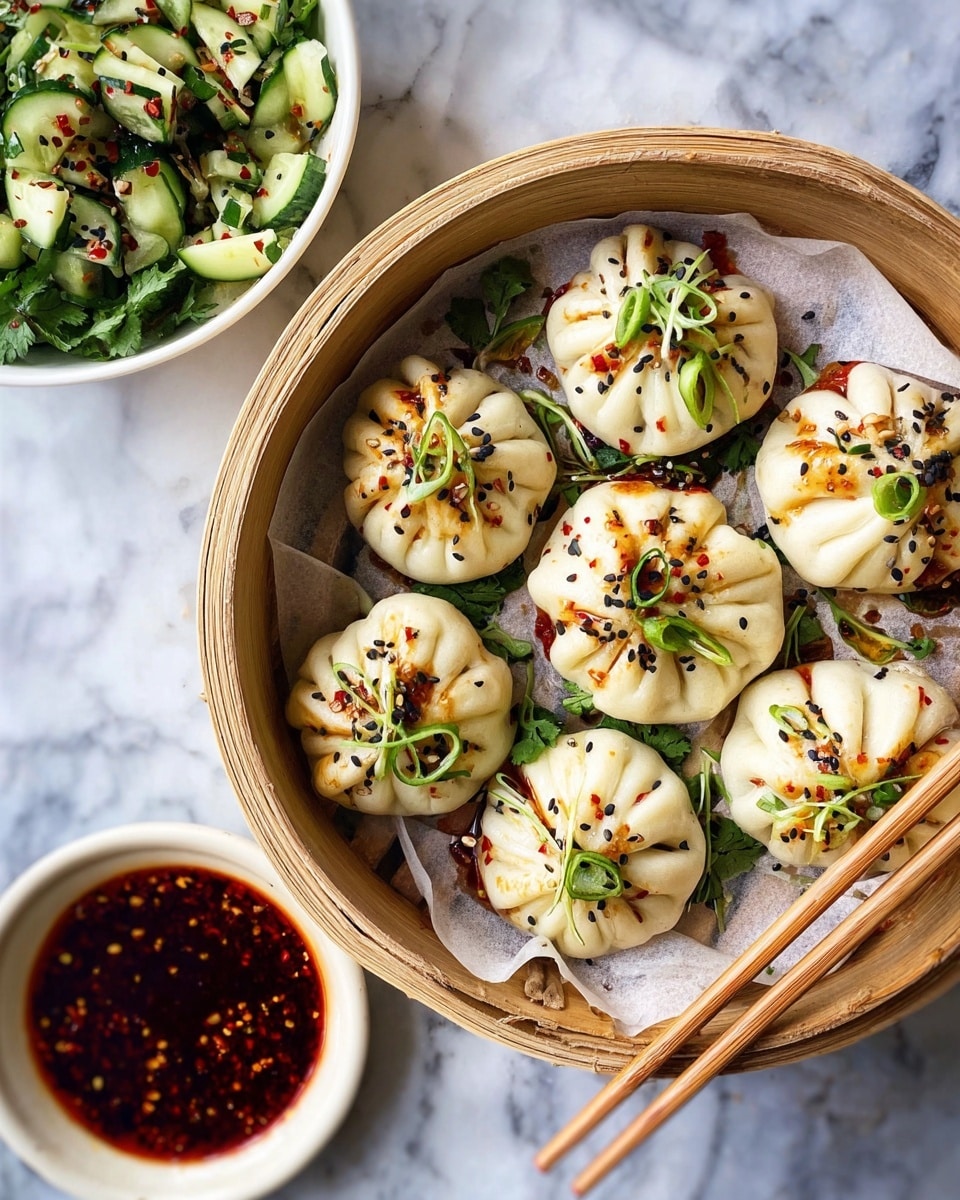
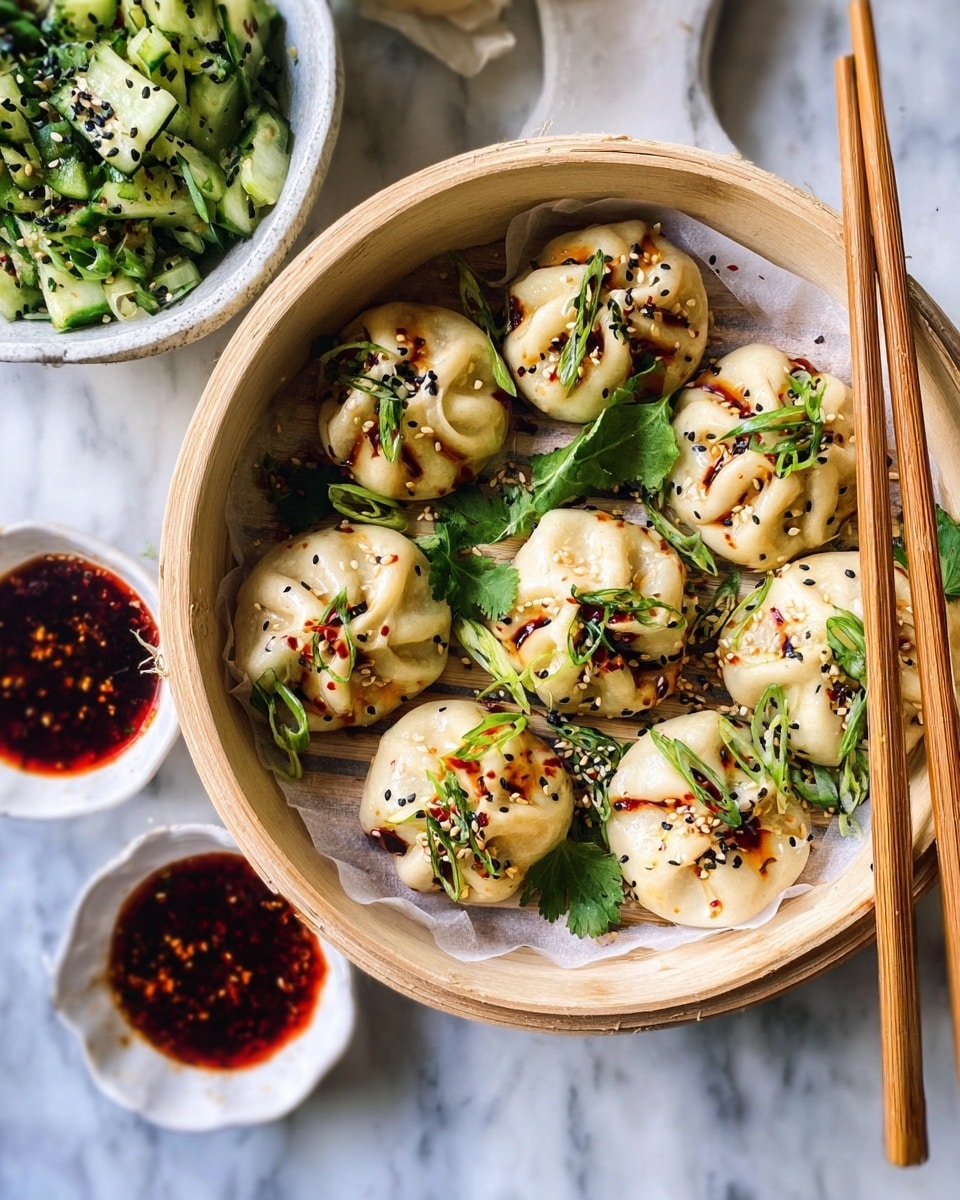
I like to drizzle a tablespoon of chili oil over my buns (plus more if you’re feeling adventurous), sprinkle with toasted sesame seeds, sliced scallions, and fresh cilantro. It’s those fresh, crunchy, and vibrant touches that take this Korean Chicken Steamed Bao Buns Recipe from delicious to unforgettable.
Pro Tips for Making Korean Chicken Steamed Bao Buns Recipe
- Mastering the Pleats: I used to struggle with sealing the buns, but keeping the dough slightly damp on your fingers really helps it stick better when folding.
- Timing Your Rest: Don’t skip the resting phase after shaping—this makes a world of difference to the bun’s fluffiness.
- Oven-Roast Chicken for Char: Roasting at a high temperature quickly chars the chicken thighs, boosting flavor without drying them out.
- Use a Lined Steamer Basket: I make a simple perforated parchment liner by folding and cutting it, so the buns don’t stick but still steam perfectly.
How to Serve Korean Chicken Steamed Bao Buns Recipe
Garnishes
I’m a sucker for fresh scallions and fragrant cilantro sprinkled right on top. A drizzle of chili oil brings that smoky heat punch, while toasted sesame seeds add texture and nutty flavor. These simple toppings make every bite pop.
Side Dishes
My go-to sides usually include a bright and zingy cucumber salad tossed with rice vinegar and a touch of sugar, or a simple pickled radish for crunch and acidity. Sometimes I serve a batch of crispy Korean fried potatoes or a fresh kimchi salad—both pair beautifully.
Creative Ways to Present
For parties, I love arranging these bao buns in a bamboo steamer on the table so guests can pick their own, making it interactive and fun. Another cool idea? Serve mini versions as sliders with colorful mini skewers! It’s always a conversation starter.
Make Ahead and Storage
Storing Leftovers
Leftover baos are best stored in an airtight container in the fridge and eaten within 2 days. I found they keep their texture really well if you reheat them gently.
Freezing
One of my favorite tips for this Korean Chicken Steamed Bao Buns Recipe is freezing cooked buns individually on a parchment-lined tray until solid, then transferring them to airtight bags. They freeze beautifully and are easy to reheat straight from the freezer.
Reheating
I usually steam frozen buns for about 10 minutes straight from the freezer, which brings back that fresh-baked fluffiness perfectly. Avoid microwaving if you can—it tends to make the dough chewy instead of soft.
FAQs
-
Can I use pre-cooked or leftover chicken for this recipe?
Absolutely! Using leftover chicken or pre-cooked meat works perfectly for this Korean Chicken Steamed Bao Buns Recipe. Just shred the cooked chicken and toss it in the gochujang sauce as instructed. It’s a great way to save time and minimize waste without sacrificing flavor.
-
How do I prevent the buns from sticking to the steamer?
I recommend lining your steamer basket with perforated parchment paper—cut with small holes to let the steam through but keep the buns from sticking. You can also use cabbage leaves or a silicone steamer liner if you have one. This little step makes cleanup easier, too!
-
Can I make the dough ahead of time?
Yes, you can prepare the dough earlier in the day or even the night before, then cover tightly and let it rest in the fridge. Just bring it back to room temperature before shaping and filling your buns for the best rise.
-
What if I don’t have gochujang paste?
Gochujang gives the chicken a unique spicy-sweet umami flavor, but if you can’t get it, try a mix of chili paste and a bit of miso or soy sauce to replicate some of those flavors. It won’t be exactly the same, but your buns will still be delicious!
-
How long can I store leftover buns in the freezer?
When frozen properly, your steamed bao buns will stay good for up to 1-2 months. I always try to label them with dates so I use them while they’re at peak flavor and texture.
Final Thoughts
This Korean Chicken Steamed Bao Buns Recipe is one of those dishes that makes me feel like I’m really treating myself in the kitchen. The process is fun, the aromas fill your home with warmth, and the final bite is comfort food at its best. I’ve shared this with friends and family countless times, and it never fails to impress. If you’re curious or even a little intimidated by homemade bao, trust me—give this recipe a go. You’ll be baking, steaming, and savoring delicious buns all week long!
Print
Korean Chicken Steamed Bao Buns Recipe
- Prep Time: 15 minutes
- Cook Time: 25 minutes
- Total Time: 1 hour 10 minutes
- Yield: 12 buns
- Category: Snack
- Method: Steaming
- Cuisine: Korean
Description
Korean Chicken Steamed Bao Buns are fluffy, soft steamed buns filled with a flavorful and sticky gochujang-glazed chicken. This recipe combines tender shredded chicken thighs marinated in a spicy, sweet, and tangy Korean-inspired sauce, wrapped in homemade bao dough that is steamed or pan-fried for a pillowy texture. Perfect as a fun appetizer or a delicious snack, these buns are garnished with chili oil, toasted sesame seeds, scallions, and fresh cilantro for vibrant contrast and extra flavor.
Ingredients
For the Bun Dough
- 350g plain flour
- 2 teaspoons baking powder
- 2 teaspoons instant yeast
- 2 teaspoons salt
- 1.5 tablespoons neutral oil (sunflower oil recommended)
- 180g lukewarm water
For the Chicken
- 1lb (500g) boneless, skinless free-range chicken thighs
- 1 teaspoon salt
- 2 tablespoons olive oil
- 1 tablespoon sesame oil
- 2 garlic cloves, crushed
- 1 tablespoon ginger, grated or paste
- 2 tablespoons gochujang paste
- 2 tablespoons soy sauce
- 1 tablespoon rice vinegar
- 3 tablespoons honey or sweet chili jam
To Serve
- 1 tablespoon chili oil
- 1 tablespoon toasted sesame seeds
- 2 scallions (spring onions), finely sliced
- A handful of fresh cilantro (coriander)
Instructions
- Prepare the Chicken: Preheat your oven to 480F (250C) fanbake and line a baking tray with parchment paper. Arrange the chicken thighs on the tray, season with salt, freshly ground pepper, and drizzle with olive oil. Roast in the oven until the chicken is charred and golden, about 15-20 minutes. Remove and allow to cool slightly before shredding the meat with two forks or chopping it into bite-sized pieces.
- Make the Gochujang Sauce: In a large mixing bowl, combine gochujang paste, soy sauce, honey (or sweet chili jam), rice vinegar, crushed garlic, and grated ginger. Mix well to form a sticky sauce, then add the shredded chicken and toss thoroughly to coat every piece with the flavorful sauce.
- Prepare the Dough using a Stand Mixer: In the bowl of a stand mixer fitted with a dough hook, combine the plain flour, baking powder, instant yeast, salt, sunflower oil, and lukewarm water. Knead on medium speed for about 6 minutes until a soft, supple, and non-sticky dough forms.
- Prepare the Dough by Hand: In a large bowl, mix the plain flour, baking powder, instant yeast, and salt thoroughly. Add sunflower oil and lukewarm water, then stir with a wooden spoon or spatula until the dough starts to come together. Turn the dough onto a floured surface and knead for about 7 minutes until smooth, supple, and not sticky.
- Form the Buns: Roll the dough into a long sausage shape and cut into 12 equal pieces. Cover dough pieces with a clean kitchen towel to prevent drying out. Take one piece at a time, shape it into a ball, then flatten into a circle about 4 inches (10 cm) in diameter with slightly thinner edges compared to the center.
- Fill and Seal the Buns: Place a heaping teaspoon of the sticky chicken filling into the center of each dough circle. Begin pleating the edges by folding small sections of dough over the filling, rotating the bun to complete a full circle. Press the dough tightly at the top to seal the bun, finishing with a gentle twist to secure it.
- Let the Buns Rest: Place the sealed buns into a lined steamer basket or on a parchment-lined plate if pan-frying. Let them rest for 30 minutes at room temperature to allow them to puff slightly. Rest time may vary depending on kitchen temperature.
- Cook the Buns: Steaming: Set the steamer basket over a pot of boiling water, cover with a lid, and steam the buns for 10 minutes. Remove and allow to cool slightly before serving.
Pan-Frying: Heat a drizzle of oil in a large non-stick pan over medium-high heat. Add buns and cook until the bottoms turn golden brown (about 2 minutes). Pour in enough water to reach one-third the height of the buns, cover with a lid, reduce heat to low, and steam for an additional 10 minutes until cooked through. - Garnish and Serve: Drizzle the cooked buns with chili oil and sprinkle with toasted sesame seeds, finely sliced scallions, and fresh cilantro. Serve immediately, enjoying the buns warm and flavorful.
Notes
- On Pleating the Dough: The pleating technique involves pinching and folding the dough over itself, which becomes easier with practice. The dough’s stickiness helps seal the buns effectively, so don’t worry if they don’t look perfect—the flavor won’t be affected.
- Storage Instructions: Cooked buns freeze beautifully. After cooking, place them on a baking paper-lined tray and freeze until firm (around 30 minutes). Transfer to zip-lock bags for long-term storage. Reheat by steaming straight from frozen for 10 minutes.
- Ingredient Substitutions: Feel free to switch up the bun filling: leftover pulled pork, roasted chicken, roasted or stir-fried vegetables, or even leftover curries like butter chicken or chicken saag work wonderfully.
- Serving Suggestions: These buns pair excellently with a fresh smacked cucumber salad and extra chili oil for dipping to balance the richness and bring a refreshing bite.
- Steamer Basket Liner Tip: Make a perfect steamer liner by folding a piece of baking paper multiple times and snipping four cuts down the folded edge. Unfold to create holes that allow steam to circulate while preventing buns from sticking.
Nutrition
- Serving Size: 1 bun
- Calories: 190
- Sugar: 6g
- Sodium: 520mg
- Fat: 7g
- Saturated Fat: 1.5g
- Unsaturated Fat: 5g
- Trans Fat: 0g
- Carbohydrates: 22g
- Fiber: 1g
- Protein: 11g
- Cholesterol: 40mg


