
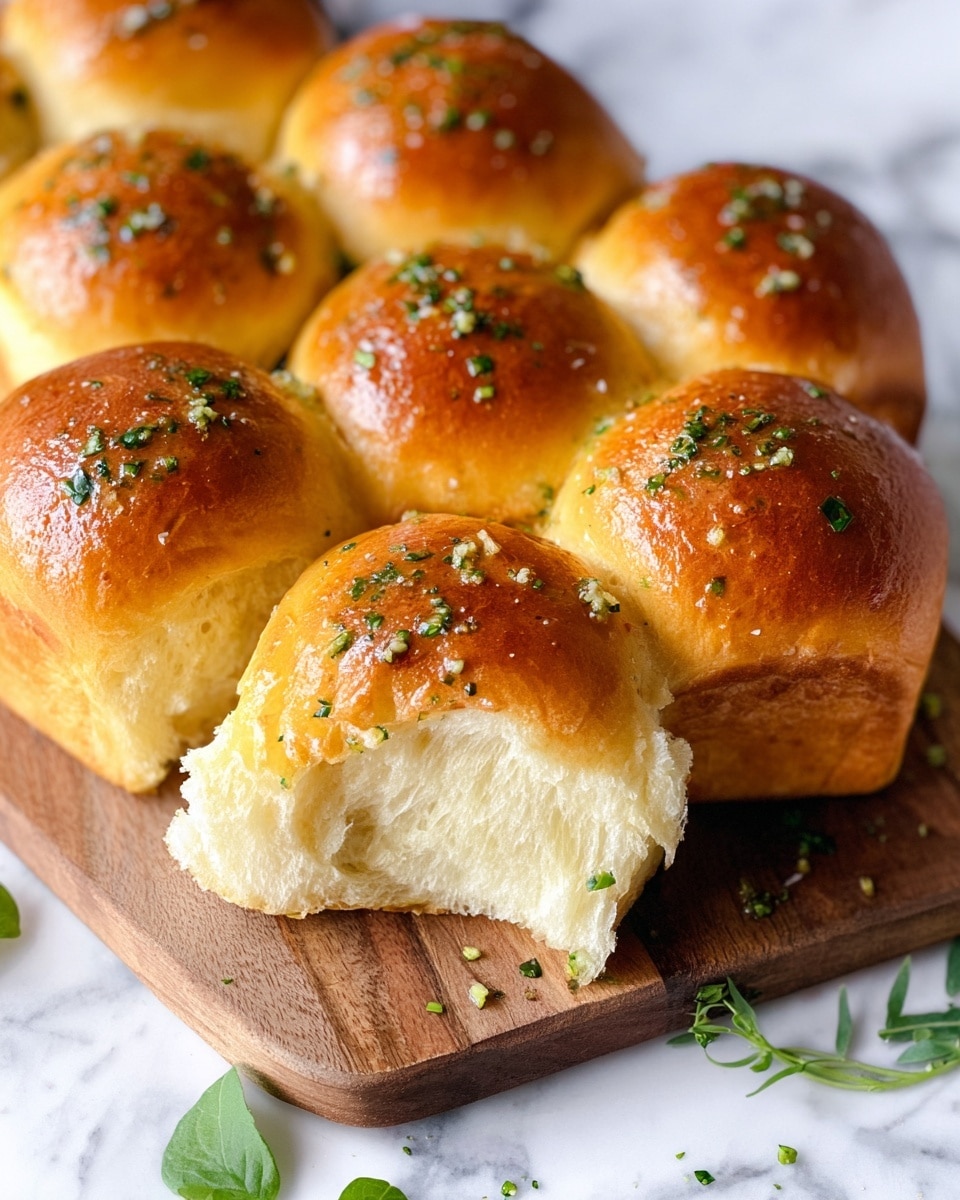
If you’re anything like me, there’s nothing quite like the warm, comforting smell of fresh bread right out of the oven. Well, with this Easy Garlic Butter Dinner Rolls Recipe, you get that heavenly scent plus a soft, buttery bite that’s absolutely irresistible. I promise you, once you try this recipe, these rolls will become a family favorite and they’re surprisingly simple to make—even if you’ve never made bread from scratch before!
Why You’ll Love This Recipe
- Simple Ingredients: No fancy stuff—just pantry staples that come together beautifully.
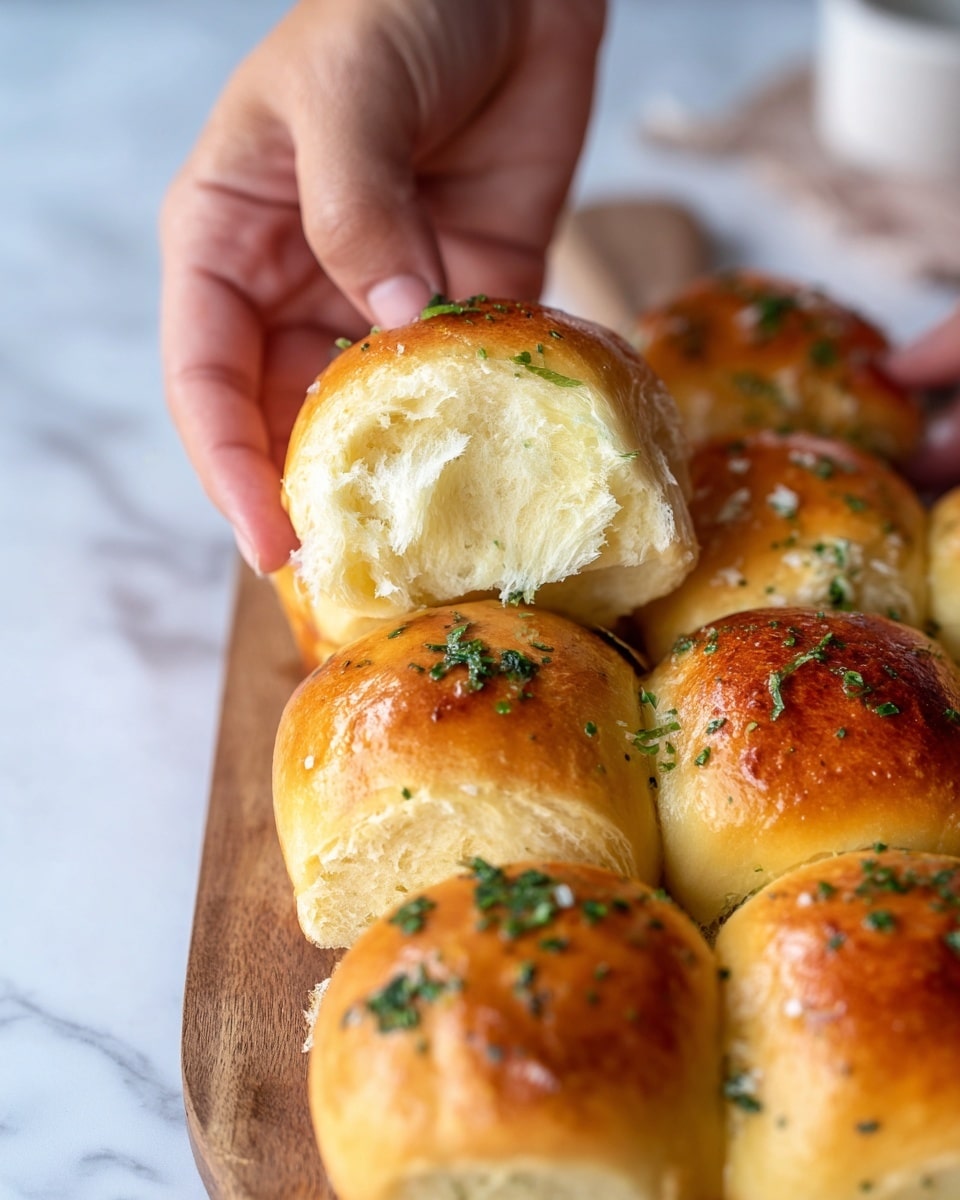
- Perfect Texture: Soft, fluffy, with just the right amount of chewiness thanks to patient kneading and rising.
- Garlic Butter Magic: That rich, garlicky topping takes these rolls from good to unforgettable.
- Great For Any Occasion: Weeknight dinners, holiday feasts, or just snack time—they always impress.

Ingredients You’ll Need
Each ingredient plays its part to create these soft, buttery rolls with a garlicky punch. I usually grab the freshest butter and a good quality garlic for the best flavor. Also, make sure that the milk is warm but not hot to activate the yeast perfectly.
- Whole milk: Warm it up just right (110°F) to wake up the yeast without killing it.
- Active dry yeast or instant yeast: Both work—just make sure it’s fresh for best rise.
- Sugar: Feeds the yeast and adds a subtle touch of sweetness.
- All-purpose flour: The backbone of your dough; measure carefully for perfect texture.
- Large egg: Adds richness and helps with structure.
- Salt: Essential for flavor balance, but don’t overdo it.
- Unsalted butter (softened): Adds tenderness and flavor to the dough.
- Egg yolk and milk (egg wash): Gives your rolls that gorgeous golden shine.
- Salted butter (for garlic butter): Melts beautifully and carries the garlic flavor perfectly.
- Garlic cloves: Fresh and finely chopped for that punch of garlicky goodness.
- Fresh parsley: Adds a bright, herbal finish to the garlic butter.
Variations
I love experimenting with these rolls to match different meals or dietary needs. Once you get the basic recipe down, feel free to tweak and make it your own! Here are some variations I’ve enjoyed or think you’ll love trying.
- Cheesy Garlic Butter Dinner Rolls: I sprinkle shredded cheddar or Parmesan right on top before baking—talk about a game-changer!
- Herb-infused Rolls: Adding rosemary or thyme to the dough or garlic butter gives a lovely savory twist.
- Vegan version: Substitute the butter with plant-based margarine and use a flaxseed “egg”—you’ll still get great texture and flavor.
- Spicy Garlic Rolls: Toss a pinch of red pepper flakes into the garlic butter when melting it for a subtle kick.
How to Make Easy Garlic Butter Dinner Rolls Recipe
Step 1: Wake Up the Yeast and Mix Ingredients
Start by stirring the warm milk and yeast together in a large bowl. I’ve found it helps to let it sit for a few minutes until it’s foamy—that means your yeast is alive and kicking! Then add in the sugar, flour, egg, salt, and softened butter all at once. Stir until your dough looks shaggy and rough. Don’t worry if it looks messy—that’s totally normal at this stage.
Step 2: Knead the Dough Like a Pro
Dump the dough onto a clean surface and get ready for some kneading—this is the part where magic happens. Use the push-pull motion with your palms, kneading for about 15 minutes. At first, it’ll be sticky, but stick with it! The dough will smooth out and stretch beautifully. I discovered the “window-pane test” to know when you’re done: gently stretch a piece until it’s almost see-through without tearing. That’s your green light!
Step 3: The First Rise – Patience Pays Off
Once kneaded, transfer your dough to a lightly oiled bowl, cover it with cling wrap, and find a warm, humid spot to let it rise. This usually takes about 90 minutes until it doubles in size. This is a great time to chill with a cup of tea or prep your garlic butter—trust me, the wait is worth it.
Step 4: Shape Your Rolls
After punching down the dough, divide it into 12 equal pieces. Rolling each into tight, smooth balls is key here. I like to hold the dough flat in one palm and gently twist it with the other—makes the rolls wrinkle-free and nice and round. Place them evenly spaced on a parchment-lined 9×13 inch baking sheet.
Step 5: Rise Again and Egg Wash Prep
Let the rolls rise a second time for 30-45 minutes until they’re puffy. Meanwhile, mix the egg yolk with a tablespoon of milk—that’s your egg wash, which you’ll brush generously over the rolls twice: once before and once after the second rise. This gives you that incredible golden color and shine.
Step 6: Bake and Make Garlic Butter
Pop the rolls into a preheated 350°F oven for 20-22 minutes, watching as they bake into beautiful golden globes. While they’re baking, melt the butter in a small pan. Add finely chopped garlic and sauté for 1-2 minutes until fragrant but not browned, then stir in chopped parsley off the heat.
Step 7: Brush, Serve, and Devour
The moment the rolls come out of the oven, brush them generously with your garlic butter mixture. I always smile at this part because the butter melts right into those warm rolls—a total flavor explosion. Serve them warm and watch everyone go crazy over these little bites of heaven!
Pro Tips for Making Easy Garlic Butter Dinner Rolls Recipe
- Don’t Skip the Window-Pane Test: I learned this trick saved my dough from being too dense; proper gluten development makes all the difference.
- Keep Your Kneading Spot Clean and Lightly Floured: I used to add way too much flour—resist that urge! Sticky dough will transform, trust the process.
- Use Room Temperature Butter in Dough: Soft butter blends better, making the rolls tender—straight from the fridge won’t work as well.
- Brush Garlic Butter Immediately: Brushing while rolls are hot locks in flavor; waiting cools and the butter won’t absorb properly.
How to Serve Easy Garlic Butter Dinner Rolls Recipe
Garnishes
I usually sprinkle a little extra freshly chopped parsley on top after brushing the garlic butter—it brightens up the flavor and looks so inviting. Sometimes I add a tiny pinch of flaky sea salt on top for that extra pop of taste.
Side Dishes
These rolls pair beautifully with hearty soups like tomato basil or creamy chicken and wild rice. I also love serving them alongside roasted veggies and caramelized onions for a comforting family dinner.
Creative Ways to Present
For holidays or special dinners, I arrange the rolls in a round baking dish or basket, garnished with rosemary sprigs and a little garlic butter drizzle. It makes the table look festive and encourages everyone to grab a warm roll and dig in.
Make Ahead and Storage
Storing Leftovers
If you have leftovers (which is rare in my house!), store them in an airtight container at room temperature for up to 2 days. I like to wrap them individually in plastic wrap before placing them in a resealable bag to keep them soft and fresh.
Freezing
I’ve frozen these rolls before successfully—just freeze them unbuttered in a sealed freezer bag. When ready, thaw overnight in the fridge and refresh by warming them in the oven before brushing with freshly made garlic butter.
Reheating
To reheat, pop the rolls in a 300°F oven for about 10 minutes wrapped in foil to keep the moisture in. Then, brush with a little more garlic butter while warm, and they’ll taste almost as fresh as the day you baked them!
FAQs
-
Can I use instant yeast instead of active dry yeast in this recipe?
Yes! Both instant yeast and active dry yeast work great in this recipe. Instant yeast can be mixed directly with dry ingredients, while active dry yeast benefits from being dissolved in warm milk first. Either way, your rolls will turn out soft and fluffy.
-
What’s the best way to achieve soft rolls with a golden crust?
Brushing your rolls generously with the egg wash before and after the second rise is the secret to that beautiful golden crust. Also, the garlic butter brushed on right after baking adds richness and a slight sheen—making them irresistible.
-
How do I know if my dough is kneaded enough?
Keep kneading until the dough feels smooth and elastic. The window-pane test is a reliable method: stretch a small piece of dough between your fingers until it’s thin and translucent without tearing. If it tears easily, keep kneading a little longer.
-
Can I make the rolls ahead of time?
You can prepare the dough a day ahead and refrigerate it after the first rise. Just let it come to room temperature before shaping and rising again. This slow fermentation actually develops deeper flavor in the rolls.
Final Thoughts
I absolutely love how these Easy Garlic Butter Dinner Rolls Recipe brings a little homemade joy to my dinner table. When I first tried baking rolls from scratch, I was nervous—but this recipe made it approachable and fun. Now, it’s one of my go-to recipes when I want to impress friends or just treat my family to something special. Give it a try—you’ll enjoy the process and the delicious results, I promise!
Print
Easy Garlic Butter Dinner Rolls Recipe
- Prep Time: 30 minutes
- Cook Time: 22 minutes
- Total Time: 3 hours 30 minutes
- Yield: 12 dinner rolls
- Category: Bread
- Method: Baking
- Cuisine: American
Description
These Easy Garlic Butter Dinner Rolls are soft, fluffy, and infused with rich garlic butter for a perfect homemade bread side. Made with simple ingredients, these rolls feature a golden crust and a tender crumb, ideal for any dinner table or special occasion.
Ingredients
Dinner Rolls:
- 1 cup whole milk (240g), warm (around 110°F)
- 3 teaspoons active dry yeast or instant yeast
- 1/3 cup sugar (70g)
- 3 3/4 cups all-purpose flour (490g)
- 1 large egg
- 1.5 teaspoons salt
- 6 tbsp unsalted butter, softened at room temperature (85g)
Egg Wash:
- 1 egg yolk
- 1 tbsp milk
Garlic Butter:
- 1/4 cup salted butter (57g)
- 2-3 garlic cloves, finely chopped
- 1-2 tbsp freshly chopped parsley
Instructions
- Activate the yeast: In a large bowl, stir together the warm milk with the yeast until combined. Let it sit for a few minutes to activate the yeast.
- Mix dough ingredients: Add the sugar, flour, egg, salt, and softened unsalted butter to the bowl with the yeast mixture. Stir together until a shaggy dough forms.
- Knead the dough: Turn the dough out onto a clean surface and knead using a push-pull motion with your palms for about 15 minutes. The dough will be sticky initially but will become smooth and elastic. The dough is ready when it passes the window-pane test.
- First rise: Transfer the dough to a large oiled bowl. Cover with cling wrap and place in a warm, humid spot to rise for about 90 minutes or until it has doubled in size.
- Shape the rolls: Punch down the risen dough and turn it onto a clean surface. Divide it into 12 equal pieces. Roll each piece into a smooth, tight ball without wrinkles or cracks.
- Prepare baking tray: Line a 9×13 inch baking sheet with parchment paper and evenly space the shaped rolls on it.
- Apply egg wash and second rise: Mix egg yolk and milk to make the egg wash. Brush it generously over the rolls. Let the rolls rise again in a warm spot for 30-45 minutes until puffy.
- Preheat the oven: In the last 20 minutes of proofing, preheat your conventional oven to 350°F (175°C).
- Final egg wash and baking: Brush another layer of egg wash on the risen rolls. Bake for 20-22 minutes until the rolls develop a shiny, golden-brown crust.
- Make garlic butter: While the rolls bake, melt salted butter in a saucepan over medium heat. Add finely chopped garlic and sauté for 1-2 minutes until fragrant. Remove from heat and stir in freshly chopped parsley.
- Brush rolls and serve: Immediately brush the hot rolls with the garlic butter mixture. Serve warm and enjoy your homemade garlic butter dinner rolls!
Notes
- Ensure the milk is warm but not hot to avoid killing the yeast.
- Do not add extra flour while kneading unless the dough is unbearably sticky; it should be slightly tacky for best results.
- The window-pane test is a good indicator of well-kneaded dough.
- You can substitute fresh yeast for dry yeast, but adjust quantities accordingly.
- Letting the rolls cool slightly before serving allows flavors to develop, but they are best enjoyed warm.
- For extra flavor, you can sprinkle some sea salt or additional parsley on top of the garlic butter after brushing.
Nutrition
- Serving Size: 1 roll (approximately 60g)
- Calories: 180
- Sugar: 4g
- Sodium: 200mg
- Fat: 7g
- Saturated Fat: 4.5g
- Unsaturated Fat: 2.5g
- Trans Fat: 0g
- Carbohydrates: 25g
- Fiber: 1g
- Protein: 4g
- Cholesterol: 45mg


