

If you’re a fan of spicy, cheesy, and totally handheld comfort food, then you’re going to adore this Cheesy Buffalo Chicken Hand Pies Recipe. I absolutely love this recipe because it combines tender shredded chicken, rich cream cheese, melty cheddar, and that unmistakable kick of Buffalo sauce all wrapped up in flaky pie crust. When I first tried these hand pies, they quickly became my family’s favorite game day snack and an easy dinner solution. Keep reading — I’m going to walk you through everything you need to know to nail these every single time!
Why You’ll Love This Recipe
- Perfect Balance of Flavors: Creamy, spicy, and cheesy come together perfectly in every bite.
- Super Convenient: Uses simple pantry staples and comes together in under 40 minutes.
- Kid-Approved and Crowd-Pleasing: My family goes crazy for these whether for dinner or a party snack.
- Customizable and Fun to Make: You can make them small for appetizers or larger for a meal. Plus, folding and sealing these pies is oddly satisfying!

Ingredients You’ll Need
I like that this Cheesy Buffalo Chicken Hand Pies Recipe uses simple ingredients you probably already have or are easy to find. The real trick is to use good quality pie crusts and room temperature cream cheese so everything melds beautifully.
- Boneless, skinless chicken breasts: Cooking and shredding your own makes all the difference in texture and flavor.
- Cream cheese: Make sure it’s softened to room temperature for smooth mixing.
- Buffalo sauce: Pick your favorite brand or make your own — this is the heart of the flavor.
- Cheddar cheese: Freshly shredded melts best, but pre-shredded works in a pinch.
- Pie crusts: Store-bought works perfectly here and saves so much time.
- Egg: Optional, but an egg wash gives the crust that beautiful golden shine.
Variations
One of the things I love most about this Cheesy Buffalo Chicken Hand Pies Recipe is how easy it is to customize to your taste or dietary needs. I’ve played around with several variations, so feel free to get creative!
- Make it milder: My kids aren’t big fans of spicy foods, so I sometimes swap some of the Buffalo sauce with ranch dressing for a creamier, milder filling.
- Use different cheeses: I once used pepper jack for a little extra zing, and it was fabulous — just what the buffalo flavor needs!
- Swap the crust: For a gluten-free version, try using store-bought gluten-free pie crusts or even puff pastry to mix things up.
- Add veggies: I’ve thrown in some diced celery or green onions for a little crunch and freshness, which I highly recommend.
How to Make Cheesy Buffalo Chicken Hand Pies Recipe
Step 1: Get that Buffalo Chicken Mix Perfectly Melty
Start by heating a skillet over medium heat. Toss in your shredded chicken and softened cream cheese, stirring until the cream cheese melts and coats all the chicken evenly — this creates a luscious, creamy base. Then, stir in the Buffalo sauce and cheddar cheese, letting everything melt together for a minute or two. It’ll smell incredible at this point. This step is crucial because you want a cohesive filling that won’t leak out of your pies.
Step 2: Cut and Prepare Your Pie Crusts
I use a large circular cookie cutter to get about 15 hand pies from two pie crusts — and yes, you’ll have to re-roll the dough once or twice to maximize your yield. If you want bigger, fewer pies, just cut larger circles or squares. Keep in mind leaving a ¼-inch border is essential for sealing later. Pro tip: dust your surface lightly with flour to avoid sticking while rolling.
Step 3: Fill, Fold, and Seal Those Hand Pies
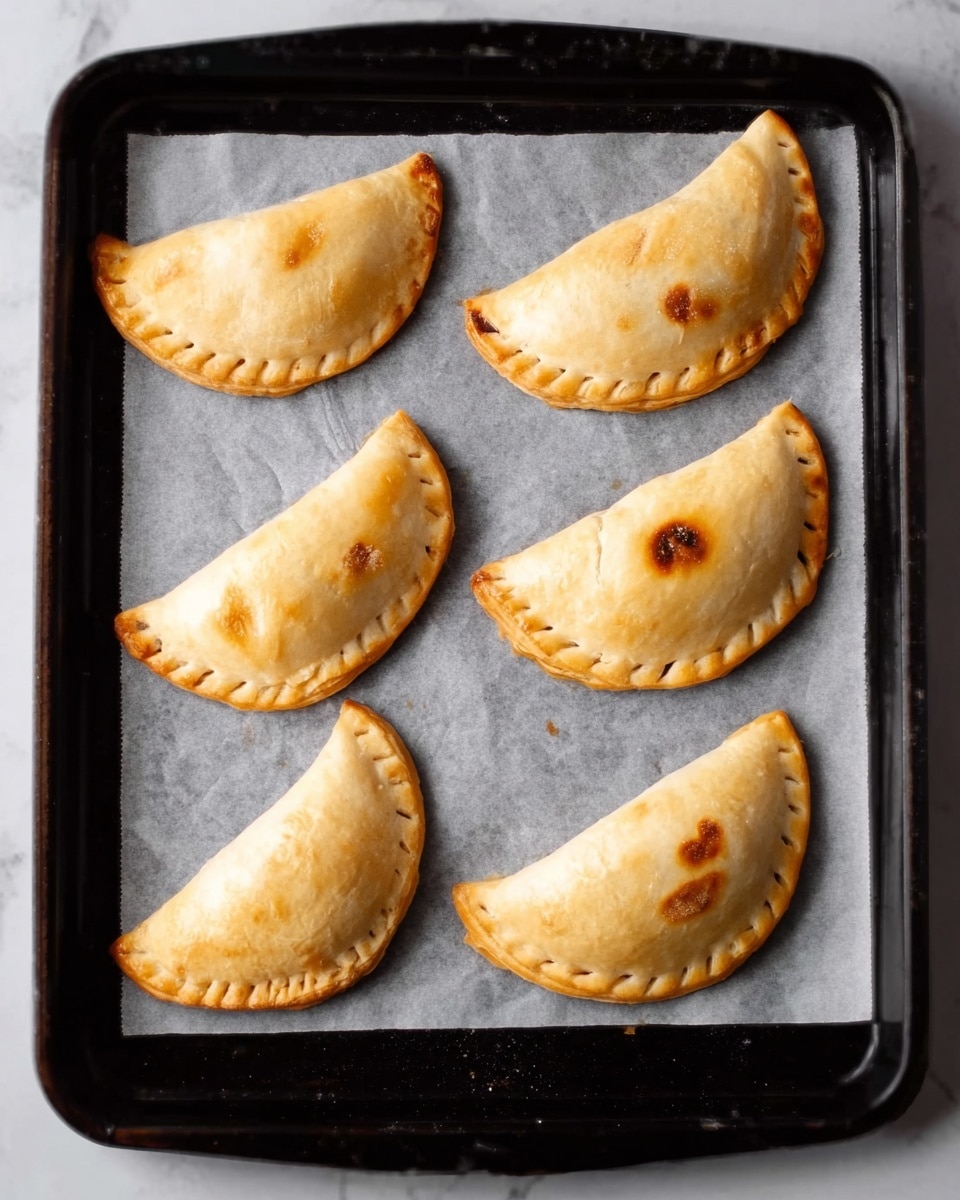
Divide your Buffalo chicken mixture equally onto the center (or one side if you’re making larger pies) of each crust circle. Wet the edges of the crust with a touch of water — this helps with sealing. Fold the crust over to form a half-moon shape, then pinch the edges together firmly, or press with a fork for a classic look. Make sure the seal is tight so the filling stays in place during baking. Lastly, cut a few small slits on top to let steam escape, then brush with egg wash if you’d like that glossy golden finish.
Step 4: Bake to Golden Perfection
Bake your hand pies at 400°F for 17-20 minutes, or until they’re golden brown and crispy. I learned the hard way to let them cool for at least 5 minutes before digging in — the filling is wicked hot! Trust me, patience here pays off for both flavor and safety.
Pro Tips for Making Cheesy Buffalo Chicken Hand Pies Recipe
- Use Shredded Chicken Blend: Shredding chicken by hand creates a better texture than chopping — your filling will be creamier and more cohesive.
- Don’t Overfill: Leaving that narrow border free of filling helps with sealing so none of the spicy goodness leaks out.
- Egg Wash Magic: Brushing on egg wash adds a glossy, golden finish that looks as good as these pies taste.
- Cool Before Serving: I used to rush and burn my mouth — cooling the pies just a bit makes sure you enjoy every flavor without the ouch.
How to Serve Cheesy Buffalo Chicken Hand Pies Recipe
Garnishes
When I serve these hand pies, a sprinkle of chopped fresh parsley or green onions adds a nice pop of color and freshness. A side of blue cheese or ranch dressing is practically essential — it’s the perfect cooling complement to the spicy Buffalo heat.
Side Dishes
My go-to side is crunchy celery sticks and carrot sticks, just like at the wing joint. Sometimes, I’ll pair them with a simple side salad or roasted sweet potatoes for a heartier meal.
Creative Ways to Present
For game days or casual parties, I love arranging these hand pies on a wooden board with little bowls of ranch, blue cheese, and extra Buffalo sauce. It turns snacking into an experience — guests get to customize their bites, which is always a hit.
Make Ahead and Storage
Storing Leftovers
I usually store leftover hand pies in an airtight container in the refrigerator for up to 3 days. When refrigerated, they keep their flavor really well — just be ready to reheat!
Freezing
Freezing these hand pies is a game-changer for meal prep. After assembling but before baking, I freeze them on a baking sheet until firm, then transfer to a freezer-safe bag. They freeze beautifully for up to 2 months and bake straight from frozen — just add a few extra minutes to the baking time.
Reheating
To reheat, I pop the pies in a 350°F oven for about 10-15 minutes until warmed through and crisp again. Avoid microwaving since the crust can get soggy — warming in the oven keeps that flaky texture intact.
FAQs
-
Can I use rotisserie chicken instead of cooking chicken breasts?
Absolutely! Rotisserie chicken is a fantastic shortcut and imparts great flavor, making these hand pies even easier to assemble. Just shred it up like you would the cooked breasts.
-
What if I don’t have pie crusts — can I use puff pastry?
Yes, puff pastry is a delicious alternative! It yields a flakier, lighter crust which pairs well with the rich filling. Just adjust baking times as puff pastry might brown faster.
-
How spicy are these hand pies?
They have a nice kick thanks to the Buffalo sauce, but you control the heat by choosing a mild, medium, or hot sauce. If you want them milder, you can tone it down by mixing some ranch dressing into the filling.
-
Can I make these ahead and bake later?
Definitely! Assemble the pies, store them in the fridge, and bake within 24 hours for best results. Or freeze them raw for longer storage and bake straight from the freezer when ready.
Final Thoughts
This Cheesy Buffalo Chicken Hand Pies Recipe holds a special place in my heart because it’s the ultimate combo of comfort and convenience. When I want something satisfying, a little spicy, and totally shareable, these pies hit the spot every time. Whether you’re feeding a crowd, looking for a fun family dinner, or prepping snacks ahead of time, give this recipe a try — I promise, you’ll find yourself making them again and again!
Print
Cheesy Buffalo Chicken Hand Pies Recipe
- Prep Time: 15 minutes
- Cook Time: 20 minutes
- Total Time: 35 minutes
- Yield: 15 hand pies
- Category: Appetizer
- Method: Baking
- Cuisine: American
Description
These Cheesy Buffalo Chicken Hand Pies are a delicious and portable snack that combines tender shredded chicken, creamy cream cheese, tangy Buffalo sauce, and melted cheddar cheese all wrapped in a flaky pie crust. Perfectly baked until golden brown, these savory hand pies offer a spicy, cheesy twist on classic comfort food that’s great for parties, game days, or a tasty appetizer.
Ingredients
Filling
- 1 pound boneless, skinless chicken breasts (cooked and shredded)
- 4 ounces cream cheese (at room temperature)
- 1/2 cup Buffalo sauce
- 1 cup cheddar cheese (shredded)
Crust
- 2 pie crusts
Optional
- 1 egg (lightly beaten, for egg wash)
Instructions
- Preheat Oven: Preheat your oven to 400°F (200°C) to prepare for baking the hand pies.
- Prepare the Filling: In a large skillet over medium heat, add the cream cheese and cooked shredded chicken. Stir continuously until the cream cheese melts and combines smoothly with the chicken.
- Add Buffalo Sauce and Cheese: Pour in the Buffalo sauce and stir in the shredded cheddar cheese. Cook for an additional 1-2 minutes until the cheese has melted and the mixture is well blended. Remove from heat.
- Cut Pie Crust Circles: Using a large circular cookie cutter, cut out 15 circles from the pie crusts. You will need to re-roll the dough after the first batch to get all 15 circles.
- Fill Pie Crusts: Divide the chicken mixture evenly among the pie crust circles, placing the filling in the center for smaller pies or to one side for larger pies, leaving about a 1/4-inch border around the edges.
- Seal Hand Pies: Moisten the edges of the pie crusts with a little water, then fold them over the filling and press the edges together firmly to seal. Use your fingers or the tines of a fork to crimp the edges.
- Vent and Egg Wash: Cut a few small slits on the tops of the pies to allow steam to escape. If desired, brush the tops with the beaten egg for a golden finish.
- Bake: Place the hand pies on a baking sheet and bake for 17-20 minutes until the crust is golden brown and crisp.
- Cool and Serve: Let the hand pies cool for a few minutes before serving to avoid burning and allow fillings to settle.
Notes
- For larger hand pies, cut the pie crust into 6 or 8 larger circles and increase the filling accordingly, placing filling slightly off-center to fold over easily.
- Re-roll leftover dough carefully to avoid toughening the crust.
- If you prefer milder, reduce the amount of Buffalo sauce or substitute with a milder wing sauce.
- Use homemade or store-bought pie crust depending on your preference.
- Egg wash is optional but gives a nice golden, shiny finish to the crust.
Nutrition
- Serving Size: 1 hand pie
- Calories: 220
- Sugar: 1.5g
- Sodium: 520mg
- Fat: 13g
- Saturated Fat: 7g
- Unsaturated Fat: 5g
- Trans Fat: 0g
- Carbohydrates: 15g
- Fiber: 1g
- Protein: 14g
- Cholesterol: 55mg


