

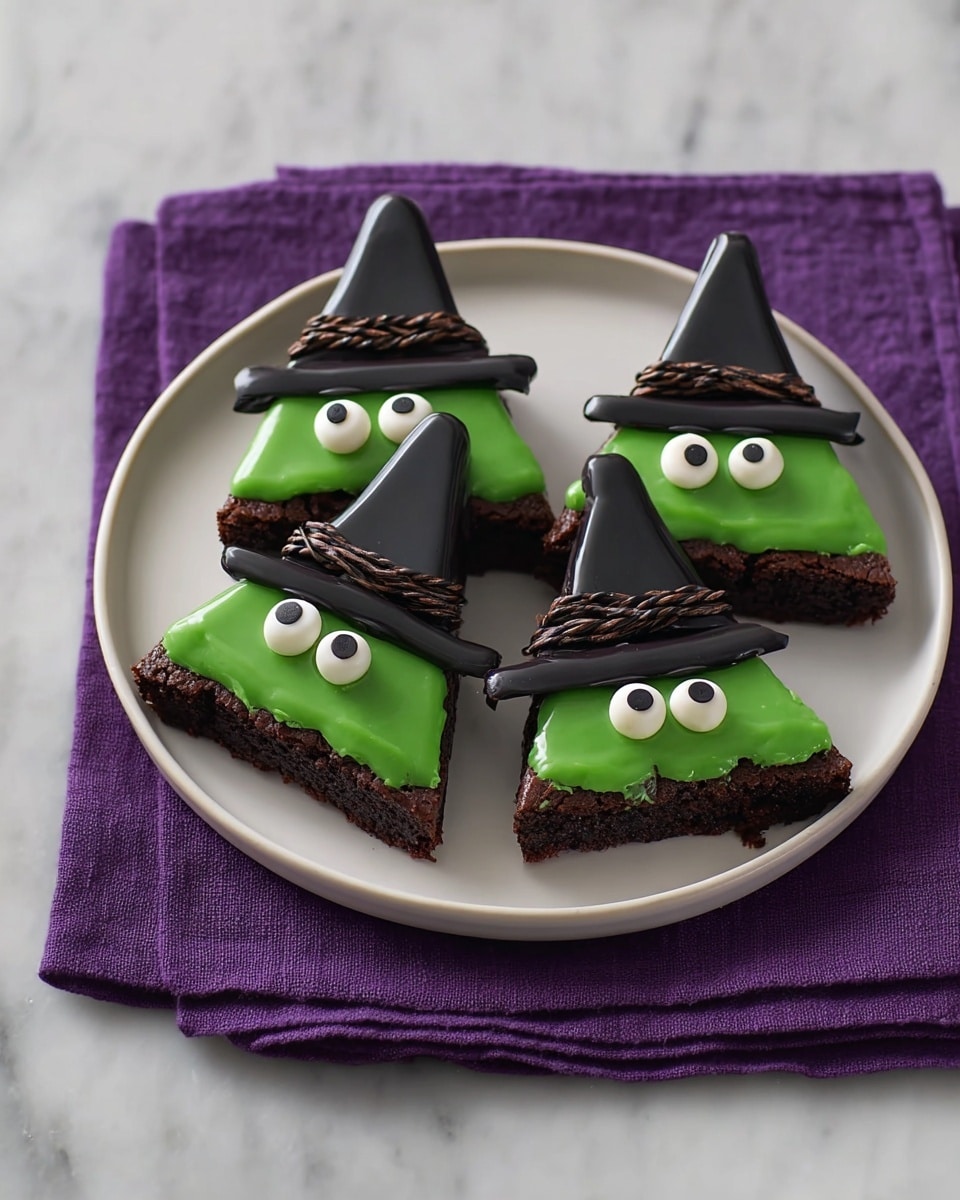
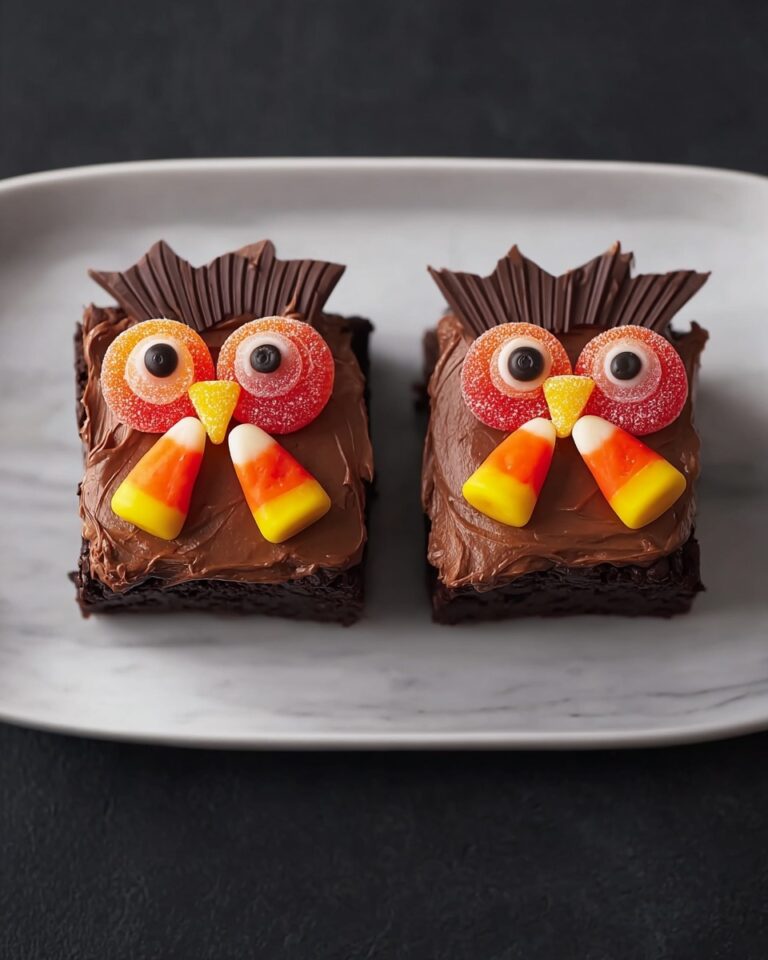
If you’re on the hunt for a Halloween treat that’s as festive as it is delicious, you’ve come to the right place. I absolutely love this Witch Brownies Recipe because it’s fun to make, visually adorable, and totally crowd-pleasing. Whether you’re throwing a spooky party or just want a sweet seasonal snack, these witch-shaped brownies with candy eyeballs and licorice hats are sure to wow your friends and family. Keep reading, and I’ll walk you through every step so you can nail it — no stress, just tasty magic!
Why You’ll Love This Recipe
- Fun and Festive: Transform simple brownies into witchy treats that bring Halloween to life on your dessert table.
- Easy to Make: Uses a boxed brownie mix so you can skip the complicated steps without sacrificing taste.
- Perfect for Parties: These brownies are bite-sized and decorated in a way that makes everyone smile (especially kids!).
- Creative Decorating: You’ll have fun piping icing and adding candy details, making it a perfect activity to do with friends or kids.

Ingredients You’ll Need
This recipe leans on a classic boxed brownie mix, which keeps things super simple, but the magic happens when you add those fun decorating touches. I like to shop for good quality decorating icings and candy eyeballs — they make the difference when it comes to the look and texture of your witch brownies.
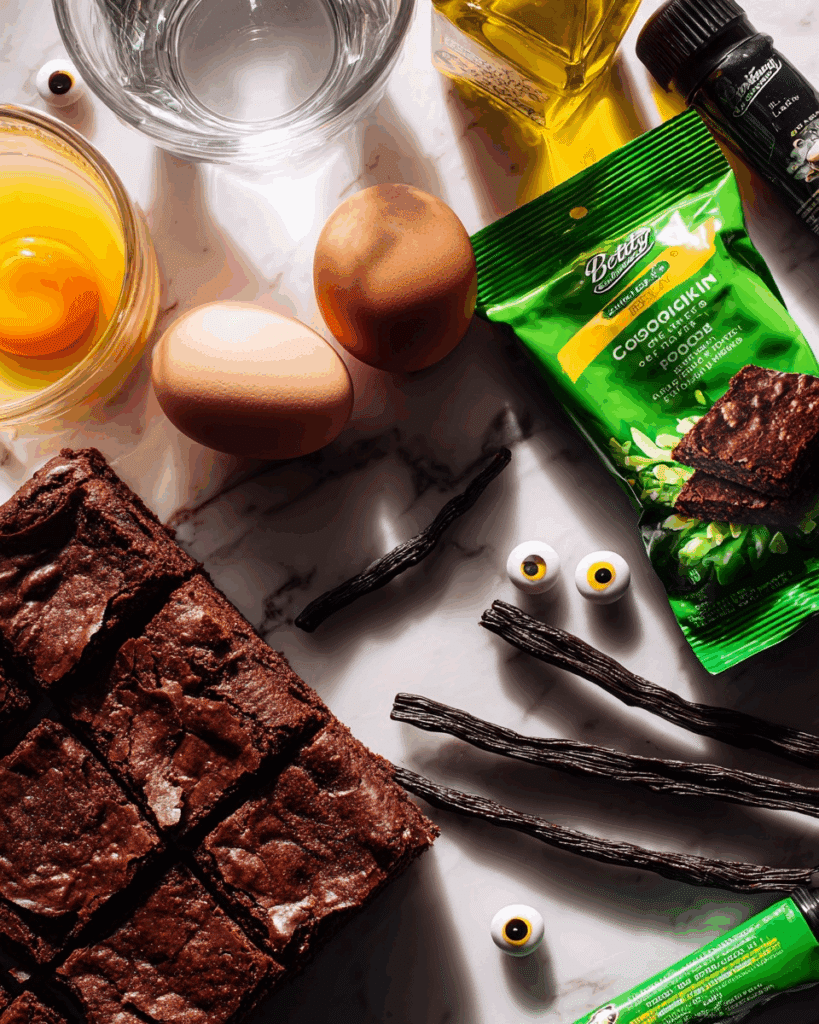
- Betty Crocker™ Fudge Brownie Mix: Using a boxed mix helps guarantee fudgy brownies every time — so you don’t have to guess on the baking science.
- Water, vegetable oil, and eggs: These ingredients bring the brownie mix to life; use what the box calls for for best results.
- Betty Crocker™ Green Cookie Icing: This icing creates the witch’s spooky green face — I love how vibrant it looks!
- Betty Crocker™ Black Decorating Cookie Icing: Use this for the witch’s hat and to outline details; it pipes smoothly and sets perfectly.
- Candy Eyeballs: These little eyeballs are essential for that creepy witch vibe; I grab the Betty Crocker™ Dessert Decorations Candy Eyeballs, which come ready to go.
- Black Licorice Twists: Cut into thirds to make the witch’s hat brims — fun and adds texture.
Variations
I love to personalize recipes, and this Witch Brownies Recipe is no exception. With just a little creativity, you can make it your own and suit everyone’s tastes.
- Chocolate Chip Twist: Sometimes I sprinkle mini chocolate chips onto the brownie batter before baking to add an extra chocolate punch — it’s a hit every time.
- Gluten-Free Version: You can swap the boxed brownie mix with a gluten-free version and use gluten-free icings for friends with dietary restrictions.
- Colorful Hats: For a fun twist, try using colored decorating icing for the witch hats — purple or orange make these perfect for other fall celebrations too.
- Spicy Kick: I’ve added a pinch of cinnamon or cayenne into the brownie batter before baking for an unexpected spicy note — it’s surprisingly delicious!
How to Make Witch Brownies Recipe
Step 1: Prep Your Baking Pan Like a Pro
First things first, preheat your oven to 350°F. Then line a 13×9-inch baking pan with foil, making sure to leave some overhang on the sides — this helps when lifting the brownies out later. I always grease the bottom and sides of the foil with shortening or cooking spray so nothing sticks. This setup saves you a lot of hassle after baking and keeps your brownies intact when you’re ready to decorate.
Step 2: Make and Bake the Brownies
Prepare the brownie mix exactly as the box instructs — trust me, following those directions matters! Pour the batter into your prepared pan and bake until a toothpick comes out with just a few moist crumbs (about the time the box suggests). When they’re done, pop them onto a cooling rack and let them cool completely — this typically takes about an hour. I used to be impatient and try to frost warm brownies, but the icing slides right off if they’re not cool enough, so patience really pays off here.
Step 3: Cut and Shape Your Brownies
Here’s the fun part! Using the foil edges, carefully lift the brownies out of the pan. Peel off the foil and set it on your cutting board. You’re going to cut the brownies into 24 triangles — which makes them look like little witch hats. I like to cut 3 horizontal rows, then cut each row into 8 triangles with 2-inch wide bases. The pointed end makes the witch’s hat tip, and the wide base is perfect for decorating the face. Don’t forget to save the end pieces for a tasty snack — I promise you won’t regret it!
Step 4: Decorate Your Witch Brownies
Now for the decorating magic. Take your green cookie icing and squeeze it over the lower third of each brownie triangle to create the witch’s creepy green face. Then pipe the black icing over the top two-thirds for the hat. Between the green and black icing, press a small piece of the cut black licorice twist to form the hat brim — this little touch adds so much character. Finally, place two candy eyeballs onto the green icing for those haunting looks. These decorating steps really make the brownies come alive, and I love how my family goes crazy for these spooky faces at parties. Store them covered in a single layer at room temperature, and they’ll stay fresh and delicious.
Pro Tips for Making Witch Brownies Recipe
- Cool Completely: Always make sure your brownies are fully cooled before decorating to avoid melting the icings and keep designs sharp.
- Use a Piping Bag: I use a disposable piping bag for the black icing to get clean lines and better control when creating witch hats.
- Work Quickly With Icing: Cookie icing can dry fast, so decorate a few brownies at a time to keep everything smooth and fresh-looking.
- Choose Your Candy Wisely: The candy eyeballs really amp up the fun, but if you can’t find them, small dots of icing or mini chocolate chips work too!
How to Serve Witch Brownies Recipe
Garnishes
When I serve these brownies, I usually keep it simple with a touch of extra candy eyeballs sprinkled around the platter for atmosphere. Sometimes I add a little edible glitter dust on the hats for a subtle sparkle — it makes the witches extra magical and is always a conversation starter.
Side Dishes
These witch brownies pair perfectly with a cold glass of milk or a warm cup of spiced cider for a cozy fall vibe. I also like to serve them alongside a simple pumpkin or apple spice muffin to round out a seasonal dessert tray.
Creative Ways to Present
For Halloween parties, I’ve arranged witch brownies standing upright on a decorative plate, leaning slightly like little hats ready to fly. Another idea I tried was placing each brownie on mini cupcake liners to make serving easier and even cuter. You can get creative with themed platters — spider-web doilies, orange and black napkins, or even small “witch hats” made from paper cone toppers.
Make Ahead and Storage
Storing Leftovers
Once decorated, I keep the witch brownies stored in a single layer in an airtight container at room temperature. They stay fresh for about 3-4 days this way. Avoid stacking them to prevent the icing and candy eyes from squishing or smearing.
Freezing
If you want to make these ahead of a party, you can freeze the undecorated brownies wrapped tightly in plastic wrap and foil, but I recommend freezing before decorating because icings can get crumbly if frozen. Thaw completely before decorating.
Reheating
I usually don’t reheat decorated witch brownies to preserve the candy eyes and icing design, but if you have leftovers undecorated, a quick 10-15 second zap in the microwave softens them perfectly. Just be careful not to overheat!
FAQs
-
Can I make the Witch Brownies Recipe without a boxed mix?
Absolutely! You can use your favorite homemade brownie recipe if you prefer. Just make sure the brownies are fully cooled before cutting and decorating.
-
What if I don’t have candy eyeballs?
No worries—mini chocolate chips, small dots of white and black icing, or even edible googly eyes from craft stores work great as substitutes.
-
How long do the decorated witch brownies stay fresh?
Stored in a single layer in an airtight container at room temperature, they stay fresh for up to 4 days. Keep them away from humidity to avoid sticky icing.
-
Can this recipe be made kid-friendly?
Definitely! Decorating witch brownies is a fantastic activity to do with kids — just be sure to supervise when handling sharp knives and piping bags.
Final Thoughts
I discovered this Witch Brownies Recipe a few years ago for a Halloween bake-off and immediately fell in love with how simple yet striking it is. My family goes crazy for the combination of fudgy brownies and playful decorations—it really turns dessert into an event. If you give it a try, I think you’ll find it’s the perfect way to add a little spooky fun to your celebrations without spending hours in the kitchen. Trust me, once you make these witches, they’ll become a yearly favorite you look forward to sharing with friends and family.
Print
Witch Brownies Recipe
- Prep Time: 40 min
- Cook Time: 30 min
- Total Time: 2 hr 10 min
- Yield: 24 brownies
- Category: Dessert
- Method: Baking
- Cuisine: American
Description
These Witch Brownies are a fun and spooky treat perfect for Halloween parties or festive gatherings. Made with fudgy Betty Crocker™ Brownie Mix, they’re decorated to look like little witches with colorful icing, candy eyeballs, black licorice hats, and a playful brim. The brownies are cut into triangular witch faces, combining a rich, chocolatey base with vibrant green and black icing accents, making them as delightful to look at as they are to eat.
Ingredients
Brownie Base
- 1 box Betty Crocker™ Fudge Brownie Mix
- Water, vegetable oil, and eggs as called for on brownie mix box
Decorations
- 1 pouch Betty Crocker™ Green Cookie Icing
- 1 pouch (7 oz) Betty Crocker™ Decorating Cookie Icing black icing
- 48 candy eyeballs from 1 package (0.88 oz) Betty Crocker™ Dessert Decorations Candy Eyeballs
- 8 (8-inch) black licorice twists, each piece cut into thirds
Instructions
- Prepare the pan: Heat your oven to 350°F (175°C). Line a 13×9-inch baking pan with foil, leaving some foil overhanging the edges for easy removal later. Grease the bottom and sides of the foil with shortening or cooking spray to prevent sticking.
- Make and bake brownies: Prepare the brownie batter according to the instructions on the box using water, vegetable oil, and eggs. Pour the batter into the prepared pan and bake as directed. Once baked, let the brownies cool completely on a cooling rack for about 1 hour.
- Cut brownies into triangles: Once cooled, use the foil edges to lift the brownies from the pan. Carefully peel away the foil. Cut the brownies into 24 triangle shapes by creating 3 horizontal rows and cutting each row into 8 triangles, ensuring each triangle has a 2-inch wide base. Save the end pieces for snacking.
- Decorate the witch faces: Take each brownie triangle and squeeze the green cookie icing over the lower third to form the witch’s face. Pipe the black icing on the remaining top portion to create the witch’s hat. Place a piece of the cut licorice twist between the green and black icing to act as the hat brim. Finally, place two candy eyeballs on the green icing to complete the face.
- Store the brownies: Arrange the decorated brownies in a single layer and store them covered at room temperature until ready to serve.
Notes
- For best results, ensure the brownies are completely cooled before decorating to prevent the icing from melting.
- You can substitute candy eyeballs with small candies or edible pearls if preferred.
- If you want to make the licorice hats sturdier, chilling the decorated brownies briefly before serving can help the icing set.
- These brownies are best enjoyed within 2-3 days when stored at room temperature to maintain freshness.
- Using foil to lift the brownies out makes cutting and decorating much easier and cleaner.
Nutrition
- Serving Size: 1 brownie (approximately 1/24th of recipe)
- Calories: 160
- Sugar: 18g
- Sodium: 110mg
- Fat: 7g
- Saturated Fat: 2g
- Unsaturated Fat: 4g
- Trans Fat: 0g
- Carbohydrates: 25g
- Fiber: 1g
- Protein: 2g
- Cholesterol: 15mg
