

If you’re looking for an adorable, seasonal treat that not only tastes amazing but also looks like it could have popped right out of a storybook, you’re in for a real treat with this Pumpkin Patch Cupcakes Recipe. I absolutely love how these cupcakes look like tiny pumpkins straight from a fall patch — they’re perfect for Halloween, Thanksgiving, or just any cozy autumn day. Trust me, you’ll find that making these is as fun as eating them, and I’d love to share all the little tricks I’ve learned to make sure your cupcakes turn out just right.
Why You’ll Love This Recipe
- Charming Presentation: These cupcakes look like real pumpkins, making them a total showstopper at any event.
- Easy Assembly: Once the cupcakes are baked, decorating is straightforward and fun — even for beginner bakers.
- Perfect Fall Flavors: The orange icing and candy eyes bring that classic autumn vibe we all crave.
- Kid-Friendly Fun: My family goes crazy for these, and kids love helping with the decorating.

Ingredients You’ll Need
The ingredients are simple, using a classic cake mix as a base which makes the process super quick. Plus, the food coloring and decorating icings add that seasonal charm without a lot of fuss. When picking out your decorating goodies, I recommend grabbing the Betty Crocker kits – they make this much easier!
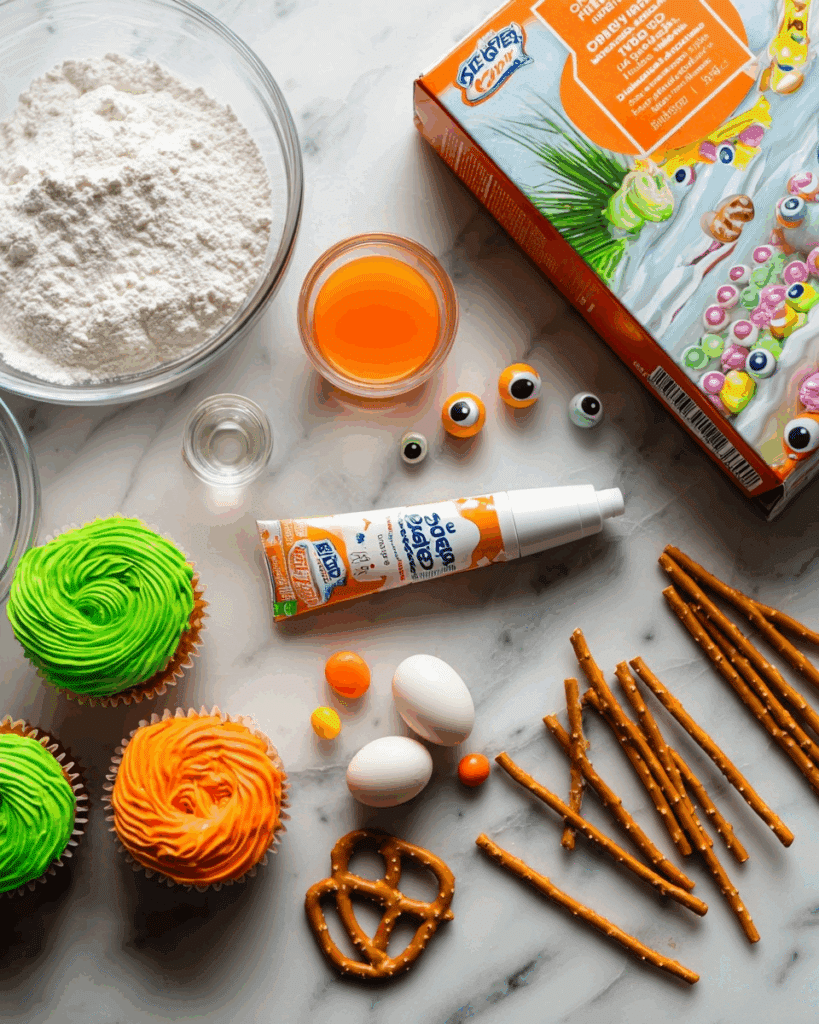
- White Cake Mix: A great base that’s light and moist, perfect to take on the added orange color.
- Water, Vegetable Oil, and Eggs: Standard ingredients to make the cake mix come alive, just follow package directions.
- Neon Gel Food Colors: Orange for that vibrant pumpkin look — gel colors won’t thin your batter.
- White Decorating Icing: Used for the pumpkin teeth detailing; piped small and neat.
- Orange Decorating Cake Icing: The star color for your pumpkin skin.
- Green Decorating Icing: To create tiny leaves that add a finishing touch.
- Candy Eyeballs: Adding a fun, whimsical face to your pumpkin.
- Decorating Tips (8-pack): Especially the round tip (#12) and leaf tip (#352) for precise decorating.
- Baking Cups: Betty Crocker cupcake liners work great with this recipe.
- Pretzel Sticks: These become the pumpkin stems — simple, crunchy, and perfect.
Variations
One of the things I love about the Pumpkin Patch Cupcakes Recipe is how much room there is to get creative. You can tweak the flavor, colors, or decorations to suit your style or dietary needs. Here are some ideas I’ve tried or thought would be fun to switch up next time you bake these.
- Flavor Boost: Sometimes I add a teaspoon of cinnamon or pumpkin pie spice to the cake batter to deepen that autumn flavor – it’s a simple way to add warmth.
- Dairy-Free Version: Use a dairy-free white cake mix and substitute the icing with a vegan-friendly frosting; the decorating still works great.
- Mini Pumpkin Versions: Make smaller cupcakes and decorate accordingly for bite-sized delights, which are perfect for kid’s parties.
- Chocolate Pumpkin: Swap the white cake mix for a chocolate one and color the icing accordingly – it’s a delicious twist.
How to Make Pumpkin Patch Cupcakes Recipe
Step 1: Get That Batter Orange and Ready
Start by preparing the white cake mix exactly as instructed on the box — water, oil, and eggs — but here’s my secret: mix in a generous amount of orange gel food coloring until you get that perfect pumpkin shade. I usually start with a few drops and gradually add more; you want a vibrant but natural-looking orange without overdoing it. This is what gives your cupcakes that unmistakable pumpkin-patch vibe, so don’t rush the coloring step!
Step 2: Bake and Cool Your Cupcakes
Fill the Betty Crocker baking cups about two-thirds full with your orange batter. Bake them as directed, usually around 15-20 minutes depending on your oven — but always test with a toothpick! Once baked, I can’t stress enough to let them cool completely before decorating. I learned the hard way that warm cupcakes make the icing slide off, and nobody wants a messy pumpkin patch.
Step 3: Build Your Pumpkin Face
Now the fun decorating begins! Remove two cooled cupcakes from their liners. Using the round decorating tip (#12), spread a layer of orange icing over the first cupcake’s top – this acts as the “glue.” Then flip the second cupcake and gently press it on top of the iced cupcake, creating a little pumpkin shape with a natural ridge between them.
Step 4: Add Those Playful Pumpkin Eyes
Grab two candy eyeballs and use a dab of white decorating icing on their backs to help them stick onto the top cupcake. I like to place them evenly spaced to give my pumpkin a friendly (or spooky!) expression. This step always draws a few smiles when I serve them.
Step 5: Pipe the Pumpkin’s Teeth
Using the white tube icing with the same round tip (#12), carefully pipe small tooth-shaped rectangles between the two cupcakes, right under those adorable eyes. This detail adds character, making your pumpkin look like he’s ready for some Halloween fun. Take your time here – you want the shapes to be clean and recognizable.
Step 6: Create Leafy Green Accents
Switch to the green decorating icing and use the leaf tip (#352) to add two small leaves at the center top of your pumpkin. These leafy touches make the cupcakes feel polished and complete — plus, it’s a nice pop of color that really finishes the look. It’s amazing what a little greenery can do!
Step 7: Top with Pretzel Stems
Finally, insert a thin pretzel stick right in the center top between the leaves to mimic a pumpkin stem. This crunchy stem adds texture and that perfect final touch. I always find this step super satisfying – it really turns your cupcake into a tiny pumpkin all ready for the patch!
Pro Tips for Making Pumpkin Patch Cupcakes Recipe
- Getting the Orange Just Right: Use gel food coloring instead of liquid to avoid thinning your batter and to get that rich pumpkin color smoothly.
- Cool Completely Before Decorating: Decorating warm cupcakes causes the icing to melt and slide, so patience here really pays off.
- Use Decorating Tips for Precision: Piping small teeth and leaves is easier with the right tips; if you don’t have them, you can still use a zip bag with a tiny snip at the corner.
- Pretzel Stem Placement: Insert the pretzel gently at a slight angle to avoid breaking it and to mimic a natural pumpkin stem.
How to Serve Pumpkin Patch Cupcakes Recipe

Garnishes
I love adding a sprinkle of cinnamon sugar over the orange icing for an extra touch of fall flavor and a subtle sparkle. Sometimes I use little autumn-themed cupcake picks or edible glitter to really wow guests at parties. Those candy eyeballs are already a great garnish, but playing with little edible accents can make each cupcake unique and playful.
Side Dishes
These Pumpkin Patch Cupcakes pair beautifully with warm apple cider or a spiced chai latte — both bring out the cozy autumn vibes. For a more substantial treat station, I like to serve these alongside roasted pumpkin seeds or caramel apples. It’s all about creating that quintessential fall comfort food spread that guests love.
Creative Ways to Present
I once arranged these cupcakes in a shallow basket lined with autumn leaves and tiny faux pumpkins—it was a huge hit at our family Halloween party. Another idea is placing them on a tiered stand decorated with fall garlands for a beautiful centerpiece effect. Don’t hesitate to get creative with seasonal props and colors to really set the mood for your gathering.
Make Ahead and Storage
Storing Leftovers
After all the fun, any leftovers should be stored in an airtight container at room temperature — but only if you’re planning to enjoy them within 2 days. I usually place them in a single layer to avoid squishing that delicate icing and decoration. The cupcakes keep nicely so long as humidity isn’t too high.
Freezing
Freezing these cupcakes works best if you hold off on decorating until after thawing. I bake and freeze the plain orange cupcakes wrapped tightly in plastic wrap, then thaw completely before piping on the icing and adding candy eyes and pretzels. This way, the decorations don’t get damaged during freezing.
Reheating
I usually don’t reheat decorated cupcakes to preserve the icing’s texture. But if you want your cupcakes warm, you can pop the plain cupcake (without decorations) in the microwave for 10-15 seconds, then decorate fresh right after. It’s a little extra step, but well worth it for that fresh-from-the-oven feel.
FAQs
-
Can I make these cupcakes without a boxed cake mix?
Absolutely! You can use your favorite from-scratch vanilla cupcake recipe as a base just fine. The key is ensuring the batter holds color well — using gel food coloring is helpful to get that rich pumpkin look.
-
What if I don’t have the specific decorating tips?
No worries! You can use a resealable plastic bag and cut a tiny hole in the corner to pipe icing. For leaf shapes, practice a little pressure and wiggle with your piping to mimic leaf shapes as best you can.
-
Can I prepare these cupcakes for a party a day in advance?
Yes, just bake and decorate them the day before, then store them in an airtight container at room temperature. The decorations hold up well overnight, making your party prep a breeze.
-
Are there any allergy-friendly substitutions?
You can use gluten-free or vegan cake mixes and frostings available at many stores. Just be sure the candy eyeballs and pretzels fit your dietary needs or swap them for safe alternatives.
Final Thoughts
I can’t recommend this Pumpkin Patch Cupcakes Recipe enough if you want a fun, festive baking project that yields absolutely charming results. Every time I make these, it feels like bringing a little joy from the pumpkin patch right into my kitchen — and sharing them with friends and family makes it even better. So, whether you’re baking for a holiday, a party, or just craving something deliciously seasonal, give this recipe a try. I’m confident you’ll love how easy and delightful these cupcakes turn out — and you might just find yourself making them every fall!
Print
Pumpkin Patch Cupcakes Recipe
- Prep Time: 30 min
- Cook Time: 1 hr
- Total Time: 1 hr 30 min
- Yield: 12 cupcakes
- Category: Dessert
- Method: Baking
- Cuisine: American
Description
These Pumpkin Patch Cupcakes are a festive and fun treat perfect for autumn celebrations. Moist white cake cupcakes are tinted bright orange to resemble pumpkins and decorated with detailed icing, candy eyeballs, green leaves, and pretzel stick stems to create a charming pumpkin patch effect. They are easy to bake using a boxed mix and come together with simple decorating techniques, making them ideal for all skill levels.
Ingredients
Cake Mix
- 1 box Betty Crocker™ Super Moist™ White Cake Mix
- Water, vegetable oil, and eggs as called for on cake mix box
- Orange Neon Gel Food Coloring (from 1 package Betty Crocker™ Neon Gel Food Colors)
Decorations
- 1 Tube Betty Crocker™ white decorating icing
- 1 Can Betty Crocker™ orange decorating cake icing
- 1 Tube Betty Crocker™ green decorating icing
- 1 Package Betty Crocker™ Candy Shop candy eyeballs
- 12 Pretzel sticks
- 1 Package Betty Crocker™ baking cups
- 1 Package Betty Crocker™ Decorating Tips (8-pack)
Instructions
- Prepare the Cake Batter: In a mixing bowl, combine the white cake mix with water, vegetable oil, and eggs as directed on the cake mix box. Add orange gel food coloring until the batter reaches your desired pumpkin-orange shade, stirring well to distribute the color evenly.
- Bake the Cupcakes: Spoon the colored batter into Betty Crocker™ cupcake liners placed in a muffin tin. Bake following the temperature and time recommendations on the cake mix box until cupcakes are fully cooked. Remove from oven and allow cupcakes to cool completely.
- Assemble Pumpkin Faces: Carefully remove two cooled cupcakes from their liners. On the first cupcake, use the round decorating tip (#12) to spread a layer of orange decorating cake icing evenly over the top. Then, flip the second cupcake upside down and place it on top of the iced cupcake, creating a ‘pumpkin face’ sandwich.
- Add Candy Eyeballs: Dab a bit of white decorating icing onto the backs of two candy eyeballs and press them onto the top cupcake to create eyes for the pumpkin face.
- Create Teeth: Using the round tip (#12) and white tube icing, pipe small tooth-shaped rectangles between the two cupcakes around the mouth area to simulate pumpkin teeth.
- Pipe Leaves: Attach the leaf tip (#352) to the green tube icing. Pipe two small green leaves at the center top of the pumpkin to mimic pumpkin foliage.
- Add Pumpkin Stem: Insert a thin pretzel stick vertically into the top center of the pumpkin face cupcake, acting as the pumpkin stem and completing the design.
Notes
- Make sure cupcakes are completely cool before decorating to prevent icing from melting.
- You can adjust the intensity of the orange color by adding more or less gel food coloring according to preference.
- If you don’t have pretzel sticks, you could use small pieces of cinnamon sticks or carved celery sticks as stems.
- These cupcakes keep well stored in an airtight container at room temperature for up to 2 days.
- For a gluten-free option, substitute the cake mix with a certified gluten-free mix and verify all decorations are gluten-free.
Nutrition
- Serving Size: 1 cupcake
- Calories: 280
- Sugar: 28g
- Sodium: 220mg
- Fat: 12g
- Saturated Fat: 3g
- Unsaturated Fat: 7g
- Trans Fat: 0g
- Carbohydrates: 38g
- Fiber: 1g
- Protein: 3g
- Cholesterol: 30mg
