

If you’re anything like me, Halloween isn’t just about spooky decorations and costumes—it’s a total excuse to get creative in the kitchen, too. That’s why I’m so excited to share this Make-Your-Own Halloween Brownies Recipe with you! It’s a fun, festive, and seriously delicious way to celebrate the season while getting the whole family involved. Trust me, once you try this, you’ll want to make these brownies a Halloween tradition.
Why You’ll Love This Recipe
- Super Easy to Make: If I can do it without baking mishaps, you can too—no stress required.
- Customizable Fun: You get to decorate your own spooky creations any way you want, making it a perfect family activity.
- Perfect Texture: Fudgy brownies and creamy frosting come together for the ultimate sweet treat.
- Festive and Colorful: With all the vibrant food colors and funky candy toppings, these brownies really bring Halloween to life—and your kitchen too.

Ingredients You’ll Need
The great thing about this Make-Your-Own Halloween Brownies Recipe is that it uses simple ingredients you’re probably already familiar with, but the decorating possibilities? Endless! I like to shop for bright food colors and all sorts of fun candy decorations ahead of time to really get inspired as I work.
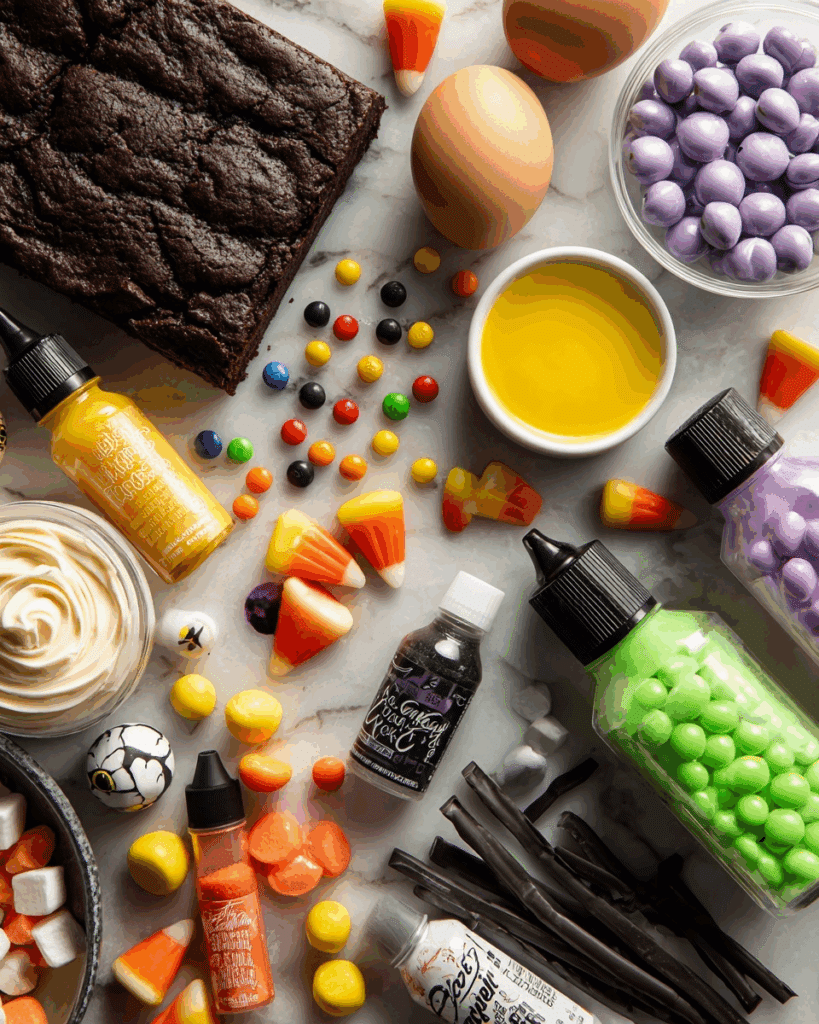
- Betty Crocker™ Fudge Brownie Mix: The base of the brownies—rich, moist, and fudgey every single time.
- Water, vegetable oil, and eggs: Make sure to follow the amounts called for on the brownie mix box for best results.
- Betty Crocker™ Rich & Creamy Vanilla Frosting: Perfect for coloring and decorating—nice and smooth for spreading or piping.
- Betty Crocker™ Neon Gel Food Color: Super vibrant colors that make your frosting pop with personality.
- Betty Crocker™ Black Writing Gel or Cookie Icing: This is your secret weapon for drawing creepy faces, spiders, or fun Halloween doodles.
- Assorted candies and snacks: Think candy corn, spooky sprinkles, Bugles™ snacks, candy eyeballs, mini candy-coated chocolates, and black licorice—anything that screams Halloween fun!
Variations
What’s awesome about the Make-Your-Own Halloween Brownies Recipe is that it’s a total blank canvas. I’ve tried all kinds of twists depending on what I have on hand or what guests prefer—feel free to make it your own!
- Gluten-Free Option: I used a gluten-free brownie mix once for a friend, and it worked beautifully without compromising that fudgey texture.
- Vegan Twist: Swap in a dairy-free frosting and an egg replacer in the brownie mix to fit vegan diets—just be sure to check your candy decorations!
- Chocolate Overload: Add in some chocolate chips or chunks right into the brownie batter for extra gooey delight, which my family went crazy over.
- Spooky Shapes: Instead of rectangles, try cutting brownies into bats or pumpkin shapes using cookie cutters—kids absolutely loved this twist last year!
How to Make Make-Your-Own Halloween Brownies Recipe
Step 1: Prepare and Bake the Brownies to Perfection
First things first: preheat your oven to 350°F. Greasing your baking pan well is super important—don’t skip this step or your brownies might stick and break when you cut them. I like to use shortening or a good spraying of cooking spray for a smooth release. Follow the directions on your Betty Crocker™ Fudge Brownie Mix box exactly for water, oil, and eggs, then bake according to the instructions—usually 8 or 9-inch square pan size. Once out of the oven, let the brownies cool completely, which usually takes about an hour and a half. Patience here pays off—if you frost warm brownies, the frosting will melt and slide off, and no one wants that mess.
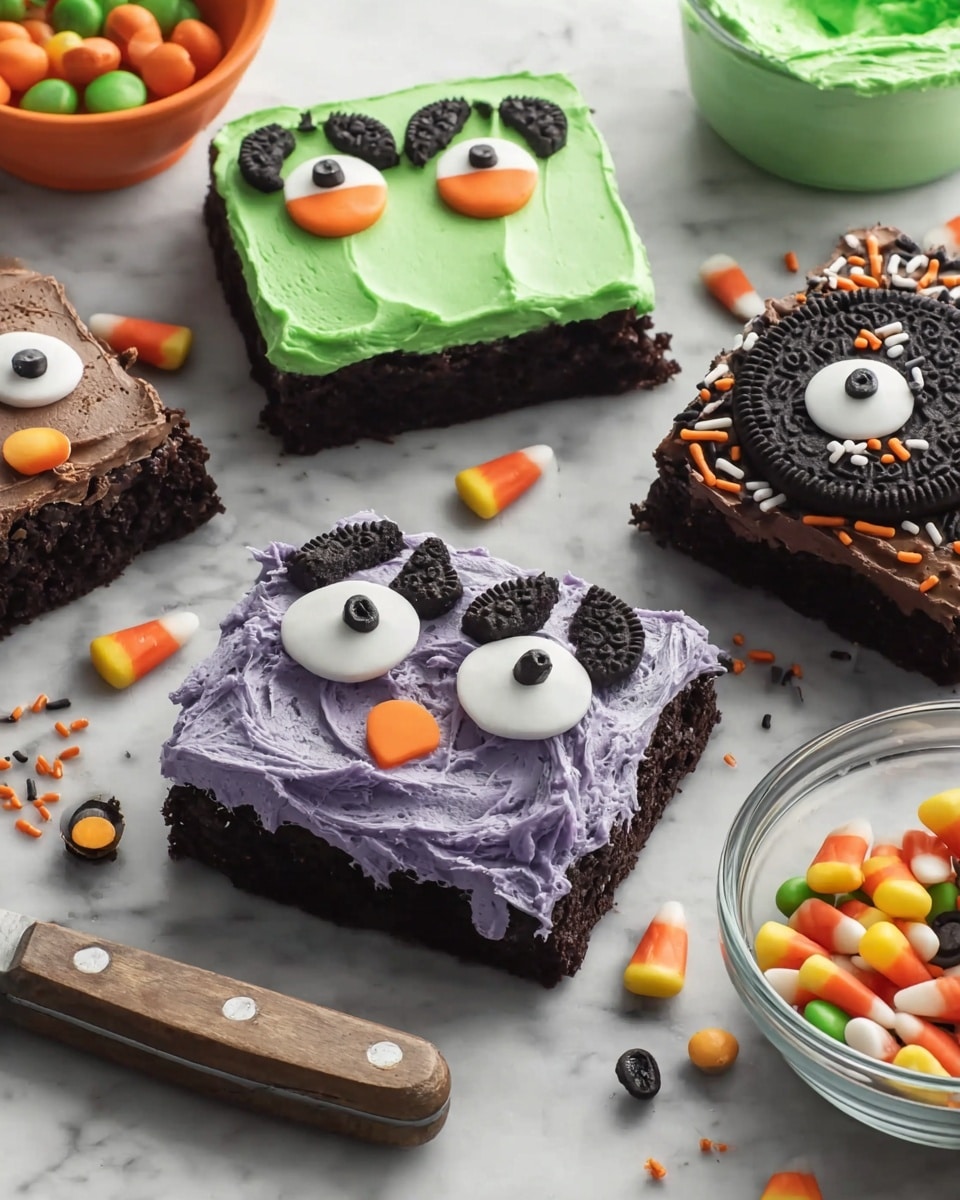
Step 2: Color and Decorate Your Frosting
Divide your vanilla frosting into small bowls, leaving enough so everyone can create their own color palette for decorating. I like to add small dabs of gel food color—remember, a little goes a long way! Mixing bright neon shades like orange, purple, and green instantly makes it feel festive. You’ll want to keep some frosting plain, too, for contrast. This is where you bring your imagination to life! Use the black writing gel or cookie icing to add little details like spider webs or jack-o’-lantern faces, then pile on those candies and sprinkles for a real Halloween party on top. My kids love coming up with wild designs and making each brownie unique.
Step 3: Store Your Masterpieces Properly
Once decorated, store the brownies covered at room temperature. I’ve found that this keeps the frosting from drying out while maintaining the brownies’ moisture–no fridge needed! Just pop them in an airtight container or cover tightly with plastic wrap to keep that fresh, fudgy goodness going.
Pro Tips for Making Make-Your-Own Halloween Brownies Recipe
- Grease Smartly: I always grease the pan twice—first with shortening, then a quick dusting of flour—to make sure brownies come out cleanly.
- Keep Frosting Cool: Color your frosting in small batches, and refrigerate any unused frosting to keep it from drying out.
- Mix Colors Gradually: Adding gel food color bit by bit helps you get the perfect shade instead of overshooting bright or dark colors.
- Cut with a Warm Knife: Heat your knife under hot water and wipe it dry before slicing to get clean, smooth brownie edges without tearing the frosting.
How to Serve Make-Your-Own Halloween Brownies Recipe
Garnishes
I’m all about using those fun Halloween candies that bring both color and texture—candy corn, spooky sprinkles, and candy eyes are must-haves for me. Black licorice strings make great spider legs, and mini chocolate candies add a tiny crunch. You can even try crushed Oreos for a “dirt” effect—I love these little touches because they make every bite an adventure.
Side Dishes
Since these brownies are already rich and filling, I usually pair them with a light, refreshing side like a crisp apple slices platter or a simple vanilla ice cream scoop to balance the sweetness. Sometimes I even brew a warm spiced apple cider for sipping alongside—total fall vibes.
Creative Ways to Present
For Halloween parties, I like to arrange my decorated brownies on a black platter sprinkled with edible glitter and place mini pumpkins and fake spider webs around them. You could even serve them inside a hollowed-out pumpkin for a wow factor! Last year, I made a “graveyard” brownie cake with tombstone-shaped brownies and licorice vines—it was a hit and sparked lots of compliments.
Make Ahead and Storage
Storing Leftovers
I usually keep leftover brownies in an airtight container on the countertop—they stay moist and tasty up to 3 days without any extra fuss. If I need to keep them longer, I’ll make sure they’re well covered so the frosting doesn’t dry out.
Freezing
Freezing decorated brownies can be tricky because of the frosting and candies, but I wrap each brownie individually in plastic wrap and then place them in a freezer-safe bag. When you thaw them overnight in the fridge, they’re still pretty tasty—just a little softer candy-wise, so maybe reserve freezing for undecorated brownies if possible.
Reheating
I don’t actually heat these brownies once decorated, but if you have undecorated leftovers, popping a piece in the microwave for 10 seconds brings back that melty, fudgy feeling. Just avoid heating frosted ones so the decorations don’t melt!
FAQs
-
Can I use homemade brownies for this recipe?
Absolutely! While the Make-Your-Own Halloween Brownies Recipe uses a boxed mix for convenience and consistent results, you can definitely use your favorite homemade brownie recipe. Just make sure they cool completely before decorating.
-
How do I prevent the frosting from melting?
Make sure your brownies are completely cool before applying the frosting. Also, keeping decorated brownies stored at room temperature rather than in the warm fridge helps keep the frosting stable and looking great.
-
What candies are best for decorating?
I love using candy corn, mini candy-coated chocolates, spooky sprinkles, candy eyeballs, and even salty snacks like Bugles™ to create fun textures and colors. Feel free to get creative with what you like!
-
Can kids help with this recipe?
Definitely! The decorating step is super kid-friendly and a great way to get little ones involved without any heat or sharp tools. Just supervise cutting and baking with an adult.
-
How long will the decorated brownies last?
Stored covered at room temperature, these brownies can stay fresh for about 3 days. After that, the frosting might start to dry out or the candies lose their crunch.
Final Thoughts
There’s something truly magical about gathering around the kitchen table with family and friends and letting your creativity run wild—this Make-Your-Own Halloween Brownies Recipe does just that. I’ve made these with kids, adults, and even on my own when I needed a little festive pick-me-up, and every single time, it’s turned out better than I expected. So next Halloween, treat yourself to this sweet, colorful, and downright fun baking adventure—I promise, you’ll be hooked.
Print
Make-Your-Own Halloween Brownies Recipe
- Prep Time: 40 minutes
- Cook Time: 30 minutes
- Total Time: 2 hours 40 minutes
- Yield: 6 brownies
- Category: Dessert
- Method: Baking
- Cuisine: American
Description
Create festive Halloween brownies easily with Betty Crocker brownie mix, colorful frosting, and fun candy decorations. This recipe guides you through baking rich fudge brownies and decorating them with vibrant gel food colors and spooky treats to delight kids and adults alike during Halloween celebrations.
Ingredients
Brownie Base
- 1 box Betty Crocker™ Fudge Brownie Mix
- Water, vegetable oil, and eggs called for on brownie mix box
Frosting and Decorations
- 1 tub (16 oz) Betty Crocker™ Rich & Creamy Vanilla Frosting
- Betty Crocker™ Neon Gel Food Color (assorted colors)
- Betty Crocker™ Black Writing Gel or Cookie Icing
- Assorted candies and snacks for decorating, such as candy corn, Betty Crocker™ Spooky Sprinkles, Bugles™ Snacks, Betty Crocker™ Dessert Decorations Candy Eyeballs, mini candy-coated milk chocolate candies, black licorice
Instructions
- Prepare and Bake Brownies: Heat oven to 350°F. Grease the bottom of an 8- or 9-inch square pan with shortening or cooking spray. Follow the instructions on the brownie mix box by combining the brownie mix with water, vegetable oil, and eggs as specified. Pour the batter into the prepared pan and bake according to package directions. Once baked, let the brownies cool completely for about 1 hour and 30 minutes.
- Cut Brownies: After the brownies have fully cooled, cut them into 6 even rectangles to prepare them for decorating.
- Color Frosting: Divide the vanilla frosting into several small bowls. Add Betty Crocker Neon Gel Food Colors to each bowl in desired amounts to achieve a variety of bright, festive shades for decorating.
- Decorate Brownies: Use the colored frostings, black writing gel or cookie icing, and an assortment of candies such as candy corn, spooky sprinkles, candy eyeballs, mini candies, and black licorice to creatively decorate each brownie piece. Refer to any inspiration photos to customize your Halloween theme designs.
- Store Finished Brownies: Once decorated, store brownies covered at room temperature to keep them fresh and ready to serve.
Notes
- Ensure brownies are completely cooled before frosting to prevent melting.
- Get creative with decorations using different candy types and colors to enhance the Halloween theme.
- Use parchment paper to make cleanup easier when decorating.
- Store decorated brownies in an airtight container at room temperature and consume within 2-3 days for best taste.
Nutrition
- Serving Size: 1 brownie (approximate)
- Calories: 350
- Sugar: 30g
- Sodium: 220mg
- Fat: 16g
- Saturated Fat: 7g
- Unsaturated Fat: 7g
- Trans Fat: 0g
- Carbohydrates: 48g
- Fiber: 2g
- Protein: 3g
- Cholesterol: 40mg
