

If you’re looking for a show-stopping dessert this spooky season, I absolutely love sharing this Halloween Witch Cake Recipe with friends and family. It’s not just a cake—it’s an experience, with layers of rich, chocolatey goodness and magically festive decorations that’ll have everyone oohing and aahing. Whether you’re baking for a crowd or just to impress your little monsters at home, this recipe is fan-freaking-tastic and surprisingly approachable. So, grab your mixing bowls because I’m about to walk you through how to create this enchanting dessert that tastes as good as it looks!
Why You’ll Love This Recipe
- Decadently Moist Layers: The combination of melted chocolate, sour cream, and brown sugar gives this cake a tender, rich crumb that melts in your mouth.
- Spooky Fun Decorations: I’ve included simple yet striking witch hat toppers and vibrant green frosting that look incredible and add a whimsical touch.
- Perfect for Parties: This recipe yields a big, crowd-pleasing cake that serves 16—it’s always a hit when the neighborhood kids come calling!
- Great for Beginners: You don’t need fancy tools or expert skills—my step-by-step tips make it easy to get this delightful dessert just right.

Ingredients You’ll Need
For this Halloween Witch Cake Recipe, the ingredients work together to create moist, flavorful cake layers with a creamy frosting that’s easy to tint. Here are some tips on picking your ingredients to get the best results.
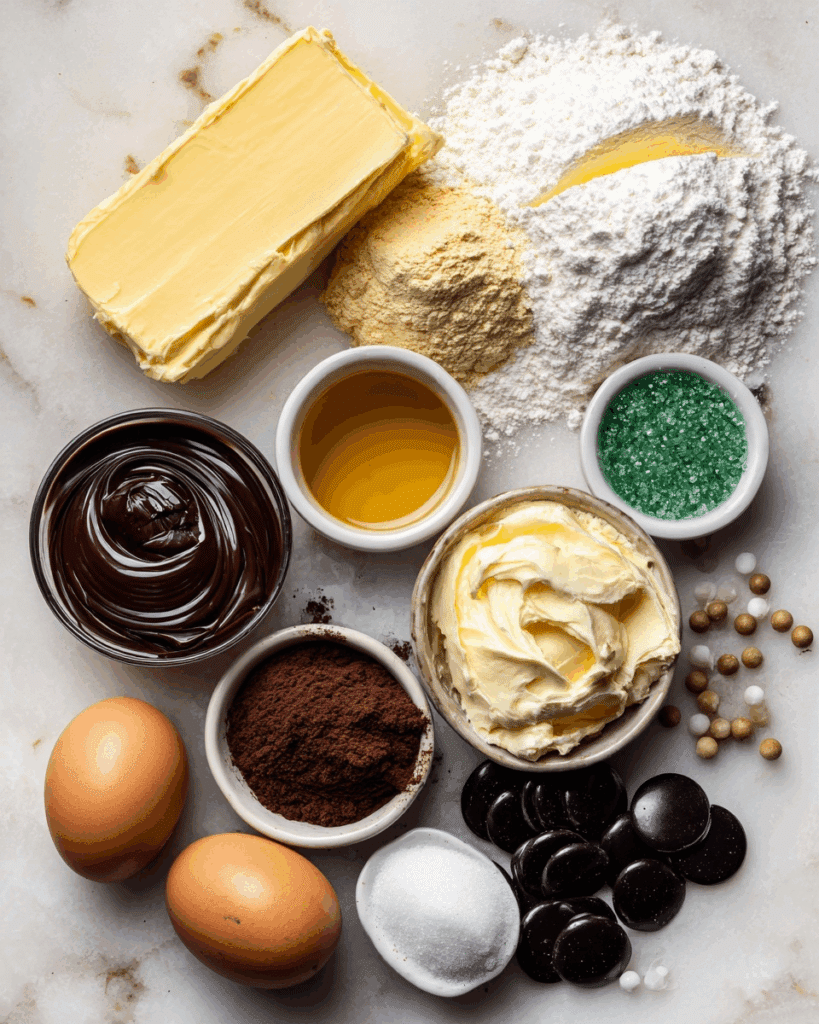
- Butter: Use softened butter for easy creaming, which helps capture air for a fluffy cake.
- Brown Sugar: Packed brown sugar brings a deep molasses flavor and extra moisture.
- Eggs: Room temperature eggs incorporate better, creating a more even batter.
- Semisweet Chocolate: I recommend melting and cooling for a touch of rich chocolate without being too bitter.
- Vanilla Extract: Adds warmth and depth to both cake and frosting.
- All-Purpose Flour: The base for a sturdy but tender crumb.
- Baking Soda: Helps the cake rise nicely and stay soft.
- Salt: Balances sweetness perfectly.
- Sour Cream: My secret ingredient for that moist, velvety texture you’ll love.
- Water: Makes the batter easy to mix and ensures a tender crumb.
- Confectioners’ Sugar: The key to smooth, sweet frosting.
- Milk: 2% milk helps get your frosting to just the right spreadable consistency.
- Gel Food Coloring: Green and black to bring that witchy vibe alive with vibrant frosting.
- Black Candy Coating Disks: Easy to melt and pipe for witch hat decorations.
- Black Sprinkles, Sanding Sugar, and Pearls: Adds texture and sparkle for a magical finish.
Variations
One of the things I love about this Halloween Witch Cake Recipe is how easy it is to customize. Whether you want it dairy-free, a little less sweet, or extra spooky, you can tweak it to fit your vibe.
- Dairy-Free Version: Swap butter and sour cream for plant-based alternatives—I tried this once for a friend’s party and no one missed the dairy at all!
- Chocolate Intensity: Use dark chocolate instead of semisweet for a richer flavor, perfect for chocoholics.
- Decorations: Replace witch hats with edible spiders or gummy worms for a fun, kid-friendly twist.
- Gluten-Free: Substituting the all-purpose flour with a gluten-free blend works wonderfully with the sour cream to keep texture soft.
How to Make Halloween Witch Cake Recipe
Step 1: Preparing Your Pans and Batter
First things first, preheat your oven to 350°F. Grease three 8-inch round baking pans and line their bottoms with parchment paper for easy release—I learned the hard way that skipping parchment can turn cake removal into a disaster! Get your butter softened and brown sugar ready, too. Then, in a large bowl, cream the butter and brown sugar until the mixture is light and fluffy, about 5 to 7 minutes—this step traps air, which helps keep the cake moist and tender.
Step 2: Mixing the Wet and Dry Ingredients
Next, beat in your eggs one at a time, making sure each is fully incorporated before adding the next. This keeps your batter smooth and avoids it curdling. Stir in the melted and cooled semisweet chocolate and vanilla extract for that rich, comforting flavor we all crave. In a separate bowl, whisk together the flour, baking soda, and salt gently, then add these dry ingredients alternately with sour cream into the wet mixture. Beat well after each addition so everything combines neatly. Finally, add the water gradually—don’t be tempted to skip this; it keeps the batter just the right consistency and the crumb perfectly moist.
Step 3: Baking and Cooling Your Cake Layers
Pour the batter evenly into your prepared pans and bake for about 40 to 45 minutes. You’ll know they’re done when a toothpick inserted in the center comes out clean or with just a few moist crumbs attached—don’t overbake, or your cake may dry out. After baking, let the cakes cool in the pans for 10 minutes—this makes them easier to handle—then carefully remove and transfer to wire racks to cool completely before frosting. Patience here pays off big time!
Step 4: Making and Tinting the Frosting
While your cakes cool, start on the frosting—beat softened butter until smooth, then gradually add confectioners’ sugar, vanilla, salt, and enough milk to reach a spreadable but thick consistency. Here’s a tip I discovered: reserve about 1-1/2 cups of the frosting and tint the rest a vibrant green using gel food coloring. The reserved will get tinted black for highlighting and piping. Using gels instead of liquid helps keep your frosting from getting too runny, which I’ve learned is super helpful for decorating.
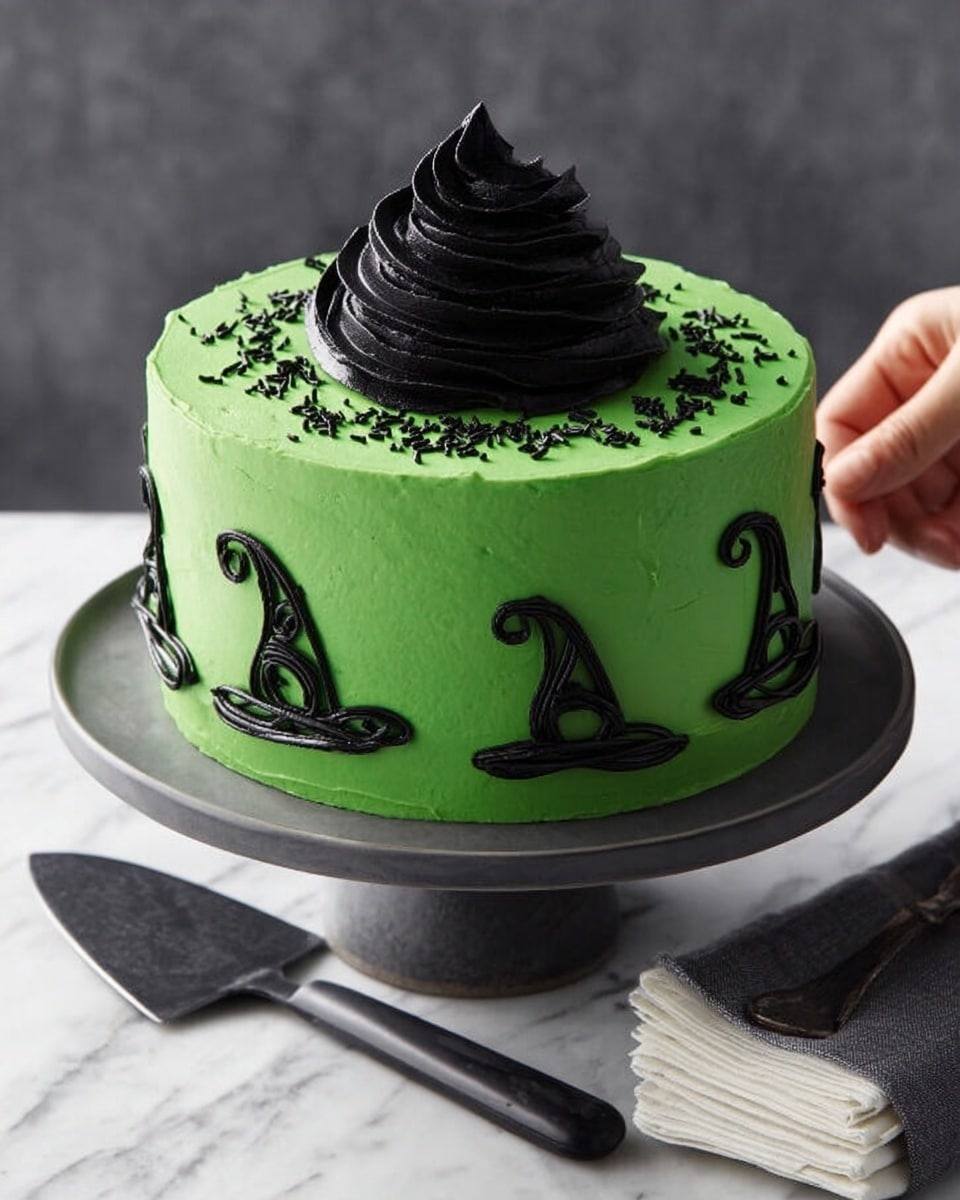
Step 5: Assembling and Decorating Your Halloween Witch Cake
If your cake layers have domed on top, slice them flat with a serrated knife—this helps your cake stack evenly. Place one layer on your serving plate and spread about 2/3 cup of green frosting evenly over it. Repeat with remaining layers. Cover the top and sides of the assembled cake with the green frosting. For the witch hats, melt your black candy coating disks and pipe little hat shapes onto waxed paper, letting them set completely. Then, top your cake with assorted sprinkles and use the black tinted frosting to pipe decorative stars on top with a large star tip. Just before serving, gently stand one witch hat upright on the top center, and press the remaining hats and black pearls along the sides for that enchanted effect that makes this cake feel truly magical.
Pro Tips for Making Halloween Witch Cake Recipe
- Cream Butter and Sugar Thoroughly: I noticed the fluffier the start, the lighter the cake texture—don’t rush this step!
- Melt Chocolate Carefully: Let it cool completely before adding to avoid scrambling eggs or causing a grainy batter.
- Trim Cake Layers: Level cakes stack better and look professional; your effort shows during decoration.
- Decorate at the Last Minute: Witch hats soften if left on too long—waiting keeps them crisp and shape-perfect for serving.
How to Serve Halloween Witch Cake Recipe
Garnishes
I love using black sanding sugar and a mix of black sprinkles and pearls to give the cake texture and sparkle—it feels like the cake is dressed to impress at a Halloween ball! The candy-coated witch hats steal the show, but those sparkling details along the sides add just the right amount of witchy glamour.
Side Dishes
Serve this cake alongside a warm cup of spiced apple cider or a rich pumpkin latte for a true autumnal treat. If you want a savory contrast, cheesy pumpkin soup or roasted butternut squash salad balances the sweetness nicely—trust me, your guests will be impressed.
Creative Ways to Present
One year, I set the cake on a rustic wooden board surrounded by faux spider webs and tiny plastic spiders for a fun tablescape. Another time, I paired it with tealight candles inside mini witch hats to add a cozy, mystical glow. You can even serve it on a tiered stand with cupcakes decorated the same way for a full Halloween dessert spread.
Make Ahead and Storage
Storing Leftovers
I usually wrap the leftover cake tightly with plastic wrap and store it in the fridge. This keeps it fresh for up to 4 days, and the frosting remains creamy and delicious. Just be sure to let it come to room temperature before serving again—you’ll get the best flavors and texture that way.
Freezing
If you want to prep ahead, the unfrosted cake layers freeze beautifully wrapped well in plastic wrap and foil. I’ve frozen layers for up to 2 months. When you’re ready to assemble the Halloween Witch Cake Recipe, thaw the layers overnight in the fridge, then bring them to room temp before frosting.
Reheating
Because it’s a cake, reheating is best avoided—but if you like your cake slightly warm, I recommend microwaving small slices for about 10 seconds. This helps the frosting soften a bit without melting too much. Alternatively, let slices sit at room temperature for about 30 minutes before serving.
FAQs
-
Can I make the Halloween Witch Cake Recipe vegan?
Absolutely! Replace the butter with a plant-based spread, use flax eggs (1 tablespoon flaxseed meal + 3 tablespoons water per egg), and swap sour cream with vegan sour cream or coconut yogurt. For frosting, use dairy-free butter and plant-based milk.
-
How do I keep the witch hats from melting?
Make sure you pipe the candy coating on waxed paper and let the hats fully set at room temperature before adding them to the cake. Place them on just before serving to keep them crisp and intact.
-
Can I prepare the cake a day in advance?
Yes! Bake and cool the layers a day ahead. You can also make the frosting and assemble the cake, covering it tightly in the fridge to keep it fresh. Bring it to room temperature before serving for the best taste.
-
What if I don’t have black candy coating disks?
No worries! You can melt black melting chocolates, use dark chocolate tinted with black food coloring, or even shape witch hats from black fondant or gum paste.
Final Thoughts
I have to say, this Halloween Witch Cake Recipe is one of my all-time favorites for October celebrations. It’s fun to make, delightfully delicious, and the reactions from kids and adults alike make every minute in the kitchen worth it. So, if you want to bake up a little magic this Halloween, give this recipe a whirl—I promise you’ll enjoy every spooky, sweet bite. Happy baking and have a wickedly wonderful Halloween!
Print
Halloween Witch Cake Recipe
- Prep Time: 1 hour 15 minutes
- Cook Time: 40 minutes
- Total Time: 1 hour 55 minutes
- Yield: 16 servings
- Category: Dessert
- Method: Baking
- Cuisine: American
Description
This Halloween Witch Cake is a decadent chocolate layer cake perfect for spooky celebrations. Moist layers of chocolate cake are layered and frosted with rich buttercream dyed in eerie green and black hues, adorned with whimsical witch hat decorations made from candy coating, sprinkles, and pearls. It’s a fun and festive dessert that combines classic chocolate flavors with creative Halloween-themed decorations.
Ingredients
Cake
- 3/4 cup butter, softened
- 2-1/2 cups packed brown sugar
- 4 large eggs, room temperature
- 6 ounces semisweet chocolate, melted and cooled
- 3 teaspoons vanilla extract
- 3 cups all-purpose flour
- 3 teaspoons baking soda
- 1 teaspoon salt
- 1-1/2 cups sour cream
- 1-1/2 cups water
Frosting
- 1-1/4 cups butter, softened
- 10 cups confectioners’ sugar
- 3 teaspoons vanilla extract
- 1/4 teaspoon salt
- 1/2 to 2/3 cup 2% milk
- Green gel food coloring
- Black gel food coloring
Decorations
- 4 ounces black candy coating disks, melted
- Assorted black sprinkles, sanding sugar, and pearls
Instructions
- Prepare the Oven and Pans: Preheat your oven to 350°F (175°C). Grease three 8-inch round baking pans and line the bottoms with parchment paper, then grease the parchment to prevent sticking.
- Cream Butter and Sugar: In a large mixing bowl, cream together the softened butter and packed brown sugar until the mixture is light and fluffy, which takes about 5-7 minutes using an electric mixer.
- Add Eggs and Flavorings: Beat in the eggs one at a time, ensuring each is well combined before adding the next. Then mix in the melted and cooled semisweet chocolate along with the vanilla extract.
- Combine Dry Ingredients: In a separate bowl, whisk together the all-purpose flour, baking soda, and salt.
- Mix Batter: Alternately add the dry ingredients and sour cream to the creamed mixture, beginning and ending with the dry ingredients. Beat well after each addition. Gradually beat in the water to achieve a smooth batter.
- Fill Pans and Bake: Divide the batter evenly among the prepared pans. Bake in the preheated oven for 40-45 minutes, or until a toothpick inserted in the center comes out clean.
- Cool the Cakes: Allow the cakes to cool in the pans for 10 minutes, then carefully turn out onto wire racks to cool completely.
- Make the Frosting: In a large bowl, beat the softened butter until smooth. Gradually add the confectioners’ sugar, vanilla, salt, and enough milk to reach a spreadable consistency. Remove 1-1/2 cups of the frosting and set aside.
- Color the Frosting: Tint the majority of the frosting with green gel food coloring until desired color is achieved. Tint the reserved frosting with black gel food coloring.
- Level Cake Layers: If the cake layers have domed tops, trim them with a serrated knife to make each layer level for stacking.
- Assemble the Cake: Place one cake layer on a serving plate and spread about 2/3 cup of the green frosting on top. Repeat with the next layer(s), and finish by placing the last cake layer on top. Frost the top and sides of the cake with the green frosting evenly.
- Decorate with Witch Hats: Pour the melted black candy coating into a piping bag fitted with a small round tip. Pipe witch hat shapes onto waxed paper and let them set until firm.
- Add Final Decorations: Place the black frosting in a piping bag with a large star tip and pipe decorative stars or accents on top of the cake. Arrange the set witch hats on top and gently press additional witch hats and black pearls onto the sides of the cake, adhering them with frosting. Scatter assorted black sprinkles and sanding sugar over the cake for a festive finish.
Notes
- Make sure the melted chocolate is cooled before adding to avoid curdling the batter.
- Use room temperature eggs to ensure smooth mixing and better cake texture.
- You can adjust the amount of milk in the frosting to reach your preferred consistency for spreading or piping.
- For a more stable cake, chill the layers after trimming and before frosting.
- If desired, substitute sour cream with Greek yogurt for a slightly tangier flavor.
Nutrition
- Serving Size: 1 slice (based on 16 servings)
- Calories: 480
- Sugar: 40g
- Sodium: 310mg
- Fat: 25g
- Saturated Fat: 15g
- Unsaturated Fat: 9g
- Trans Fat: 0.5g
- Carbohydrates: 62g
- Fiber: 3g
- Protein: 5g
- Cholesterol: 95mg


