

If you’re craving a dessert that’s sweet, cozy, and downright delicious, then this Maple Syrup Pie Recipe is about to become your new favorite. I absolutely love how this pie captures the rich, buttery flavor of real maple syrup in each bite. Trust me, once you try this, you’ll find it’s the perfect centerpiece for any gathering or a comforting treat on a quiet night at home.
Why You’ll Love This Recipe
- Authentic Maple Flavor: This pie uses real maple syrup, which gives it a deep, naturally sweet taste you can’t fake.
- Simple Ingredients: Only a handful of pantry staples come together for a dessert that feels fancy but is totally doable.
- Eye-Catching Presentation: The maple leaf cutouts are a charming touch that’ll have guests impressed before the first bite.
- Family-Approved: My family goes crazy for this pie every time, and I’m betting yours will too!

Ingredients You’ll Need
When you combine the natural sweetness of maple syrup with butter and a flaky pie crust, you get this rich, velvety pie. I always recommend using real maple syrup, not the imitation stuff, because it truly makes all the difference. Plus, having good-quality pastry dough on hand saves time and makes this recipe even easier.
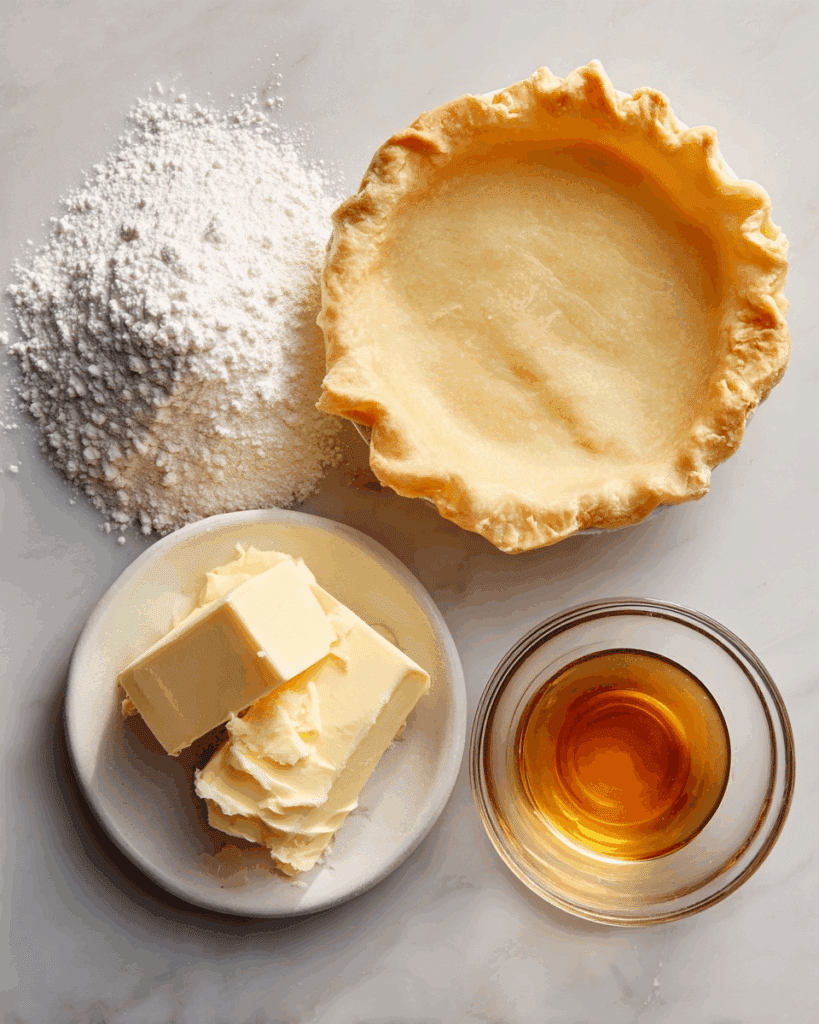
- Cornstarch: This is the secret to thickening the maple filling perfectly without altering the flavor.
- Water: Needed to dissolve the cornstarch and help the filling set up just right.
- Real Maple Syrup: The star ingredient! Choose 100% pure maple syrup for the best taste.
- Butter: Adds a luscious richness to the filling that balances the syrup’s sweetness.
- Pastry for Double-Crust Pie: A buttery, flaky crust is essential here — use homemade or store-bought for convenience.
Variations
I love that this Maple Syrup Pie Recipe is super adaptable — you can tweak it to suit your taste or dietary needs easily. Personally, I like adding a sprinkle of nuts on top for some crunch, but it’s just as good plain. Feel free to get creative!
- Nutty Twist: Adding chopped pecans or walnuts on top before baking gives a lovely texture contrast; my family always asks for this version during winter holidays.
- Gluten-Free: Swap in a gluten-free pie crust mixture if you’re avoiding gluten — just make sure it’s sturdy enough to hold the filling.
- Vegan Version: Use vegan butter substitutes and check that your pie dough is vegan-friendly; the filling sets nicely without eggs, so it’s pretty easy.
- Spiced Up: A pinch of cinnamon or nutmeg stirred into the filling adds warmth and depth, perfect for cozy evenings.
How to Make Maple Syrup Pie Recipe
Step 1: Whisk and Thicken the Maple Filling
Start by mixing the cornstarch and water in a large saucepan until smooth — this combo works as your thickening agent, so don’t skip it! Then whisk in the maple syrup and bring it to a boil over medium heat. Keep stirring for about 4 minutes until it thickens beautifully. When it’s done, remove from heat and stir in the butter until melted and silky. Set it aside to cool while you prep your crust.
Step 2: Prepare and Chill the Crusts
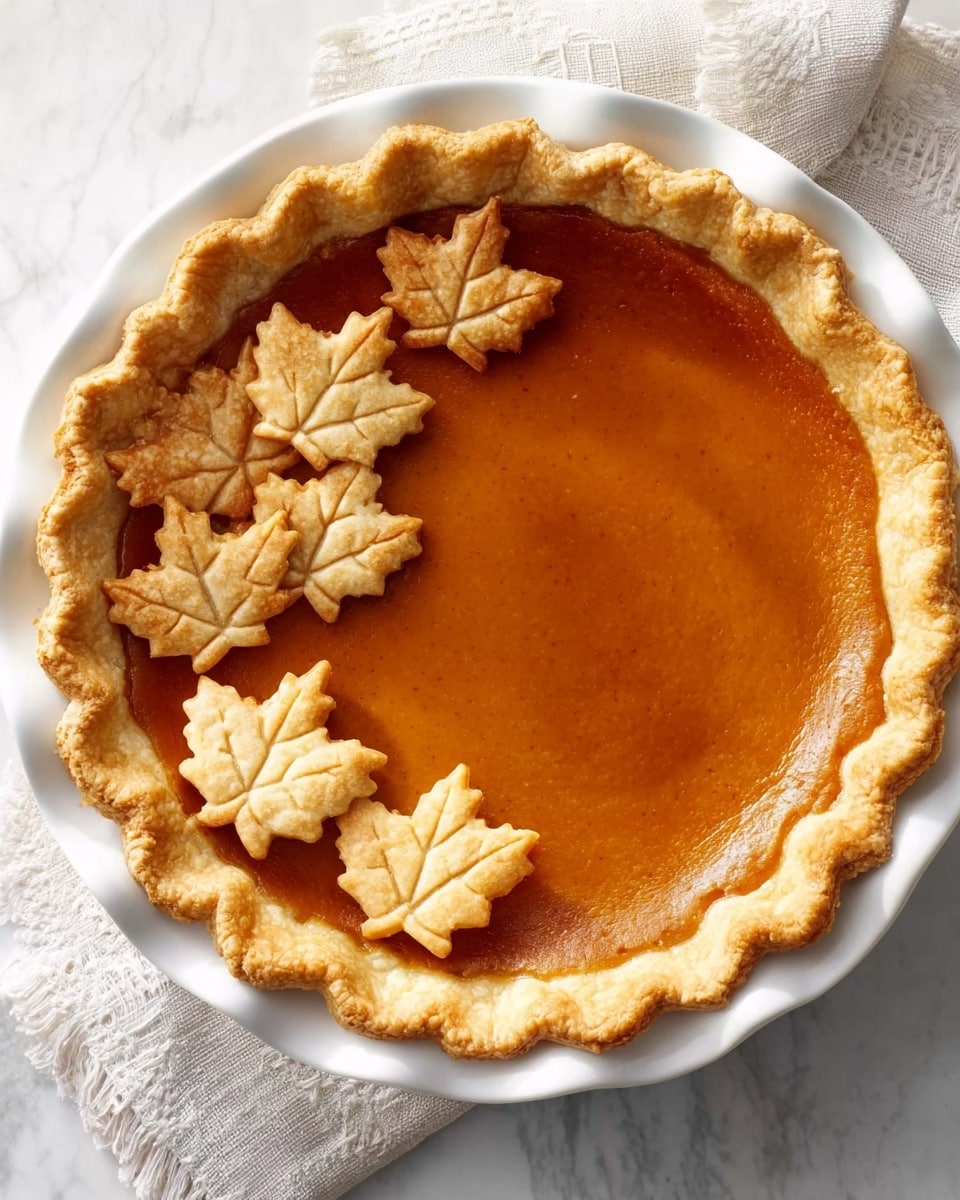
On a lightly floured surface, roll out half your pie dough to about 1/8-inch thickness, then fit it into a 9-inch pie plate. Trim the edges to about half an inch past the rim and flute them for that classic look. I like chilling it for about 30 minutes here — it helps prevent shrinking during baking. Meanwhile, roll out the remaining dough thicker (around 1/4 inch) and use maple leaf cookie cutters to make charming cutouts. Pop these on a baking sheet and chill them, too. These little decorative leaves really take the pie to the next level in presentation!
Step 3: Bake the Pie and Decorative Leaves
Pour the cooled maple filling into your prepared pie crust. Bake at 400°F on a lower rack for 10 minutes to start setting that filling. Then lower the oven to 350°F and bake for another 35-40 minutes, until the crust is golden and the filling is bubbly. Don’t forget to bake the leaf cutouts separately for about 8-10 minutes until they’re golden brown and crisp — these make such a fun topping when you arrange them on the pie before serving.
Pro Tips for Making Maple Syrup Pie Recipe
- Use Pure Maple Syrup: I’ve tried this with pancake syrup before, and it just doesn’t compare— real maple syrup is key for that rich, authentic flavor.
- Chill the Dough Well: Chilling both the pie plate crust and the leaf cutouts helps keep their shape and prevents shrinking during baking.
- Watch the Filling Thickness: Cook the filling just until noticeably thickened; overcooking can make it gummy, which you want to avoid.
- Cool Completely Before Serving: The filling sets best once cooled, so don’t be tempted to slice it warm — patience pays off in texture and flavor.
How to Serve Maple Syrup Pie Recipe
Garnishes
I love topping this maple pie with a dollop of whipped cream for a creamy balance to the sweet syrup filling. Sometimes, I sprinkle a little cinnamon or chopped nuts on top for extra texture and warmth. Those maple leaf cutouts? They’re not just pretty — they add a delightful crunch that guests adore.
Side Dishes
This pie pairs beautifully with a hot cup of coffee or black tea to cut through the sweetness. For brunch, I like serving it alongside scrambled eggs or a simple fruit salad to round out the meal. It’s sweet but not overpowering, so it complements many dishes.
Creative Ways to Present
For holiday dinners or special occasions, I arrange the maple leaf cookies artistically on the pie with a few fresh autumn leaves or small sprigs of rosemary around the plate. You can even drizzle a little maple syrup over the leaves for a glossy finish. It’s simple but feels fancy, making this pie a real crowd-pleaser visually as well as taste-wise.
Make Ahead and Storage
Storing Leftovers
I store leftover pie tightly covered in the fridge. When chilled well, the filling stays firm but soft, and the crust remains flaky for a couple of days. Just make sure to cover it well to avoid any fridge odours sneaking in.
Freezing
While I usually eat it fresh, you can freeze this pie by wrapping it tightly in plastic wrap and foil after baking and cooling completely. It freezes well for up to 2 months. Thaw overnight in the fridge before reheating. The texture stays surprisingly good!
Reheating
To reheat, I recommend warming individual slices gently in a microwave for about 20-30 seconds or placing the whole pie in a 325°F oven for 10-15 minutes. This refreshes the crust and filling without drying it out. If you used leaf cutouts, add those fresh or bake new ones, since reheated cutouts can lose their crispness.
FAQs
-
Can I use pancake syrup instead of real maple syrup in this recipe?
While you technically can, I highly recommend using pure maple syrup for the best flavor. Pancake syrups often contain corn syrup and artificial flavors which won’t give you that rich, authentic taste that makes this pie special.
-
Do I need to use a double-crust for this pie?
The bottom crust is essential for holding the filling, but the top crust isn’t fully covered— it’s made from decorative leaf cutouts rather than a full crust. This keeps it light and visually appealing without the heaviness of a double top crust.
-
Can this pie be made ahead of time?
Absolutely! You can prepare the filling and crust in advance, assemble it, and bake when ready. The pie also tastes great when chilled and can be stored in the fridge for a couple of days before serving.
-
How do I make the leaf cutouts without cookie cutters?
If you don’t have maple leaf cutters, you can use any leaf-shaped cutter or even a simple round cutter for a different look. Alternatively, carefully cutting out leaf shapes with a small sharp knife works fine—just take your time!
-
What’s the best way to prevent the pie crust from shrinking?
Chilling the dough before baking is key. Also, avoid stretching the dough when placing it in the pie plate—gentle handling helps keep the shape. Sometimes, poking small holes in the bottom crust with a fork before filling helps keep it flat and prevents bubbling.
Final Thoughts
This Maple Syrup Pie Recipe has become a comforting favorite in my kitchen for good reason. It’s simple, elegant, and offers that perfect balance of sweetness and buttery richness I always crave. If you’re looking to impress your friends or just treat yourself to something cozy and delicious, this pie will steal the show every time. Give it a try—you’ll be so glad you did!
Print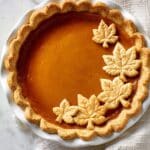
Maple Syrup Pie Recipe
- Prep Time: 30 minutes
- Cook Time: 45 minutes
- Total Time: 1 hour 15 minutes
- Yield: 8 servings
- Category: Dessert
- Method: Baking
- Cuisine: American
Description
A deliciously sweet Maple Syrup Pie featuring a smooth, thickened maple filling nestled in a flaky double-crust pastry. This classic dessert perfectly balances the rich, amber flavors of real maple syrup with a buttery crust, decorated with charming baked maple leaf cutouts for a beautiful presentation.
Ingredients
Filling:
- 3 tablespoons cornstarch
- 2/3 cup water
- 1-1/2 cups real maple syrup
- 2 tablespoons butter
Crust and Decoration:
- Pastry for double-crust pie
Instructions
- Prepare the Filling: In a large saucepan, whisk together the cornstarch and water until smooth, then whisk in the maple syrup. Bring the mixture to a boil over medium heat, stirring constantly until it thickens, about 4 minutes. Remove from heat and stir in the butter until melted. Set the filling aside to cool.
- Prepare the Bottom Crust: On a lightly floured surface, roll out one portion of the pie dough to a 1/8-inch thick circle. Transfer it carefully to a 9-inch pie plate. Trim the edges to extend about 1/2 inch beyond the rim and flute the edges. Chill the crust for 30 minutes in the refrigerator.
- Cut the Leaf Decorations: Meanwhile, roll out the remaining dough to about 1/4-inch thickness. Using maple leaf-shaped cookie cutters (ranging from 1-1/2 to 2-1/2 inches), cut out leaf shapes. Place these on a baking sheet and chill until ready to bake.
- Fill and Bake the Pie: Pour the cooled maple filling into the prepared pie crust. Place the pie on a lower oven rack and bake at 400°F (204°C) for 10 minutes. Then, reduce the oven temperature to 350°F (177°C) and continue baking for an additional 35-40 minutes, or until the crust is golden brown and the filling is bubbly.
- Bake the Leaf Cutouts: While the pie finishes baking, bake the chilled leaf cutouts on a baking sheet for 8-10 minutes or until they are golden brown. Cool them completely.
- Assemble and Serve: Once the pie has cooled completely on a wire rack, arrange the baked maple leaf cutouts decoratively on top of the pie before serving.
Notes
- Use real maple syrup for the best flavor and authenticity.
- Keep the pie crust chilled to ensure a flaky texture.
- The leaf cutouts not only decorate the pie but add a delightful buttery crunch.
- Allow the pie to cool completely to let the filling set properly before slicing.
- If maple leaf cookie cutters are unavailable, any leaf-shaped cutter or small shapes can be used as substitutes.
Nutrition
- Serving Size: 1 slice (1/8 of pie)
- Calories: 280
- Sugar: 26g
- Sodium: 120mg
- Fat: 12g
- Saturated Fat: 7g
- Unsaturated Fat: 4g
- Trans Fat: 0g
- Carbohydrates: 38g
- Fiber: 1g
- Protein: 2g
- Cholesterol: 25mg

