

If you’re looking to brighten up your cookie game with a fun, festive twist, this Candy Corn Cookies Recipe is just what you need. I absolutely love how these cookies capture the classic candy corn colors and flavors, but in a buttery, soft cookie form that’s way more addictive than the candy itself. Whether you’re baking for Halloween or just craving a sweet treat with a pop of color, stick with me—I’m going to walk you through every step so your batch turns out perfectly every time.
Why You’ll Love This Recipe
- Classic Candy Corn Look: The tri-color layering makes these cookies instantly recognizable and festive.
- Soft, But Firm Texture: They bake up tender without losing their shape—no spreading chaos here.
- Simple Ingredients: With pantry staples and a touch of food coloring, you get a standout cookie easily.
- Fun Assembly Process: Rolling and stacking dough logs is a neat little kitchen project that’s satisfying and therapeutic.

Ingredients You’ll Need
The magic of this Candy Corn Cookies Recipe is in its simplicity—basic baking ingredients that come together beautifully with those vibrant pops of color. When you’re picking out your butter, slightly softened is the way to go for easy creaming, and the paste food coloring is a game-changer for dough coloring without making the dough too wet.
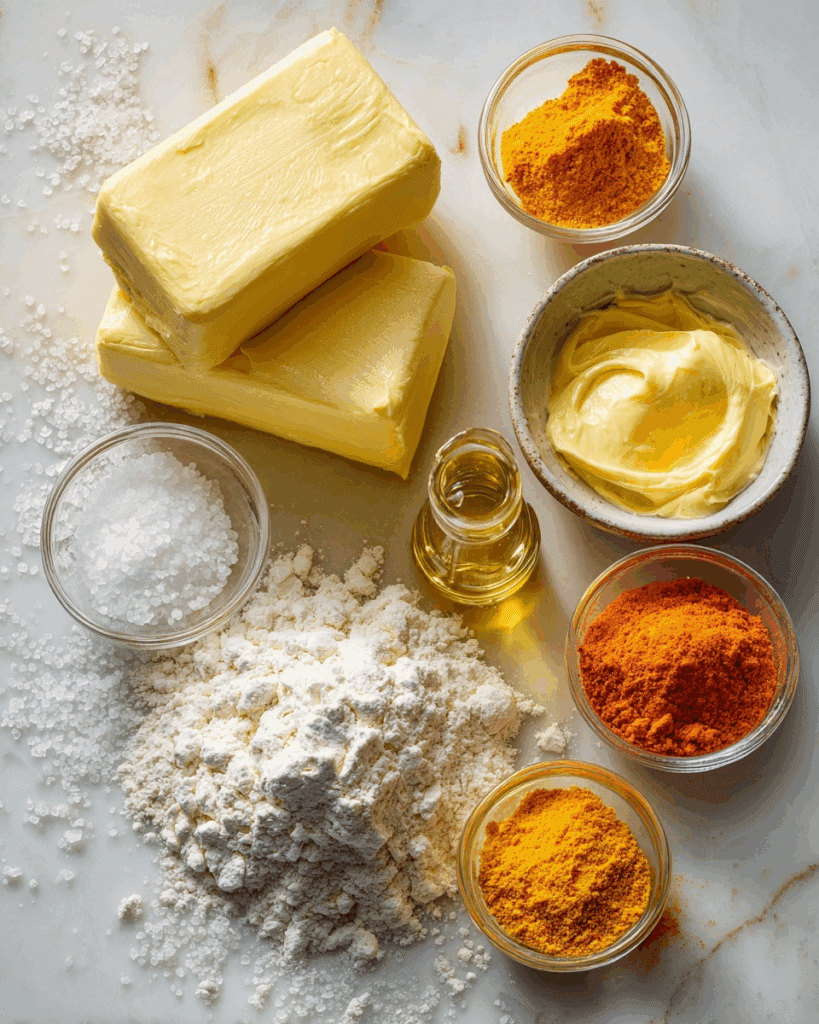
- Butter: Use unsalted butter softened to room temperature for easy creaming and balanced flavor.
- Sugar: Granulated sugar gives these cookies the classic sweetness and helps achieve that tender texture.
- Vanilla Extract: A splash of vanilla adds warmth and depth—don’t skip it.
- All-Purpose Flour: The foundation of the dough, giving structure without heaviness.
- Baking Soda: Helps the cookies rise just right, keeping them soft but not cakey.
- Salt: Balances the sweetness and enhances the flavors.
- Yellow and Orange Paste Food Coloring: These concentrated colors provide that iconic candy corn look without watering down the dough.
Variations
I love that this Candy Corn Cookies Recipe is so versatile—you can really make it your own. Over time, I’ve played around with different tweaks depending on the occasion or what I have on hand, and honestly, it’s always a hit. Feel free to get creative with colors, add-ins, or even flavor twists.
- Spiced Twist: Adding a pinch of cinnamon and nutmeg gives the cookies a cozy fall vibe that my family adores during colder months.
- Gluten-Free Version: I swapped in a 1:1 gluten-free baking flour blend once, and they turned out wonderfully—just watch your baking time as it may vary slightly.
- Chocolate Drizzle: After baking, I like to drizzle melted white or dark chocolate over the cookies for extra decadence and visual appeal.
- Extra Chewy: For those who love a chewier cookie, try replacing a couple tablespoons of all-purpose flour with bread flour—it really changes the texture in a good way.
How to Make Candy Corn Cookies Recipe
Step 1: Cream Together the Butter and Sugar
Start by beating your softened butter and sugar together until the mixture is light and fluffy—this usually takes about 5 to 7 minutes with an electric mixer. This step is golden because it incorporates air into the dough, helping your cookies be tender and slightly airy. If you rush this, your cookies might come out a bit dense, so trust me, patience here really pays off!
Step 2: Mix the Dry Ingredients and Combine
In a separate bowl, whisk together the all-purpose flour, baking soda, and salt. This ensures your raising agent and salt are evenly distributed, so your cookie texture stays consistent throughout. Gradually add this dry mix into your creamed butter and sugar, beating slowly to avoid flour clouds everywhere. When combined, your dough should come together smoothly without being sticky.
Step 3: Divide and Color Your Dough
Here’s where the fun begins! Split your dough in half—the first half will be tinted bright yellow. Then take the other half and divide it into two parts: two-thirds of that will become a lovely orange, and the remaining third stays plain (that’s our white layer). Use gel or paste food coloring for best results—these colors blend in well and don’t make the dough watery, which can mess with texture.
Step 4: Shape and Stack the Dough Logs
Shape each colored dough portion into an 8-inch log. Flatten the top slightly and press the sides in at a gentle angle to mimic that classic candy corn shape. Place the orange logs right on top of the yellow ones, pressing gently but firmly, then add the plain log on top. This stacking trick creates those distinct candy corn layers once sliced. Wrap tightly in plastic wrap and chill for about 4 hours—or overnight if you want to prep ahead.
Step 5: Slice and Bake
When your dough is nice and firm, preheat your oven to 350°F. Unwrap your logs and slice them into ¼-inch thick pieces. Place these spaced about 2 inches apart on ungreased baking sheets—this keeps them from spreading and blending colors. Bake for 10 to 12 minutes until set but still soft to the touch. Let them cool on wire racks before diving in; patience here keeps those perfect layers intact.
Pro Tips for Making Candy Corn Cookies Recipe
- Use Paste Food Coloring: Gel or paste colors give vibrant candy corn hues without watering down your dough.
- Chill Dough Thoroughly: Letting the stacked logs firm up in the fridge prevents your colors from bleeding and makes slicing cleaner.
- Slice with a Sharp Knife: A sharp blade helps keep the layers distinct and the edges neat.
- Don’t Overbake: Watch close during the last few minutes—cookies can appear underdone but will firm up as they cool perfectly.
How to Serve Candy Corn Cookies Recipe

Garnishes
I usually keep these cookies simple since their colors do all the talking, but if I’m feeling fancy, a light dusting of powdered sugar or a drizzle of white chocolate works perfectly. Sometimes I also sprinkle a tiny bit of edible gold glitter for a bit of sparkle—kids and adults both can’t get enough!
Side Dishes
These cookies pair beautifully with a cozy cup of hot cider or a rich pumpkin spice latte. For parties, I love setting them next to a bowl of candy corn or a little fruit platter to balance sweetness and give a festive spread.
Creative Ways to Present
For a Halloween party, I stack the cookies on tiered trays to mimic candy corn’s layered shape. I’ve also arranged slices upright in mason jars filled with festive colored sugar for a fun “cookie bouquet” display—guests always get a kick out of this creative touch.
Make Ahead and Storage
Storing Leftovers
I store leftover candy corn cookies in an airtight container at room temperature, layering them between sheets of parchment paper to keep them from sticking. They usually stay fresh and soft for up to a week, which is great because, honestly, they rarely last that long in my house!
Freezing
If you want to freeze extras, I recommend freezing the dough logs before slicing. Wrap each log tightly in plastic wrap and place in a freezer bag. When you’re ready to bake, thaw overnight in the fridge and proceed with slicing and baking. This method keeps the colors crisp and texture intact.
Reheating
To refresh leftover cookies, I pop them in a 300°F oven for 4-5 minutes or a quick 10 seconds in the microwave (but watch out—they can get chewy fast). This warms them through and brings back that just-baked softness I adore.
FAQs
-
Can I use liquid food coloring instead of paste for Candy Corn Cookies Recipe?
You can, but I don’t recommend it. Liquid food coloring can add too much moisture to your dough, which risks changing the cookie’s texture and the way it holds shape. Paste or gel food coloring is concentrated and won’t affect dough consistency, so your cookies keep their classic look and texture.
-
How long should I chill the dough before baking?
Chilling the layered dough logs for at least 4 hours is essential—it helps the cookies hold their shape during baking and keeps the vibrant layers distinct. You can also refrigerate overnight if prepping ahead; just slice and bake right from the fridge.
-
Can I make these cookies without stacking the dough logs?
The stacking process is key to achieving that candy corn look. If you skip it, you’ll miss the iconic tri-color layering that makes these cookies special. However, you could try making separate yellow, orange, and white cookies if you prefer simpler steps, but it won’t have the same visual impact.
-
Do these Candy Corn Cookies freeze well after baking?
Yes! Once baked and cooled completely, you can freeze the cookies in an airtight container or freezer bag for up to 3 months. Thaw at room temperature before serving, and they’ll taste almost as fresh as the day you baked them.
Final Thoughts
This Candy Corn Cookies Recipe has become one of my absolute favorites for festive occasions and casual cookie cravings alike. The way the colors come together reminds me of fun memories and adds a cheerful vibe to any gathering. I hope when you make these, you’ll find the process as enjoyable as the sweet reward itself—I promise your friends and family will be begging for more. So grab your mixing bowl and food coloring, and let’s bring a little candy magic into your kitchen!
Print
Candy Corn Cookies Recipe
- Prep Time: 35 minutes
- Cook Time: 10 minutes
- Total Time: 45 minutes plus 4 hours chilling time
- Yield: 5 dozen cookies
- Category: Dessert
- Method: Baking
- Cuisine: American
Description
These festive Candy Corn Cookies are a colorful and delicious treat perfect for Halloween or any fall celebration. Made with a buttery sugar cookie dough tinted in vibrant yellow and orange hues and layered to mimic the classic candy corn appearance, these cookies are soft, slightly chewy, and irresistibly fun to eat.
Ingredients
Cookie Dough
- 1-1/2 cups butter, softened
- 1-1/2 cups sugar
- 1/2 teaspoon vanilla extract
- 3 cups all-purpose flour
- 1 teaspoon baking soda
- 1/2 teaspoon salt
Food Coloring
- Yellow paste food coloring
- Orange paste food coloring
Instructions
- Cream Butter and Sugar: In a large mixing bowl, cream together the softened butter and sugar until the mixture is light and fluffy, about 5 to 7 minutes. This aerates the dough and ensures the cookies have a tender texture. Then, beat in the vanilla extract thoroughly.
- Mix Dry Ingredients: In a separate bowl, whisk together the all-purpose flour, baking soda, and salt. Gradually incorporate this dry mixture into the creamed butter and sugar, beating until fully combined to form a dough.
- Divide and Color Dough: Split the dough into halves. Tint one half with yellow paste food coloring. Take the other half and divide it into two portions: one portion that is two-thirds of the dough to be colored orange, and a smaller one-third plain portion left uncolored.
- Shape the Dough Logs: Shape each colored dough portion into two 8-inch logs. Flatten the top of each log slightly, and gently press in the sides at a slight angle to prepare for layering.
- Assemble the Candy Corn Logs: Place the orange dough logs directly on top of the yellow logs, aligning and pushing the sides in slightly so the layers adhere. Then, place the plain (uncolored) logs on top of the orange ones, forming a rounded top that mimics the classic candy corn shape. Wrap the assembled logs tightly in plastic wrap.
- Chill Dough: Refrigerate the wrapped logs until firm, approximately 4 hours. This step is essential for maintaining the logs’ shape and making them easier to slice.
- Preheat Oven: Preheat your oven to 350°F (175°C) to ensure it reaches the perfect temperature by the time you’re ready to bake.
- Slice and Bake: Unwrap the chilled logs and slice into 1/4-inch thick pieces. Arrange the slices 2 inches apart on ungreased baking sheets to allow for slight spreading.
- Bake Cookies: Bake in the preheated oven for 10 to 12 minutes or until the cookies are set but not browned. The cookies should maintain their colorful layers distinctly.
- Cool: Remove the cookies from the baking sheets and transfer them to wire racks to cool completely before serving or storing.
Notes
- Use paste food coloring instead of liquid to prevent altering the dough’s consistency.
- For best results, chill the dough thoroughly before slicing to keep the layers intact while baking.
- These cookies can be stored in an airtight container at room temperature for up to one week.
- Softened butter should be room temperature but not melted for proper creaming.
- If you prefer crisper cookies, bake a minute or two longer, watching carefully to avoid browning.
Nutrition
- Serving Size: 1 cookie (approximate)
- Calories: 110
- Sugar: 7 g
- Sodium: 90 mg
- Fat: 6 g
- Saturated Fat: 3.5 g
- Unsaturated Fat: 2 g
- Trans Fat: 0 g
- Carbohydrates: 14 g
- Fiber: 0.3 g
- Protein: 1 g
- Cholesterol: 20 mg


