

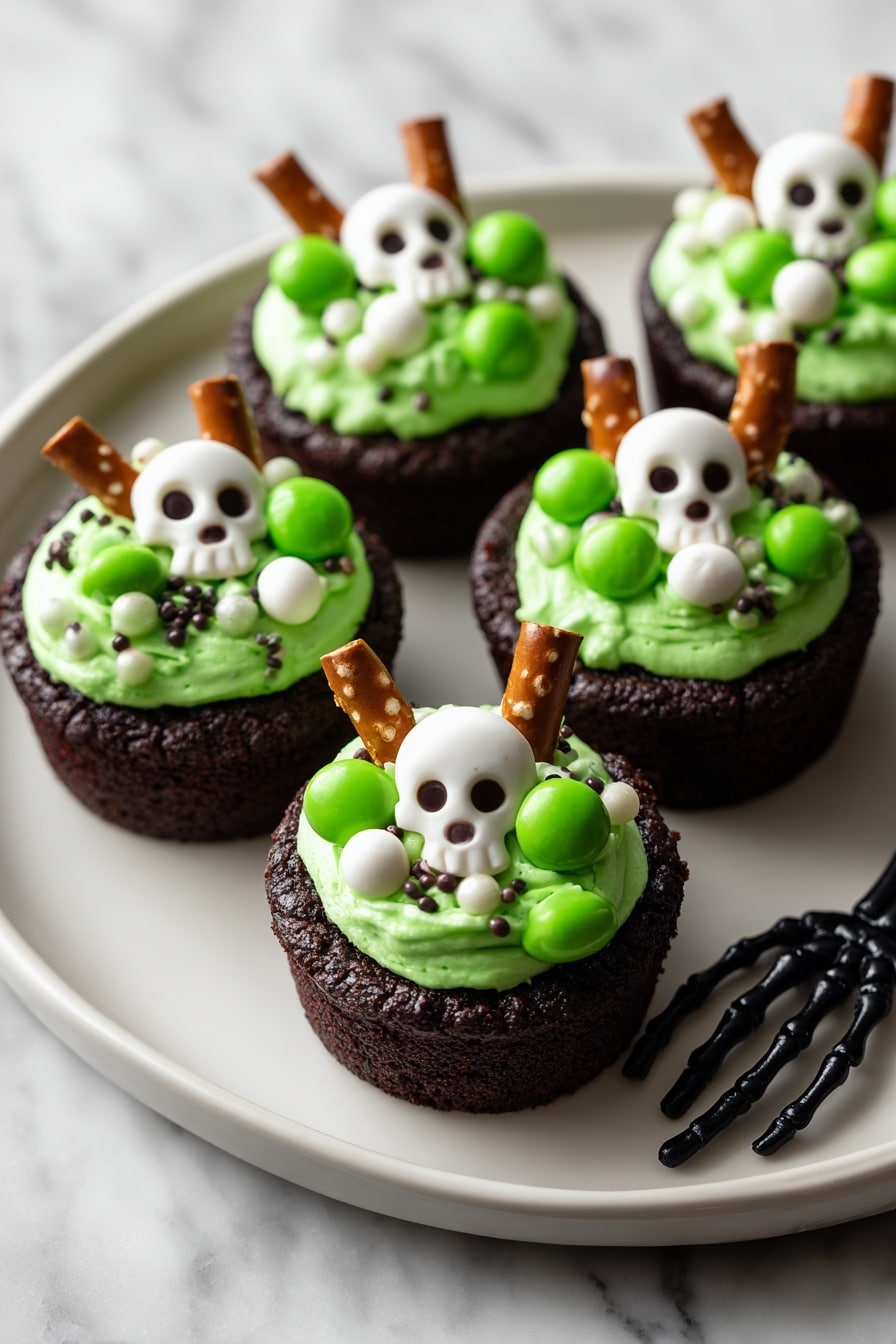
If you’re hunting for a dessert that’s as fun as it is delicious, you’ve got to try this Cauldron Cookie Cups Recipe. I absolutely love how these mini treats come together with a rich, chocolaty cookie base and a vibrant green buttercream topping, all styled like little bubbling cauldrons! Whether you’re planning a Halloween party or just want a whimsical dessert to impress your kids, this recipe is an absolute crowd-pleaser. Trust me, you’ll want to keep this one in your go-to dessert rotation.
Why You’ll Love This Recipe
- Super Easy Prep: Using cake mix as the base makes these cookie cups quick and foolproof.
- Creative and Festive: They look just like tiny witch’s cauldrons, perfect for Halloween or themed parties.
- Customizable Decorations: You can get really creative with sprinkles, candy eyeballs, and pretzels.
- Kid-Friendly and Crowd-Pleasing: Everyone from the littles to adults loves these cute, bite-sized treats.

Ingredients You’ll Need
Most of these ingredients you might already have in your pantry or fridge, and the rest you can grab easily at any grocery store. The key here is the devil’s food cake mix – it gives the cookie cups that deep, rich chocolate flavor that everyone adores.
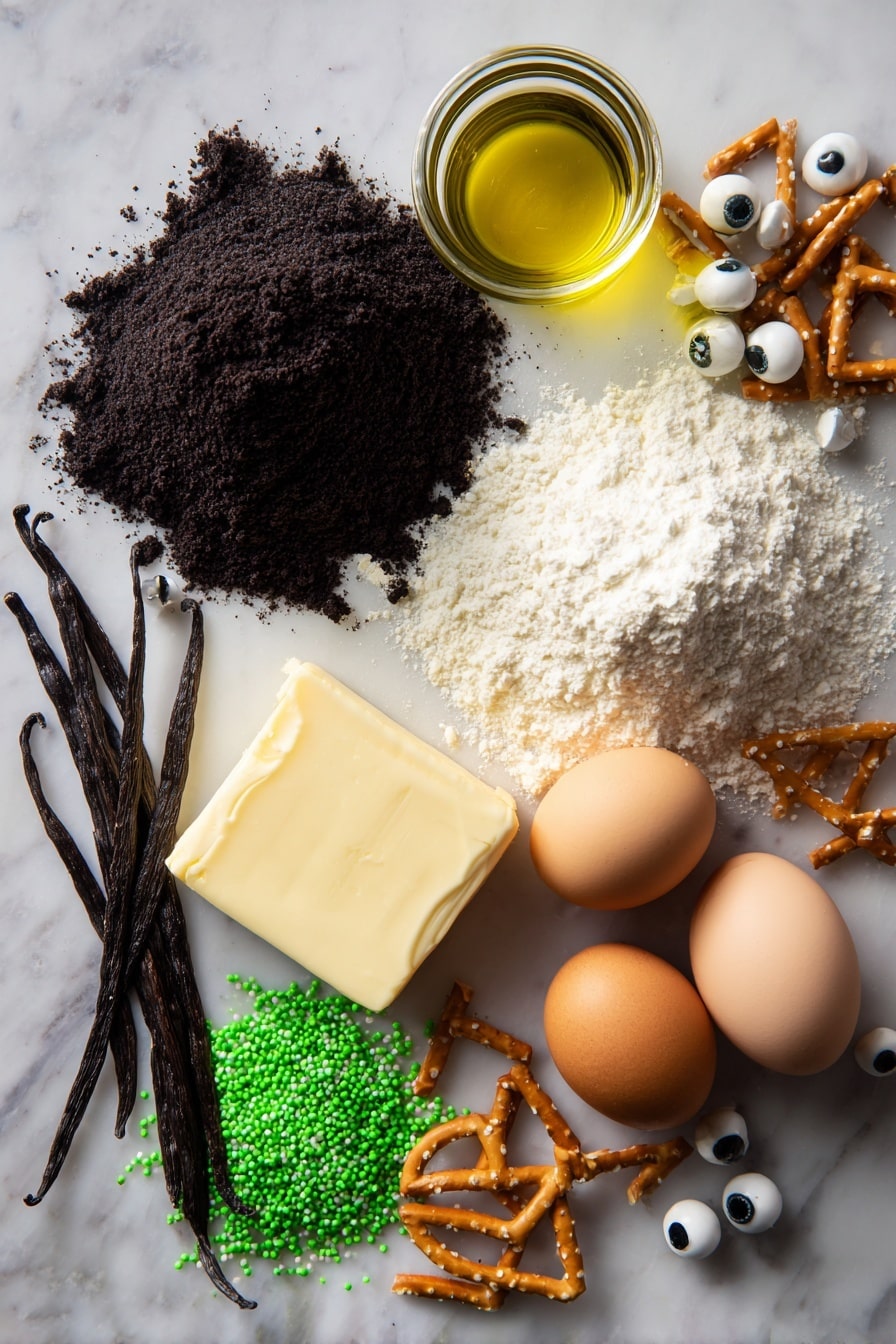
- Devil’s Food Cake Mix: This forms the chocolaty base of the cookie cups and keeps them tender yet sturdy.
- Eggs: Helps bind the dough together for that perfect chewy texture.
- Canola or Vegetable Oil: Keeps the cookie cups moist and creates a tender crumb.
- Black Food Coloring (optional): Adds a spooky, dark touch to the dough, but it’s totally optional if you want to keep it classic.
- Unsalted Butter: The base of the buttercream frosting and makes it beautifully creamy.
- Powdered Sugar: Sweetens and thickens the frosting to pipe-perfect consistency.
- Vanilla Extract: Enhances the flavor of the icing for that comforting homemade taste.
- Salt: Balances the sweetness for a more complex flavor profile.
- Milk: Just enough to thin the frosting so it’s easy to pipe and smooth.
- Green Food Coloring: Makes the frosting look like a magical bubbling potion.
- Round Green Sprinkles, Halloween Sprinkles, Candy Eyeballs: Decorations that bring your cauldrons to life with fun textures and spooky vibes.
- Pretzel Sticks: Serve as adorable little stir sticks that add crunch – my personal favorite touch!
Variations
I love that the Cauldron Cookie Cups Recipe is so versatile—you can easily tweak it to fit your mood or occasion. Over the years, I’ve picked up a few favorite spins that always turn out great.
- Omit Black Food Coloring: If you prefer a more classic chocolate look, just skip the black coloring; the cookies still look amazing and taste yummy.
- Flavor the Frosting: I sometimes add a teaspoon of peppermint or almond extract instead of vanilla for a cool seasonal twist.
- Different Toppings: Swap sprinkles for crushed Oreos, mini chocolate chips, or edible glitter for a dazzling effect.
- Gluten-Free Option: Use a gluten-free chocolate cake mix if anyone at your table needs to avoid gluten.
How to Make Cauldron Cookie Cups Recipe
Step 1: Prep Your Mini Muffin Pans and Dough
First things first, preheat your oven to 350°F. Lightly grease three 12-count mini muffin pans — this part’s crucial to help the cookie cups pop out easily later. Then, in a large bowl, combine the Devil’s Food cake mix, eggs, canola oil, and if you’re using it, your black food coloring. I like to mix everything until the dough is just combined so it stays tender. Using about half a tablespoon of dough per cup, drop it into each mini muffin tin and flatten it gently with your fingers. This helps the cookie form its cup shape as it bakes.
Step 2: Bake and Shape the Cookie Cups
Bake for 8 to 10 minutes until the edges look set but the centers are still a little soft. Here’s what I learned from experience: right when they come out of the oven, use the back of a tablespoon to press an indentation into each cookie — this makes space for your frosting later. Be careful because they’ll be hot, but don’t wait too long or the dough will harden and be tough to shape. Let the cups cool completely before moving on to frosting.
Step 3: Whip Up the Magical Buttercream
While the cookie cups cool, it’s time to make that dreamy green buttercream. Beat the soft butter until creamy, then gradually add powdered sugar, vanilla extract, and salt, mixing until smooth. Add milk bit by bit to reach a pipe-able, fluffy consistency. Then stir in green food coloring—you can get as bright or as muted as you like! I like a bold shade that really stands out against the dark cookie.
Step 4: Frost and Decorate Your Cauldrons
Pipe the green buttercream into each cooled cookie cup so it looks like a bubbling potion. Now for the fun part—sprinkle on your round green sprinkles, Halloween-themed sprinkles, and top with candy eyeballs for that spooky effect. Break pretzel sticks in half and pop them in as stir sticks; this tiny detail always wows guests! It’s amazing how these small touches bring the whole magical cauldron theme to life.
Pro Tips for Making Cauldron Cookie Cups Recipe
- Press Indent Early: Shaping the dough right out of the oven saves you from cracking or breaking the cookie cups later.
- Don’t Overbake: Take them out when edges are set but centers still look slightly soft for the perfect chewy texture.
- Pipe with Confidence: Use a piping bag or a zip-top bag with the corner snipped off for neat frosting application.
- Store in Airtight Container: Keeps cookie cups fresh and prevents the frosting from drying out for several days.
How to Serve Cauldron Cookie Cups Recipe
Garnishes
I’m a bit obsessed with candy eyeballs on these — they add that perfect spooky-cute vibe. Besides sprinkles, I sometimes add edible glitter for a magical shimmer. Pretzel sticks are non-negotiable for me because they mimic little potion stirrers, and guests always comment on that clever touch. You can get creative here – mini gummy worms or colored sugar crystals work too!
Side Dishes
Since these cookie cups are a dessert, I like pairing them with simple, light bites – think fresh fruit or a small bowl of vanilla ice cream. For a spooky-themed party, serve alongside other Halloween treats like caramel apples or pumpkin spice donuts to keep the festive vibe going.
Creative Ways to Present
One year, I arranged the cookie cups on a platter lined with dry ice for that foggy cauldron effect — total showstopper! You could also put them in small cauldrons or black bowls to match the theme. For parties, label them with punny tags like “Witches’ Brew” to add some charm and laughs.
Make Ahead and Storage
Storing Leftovers
I store leftover Cauldron Cookie Cups in an airtight container at room temperature, and they stay fresh for about 3-4 days. If your kitchen tends to be warm, pop them in the fridge to extend freshness up to a week — just bring them back to room temp before serving for best flavor.
Freezing
I’ve successfully frozen the undecorated cookie cups for up to three months. After baking and cooling, I wrap them tightly in plastic wrap and place them in a freezer bag. When you’re ready, thaw them completely before frosting and decorating. It’s a great tip if you want to prep ahead for a party!
Reheating
Since the cookie cups are best served at room temp, I usually just let them sit out for 20-30 minutes after removing them from the fridge or freezer. If you want them warmer, a quick 5-7 seconds in the microwave can soften the cookie slightly—just be careful not to melt the frosting!
FAQs
-
Can I use a different cake mix for Cauldron Cookie Cups Recipe?
Yes! While Devil’s Food cake mix gives the richest chocolate flavor, you can use other chocolate cake mixes or even spice cake mixes for a fun twist. Just remember that flavor and color may vary slightly.
-
How do I make sure the cookie cups hold their shape?
Pressing the indentation immediately after baking while the cookies are still warm is key. This prevents cracking and ensures you get that perfect cup shape for filling.
-
Can I make the frosting dairy-free?
Absolutely! Substitute the butter with a dairy-free margarine or coconut oil and use non-dairy milk alternatives to keep the frosting creamy and delicious.
-
What if I don’t have mini muffin pans?
Mini muffin pans work best to create the cauldron shape, but if you don’t have one, you could try using small silicone molds or cupcake pans, though the results might differ slightly.
-
Can I prepare Cauldron Cookie Cups Recipe ahead of time?
Yes! You can bake the cookie cups up to 3 days ahead and keep them airtight at room temperature. Wait to frost and decorate until just before serving for the freshest look and best texture.
Final Thoughts
This Cauldron Cookie Cups Recipe has been such a fun discovery for me—bringing a little magic to dessert time that makes everyone smile. I hope you enjoy making these as much as I do, and remember, they’re as much about creativity as they are about flavor. Whether you’re making them for a Halloween bash or a family treat, these little cauldrons of joy never fail to impress. Give them a try, and let me know how your bubbling potions turn out!
Print
Cauldron Cookie Cups Recipe
- Prep Time: 20 minutes
- Cook Time: 8-10 minutes
- Total Time: 28-30 minutes
- Yield: 36 cookie cups (based on three 12-count mini muffin pans)
- Category: Dessert
- Method: Baking
- Cuisine: American
- Diet: Vegetarian
Description
Cauldron Cookie Cups are a fun and festive Halloween treat featuring rich Devil’s Food cake mix cookies shaped into little cups filled with creamy green buttercream frosting. These bite-sized delights are decorated with spooky sprinkles, candy eyeballs, and pretzel stick stirrers to resemble bubbling potions, perfect for parties or holiday celebrations.
Ingredients
Cookies
- 1 (15.25 ounce) box Devil’s Food cake mix
- 2 large eggs
- 1/2 cup canola or vegetable oil
- black food coloring (optional)
Frosting
- 1 cup unsalted butter, softened
- 3 cups powdered sugar
- 1 teaspoon vanilla extract
- 1/2 teaspoon salt
- 1-3 tablespoons milk
- green food coloring
Decorations
- Round green sprinkles
- Halloween sprinkles
- Candy eyeballs
- Pretzel sticks
Instructions
- Preheat and prepare pans: Preheat the oven to 350°F (175°C) and lightly grease three 12-count mini muffin pans to prevent the cookie cups from sticking.
- Make cookie dough: In a large bowl, combine the Devil’s Food cake mix, eggs, canola oil, and optional black food coloring. Mix thoroughly until well combined and smooth.
- Form cookie cups: Using about 1/2 tablespoon of dough per cup, place the dough into the mini muffin pans. Flatten each portion gently with your fingers to form an even base and walls.
- Bake and shape indentations: Bake for 8-10 minutes or until the edges are set but the centers remain pliable. Immediately remove from oven and use the back of a 1 tablespoon measuring spoon to press an indentation into each warm cookie to create the ‘cup’ shape. Let them cool completely in the pans.
- Prepare buttercream frosting: While the cookie cups cool, beat the softened butter in a medium bowl until creamy. Gradually add powdered sugar, vanilla extract, and salt, beating until smooth. Add milk gradually to reach a smooth, pipeable consistency. Mix in green food coloring until the desired shade is achieved.
- Fill cookie cups: Once the cookie cups are fully cooled, pipe the green buttercream into each cup, filling them to look like bubbling potions.
- Decorate: Top the frosted cookie cups with round green sprinkles, candy eyeballs, and Halloween sprinkles. Break pretzel sticks in half and insert one into each cookie cup to resemble stir sticks.
- Serve: Serve immediately or store as noted. Enjoy your festive Cauldron Cookie Cups!
Notes
- Store cookie cups in an airtight container at room temperature for 3-4 days or refrigerate up to one week.
- Undecorated cookie cups can be frozen for up to three months; thaw and decorate before serving.
Nutrition
- Serving Size: 1 cookie cup
- Calories: 180
- Sugar: 15g
- Sodium: 110mg
- Fat: 10g
- Saturated Fat: 5g
- Unsaturated Fat: 4g
- Trans Fat: 0g
- Carbohydrates: 22g
- Fiber: 1g
- Protein: 2g
- Cholesterol: 30mg

