
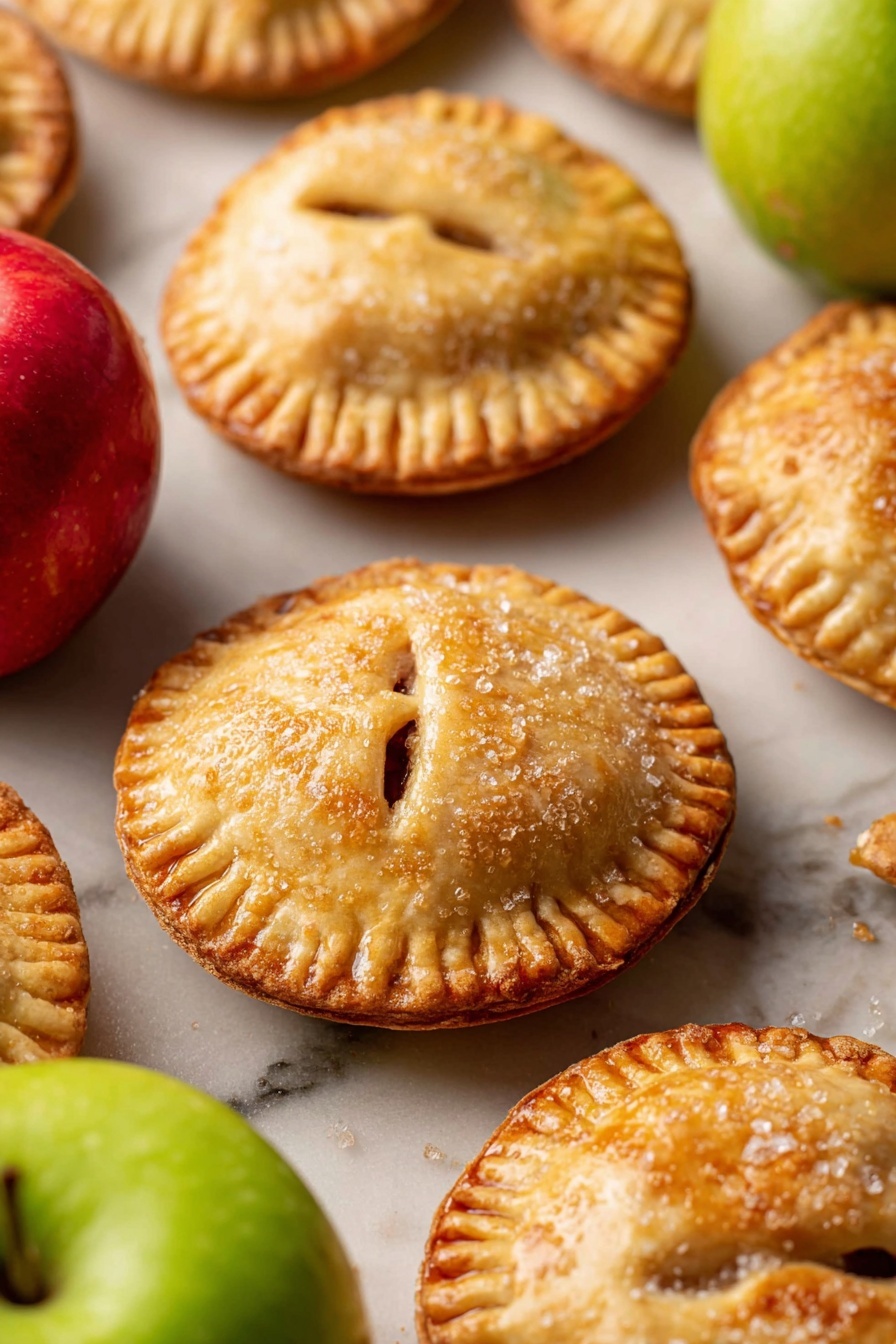
If you’re craving a cozy, sweet treat that’s perfectly portable and indulgent, this Apple Hand Pies Recipe is an absolute game-changer. I love how these little pockets of apple goodness bake up crispy on the outside and tender, cinnamony, and juicy on the inside—plus, they’re super fun to make. Trust me, once you try this recipe, you’ll be reaching for hand pies instead of regular slices of pie all the time!
Why You’ll Love This Recipe
- Perfectly Portable: These individual hand pies make snacking on pie so easy, no fork required.
- Simple Yet Flavorful Filling: The classic apple, cinnamon, and vanilla combo is my family’s forever favorite.
- Quick to Make: With store-bought pie crusts, you can whip these up in under an hour.
- Customizable: Adjust the spices and sugar to suit your taste exactly.

Ingredients You’ll Need
The magic of this Apple Hand Pies Recipe lies in simple, high-quality ingredients that come together beautifully. I always recommend using tart apples because their natural tang balances the sweetness perfectly, but feel free to choose your favorite variety.
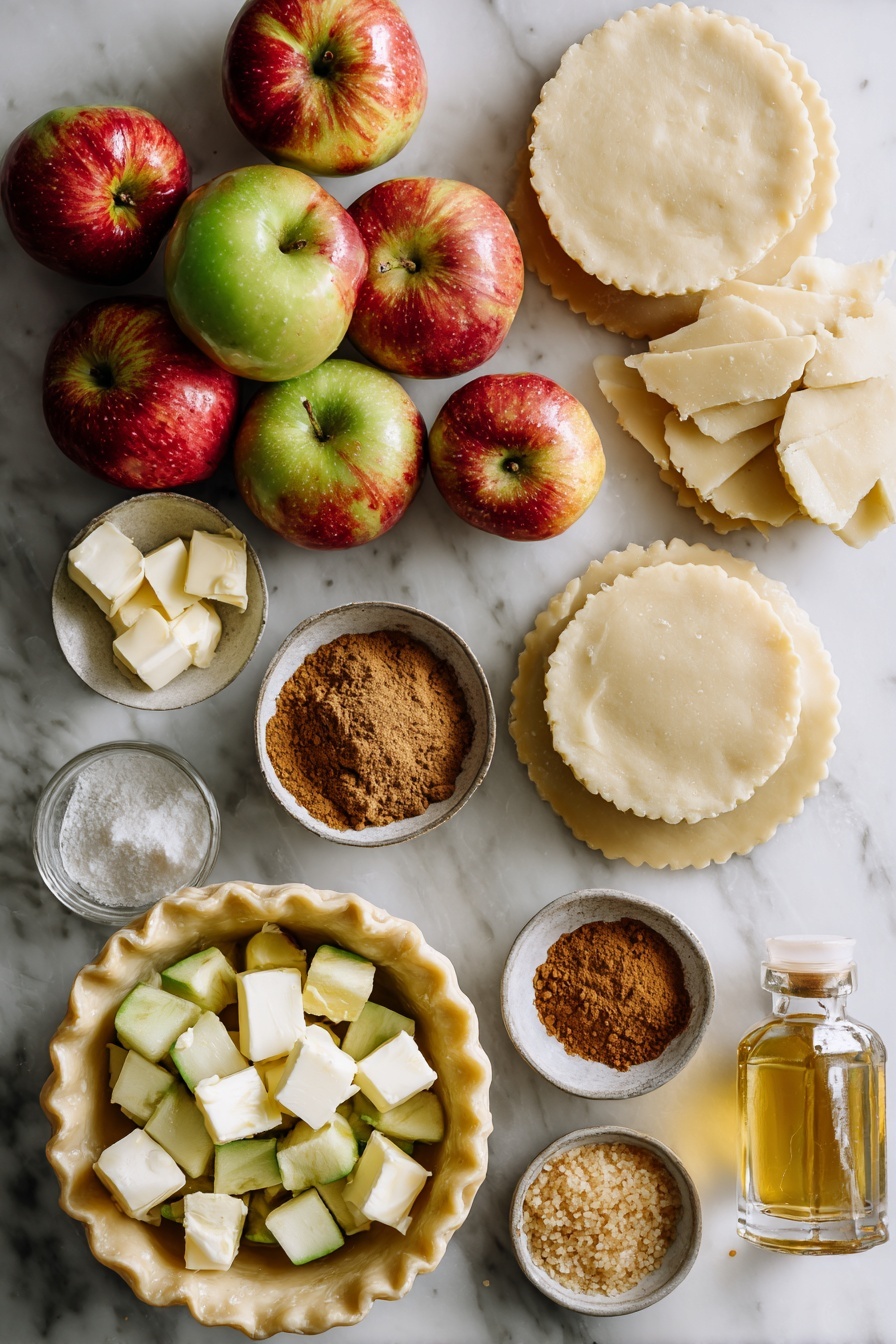
- Pie crusts: You can go either homemade or store-bought—store-bought saves time and still turns out delicious.
- Chopped apples: Tart varieties like Granny Smith work best for baking and give the pies a nice tang.
- Granulated sugar: Adds just the right sweetness, but you can adjust based on your apples’ natural sugar.
- All-purpose flour: This helps thicken the apple filling so it’s not runny.
- Pure vanilla extract: A splash adds warmth and depth to the filling.
- Ground cinnamon: The star spice for any apple dish—use more or less to your preference.
- Ground nutmeg: Just a pinch enhances the cinnamon without overpowering.
- Egg: One beaten egg for the wash to brush onto the pies for that beautiful golden finish.
- Milk: Mixed with the egg to make the egg wash silky and easy to brush.
- Butter (optional): Tiny cubes on top of the filling add a lovely richness.
- Coarse sugar (optional): Sprinkled on top for a little crunch and sweetness.
Variations
I love mixing things up with this Apple Hand Pies Recipe, and you should feel encouraged to try your own spin on it! Whether it’s swapping out spices, changing the crust, or adding a surprise touch, the possibilities are endless.
- Spiced Up: I once added a pinch of ground cloves and ginger, and my family was hooked on the extra warmth and aroma.
- Gluten-Free Crust: Use a gluten-free pie crust if you’re avoiding gluten—just make sure it’s rolled thin so baking times stay the same.
- Caramel Drizzle: Before sealing, try adding a teaspoon of caramel sauce on the apple filling for a luscious surprise.
- Miniature Size: Use a smaller cutter to make bite-sized hand pies perfect for parties and kids.
How to Make Apple Hand Pies Recipe
Step 1: Prep Your Baking Station and Pie Crust
Start by preheating your oven to 400°F (204°C), then line your baking sheets with parchment paper—I swear by this to prevent sticking and make cleanup easy. Roll out your pie crusts on a lightly floured surface to about 1/8-inch thickness. Using a 3.5-inch cookie cutter or a sturdy cup, cut circles from the dough for your hand pies. You should get roughly 18 to 20 circles; roll the scraps to get every last one. Pop these rounds into the fridge while you make the filling to keep them from getting too soft.
Step 2: Make the Flavor-Packed Apple Filling
In a bowl, toss chopped apples with sugar, flour, vanilla extract, cinnamon, and nutmeg until every apple piece is cozy with those spices and sweetness. This combination always fills my kitchen with that unmistakable fall aroma, and it’s honestly what makes this hand pies recipe so comforting.
Step 3: Assemble Your Hand Pies
Take the pie crust circles from the fridge and place roughly a tablespoon of filling in the center of half the circles, leaving enough margin to seal the edges. I like to add one or two tiny cubes of butter on top of the filling—it melts into the filling while baking, making it extra luscious. Then, brush the edges with a bit of egg wash or water to help seal. Press the second circle on top and crimp the edges firmly with a fork to lock the filling inside.
Step 4: Finish and Bake to Golden Perfection
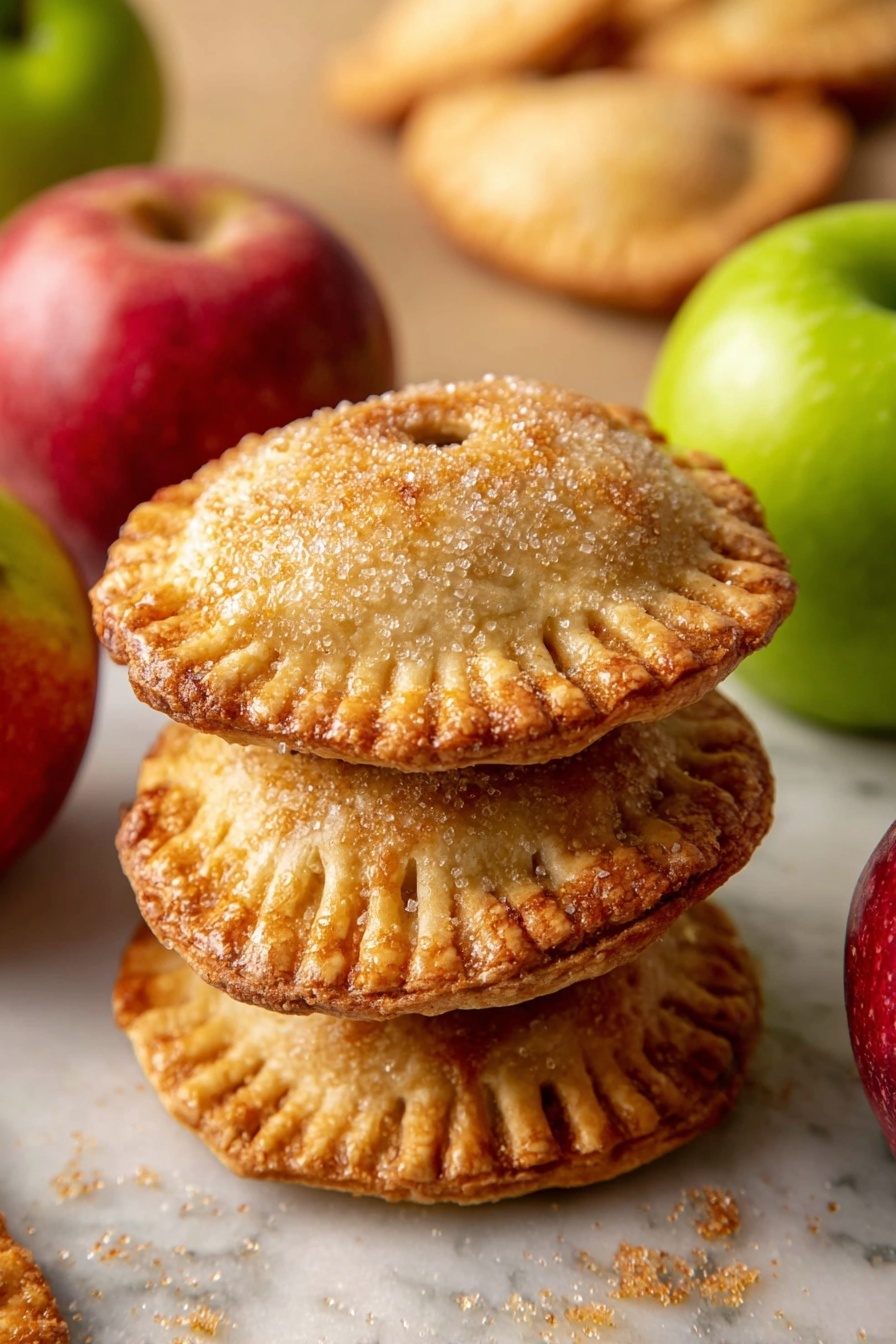
Brush the tops of each pie with the egg wash made by whisking egg and milk. Sprinkle with a bit of coarse sugar for that delicate crunch and sparkle. Don’t forget to cut 2 to 3 small slits on top for steam to escape—this keeps the pies from getting soggy inside. Pop them in your preheated oven and bake for 18 to 22 minutes until golden brown and the filling is bubbling beautifully. Let them cool just enough so you don’t burn your fingers, then dig in!
Pro Tips for Making Apple Hand Pies Recipe
- Keep Dough Cold: Chilling your pie crust rounds before assembly helps prevent shrinking and keeps the crust flaky.
- Don’t Overfill: Less is more here—too much filling can leak out and make a mess.
- Seal the Edges Tight: Using a fork to crimp the edges ensures your pies won’t burst open while baking.
- Watch Your Oven: Ovens vary, so start checking around 18 minutes to prevent over-browning.
How to Serve Apple Hand Pies Recipe
Garnishes
I like to keep garnishing simple and classic—just a light dusting of powdered sugar or a drizzle of warm caramel sauce right before serving adds that extra wow factor without overpowering the apples. Sometimes, a small scoop of vanilla ice cream on the side makes all the difference for a quick dessert upgrade.
Side Dishes
If you’re serving these at brunch or a casual gathering, they pair wonderfully with a hot cup of coffee or chai tea. For something more substantial, try them alongside a sharp cheddar cheese or a crisp green salad—you might be surprised how well those flavors marry!
Creative Ways to Present
Whenever I make these for special occasions, I like to arrange them on a rustic wooden board with a few fresh apple slices and sprigs of cinnamon sticks for a cozy vibe. Another fun idea is to tie them individually with a thin ribbon or twine—makes for an adorable edible gift or party favor.
Make Ahead and Storage
Storing Leftovers
Leftover hand pies store nicely in an airtight container at room temperature for up to 3 days, though I find refrigeration extends their life to 4 days. Just be sure they’re fully cooled before sealing to avoid sogginess.
Freezing
I’ve frozen these pies both before and after baking. My favorite method is to freeze them baked and cooled—wrap each pie tightly in plastic wrap, then place in a freezer bag. They last up to 3 months this way. When you’re ready, thaw at room temp for a few hours or overnight.
Reheating
To revive your hand pies, I recommend reheating in a 350°F oven for about 10 minutes so they get crispy again. Microwaving can make the crust chewy, which none of us want!
FAQs
-
Can I use fresh or frozen apples for this Apple Hand Pies Recipe?
Fresh apples are ideal because they hold their texture better during baking. If you use frozen apples, make sure to thaw and drain excess liquid to prevent soggy filling. Adjust the flour slightly if the filling is too wet.
-
What type of apples work best for these hand pies?
I usually go with tart varieties like Granny Smith or Honeycrisp because they keep their shape well and provide a nice balance of sweet and tart flavors once baked.
-
Can I make the pie crust from scratch?
Absolutely! A homemade pie crust can add incredible flakiness and flavor. Just be sure to keep your dough chilled and roll it evenly for the best results.
-
How do I prevent the filling from leaking out during baking?
Seal the edges well with egg wash or water and crimping using a fork. Also, don’t overfill the pies and cut slits on top to let steam escape, which helps keep the filling contained.
-
Can these pies be made vegan?
Yes! Swap out butter for a vegan alternative and use a plant-based milk or aquafaba for the egg wash. Many store-bought pie crusts are also vegan, just check the label.
Final Thoughts
This Apple Hand Pies Recipe has become one of my all-time favorites because it captures the spirit of fall and homemade comfort in every bite. Making these little pies feels like a warm hug on a chilly day, and it’s so satisfying to see the golden crust and steam escaping from those perfect slits. I highly recommend giving this recipe a try—you might just find it becoming a family favorite like mine did. Enjoy every flaky, fruity bite!
Print
Apple Hand Pies Recipe
- Prep Time: 45 minutes
- Cook Time: 20 minutes
- Total Time: 1 hour 5 minutes
- Yield: 10 hand pies
- Category: Dessert
- Method: Baking
- Cuisine: American
- Diet: Vegetarian
Description
These delicious Apple Hand Pies are perfect for a cozy dessert or snack. Made with flaky pie crusts filled with a spiced apple mixture, brushed with an egg wash and baked to golden perfection, they offer a delightful combination of sweet and warmly spiced flavors in a portable form. Ideal for serving at gatherings or enjoying on-the-go.
Ingredients
Pie Crust
- 2 pie crusts (homemade or store-bought)
Filling
- 2 cups chopped apples (240 grams)
- ¼ cup granulated sugar (50 grams)
- 2 tablespoons all-purpose flour (15 grams)
- ½ teaspoon pure vanilla extract
- ½ to 1 teaspoon ground cinnamon (adjust to your personal preference)
- ⅛ teaspoon ground nutmeg
Egg Wash & Topping
- 1 large egg, lightly beaten
- 1 tablespoon milk (15 ml)
- 1 tablespoon butter (15 grams), cubed into small pieces (optional)
- Coarse sugar for sprinkling on top (optional)
Instructions
- Preheat the Oven: Preheat your oven to 400°F (204°C). Line one or two large baking sheets with parchment paper or silicone baking mats to prepare for baking the pies.
- Roll and Cut Pie Crusts: On a lightly floured surface, roll out the pie crusts to about 1/8-inch thickness. Using a 3.5-inch cookie cutter or a cup, cut out approximately 18 to 20 circles. Reroll scrap dough as needed. Place the circles on the prepared baking sheets and chill them in the refrigerator while preparing the filling.
- Prepare the Filling: In a mixing bowl, combine chopped apples, sugar, flour, vanilla extract, ground cinnamon, and ground nutmeg. Mix well until the apples are fully coated with the mixture.
- Make the Egg Wash: In a separate bowl, whisk together the egg and milk until well combined. Set aside for later use.
- Assemble the Pies: Remove pie crust circles from the refrigerator. Evenly distribute the apple filling onto half of the circles, leaving space around the edges. Place 1 to 2 small cubes of butter on top of the filling for extra richness.
- Seal the Pies: Place the remaining pie crust circles on top of the filled ones. Use water or some of the egg wash to dampen edges to help seal. Press edges together and crimp with a fork to secure.
- Apply Egg Wash and Prepare for Baking: Brush the top of each pie with egg wash. Sprinkle with coarse sugar for a crunchy topping, then cut 2 to 3 slits on top of each pie to allow steam to escape during baking.
- Bake the Pies: Bake in the preheated oven for 18 to 22 minutes, or until pies are golden brown and the filling is bubbling.
- Cool and Serve: Remove the pies from the oven and let them cool slightly on a wire rack before serving to enjoy warm or at room temperature.
Notes
- Store pies in an airtight container at room temperature or refrigerate for 3 to 4 days.
- Freezing Instructions: After cooling completely, freeze pies on a baking sheet lined with parchment until solid (2 to 3 hours). Wrap tightly in plastic wrap and store in a freezer bag or container for up to 3 months. Thaw at room temperature before serving.
- Adjust ground cinnamon quantity according to taste preference. Up to 1 teaspoon works great for cinnamon lovers.
Nutrition
- Serving Size: 1 pie
- Calories: 220
- Sugar: 15g
- Sodium: 150mg
- Fat: 9g
- Saturated Fat: 4g
- Unsaturated Fat: 4g
- Trans Fat: 0g
- Carbohydrates: 32g
- Fiber: 3g
- Protein: 2g
- Cholesterol: 35mg


