
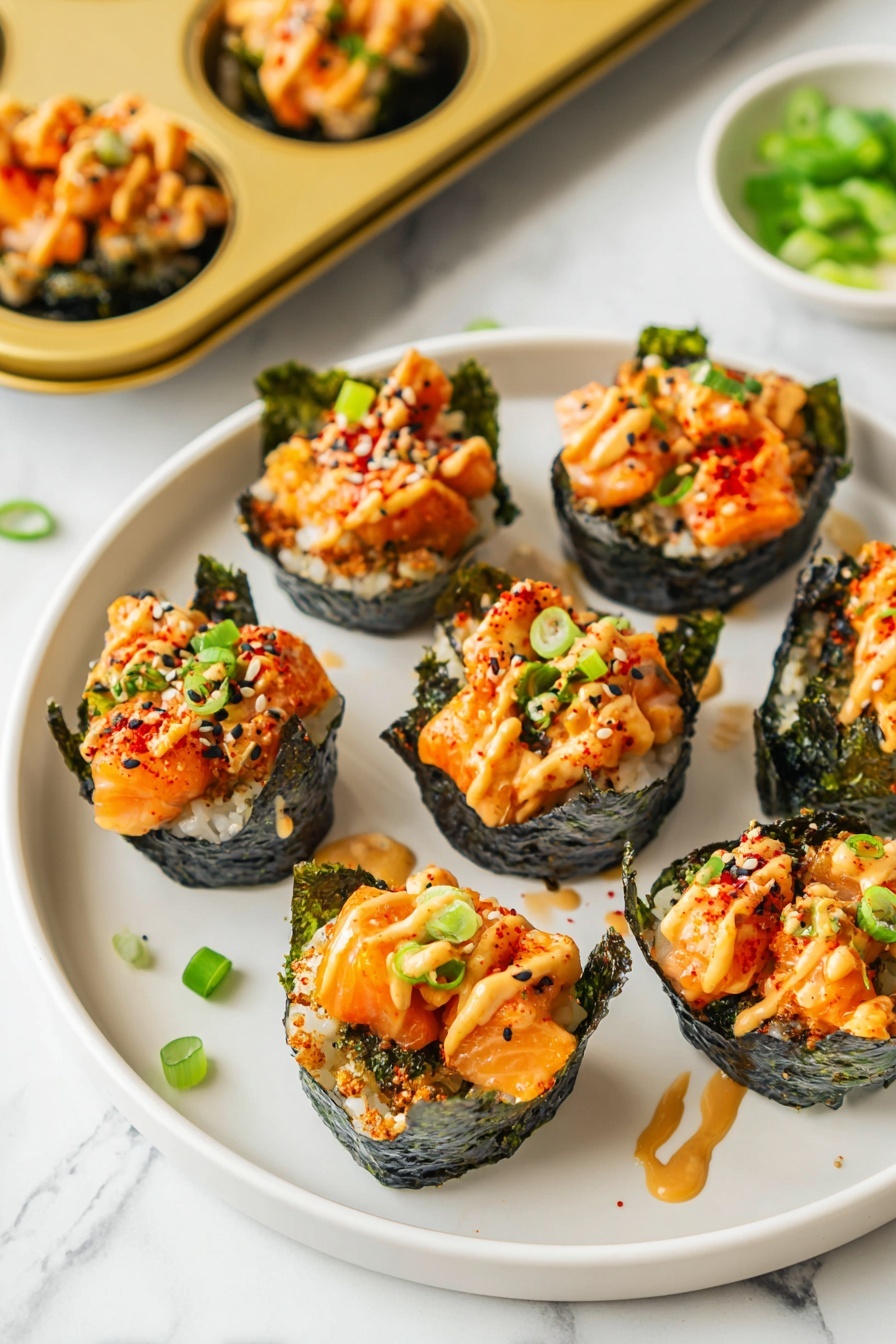
If you’re craving something fun, flavorful, and totally unique, I absolutely love sharing my Baked Salmon Sushi Cups Recipe with friends. This dish checks all the boxes — it’s easy to make, packed with delicious layers of savory salmon and perfectly seasoned sushi rice, and just cute enough to wow at any gathering. Trust me, once you try this, it’ll quickly become one of your go-to recipes, whether for a casual dinner or a party appetizer.
Why You’ll Love This Recipe
- Deliciously Layered Flavors: The mix of baked salmon and sushi rice with tangy vinegar and spicy mayo is a taste explosion in every bite.
- Super Easy to Prep: You don’t have to be a sushi chef or own fancy tools — just a muffin tin and some basic ingredients.
- Perfect Party Pleasers: These sushi cups look fancy but come together quickly, making entertaining stress-free and impressive.
- Kid-Friendly and Customizable: You can adjust the spiciness or toppings to please everyone at your table.

Ingredients You’ll Need
The magic of this Baked Salmon Sushi Cups Recipe lies in simple, fresh ingredients working together. Sushi rice creates that signature sticky base, while the salmon mixture adds tender, flavorful protein. I like to grab high-quality nori sheets and fresh green onions to top it all off just right.

- Salmon: Fresh, cubed salmon is key for tender bites—look for sushi-grade if possible for the best quality.
- Light Soy Sauce: Adds salty umami without overpowering your salmon.
- Kewpie Mayo: This Japanese mayo brings a creamy tang that’s smoother than regular mayo.
- Sriracha: Adds a kick of heat, but feel free to adjust depending on your spice comfort level.
- Sesame Oil: Just a splash delivers that nutty, aromatic note that ties all the flavors.
- Sushi Rice: Use short-grain rice for the perfect sticky texture essential in sushi dishes.
- Rice Vinegar and White Sugar: Combine these to season the sushi rice beautifully with a subtle tang.
- Nori Sheets: These seaweed sheets wrap your sushi cups and hold everything together—cut them to fit your muffin tin.
- Furikake: A Japanese rice seasoning that adds a little crunch and umami punch on top.
- Green Onion: Fresh, chopped green onion adds a nice pop of color and subtle bite.
- Cooking Spray: Don’t forget this to make sure your sushi cups pop right out of the tin cleanly.
Variations
I love how flexible this Baked Salmon Sushi Cups Recipe is — it’s easy to tweak depending on what you have on hand or your flavor preferences. Some of my favorite twists have really upped the excitement in my kitchen and helped me accommodate different tastes, too.
- Spicy Tuna Version: Swap out the salmon for tuna and stir in a bit more sriracha to make it spicy. I tried this once for a sushi night with friends and everyone loved how vibrant the flavor was.
- Vegetarian Option: Replace the salmon with diced avocado and cucumber, adding a splash of soy sauce and a sprinkle of toasted sesame seeds for texture—I always keep this variation for my veggie-loving guests.
- Gluten-Free Swap: Use tamari instead of soy sauce to keep everything gluten-free without losing that savory depth.
- Extra Crunch: Add tempura flakes or toasted breadcrumbs on top just before baking, which is a trick I discovered to bring irresistible texture.
How to Make Baked Salmon Sushi Cups Recipe
Step 1: Cook and Season the Sushi Rice Perfectly
Start by cooking your sushi rice according to the package instructions — I usually rinse mine with cold water until it runs clear to get rid of excess starch, which helps the rice cook up sticky but not mushy. While the rice is hot, microwave your rice vinegar and sugar just until the sugar dissolves, then gently fold this into the rice. This seasoning is what gives sushi rice that subtle tang you’ll love. Set it aside to cool slightly while you prep the salmon.
Step 2: Mix the Flavorful Salmon Topping
In a bowl, combine cubed salmon with light soy sauce, Kewpie mayo, sriracha, and a touch of sesame oil. This blend might seem simple, but it’s packed with layers of flavor that become even better when baked. I like to mix until everything is evenly coated, giving the salmon that creamy, spicy, umami punch.
Step 3: Prepare Nori and Assemble Your Cups
Cut your nori sheets into squares or rectangles that will fit nicely into your muffin tins — I find 4 pieces per sheet works well for a standard tin. Spray the muffin tin with cooking spray to keep things from sticking. Lay each nori square into a muffin cup, then press a spoonful of sushi rice into the center, gently spreading it down to form the base. Once your tin is filled with rice layers, add a generous spoonful of your salmon mixture on top.
Step 4: Bake to Perfection
Bake everything in a 400°F oven for about 15 minutes. You’ll want to watch for the salmon to be cooked through and for the top edges to get slightly golden and caramelized—it adds a beautiful depth. When you pull them out, give them a moment to cool so they hold their shape when you remove them from the tin.
Step 5: Add Finishing Touches and Serve
Before serving, drizzle some extra sriracha or a quick spicy mayo on top for that final burst of flavor, then sprinkle furikake and chopped green onions for beautiful color and texture. My family goes crazy for that salty crunch from the furikake—it feels like the cherry on top.
Pro Tips for Making Baked Salmon Sushi Cups Recipe
- Don’t Skip Rinsing Your Rice: It’s key for perfect sushi rice texture and prevents it from getting too gluey.
- Use Kewpie Mayo for Authentic Flavor: Regular mayo won’t give you that rich, slightly sweet tang that makes these salmon cups stand out.
- Press Gently but Firmly: When adding rice to nori, pressing just right helps cups hold shape but keeps the rice fluffy.
- Keep an Eye on Baking Time: Overbaking dries out the salmon, so stick closely to 15 minutes for tender, juicy bites.
How to Serve Baked Salmon Sushi Cups Recipe

Garnishes
I’m all about those little finishing touches — a sprinkle of furikake adds that wonderful umami and a bit of crunch, and fresh green onions bring a light sharpness that cuts through the richness of the mayo and salmon. Sometimes, I also add tiny roe or a drizzle of unagi sauce when I want to get fancy.
Side Dishes
Pair these sushi cups with a simple miso soup or a crisp seaweed salad for a balanced meal. I’ve found that lightly pickled ginger helps refresh the palate when enjoying multiple cups, making the experience even better.
Creative Ways to Present
Hosting a party? Arrange the sushi cups on a wooden platter lined with shiso leaves or bamboo mats to give your spread an authentic feel. You can also serve them with cute little dipping bowls of soy sauce or spicy mayo for guests to customize their bites.
Make Ahead and Storage
Storing Leftovers
I store leftovers in an airtight container in the fridge and found that the sushi cups hold up well for about 1-2 days. I usually prefer reheating only a few cups at a time to retain the texture of the rice and keep that fresh salmon flavor.
Freezing
Freezing is a bit tricky because of the rice texture, but if you want to freeze, I recommend wrapping each sushi cup tightly in plastic wrap, then placing them all in a freezer-safe container. Defrost overnight in the fridge before reheating gently.
Reheating
The best way I’ve found to reheat is popping them in the oven at 325°F for about 8-10 minutes covered with foil to prevent drying out. This helps warm the salmon without making the rice tough, and you can freshen up the garnish afterward.
FAQs
-
Can I use regular mayonnaise instead of Kewpie mayo?
Yes, you can use regular mayo, but Kewpie mayo has a unique richness and slight sweetness that adds extra depth to the salmon mixture. If you want to mimic that, try adding a tiny squeeze of honey or rice vinegar to regular mayo.
-
Is it necessary to use sushi rice for this recipe?
Sushi rice is ideal because of its sticky, short-grain texture that holds the cups together. Using other rice types might not bind as well and could alter the texture, but if you don’t have sushi rice, try rinsing short-grain rice thoroughly and adjust liquid amounts carefully.
-
How spicy are the sushi cups? Can I make them milder?
The sriracha adds noticeable heat, but it’s easy to adjust. Use less sriracha or replace it with a mild chili sauce to tone down the spice, or omit it entirely and serve extra spicy sauce on the side so everyone can customize.
-
Can I prepare the sushi cups ahead of time before baking?
Absolutely! You can assemble the sushi cups a few hours ahead and keep the muffin tin covered in the fridge. Just bring them back to room temperature before baking for even cooking.
Final Thoughts
I still remember the first time I made this Baked Salmon Sushi Cups Recipe—how it turned out exactly like I hoped and how my family’s faces lit up with every bite. It’s impressive but so approachable, and you get that rewarding feeling of creating something truly special with simple ingredients. You’ll love how adaptable it is, so don’t hesitate to play around with toppings or spice levels until it feels just right for you. Go ahead and give it a try—it’ll quickly become your favorite way to enjoy salmon with a fun twist!
Print
Baked Salmon Sushi Cups Recipe
- Prep Time: 15 minutes
- Cook Time: 15 minutes
- Total Time: 30 minutes
- Yield: 12 sushi cups
- Category: Appetizer
- Method: Baking
- Cuisine: Japanese
Description
Delight in these Easy Baked Salmon Sushi Cups, a perfect fusion of traditional sushi flavors with a convenient baked twist. Packed with savory marinated salmon atop seasoned sushi rice and crispy nori, these flavorful cups are garnished with furikake and fresh green onion, delivering a delicious appetizer or snack that’s both satisfying and visually appealing.
Ingredients
Salmon Mixture
- 1 lb salmon, cubed
- 1 tbsp light soy sauce
- 1 tbsp Kewpie Mayo
- 1 tbsp Sriracha
- 1 tsp sesame oil
Sushi Rice
- 1 1/2 cup uncooked sushi rice
- 1 tablespoon rice vinegar
- 2 teaspoon white sugar
Assembly and Garnish
- 3 large nori sheets
- Furikake, for garnish
- 1 green onion, chopped, for garnish
- Cooking spray
Instructions
- Cook Sushi Rice: Prepare the sushi rice according to the package instructions. Use the appropriate water ratio and cooking time for perfectly cooked rice.
- Season Rice: In a microwave-safe bowl, combine rice vinegar and sugar. Microwave for about 30 seconds until sugar dissolves. Pour the vinegar mixture evenly over the cooked rice and mix gently until well combined. Set aside to cool slightly.
- Preheat Oven: Set your oven to 400℉ (204℃) to preheat while assembling the sushi cups.
- Prepare Salmon Mixture: In a medium bowl, combine the cubed salmon with light soy sauce, Kewpie mayo, Sriracha, and sesame oil. Mix thoroughly to coat the salmon with the flavorful sauce. Set aside.
- Prepare Nori Sheets: Cut the large nori sheets into 4 rectangles or squares, sized to fit inside the muffin tin cups.
- Assemble Sushi Cups: Lightly spray a muffin tin with cooking spray. Place a nori square into each muffin compartment. Spoon sushi rice onto the center of each nori piece and press lightly to form a compact base. Then top each with an even layer of the salmon mixture.
- Bake: Place the muffin tin in the preheated oven and bake for 15 minutes, or until the salmon is fully cooked and the tops have a slight golden brown color.
- Garnish and Serve: Remove sushi cups from the oven and let them cool for a few minutes. Drizzle additional Sriracha or spicy mayo if desired. Garnish each cup with furikake seasoning and chopped green onions. Serve immediately and enjoy this tasty sushi-inspired treat!
Notes
- Ensure sushi rice is properly cooked and seasoned to achieve authentic flavor.
- For a spicier kick, adjust the amount of Sriracha in the salmon mixture or drizzle more on top.
- Use fresh, high-quality salmon suitable for cooking to ensure the best taste and safety.
- The nori should be cut to fit snugly within the muffin tin to hold the rice and salmon mixture well.
- Leftover sushi cups can be stored in the refrigerator but are best enjoyed fresh.
Nutrition
- Serving Size: 1 sushi cup
- Calories: 120
- Sugar: 2 g
- Sodium: 280 mg
- Fat: 5 g
- Saturated Fat: 1 g
- Unsaturated Fat: 3 g
- Trans Fat: 0 g
- Carbohydrates: 10 g
- Fiber: 1 g
- Protein: 9 g
- Cholesterol: 35 mg


