
I absolutely love sharing this Cheesy Garlic Chicken Wraps Recipe because it’s one of those simple yet insanely satisfying meals that comes together in no time. When I first tried this, I was blown away by how the melty cheese and zesty garlic chicken filling wrapped in a crispy tortilla could make such an easy lunch feel like a treat.
You’ll find that this recipe works perfectly for busy weeknights or whenever you need to whip up something tasty without messing up the kitchen. Plus, it’s flexible enough for you to tweak with your favorite cheeses or spice levels — a real winner in my book.
Why You’ll Love This Recipe
- Quick & Easy: Ready in about 20 minutes, perfect for busy days.
- Melty & Flavorful: The mix of cheese, garlic, and hot sauce packs a punch.
- Versatile & Kid-Friendly: Great for all ages and easy to customize.
- Make-Ahead Friendly: Chicken filling can be prepped ahead for fast assembly later.

Ingredients You’ll Need
The ingredients in this Cheesy Garlic Chicken Wraps Recipe come together beautifully to create that irresistible combination of creamy texture and zingy flavor. I like using rotisserie chicken to save time, but fresh grilled chicken works just as well.
- Large tortillas: Regular ones are perfect, but low-carb or high-protein options can be great if you’re watching your intake.
- Cooked chicken: Rotisserie chicken is my go-to because it’s super flavorful and already cooked.
- Garlic cloves: Fresh is best—grated or minced for that bold garlic punch.
- Light mayonnaise: Adds creaminess without being too heavy.
- Light Greek yogurt: Keeps the filling tangy and balances the richness.
- Hot sauce: I usually use Frank’s — adjust to your spice comfort zone.
- Salt: Just a pinch to bring all the flavors together.
- Grated cheese: A cheddar blend works perfectly for meltiness; try mixing cheeses if you like.
- Green onion: Adds a fresh, mild crunch as a finishing touch.
- Olive oil spray: For that perfect golden crisp on the outside.
Variations
I love making this Cheesy Garlic Chicken Wraps Recipe my own by switching up a few ingredients based on what I crave or have on hand. You should definitely feel free to tweak it to your taste — it’s forgiving and welcoming to experimentation.
- Spicy Kick: I toss in some diced jalapeños or a splash of sriracha for extra heat, and trust me, it elevates the flavor so well.
- Veggie Boost: Adding diced bell peppers or shredded carrots gives some crunch and extra nutrition.
- Cheese Swap: Switching cheddar for mozzarella or pepper jack creates a different melt and flavor profile — all delicious.
- Wrap Options: For a lighter version, use whole wheat or spinach tortillas to add a bit of color and fiber.
How to Make Cheesy Garlic Chicken Wraps Recipe
Step 1: Mix That Flavorful Chicken Filling
In a bowl, combine your chopped cooked chicken with minced garlic, light mayonnaise, Greek yogurt, hot sauce, and a pinch of salt. Stir everything gently until well mixed. This is where the magic starts — the garlic and hot sauce add a subtle zing that balances perfectly with creamy mayo and yogurt. Try to chop the chicken into bite-sized pieces so every bite pulses with flavor.
Step 2: Layer Up Your Wrap
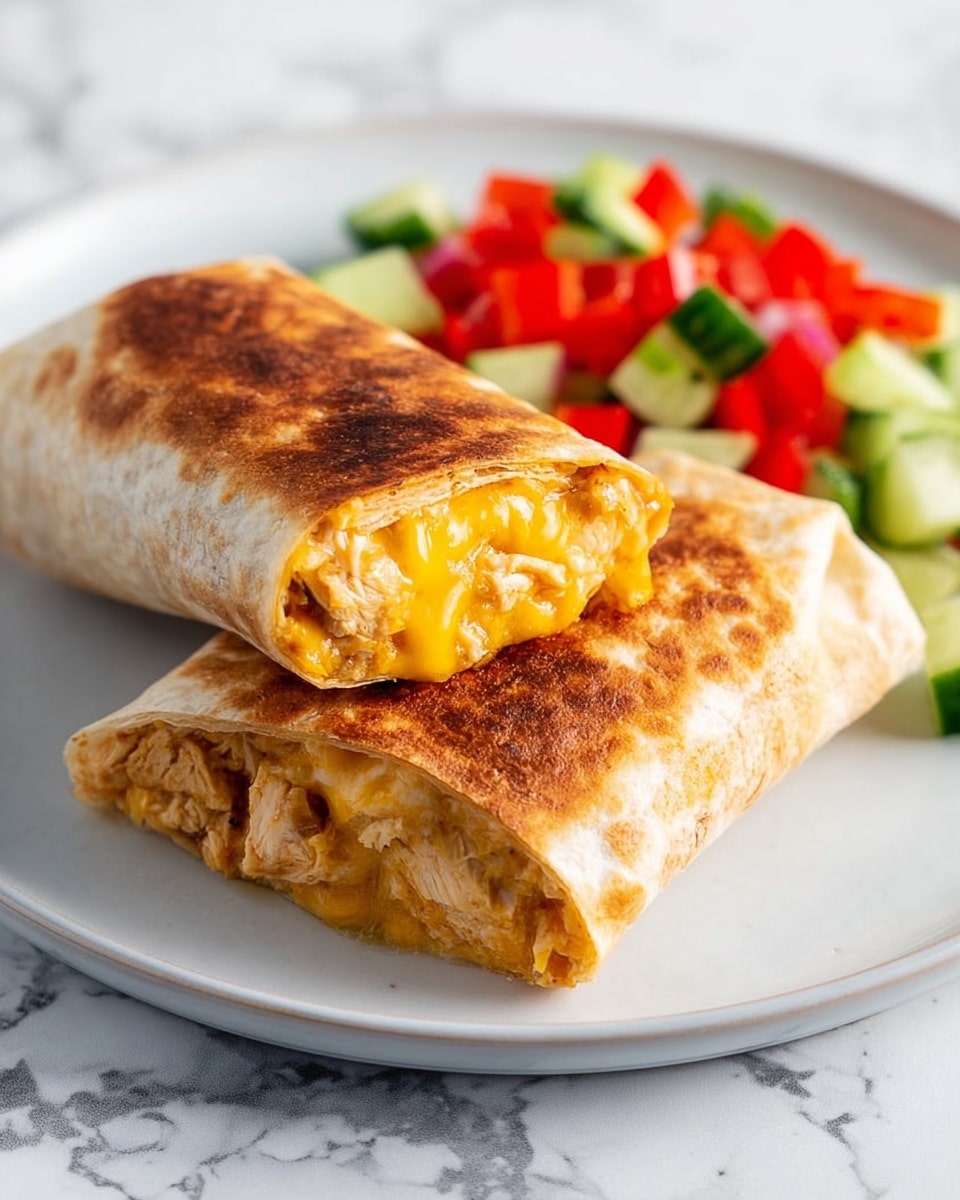
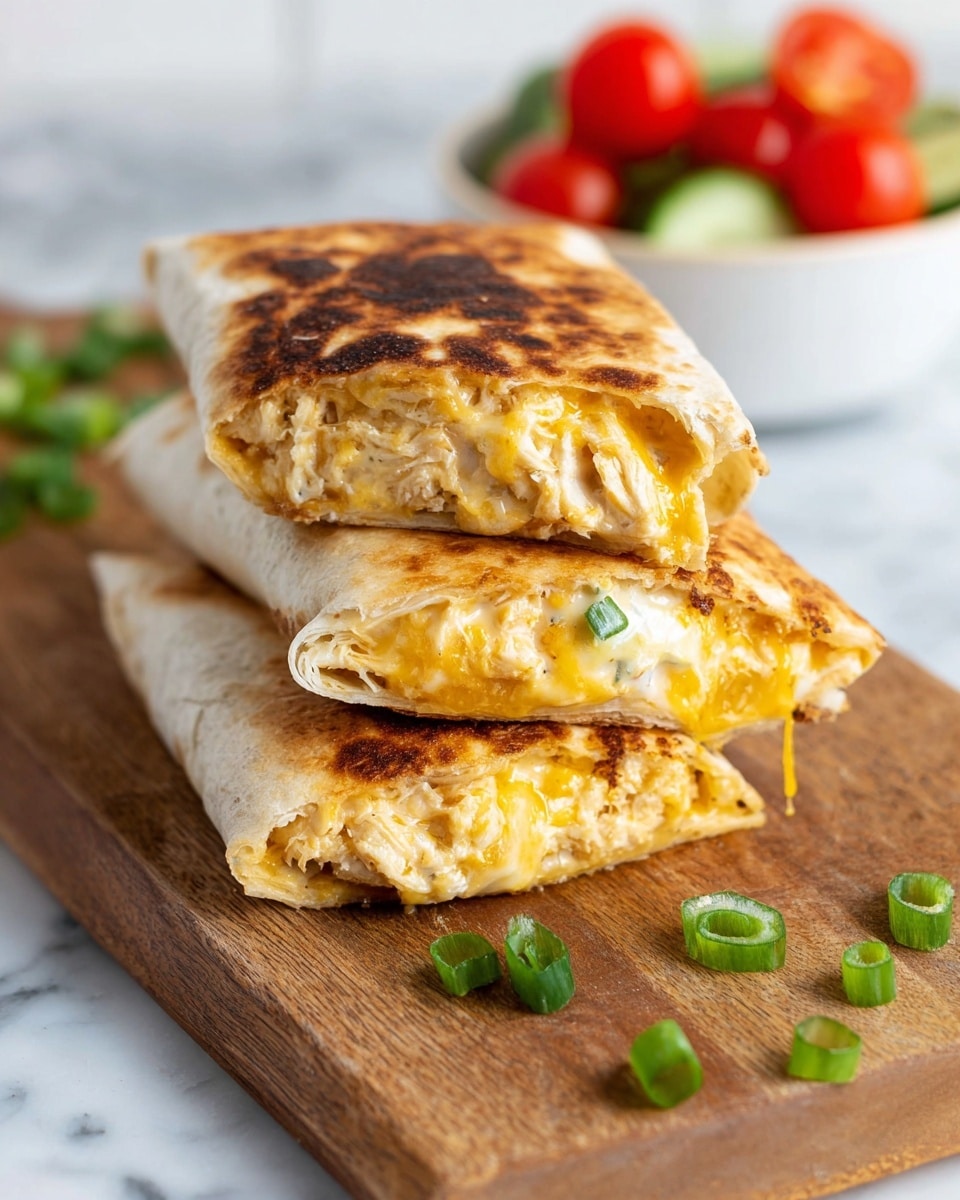
Lay your tortilla flat on a clean surface. On the bottom third, sprinkle about 2 tablespoons of grated cheese. Next, spoon roughly two-thirds of a cup of the chicken mixture right on top of the cheese, spreading it evenly but leaving room on the edges. Add another tablespoon of cheese over the chicken, then sprinkle on some chopped green onion for a fresh pop. This layering is key for a gooey, cheesy inside and that lovely contrast between melty filling and toasted wrap.
Step 3: Wrap It Tight
Fold in the sides of the tortilla over the filling, then roll it up tightly from the bottom like you’re making a burrito. This tight roll keeps everything snug so nothing spills while cooking. I learned the hard way that a loose wrap can cause a cheesy mess in the pan, so take your time here.
Step 4: Crisp It to Perfection
Heat a non-stick pan on medium-high and give it a quick spray of olive oil. Place your wraps seam-side down first — this seals them and helps hold their shape. Cook for about 3 to 4 minutes on each side until golden and crispy. I like to cover the pan with a lid during cooking, which traps steam and melts the cheese inside beautifully without burning the tortilla. Once done, slice in half and get ready to dive in!
Pro Tips for Making Cheesy Garlic Chicken Wraps Recipe
- Use Warm Chicken: If using leftover chicken, warm it slightly before mixing to help the flavors meld.
- Don’t Overfill: Too much filling makes rolling tricky and can cause breaks while cooking.
- Cover the Pan: This simple step melts cheese faster and keeps the inside piping hot.
- Crisp on Medium Heat: Cooking over medium-high avoids burning the tortilla and helps a crispy finish.
How to Serve Cheesy Garlic Chicken Wraps Recipe
Garnishes
I like to garnish these wraps with a few sprigs of fresh cilantro or extra chopped green onion to brighten the flavors. A dollop of sour cream or a drizzle of ranch dressing on the side also makes every bite even more indulgent.
Side Dishes
These wraps shine on their own but I often serve them with a crisp garden salad or roasted sweet potatoes for something more filling. When I want to keep it casual, a side of crunchy pickles or tortilla chips with salsa makes a fun, snack-worthy combo.
Creative Ways to Present
For family dinners or casual entertaining, I sometimes slice the wraps into pinwheels and arrange them on a platter with dipping sauces. It’s a fun finger food presentation that always gets compliments. You can also wrap them tightly in parchment paper and cut them in halves to take on picnics or packed lunches.
Make Ahead and Storage
Storing Leftovers
I store leftover wraps in an airtight container in the fridge for up to two days. When reheating, gently crisp them again in a skillet or air fryer to bring back that delicious golden crunch.
Freezing
While I don’t recommend freezing the wrapped and cooked version because the tortilla can get soggy, the chicken filling itself freezes beautifully. Just pop it into a freezer-safe container for up to a month — then thaw and assemble fresh wraps when you want a quick meal.
Reheating
To reheat, I prefer using a skillet over medium heat or an air fryer at 350°F (175°C) for a few minutes. This revives the crisp exterior while evenly warming the filling without drying it out like a microwave can.
FAQs
-
Can I use fresh chicken instead of rotisserie chicken?
Absolutely! Fresh grilled or sautéed chicken works just as well. Just cook and chop the chicken into small pieces before combining with the other ingredients, so the filling has great texture.
-
What type of cheese is best for these wraps?
I like using a cheddar blend because it melts nicely and offers a sharp flavor that complements the garlic and hot sauce perfectly. But mozzarella or pepper jack also make tasty options depending on your preference.
-
Can I make this recipe gluten-free?
Yes! Just swap the tortillas for gluten-free wraps or lettuce leaves for a low-carb, gluten-free option that still holds all the delicious filling.
-
Is there a way to make this recipe spicier?
Definitely! Adding more hot sauce or including diced jalapeños will increase the heat. You can also sprinkle in some chili powder or cayenne to kick up the spice level to your liking.
Final Thoughts
This Cheesy Garlic Chicken Wraps Recipe is one of those comforting, satisfying meals that I keep coming back to, especially when life gets busy but I still want something delicious. It’s simple to make, easy to customize, and just downright tasty – the kind of food that even picky eaters tend to love. Honestly, once you try this, I have a feeling it’ll become your go-to wrap too, just like it did for me!
Print
Cheesy Garlic Chicken Wraps Recipe
- Prep Time: 15 minutes
- Cook Time: 7 minutes
- Total Time: 22 minutes
- Yield: 2 servings
- Category: Lunch
- Method: Frying
- Cuisine: American
Description
These Cheesy Garlic Chicken Wraps are a quick and delicious meal featuring tender rotisserie chicken mixed with garlic, light mayo, Greek yogurt, and hot sauce, combined with melty cheddar cheese in warm, crispy tortillas. Perfect for a satisfying lunch or dinner, they come together easily and can be cooked on the stovetop, in an air fryer, or baked for a crispy, cheesy finish.
Ingredients
Wrap and Filling
- 2 large tortillas (regular or low-carb/high-protein)
- 7 oz cooked chicken, chopped (about 200 grams, rotisserie recommended)
- 2 garlic cloves, minced or grated (adjust to taste)
- 2 tablespoons light mayonnaise
- 1 tablespoon light Greek yogurt or plain yogurt
- 2 teaspoons hot sauce (such as Frank’s)
- 1/4 teaspoon salt
- 3 oz grated cheese (about 90 grams, cheddar blend recommended)
- 1 green onion, chopped
Cooking
- Olive oil spray
Instructions
- Prepare the chicken filling: In a bowl, mix the chopped cooked chicken, minced garlic, light mayonnaise, Greek yogurt, hot sauce, and salt thoroughly until well combined. This mixture will add creamy texture and a spicy kick to the wraps.
- Assemble the wraps: Lay out each tortilla flat. On the lower third of the tortilla, sprinkle about 2 tablespoons of grated cheese. Then, spoon about two-thirds cup of the chicken mixture evenly over the cheese, add another tablespoon of grated cheese on top, and sprinkle chopped green onion for freshness.
- Fold and roll the tortilla: Fold in the sides of the tortilla toward the center to contain the filling, then tightly roll the wrap from the bottom up to secure everything inside.
- Cook the wraps on stovetop: Heat a non-stick pan over medium-high heat and spray it lightly with olive oil. Place the wraps seam-side down on the pan. Cook each side for 3 to 4 minutes until the tortilla is golden brown and crispy. Cover the pan with a lid while cooking to melt the cheese inside and evenly heat the filling.
- Serve: Remove the wraps from the pan, slice them in half diagonally, and serve immediately for best taste and texture.
Notes
- Covering the pan while cooking helps melt the cheese and heats the filling faster.
- The chicken filling can be made ahead and stored in the fridge for up to 3 days.
- For a lighter version, reduce the amount of cheese, but note that the melty cheese is a highlight of this recipe.
- Alternative cooking methods include air frying at 375°F (190°C) for 6–8 minutes or baking at 400°F (200°C) for 10–12 minutes, flipping once for crispiness.
- Leftover filling is versatile and can be used in toasties, quesadillas, or stuffed baked potatoes.
- Store cooked wraps in the fridge for up to 2 days and reheat in a skillet or air fryer to maintain crispiness. Avoid freezing assembled wraps; however, the filling can be frozen for up to 1 month.
- You can prepare the chicken filling 2–3 days in advance and keep it chilled until ready to assemble and cook.
- Serve these wraps with a crunchy salad, roasted veggies, pickles, salsa for dipping, or chips for a complete and enjoyable meal.
Nutrition
- Serving Size: 1 wrap
- Calories: 420
- Sugar: 2 g
- Sodium: 600 mg
- Fat: 20 g
- Saturated Fat: 9 g
- Unsaturated Fat: 10 g
- Trans Fat: 0 g
- Carbohydrates: 30 g
- Fiber: 3 g
- Protein: 35 g
- Cholesterol: 85 mg

