
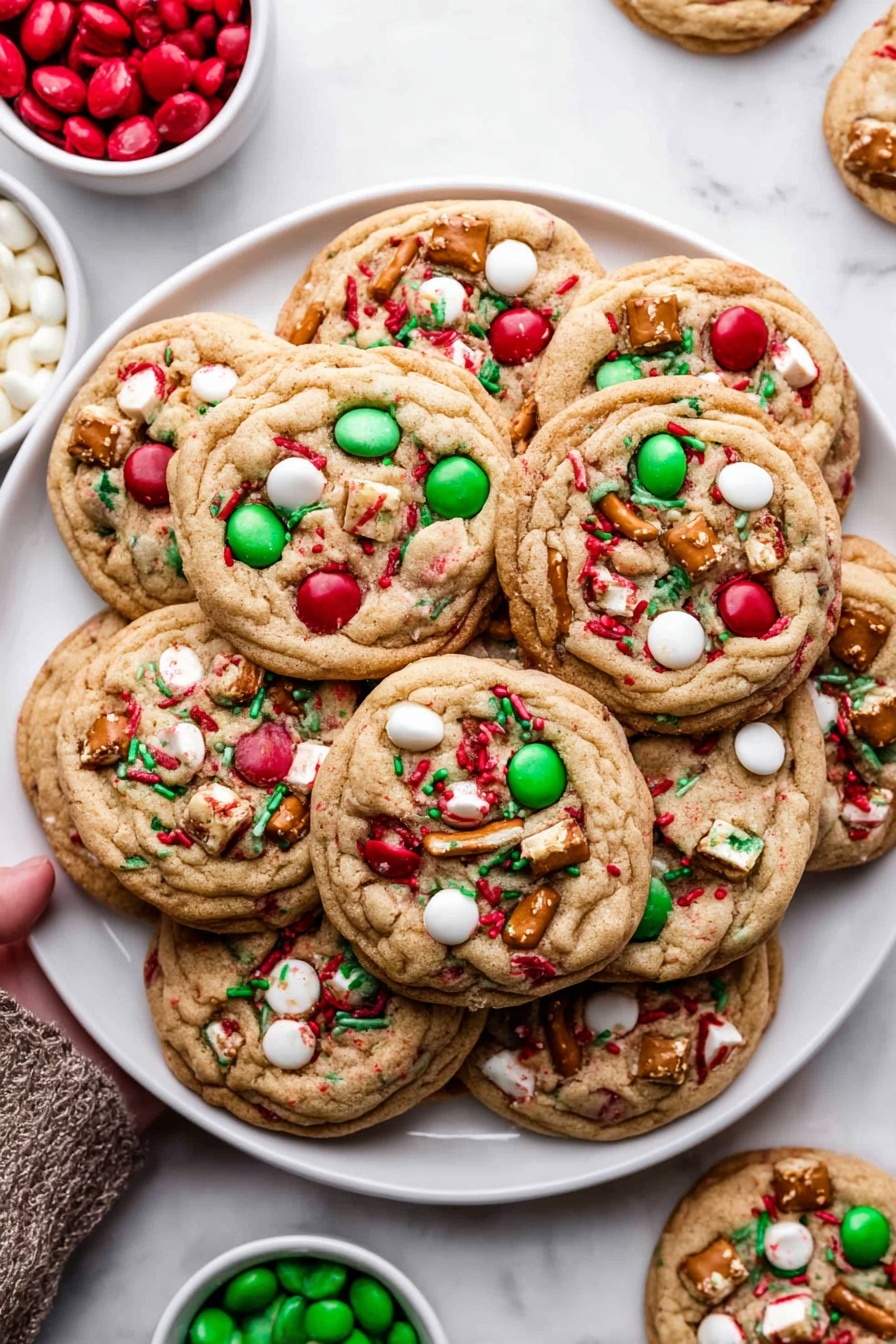
If you’re looking for a festive treat that’s bursting with flavor, texture, and all the holiday cheer, you’ve got to try my Christmas Kitchen Sink Cookies Recipe. These cookies are exactly what their name promises—a little bit of everything you love, all packed into one irresistible bite. I absolutely love how this recipe balances sweet, salty, crunchy, and chewy elements, making each cookie a fun surprise. Trust me, once you make these, your holiday cookie platter will never be the same!
Why You’ll Love This Recipe
- Bursting With Flavor: The mix of sweet chocolates and salty pretzels makes every bite exciting.
- Fun & Festive: The red and green M&M’s and sprinkles make these perfect for holiday gatherings.
- Easy to Customize: You can swap mix-ins based on what you have or like—no stress at all.
- Great Make-Ahead Cookie: These store well and even freeze beautifully for busy holiday seasons.

Ingredients You’ll Need
Each ingredient in this Christmas Kitchen Sink Cookies Recipe plays a special role, blending creamy, crunchy, sweet, and salty to create that perfect cookie harmony. When you shop, try to get quality mix-ins for the best results—those little details really make a difference.

- Salted Butter: Make sure it’s softened to room temperature for the creamiest cookie dough texture.
- Light Brown Sugar: Adds moisture and a touch of caramel flavor—don’t swap this one out!
- Granulated White Sugar: Helps balance sweetness and gives the cookies a slight crisp edge.
- Egg Yolks: These add richness without extra liquid that might change the texture.
- Vanilla Bean Paste or Extract: Vanilla always boosts cookie flavor, and I love using paste for those little vanilla flecks.
- All-Purpose Flour: I recommend spooning and leveling for accuracy—too much flour makes cookies dry.
- Baking Powder & Baking Soda: These work together for just the right rise and tender crumb.
- Salt: Enhances the sweetness and balances the flavors perfectly.
- Red and Green M&M’s: Adds fun color and chocolate crunch, perfect for Christmas vibes.
- White Chocolate Chips: The creamy sweetness pairs so well with the salty mix-ins.
- Pretzel Pieces: Love the salty crunch here—don’t skip these!
- Potato Chip Pieces: This may surprise you, but the salty potato chips make the flavor pop.
- Red and Green Jimmies: These sprinkles add a festive touch and just a little bit of extra crunch.
Variations
I love how flexible this Christmas Kitchen Sink Cookies Recipe is—feel free to tweak the mix-ins based on what you love or what’s on hand. Whether you want it more chocolatey, nuttier, or gluten-free, you can make it your own and it will still be delicious.
- Add Nuts: I sometimes throw in chopped pecans or walnuts for an extra crunch and a touch of warmth.
- Nut-Free Version: Swap pretzels for extra potato chips or other crunchy snacks to keep it allergy-friendly.
- Chocolate Lovers’ Twist: Double up on the white and milk chocolate chips for an ultra-chocolatey cookie experience.
- Festive Flavors: Try adding a sprinkle of cinnamon or a dash of peppermint extract if you want to boost that holiday aroma.
How to Make Christmas Kitchen Sink Cookies Recipe
Step 1: Cream Your Butter and Sugars
Start by preheating your oven to 350 degrees and lining two baking sheets with parchment paper. In a large mixing bowl, add your softened salted butter, light brown sugar, and granulated sugar. Using an electric mixer, beat these together for about two minutes until the mixture is light and fluffy. This is important because well-creamed butter and sugar help create that tender, chewy texture you want in your cookies.
Step 2: Mix in Egg Yolks and Vanilla
Next, add in your two egg yolks and vanilla bean paste or extract. Beat on medium speed for another two minutes until everything is pale and fluffy. I like using egg yolks instead of whole eggs here because it adds richness without making the dough too liquidy, which can sometimes happen and result in flat cookies.
Step 3: Combine Dry Ingredients
In a separate bowl, whisk together your all-purpose flour, baking powder, baking soda, and salt. Slowly add this to your wet mixture and stir until just combined. Be careful not to overmix here—you want the dough to come together but still be tender and soft.
Step 4: Add All the Mix-Ins
This is the fun part! Add in your red and green M&M’s, white chocolate chips, pretzel pieces, potato chip pieces, and jimmies. I find it easiest to gently fold these in with a spatula so everything mixes evenly without breaking up your little treasures. If you want your cookies to look extra festive, sprinkle a few more mix-ins on top of each dough ball as you arrange them on the baking sheet.
Step 5: Scoop and Shape
Scoop the dough into about 20 balls and space them roughly two inches apart on your prepared baking sheets. This recipe makes a teeny bit less than two dozen cookies. If you want perfectly shaped rounds like I do, here’s a neat trick I discovered: right after baking, while the cookies are still warm, use a large circular cookie cutter to swirl each cookie into a perfect circle. This helps push all the mix-ins together and makes them look bakery-perfect!
Step 6: Bake and Cool
Bake your Christmas Kitchen Sink Cookies for 10-12 minutes. If you like a chewier center, aim for about 10 minutes; for crispier edges, 12 minutes is ideal. Once out of the oven, let them cool on the baking sheet for 5 minutes before transferring them to a cooling rack for another 10 minutes. I always say patience is key here—you want them to set up just right before digging in.
Pro Tips for Making Christmas Kitchen Sink Cookies Recipe
- Perfect Flour Measurement: I used to scoop flour directly, which led to dense cookies—now I spoon and level or weigh it, and the dough turns out perfect every time.
- Room Temperature Ingredients: Using room temp butter and egg yolks helps the dough come together more easily and bakes more evenly.
- Add Extra Mix-Ins on Top: It’s not just for looks—this trick ensures every cookie has a festive pop of color and texture.
- Don’t Overbake: Pulling them out right on time keeps the centers soft and luscious—watch closely during that last couple minutes!
How to Serve Christmas Kitchen Sink Cookies Recipe

Garnishes
I personally like to garnish my cookies with a light dusting of powdered sugar or a sprinkle of festive red and green sanding sugar to amp up the holiday look. Sometimes, I even drizzle a touch of melted white chocolate over them for a little extra show-stopper shine. These little touches make these cookies feel extra special, especially if you’re bringing them to a party.
Side Dishes
These cookies are so packed with flavor, they’re actually a treat on their own. But if you want to make a dessert platter, I love pairing them with a simple bowl of vanilla ice cream or mini cups of hot cocoa with marshmallows for a cozy touch. They also go great alongside a plate of fresh fruit to balance sweetness.
Creative Ways to Present
One year, I stacked these cookies in a glass jar tied with a festive ribbon as a quick gift idea, which was a huge hit! Another fun way is to layer them on a holiday-themed platter with other colorful cookies, creating a cheerful and inviting dessert spread that guests can’t resist.
Make Ahead and Storage
Storing Leftovers
I store leftover cookies in an airtight container at room temperature, and they stay fresh and chewy for about three days. If you want to keep them longer, I recommend layering parchment paper between so they don’t stick together or get crushed.
Freezing
I love freezing these cookies because it lets me bake in bulk ahead of busy holiday days. After baking and cooling, I place them in a freezer-safe container separated by parchment, and they freeze wonderfully for up to two months. When I’m ready, I just thaw them at room temp or warm briefly in the oven.
Reheating
To revive leftover or frozen cookies, I pop them in a 300-degree oven for about 5 minutes. This brings back a freshly-baked taste and soft texture without drying them out. Avoid microwaving if possible since it can make them chewy or tough.
FAQs
-
Can I use all-purpose chocolate chips instead of white chocolate chips?
Absolutely! You can substitute any chocolate chips you prefer. I love the creamy sweetness of white chocolate in this recipe, but regular or semi-sweet chips work just as well and add a classic chocolate flavor.
-
What’s the difference between baking soda and baking powder in this recipe?
Great question! Baking soda helps the cookies spread and promotes browning, while baking powder gives them a little extra lift and softness. Using both balances the texture perfectly in this Christmas Kitchen Sink Cookies Recipe.
-
Can I make this recipe gluten-free?
Yes, swap the all-purpose flour for a certified gluten-free blend. I’d recommend one with xanthan gum included for the best texture. Keep the rest of the ingredients the same, and you’ll still have delicious, festive cookies.
-
Why do the cookies need egg yolks instead of whole eggs?
Using just egg yolks adds richness and chewiness without adding extra liquid, which helps the cookies maintain their shape and dense, delicious texture. It’s a small tweak that really ups the cookie game.
-
Can I prepare the cookie dough ahead of time?
Yes! You can mix the dough, cover it tightly, and refrigerate for up to 48 hours. I even freeze it in balls to bake fresh cookies anytime. Just add a minute or two extra to the baking time if baking from chilled dough.
Final Thoughts
This Christmas Kitchen Sink Cookies Recipe has quickly become my go-to holiday treat because it brings all those festive flavors and textures I crave in one happy cookie. They’re perfect for sharing with family, gifting to friends, or simply enjoying with a cup of tea while basking in holiday lights. I promise, once you try making these, you’ll understand why my family goes crazy for them. Grab your mixing bowl and let’s make your holiday kitchen smell like the coziest Christmas ever!
Print
Christmas Kitchen Sink Cookies Recipe
- Prep Time: 15 minutes
- Cook Time: 10 minutes
- Total Time: 25 minutes
- Yield: 20 cookies
- Category: Dessert
- Method: Baking
- Cuisine: American
Description
These Christmas Kitchen Sink Cookies are a delightful holiday treat packed with a festive mix of M&M’s, white chocolate chips, pretzels, potato chips, and colorful sprinkles. Soft and chewy with a perfect balance of sweet, salty, and crunchy textures, they are the quintessential holiday cookie to please every palate and add joy to your Christmas cookie platter.
Ingredients
Wet Ingredients
- 3/4 cup salted butter, softened
- 3/4 cup light brown sugar, packed
- 1/4 cup granulated white sugar
- 2 egg yolks, at room temperature
- 2 tsp vanilla bean paste or extract
Dry Ingredients
- 1 1/2 cups all-purpose flour, spooned and leveled
- 1/2 tsp baking powder
- 1/2 tsp baking soda
- 1/2 tsp salt
Mix-Ins
- 1/2 cup red and green M&M’s
- 1/3 cup white chocolate chips
- 1/3 cup pretzel pieces
- 1/3 cup potato chip pieces
- 2 tbsp red and green jimmies (sprinkles)
Instructions
- Preheat Oven and Prepare Baking Sheets: Preheat your oven to 350°F (175°C) and line two baking sheets with parchment paper to prevent sticking and ensure even baking.
- Cream Butter and Sugars: In a large bowl, add the softened salted butter, light brown sugar, and granulated sugar. Using an electric mixer, cream them together for about two minutes until the mixture is light and fluffy, which helps incorporate air for a softer cookie texture.
- Add Egg Yolks and Vanilla: Beat in the egg yolks and vanilla bean paste or extract on medium speed for two minutes until the mixture becomes pale and fluffy, ensuring a well-emulsified dough.
- Mix Dry Ingredients: In a separate bowl, combine the all-purpose flour, baking powder, baking soda, and salt. Slowly add this dry mixture to the wet ingredients and mix until just combined to avoid overmixing which could toughen the cookies.
- Fold in Mix-Ins: Gently fold in the colorful M&M’s, white chocolate chips, pretzel pieces, potato chip pieces, and red and green jimmies using a spatula until everything is evenly distributed throughout the dough.
- Scoop Dough: Using a cookie scoop or spoon, form 20 dough balls and place them about two inches apart on the prepared baking sheets to allow room for spreading.
- Optional Decoration: Optionally, top each dough ball with a few extra mix-ins for visual appeal and texture.
- Bake the Cookies: Bake the cookies in the preheated oven for 10 to 12 minutes; 10 minutes for chewier centers or 12 minutes for crispier edges depending on your preference.
- Shape Cookies (Optional): When cookies come out of the oven, use a large circular cookie cutter to gently swirl around each cookie to form a perfect round shape and to help consolidate the mix-ins.
- Cool: Let the cookies cool on the baking sheets for 5 minutes to firm up, then transfer them to a wire rack to cool completely for an additional 10 minutes before serving or storing.
- Storage: Store any leftover cookies in an airtight container for up to three days to maintain freshness.
Notes
- Measure your flour properly: spoon the flour into your measuring cup and level it off with a knife instead of scooping directly from the bag to avoid dense cookies. Ideally, weigh your flour using 125 grams per cup.
- For perfectly shaped cookies, swirl a large circular cookie cutter around the hot cookies immediately after baking to merge the edges into a neat circle.
- Adding extra mix-ins on top of dough balls before baking is optional but adds delightful visual appeal and extra texture.
Nutrition
- Serving Size: 1 cookie
- Calories: 150
- Sugar: 12g
- Sodium: 150mg
- Fat: 7g
- Saturated Fat: 4g
- Unsaturated Fat: 3g
- Trans Fat: 0g
- Carbohydrates: 20g
- Fiber: 1g
- Protein: 2g
- Cholesterol: 30mg


