

If you’re looking to bring some extra joy and creativity to your holiday baking, you’re going to adore this Christmas Sugar Cookie Faces Recipe. It’s playful, super easy, and the results are so charming that everyone at the party will ask for seconds. I absolutely love how quickly you can whip these up and how fun it is to decorate them — trust me, these little festive faces will put a big grin on your loved ones’ faces!
Why You’ll Love This Recipe
- Quick and Easy: I love that these cookies only take about 15 minutes total, perfect for last-minute holiday fun.
- Kid-Friendly Decoration: You can get the kids involved decorating the faces — it’s a great way to make memories together.
- No Baking Required: Using store-bought cookies and frosting makes it so simple, yet still festive and delicious.
- Adorable Presentation: These cookie faces are guaranteed to brighten up any holiday dessert table.

Ingredients You’ll Need
These ingredients come together like a holiday hug — sweet, colorful, and full of fun textures. Using store-bought elements like sugar cookies and frosting will save you tons of time without sacrificing taste or cuteness.
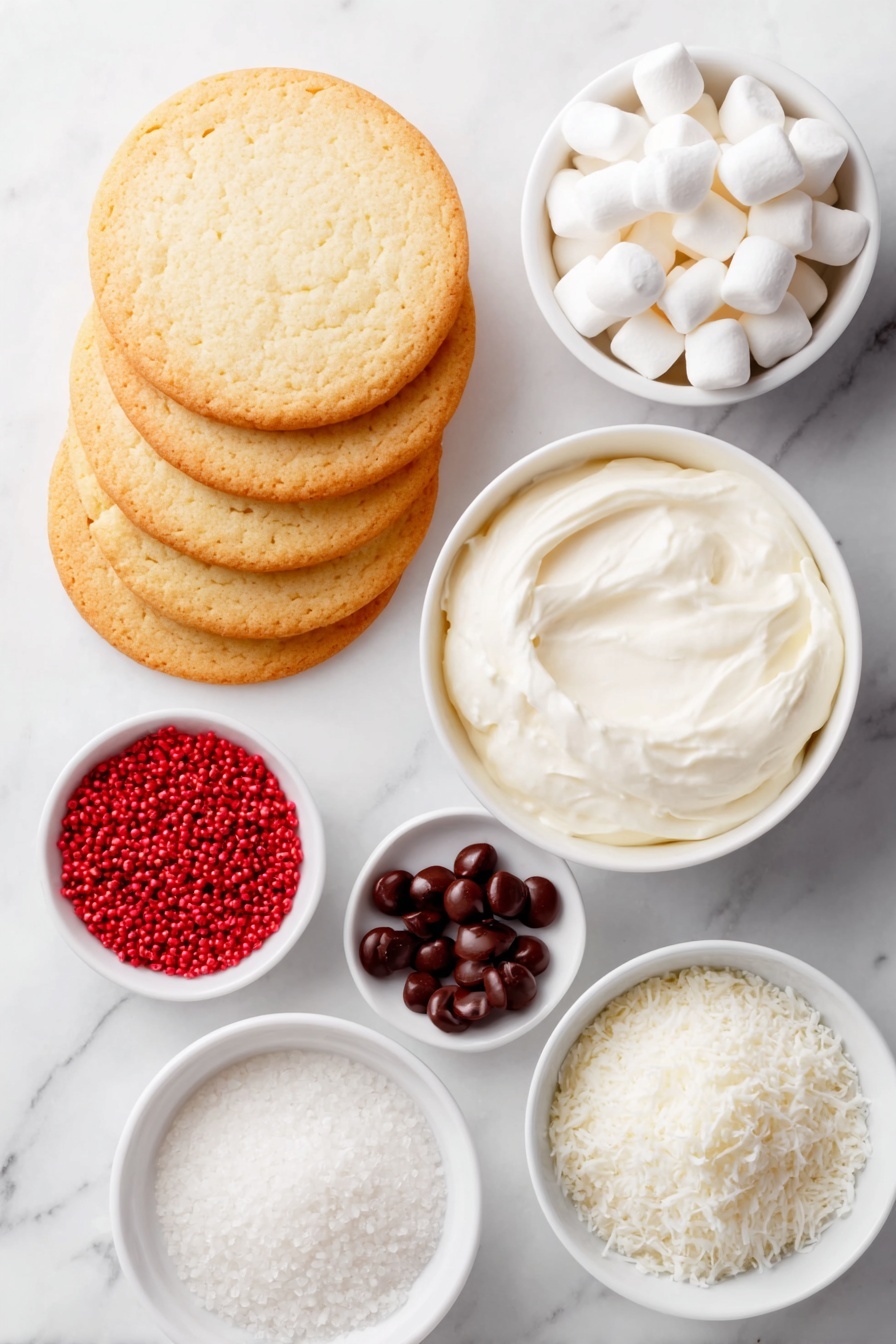
- Store-bought sugar cookies: Choose your favorite brand or homemade if you have a go-to recipe; a sturdy, round cookie works best as the canvas for these faces.
- Betty Crocker™ Rich & Creamy Vanilla Frosting: Its smooth texture is perfect for “gluing” decorations and spreading evenly.
- Candy eyes: These instantly add personality — make sure to get the kind with a flat back for easy sticking.
- Cinnamon imperial candies: Their bright red color is iconic for holiday treats and adds a nice spicy scent.
- Red sugar sprinkles: For a sparkly pop of Christmas color on the frosting.
- Sweetened shredded coconut: Looks like fluffy snow — an essential detail for festive fun.
- Miniature marshmallows: Tiny and soft, these top off the cookie as a cute “hat” or snowball.
- Black edible marker: Use this for drawing expressive smiles — I love that it’s so forgiving for playful designs!
Variations
I love how customizable this Christmas Sugar Cookie Faces Recipe is — you can get as creative as you want! Here are a few ways I’ve played around with the look and flavors, but really, there’s no wrong way.
- Different Eyes: Sometimes I swap candy eyes for chocolate chips or colored icing dots—it’s fun to mix up their expressions!
- Flavored Frosting: I’ve tried cream cheese frosting instead of vanilla for a tangy twist that pairs perfectly with cinnamon candies.
- Nut-Free or Vegan: Use dairy-free frosting and substitute marshmallows with small fruits like red grapes or berries to keep it allergy-friendly.
- More Colorful Sprinkles: Add green or multi-colored sugar for a brighter, more whimsical look, especially if you’re making a cookie decorating party.
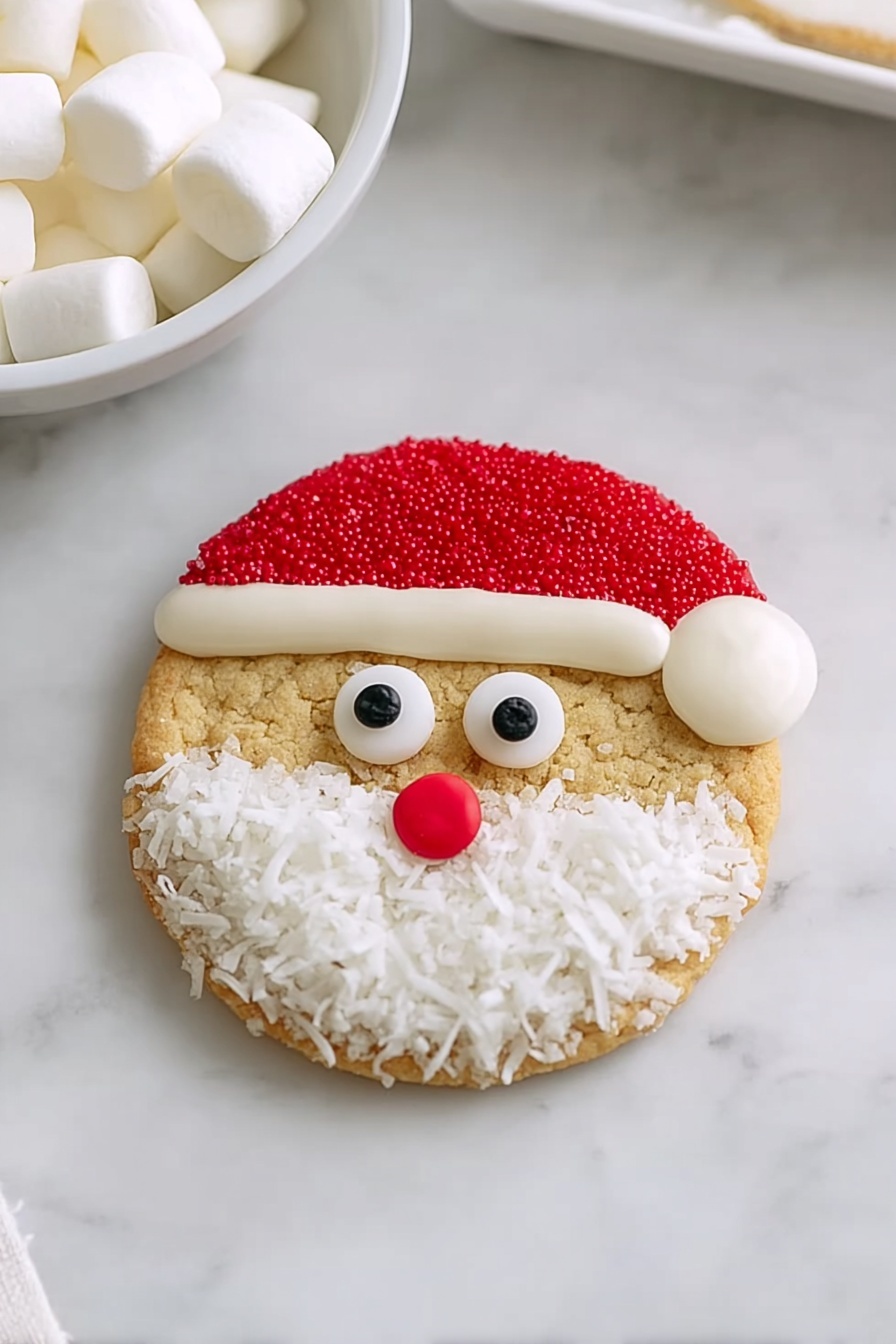
How to Make Christmas Sugar Cookie Faces Recipe
Step 1: Add the Eyes and Nose
Start by taking a small knife or toothpick dipped in frosting—this little trick helps the decorations stick without making a mess. I find it easiest to attach the two candy eyes near the top of the cookie, then press a cinnamon imperial candy just below and between them to form the nose. This instantly gives your cookie character!
Step 2: Frost on the Hat
Spread frosting on the top third of the cookie, gently but thoroughly so it’s flat enough to hold the sprinkles. Then, carefully shake the red sugar sprinkles on top — I like to leave a little white frosting line at the bottom edge for that classic Santa hat look.
Step 3: Decorate the Beard Area
Now, spread frosting on the bottom third of the cookie — this will be the “beard” area. Press shredded coconut directly onto the frosting to create a fluffy, snowy beard effect. It’s one of my favorite parts because it looks so festive and adds delightful texture.
Step 4: Add the Marshmallow Hat Top and Smile
Attach the miniature marshmallow right on top of the cookie as the bobble on Santa’s hat. Finishing up, grab your black edible marker to draw a smile. I usually go for a simple curve, but feel free to get goofy — I discovered this is the step where your cookie really comes alive!
Pro Tips for Making Christmas Sugar Cookie Faces Recipe
- Use a Toothpick for Precision: Dipping a toothpick in frosting to place small decorations saves frustration and keeps your fingers clean.
- Let Frosting Set Slightly: After spreading, give the frosting a minute to firm up a bit before adding sprinkles or coconut, so they don’t slide off.
- Draw Smiles Last: Wait until all frosting and toppings are set so your edible marker doesn’t smear.
- Avoid Overcrowding Decorations: Simplicity is charming — I learned that too many toppings can overwhelm the cookie face’s expression.
How to Serve Christmas Sugar Cookie Faces Recipe
Garnishes
I love sprinkling a few extra candy eyes or red sugar crystals around the serving platter for a playful touch. Sometimes I add a few fresh cranberries or small peppermint sticks to the tray, which brings in that true Christmas spirit and makes the presentation pop.
Side Dishes
These cookies go wonderfully with a warm cup of spiced hot chocolate or a simple glass of cold milk. For a party, I like setting up a festive drink station with eggnog or mulled cider alongside the cookies for everyone to enjoy.
Creative Ways to Present
Once, I arranged these sugar cookie faces on a rustic wooden tray lined with evergreen sprigs and cranberry garlands — it made the entire dessert table look like a winter wonderland. You could also individually wrap each cookie in clear cellophane tied with red and white twine for gifting or party favors.
Make Ahead and Storage
Storing Leftovers
I store leftover cookies in an airtight container at room temperature, layered with parchment paper so they don’t stick together. They stay fresh and tasty for up to 3 days — perfect if you want to spread out the cookie snacking!
Freezing
To freeze, I recommend assembling the cookie faces but skipping the edible marker smile until you thaw them. Wrap each cookie individually in plastic wrap, then place in a freezer-safe bag. They freeze well for about 1 month.
Reheating
Because these are frosted sugar cookies, reheating isn’t necessary — they’re best enjoyed cold or at room temp. If your frosting firms up too much in the fridge, just let the cookies sit out for 15 minutes before serving, and redraw any faded smiles with the edible marker.
FAQs
-
Can I use homemade sugar cookies instead of store-bought?
Absolutely! I often make my own sugar cookies when I have time. Just make sure they’re thick and sturdy enough to hold the decorations without breaking. Chill your dough well before baking for even better results.
-
What else can I use instead of candy eyes?
If you can’t find candy eyes, chocolate chips, small icing dots, or even tiny candies work well. Feel free to get creative — the goal is to give each cookie a cute and festive personality.
-
How do I prevent the frosting from melting or sliding off?
This is a common concern! I found that letting the frosting set at room temperature for a few minutes after spreading before adding candies helps. Also, spreading a slightly thicker but smooth layer gives better hold.
-
Can these cookies be made ahead for a party?
Yes! You can assemble the cookie faces a day before, but I recommend adding the edible marker smile on the day of serving to keep it crisp and clear. Store the cookies in a single layer in an airtight container until ready.
Final Thoughts
This Christmas Sugar Cookie Faces Recipe holds a special spot in my heart because it turns holiday baking into an adorable art project that anyone can enjoy. Whether you’re making them with kids, party guests, or simply treating yourself, these cookies bring smiles — both in the kitchen and around the table. I truly recommend giving them a try this year; they’re as delightful to make as they are to eat!
Print
Christmas Sugar Cookie Faces Recipe
- Prep Time: 5 min
- Cook Time: 0 min
- Total Time: 15 min
- Yield: 12 cookies
- Category: Dessert
- Method: No-Cook
- Cuisine: American
Description
These festive Santa Sugar Cookies are a fun and easy holiday treat that transform simple store-bought sugar cookies into adorable Santa faces using classic candies and frosting. Perfect for holiday parties and family baking sessions, they combine creamy vanilla frosting, playful candy eyes, and colorful sprinkles to create delightful and edible holiday decorations.
Ingredients
Base
- 12 store-bought sugar cookies
Frosting & Decorations
- 1 can (16 oz) Betty Crocker™ Rich & Creamy Frosting Vanilla
- 24 candy eyes
- 12 cinnamon imperial candies
- Red sugar sprinkles, as needed
- Approximately 1/4 cup sweetened shredded coconut
- 12 miniature marshmallows
- Black edible marker
Instructions
- Attach the eyes and nose: Using a small knife or toothpick dipped in frosting, carefully attach 2 candy eyes and 1 cinnamon imperial candy to the top section of each sugar cookie to create Santa’s face.
- Frost the top portion: Spread vanilla frosting evenly over the top one-third of the cookie, creating Santa’s hat base.
- Apply red sprinkles: Gently shake red sugar sprinkles on top of the frosted section, leaving a clear line to simulate the hat’s trim.
- Frost the bottom portion: Spread frosting over the bottom one-third of each cookie to serve as the beard’s base.
- Add the coconut beard: Press sweetened shredded coconut onto the frosting on the bottom section to create a fluffy beard texture.
- Add the hat pom-pom: Attach a miniature marshmallow to the top of the cookie as the pom-pom on Santa’s hat.
- Draw the smile: Use the black edible marker to carefully draw a smiling mouth on each cookie, completing Santa’s cheerful face.
Notes
- For the best adhesion, slightly press candy eyes and marshmallows into the frosting.
- These cookies are best enjoyed the same day for optimal freshness and decoration quality.
- You can substitute store-bought sugar cookies with homemade soft sugar cookies if preferred.
- For a kid-friendly activity, have children help with applying sprinkles and drawing smiles using the edible marker.
Nutrition
- Serving Size: 1 cookie
- Calories: 180
- Sugar: 15g
- Sodium: 120mg
- Fat: 8g
- Saturated Fat: 3g
- Unsaturated Fat: 4g
- Trans Fat: 0g
- Carbohydrates: 25g
- Fiber: 0.5g
- Protein: 1g
- Cholesterol: 5mg

