
If you’re looking for a festive, fun, and absolutely stunning way to welcome guests this holiday season, then you’re going to love this Christmas Tree Charcuterie Board Recipe. It’s not only a feast for the eyes but also a crowd-pleaser that offers a delightful mix of flavors and textures—perfect for that cozy family gathering or a holiday party. Trust me, this board is fan-freaking-tastic and surprisingly easy to put together once you get the hang of it. Let’s dive in!
Why You’ll Love This Recipe
- Visually Stunning: This Christmas Tree Charcuterie Board is like edible holiday art that impresses every guest instantly.
- Easy to Customize: You can swap cheeses, fruits, or nuts to match what you and your loved ones prefer.
- Prep Ahead Friendly: You can assemble the entire board hours before your party and keep it fresh till serving time.
- Great for All Skill Levels: I used to struggle with fancy-looking platters, but this one is straightforward and forgiving.

Ingredients You’ll Need
The magic of this Christmas Tree Charcuterie Board comes from a lovely balance of fresh herbs, crisp fruits, savory cheeses, and crunchy nuts. Shopping for these ingredients is a breeze, and many can be swapped depending on what’s seasonal or on sale.
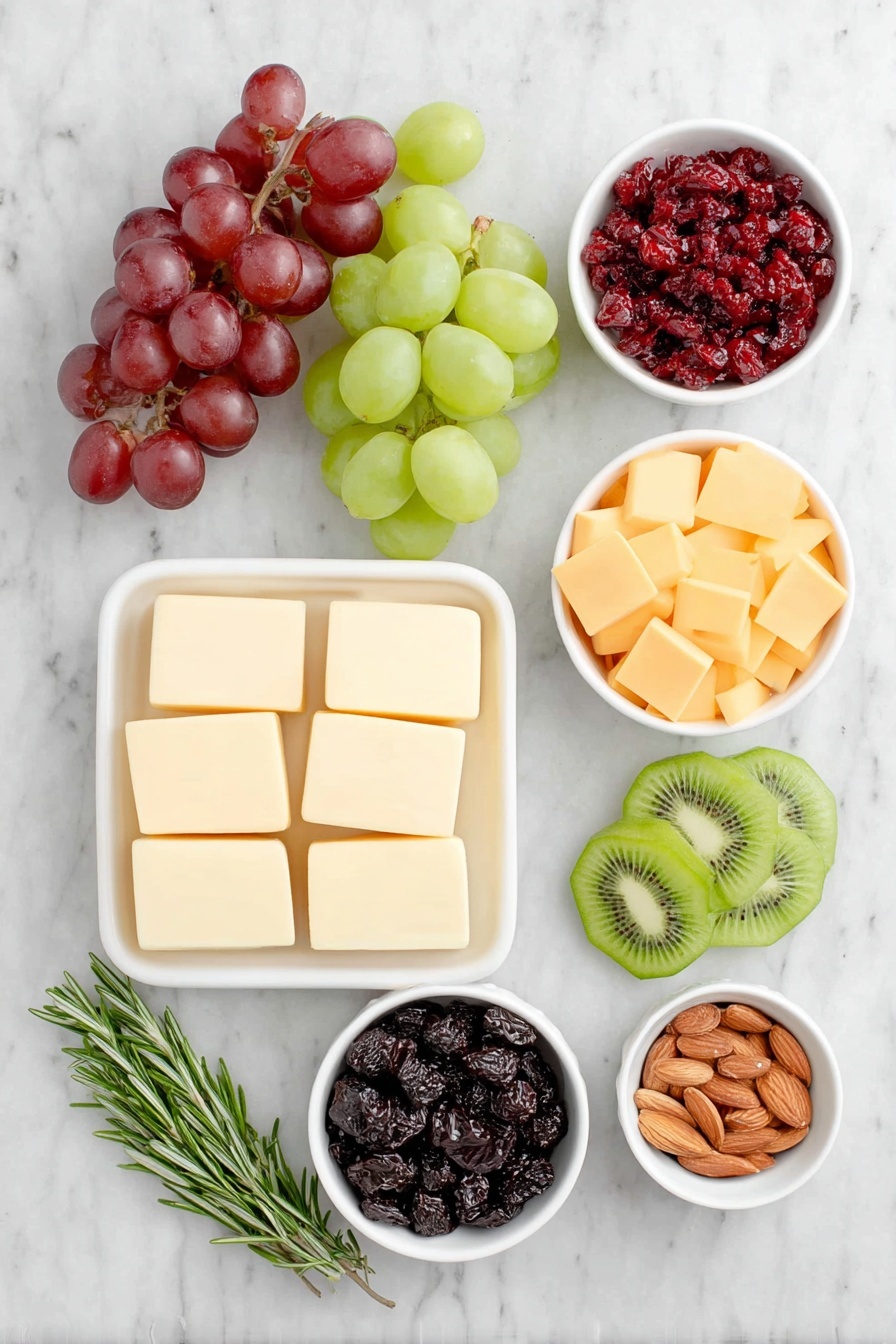
- Fresh Rosemary Sprigs: These form the aromatic “branches” outline of your tree, so grab the freshest you can find for that piney scent and look.
- Celery Stalk: This stands in as the tree trunk — think of it as nature’s handle for your board.
- Seedless Grapes (Red, Green, Black): Easy-to-eat and visually vibrant, grapes add juiciness and a pop of color.
- Sharp Cheddar: Bold and flavorful, cheddar adds a nice sharpness that complements the fruit.
- Monterey Jack Cheese: Creamy and mild, it balances well with stronger cheeses and provides a lovely pale color.
- Mild or Medium Cheddar: Another layer of cheese flavor; you can pick your favorite sharpness here.
- Fresh Cranberries: These tart gems double as “ornaments” around your tree.
- Star Fruit: Adds that perfect star shape for the top of the tree and festive flair all around.
- Assorted Nuts: For crunch and texture contrast, plus a nice earthy flavor—almonds work great for the “pot” of the tree.
- Kiwi Fruit: Sliced kiwi brings a fresh burst of green and a little tang to the mix.
Variations
One of my favorite things about this Christmas Tree Charcuterie Board Recipe is how flexible it is. I often swap in seasonal fruits or try different nuts depending on what I have on hand. Don’t be afraid to make it your own!
- Meat Lover’s Variation: I once added rolled-up deli meats like salami and prosciutto in some of the rows, which gave the board an extra savory dimension my family went crazy for.
- Cheese Curds Twist: For a fun texture variation, try replacing some cheddar with cheese curds, especially if you want a bit more chew.
- Star Shapes Everywhere: Using a small star-shaped cookie cutter, I like to cut slices of cheese into stars to decorate the entire tree — makes it feel extra festive.
- Tropical Touch: Swap kiwi for sliced mango or pineapple if you want a tropical holiday vibe.
How to Make Christmas Tree Charcuterie Board Recipe
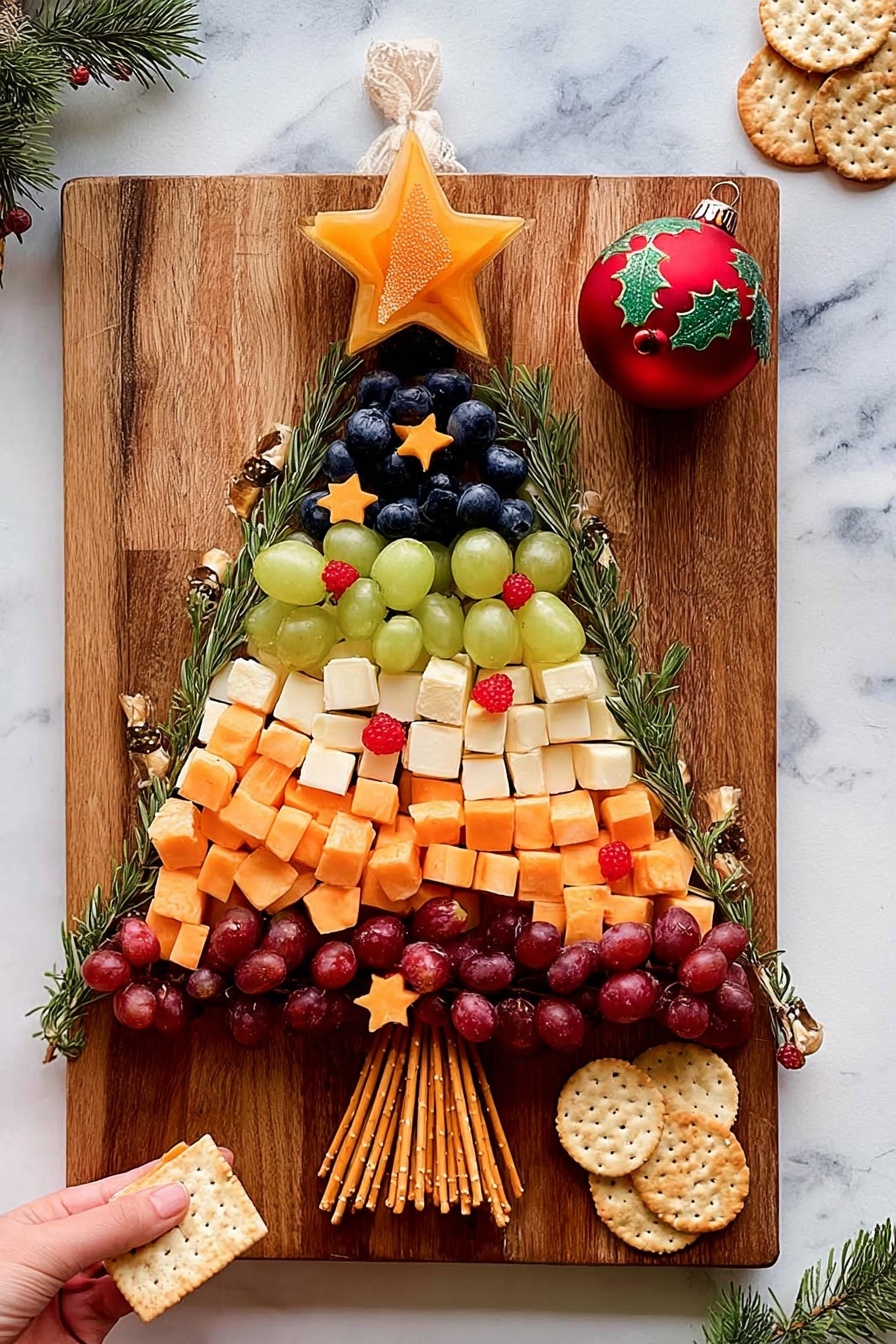
Step 1: Shape Your Christmas Tree with Rosemary and Celery
Start by laying out your rosemary sprigs on your serving board to form the outline of a Christmas tree. Begin at the narrow top and fan out wider as you move down, adjusting the sprigs until you get a shape you like. The beautiful scent of rosemary also adds to the holiday vibe. Next, place the celery stalk below the rosemary as your tree trunk — I usually trim it to a length that feels balanced with the tree outline. Don’t worry if it’s not perfect; this part is all about what looks good to you.
Step 2: Fill the Tree Rows with Cheese and Grapes
Working from the bottom up, arrange the cheese and grapes in rows to “fill” your tree. I like to alternate between rows of cheeses and grapes — for example, a row of cheddar squares, then red grapes, another cheese row, green grapes, then a row of cheese with black grapes on top. Keeping the cheese pieces roughly the same size helps the board look neat and balanced. This layering creates a vibrant patchwork effect that really pops!
Step 3: Shape the Tree Top and Add the Star
Use kiwi slices to create a triangular shape at the very top of your tree — this gives a nice green leafy appearance. Then crown your masterpiece with a single slice of star fruit for the iconic Christmas tree star. If you can’t find star fruit, no worries! You can cut a star from cheese with a small cookie cutter or use a bright red cherry tomato instead. Don’t forget to scatter extra star fruit slices, fresh cranberries, and some nuts around the tree for that extra festive look and lovely texture.
Step 4: Create the Tree Pot with Nuts
At the base of the celery trunk, arrange a neat square of almonds or mixed nuts to resemble a tree pot. This little finishing touch grounds your whole board and adds a satisfying crunch. Plus, almonds give a nice nutty flavor that’s not overpowering.
Step 5: Chill and Serve
The great thing is you can assemble your Christmas Tree Charcuterie Board up to 4 hours ahead. Just cover it tightly with plastic wrap and keep it chilled in the fridge. This saves you last-minute stress and keeps everything fresh for your guests to enjoy.
Pro Tips for Making Christmas Tree Charcuterie Board Recipe
- Go for Uniform Cheese Cubes: Cutting the cheese into evenly sized cubes helps your board look clean and deliberate.
- Use Fresh, Firm Rosemary: Fresh rosemary holds its shape better and smells amazing, setting the festive tone instantly.
- Make Assembly a Visual Process: Step back and adjust the layout as you add rows to keep your tree shape sharp and tidy.
- Avoid Overcrowding: Give each component some breathing room so the colors and textures shine individually.
How to Serve Christmas Tree Charcuterie Board Recipe

Garnishes
I love adding a few sprigs of fresh parsley or even some pomegranate seeds around the edges for extra color and a pop of freshness. If you want a little sparkle, edible gold flakes on some of the cheeses or fruit edges elevate the festive feel.
Side Dishes
I usually pair this board with crusty bread or crackers, maybe some homemade honey mustard or fig jam for dipping. It’s also fantastic alongside a simple green salad or roasted nuts for guests to nibble on between bites.
Creative Ways to Present
One year, I laid the whole board atop a rustic wooden tray lined with a festive cloth napkin. Another time, I placed mini fairy lights around the board edges to add that magical holiday glow. If you want to get playful, try sprinkling powdered sugar lightly over the cranberries to mimic snow.
Make Ahead and Storage
Storing Leftovers
After your party, I recommend storing any leftover components separately if possible—cheese wrapped tightly, fruit in an airtight container, and nuts stored in a cool dry place. This keeps everything tasting fresh and prevents sogginess.
Freezing
This recipe isn’t ideal for freezing because the fresh fruit and delicate herbs lose their texture and flavor. I usually enjoy any leftovers fresh or repurpose the cheeses and nuts in other dishes.
Reheating
Since this board is meant to be enjoyed cold or at room temperature, reheating isn’t necessary. However, if you want warm cheese later, I recommend removing cheeses from the board and melting them separately for best results.
FAQs
-
Can I make the Christmas Tree Charcuterie Board Recipe vegan or dairy-free?
Absolutely! You can swap the cheeses for your favorite vegan cheese alternatives and substitute nuts and fruits just as described. Using seedless grapes, fresh herbs, and crunchy veggies like celery will keep things tasty and plant-based.
-
What if I can’t find star fruit for the tree topper?
No worries! You can cut a star shape out of cheese, use a cherry tomato, or even a bright red slice of bell pepper. The key is to have something colorful and star-shaped to crown your tree.
-
How far in advance can I assemble the board?
You can prepare your Christmas Tree Charcuterie Board up to 4 hours before serving. Just cover it tightly with plastic wrap and refrigerate to keep everything crisp and fresh.
-
Can I add meats to this charcuterie board?
Definitely! Rolled deli meats like salami or prosciutto fit beautifully in rows with the cheeses and fruits. It adds an extra savory note that many guests love.
Final Thoughts
I absolutely love how this Christmas Tree Charcuterie Board Recipe brings people together with its festive charm and delicious variety. When I first tried it, I was surprised at how easy it was to assemble something that looks so fancy. Whether you’re hosting a big holiday bash or a cozy family get-together, this board is sure to be a standout. Trust me, give it a try and watch your friends and family go crazy for it—they’ll be asking you how you made such a fun and tasty centerpiece. Happy holidays and happy snacking!
Print
Christmas Tree Charcuterie Board Recipe
- Prep Time: 25 minutes
- Cook Time: 0 minutes
- Total Time: 25 minutes
- Yield: Serves 10 people
- Category: Appetizer
- Method: No-Cook
- Cuisine: American
Description
Create a festive Christmas Tree Shaped Charcuterie Board perfect for holiday gatherings. This visually stunning and delicious arrangement includes a variety of cheeses, fresh fruits, nuts, and herbs shaped like a Christmas tree, making it a delightful centerpiece and appetizer.
Ingredients
Herbs and Vegetables
- 10 fresh rosemary sprigs (more or less depending on size)
- 1 celery stalk
Fruits
- Red, green, and black seedless grapes, clipped into small clusters or stems removed
- ½ cup fresh cranberries
- 1-2 star fruits, sliced
- 1 green kiwi fruit, sliced
Cheeses
- 4 ounces sharp cheddar, cut into ¾-inch squares
- 4 ounces Monterey Jack, cut into same size squares
- 4 ounces mild or medium cheddar, cut into same size squares
Nuts
- 1 cup assorted nuts (almonds recommended for the “pot”)
Instructions
- Create the Tree Outline: Using the rosemary sprigs, outline the shape of a Christmas tree on your serving board, starting narrow at the top and spreading wider at the bottom. Adjust and rearrange sprigs as needed while adding ingredients.
- Form the Tree Trunk: Place the celery stalk vertically at the bottom center to represent the tree trunk, adjusting the length so it looks natural with your tree shape.
- Layer the Cheese and Grapes: Starting from the bottom of the tree shape, arrange rows in this order: a row of cheese squares, a row of red grapes, another row of cheese, then green grapes, then cheese again, and finally black grapes at the top layers.
- Add Kiwi for the Tree Top: Position the kiwi slices in a triangular shape to represent the top of the tree.
- Decorate with Star Fruit and Cranberries: Place a star fruit slice at the very top as the star. Scatter additional star fruit slices and fresh cranberries randomly across the tree shape for vibrant accent points.
- Arrange the Nuts: Scatter the mixed nuts around the tree. To create a “pot” base, arrange almonds in a square shape around the bottom of the celery stalk trunk to mimic a tree stand.
- Chill and Serve: Cover the assembled board with plastic wrap and refrigerate if preparing ahead. It can be made up to 4 hours before serving.
Notes
- This recipe is a flexible guide; you can add rolled deli meats in rows to make it a meat and cheese board.
- Feel free to use your favorite cheeses, including gourmet varieties or cheese curds.
- Use a small star-shaped cookie cutter to create star shapes from cheese for additional decorations.
- If star fruit is unavailable, substitute with sliced yellow or green apple or pear slices shaped like stars for a similar aesthetic.
Nutrition
- Serving Size: 1/10th of board
- Calories: 210
- Sugar: 10g
- Sodium: 150mg
- Fat: 14g
- Saturated Fat: 6g
- Unsaturated Fat: 7g
- Trans Fat: 0g
- Carbohydrates: 15g
- Fiber: 3g
- Protein: 7g
- Cholesterol: 25mg


