
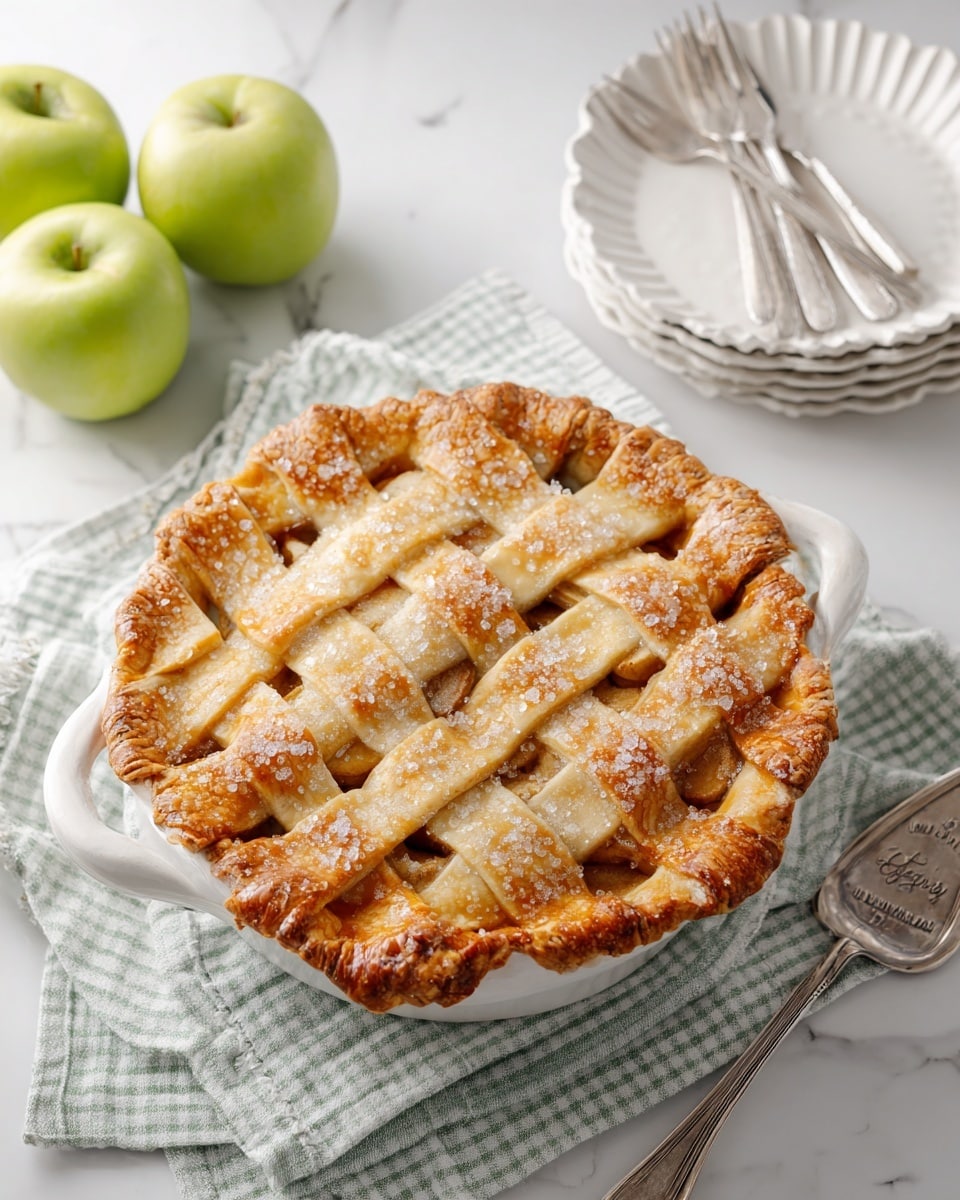
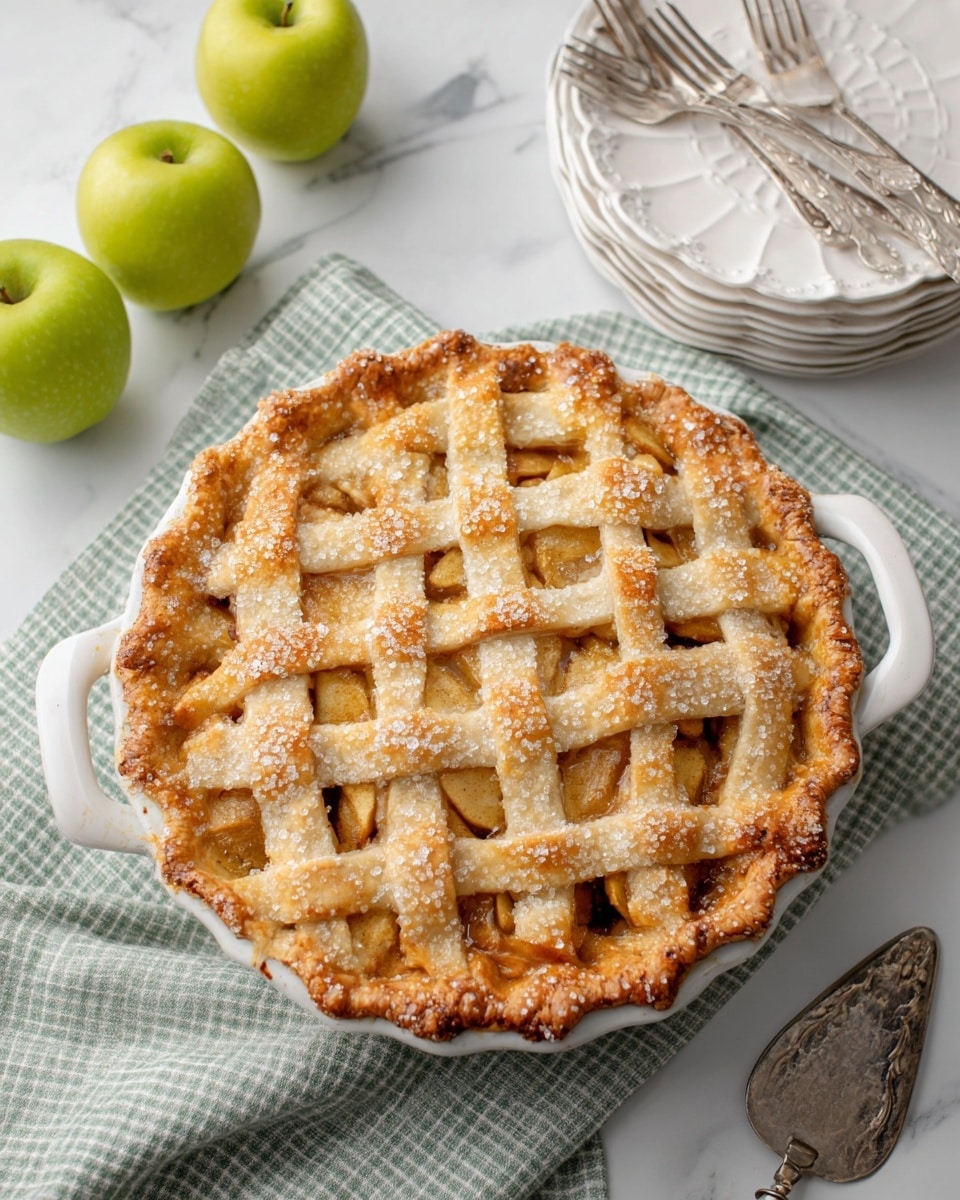
I absolutely love this Classic Apple Pie Recipe because it captures that perfect balance of sweet, tart apples nestled in a buttery, flaky crust. Every time I make it, the house fills with the most comforting, warm aroma that instantly feels like home. Whether you’re baking for a cozy family dinner or a special holiday gathering, this recipe is a sure crowd-pleaser—and it’s simpler to pull off than you might think.
When I first tried this Classic Apple Pie Recipe, I discovered the key is in cooking the apples just right before filling the crust. It makes a world of difference because the pie comes out juicy without turning the crust soggy. You’ll find that this approach keeps the filling perfectly tender and flavorful, making every bite a little slice of nostalgia.
Why You’ll Love This Recipe
- Perfect Texture: Pre-cooking the apples ensures a juicy filling without soggy crust.
- Classic Comfort: The combination of cinnamon and brown sugar creates that nostalgic apple pie flavor.
- Simple to Customize: Easy to tweak with different apple varieties or crust designs.
- Trusted Technique: A foolproof method that even beginners will feel confident making.

Ingredients You’ll Need
The magic behind this Classic Apple Pie Recipe comes from using fresh, crisp apples combined with warm spices and a buttery crust. Each ingredient plays an important role, so picking the right ones makes all the difference.
- Perfect Pie Crust Recipe: Use your favorite homemade or store-bought crust; I like a flaky, all-butter crust for richness.
- Butter: Adds flavor and helps cook the apples gently in the filling.
- Apples: Choose firm varieties like Granny Smith or Honeycrisp for a nice balance of tart and sweet.
- Brown Sugar: Lightly packed for just enough sweetness and depth.
- All-Purpose Flour: Thickens the filling without altering the flavor.
- Cinnamon: The classic spice that brings warmth and coziness.
- Lemon Juice: Keeps apples from browning and adds subtle brightness.
- Salt: Enhances the overall flavor and balances sweetness.
- Egg: Used in the egg wash to give the crust that beautiful golden color.
- Water: Mixes with the egg for the egg wash.
- Coarse Sugar (optional): Sprinkled on top for a pretty, crunchy finish.
Variations
I love to switch things up depending on the season or my mood—and you should definitely make this Classic Apple Pie Recipe your own. Whether you want a gluten-free crust or a peek of caramel, there’s so much room to experiment here.
- Caramel Apple Pie: Drizzle some caramel sauce over the cooked apples before adding the top crust for a luscious twist.
- Spiced Up: Add a pinch of nutmeg or cloves along with cinnamon for a deeper warm spice profile.
- Gluten-Free: Swap in a gluten-free pie crust to keep this dessert friendly for dietary needs without compromising taste.
- Lattice Top: Weave your pie crust into a lattice for a stunning presentation that keeps things light and crispy on top.
How to Make Classic Apple Pie Recipe
Step 1: Cook the Apples Until Tender and Flavorful
Start by melting butter in a large pot over medium-low heat, then toss in the peeled, cored, and thinly sliced apples along with brown sugar, flour, cinnamon, lemon juice, and salt. Cook this mixture gently, stirring occasionally, until the apples soften but still hold their shape—usually about 8 to 10 minutes. This step helps build flavor and ensures the filling isn’t watery later on. Pro tip: Resist the urge to rush this part—good things take time!
Step 2: Prepare and Roll Out Your Pie Crust
While the filling cools, divide your pie dough into two halves if it’s not already pre-portioned. Lightly flour your work surface and roll the first portion out to about 1/8-inch thickness—just slightly larger than your 9-inch pie plate. Transfer this dough carefully into the pie plate, pressing gently so it fits nicely on all sides without stretching. This will be your pie’s sturdy, buttery base.
Step 3: Fill and Cover Your Pie
Pour the cooled apple filling evenly into your prepared crust. Then roll out the second dough portion and decide whether to cover your pie with a full top or get creative with strips for a lattice effect. If you go with a full top, don’t forget to cut vents so steam escapes during baking. Trim any excess dough around the edges and crimp the edges tightly—this seals in all those delicious juices.
Step 4: Finish with an Egg Wash and Bake
Whisk together the egg and water for your egg wash, then lightly brush the pie’s surface to help it brown beautifully. For a little sparkle and crunch, sprinkle coarse sugar on top. Bake the pie at 425°F for 15 minutes, then reduce the heat to 350°F and continue baking for roughly 40 minutes more. Keep an eye on the crust—if it starts browning too fast, tent it with foil. When you see bubbling filling through the vents and a golden crust, it’s ready to come out and rest.
Pro Tips for Making Classic Apple Pie Recipe
- Choose the Right Apples: Using a mix of tart Granny Smith and sweeter Honeycrisp adds great depth and texture.
- Don’t Skip Pre-Cooking: This little step keeps the apples from leaking too much liquid and helps them absorb spice flavor better.
- Chill Your Dough: Keep your pie dough cold before rolling to prevent shrinking and tough crusts.
- Use Foil Tenting: Shield your crust mid-bake if it browns too quickly to avoid a burnt top.
How to Serve Classic Apple Pie Recipe
Garnishes
I love serving this pie with a generous scoop of vanilla ice cream or a dollop of freshly whipped cream—that creamy coolness complements the warm spiced apples perfectly. Sometimes, a sprinkle of cinnamon or a drizzle of caramel sauce on top takes it from great to show-stopping.
Side Dishes
This apple pie shines on its own but goes beautifully alongside a cup of strong coffee or spiced chai. For holiday dinners, I like pairing it with roasted root veggies or a simple green salad to balance the sweetness on the plate.
Creative Ways to Present
For special occasions, I’ve made mini versions using a muffin tin—perfect for individual servings that look adorable and bake faster. A lattice crust decorated with cut-out leaves adds a festive touch, while a braided edge always impresses guests without needing fancy pastry skills.
Make Ahead and Storage
Storing Leftovers
Once cooled, I cover leftover pie tightly with plastic wrap or foil and store it in the fridge. It keeps well for up to 4 days, though honestly, it rarely lasts that long in my house! To keep the crust from softening, avoid stacking anything on top of the pie.
Freezing
I’ve frozen unbaked apple pies wrapped securely in plastic wrap and foil—just thaw overnight in the fridge before baking. You can also freeze baked pie slices for a quick dessert later; just thaw in the fridge and warm gently.
Reheating
Reheating is best done in the oven at 350°F for about 15-20 minutes to bring back the crispness of the crust and warm the filling without drying it out. Microwaves work in a pinch but can make the crust soggy, so I save that for the fastest possible option.
FAQs
-
Can I use frozen apples for this Classic Apple Pie Recipe?
Using frozen apples isn’t ideal because they release a lot of water and can make the filling watery. If you do use them, be sure to thaw and drain thoroughly before cooking, and consider adding an extra thickener like cornstarch.
-
What’s the best way to prevent a soggy bottom crust?
Pre-cooking the apples helps reduce excess liquid, plus rolling the dough a bit thicker and chilling it before baking also helps. You can also bake the bottom crust blind for 10 minutes before adding the filling to firm it up.
-
How do I know when the pie is done?
The pie is ready when the crust is golden brown and you see the filling bubbling through the vents—this indicates the apples are fully cooked and the juices thickened.
-
Can I make this Classic Apple Pie Recipe ahead of time?
Absolutely! You can prepare and assemble the pie up to a day in advance, keeping it covered in the fridge. Bake it fresh when you’re ready to serve for the best crust texture.
Final Thoughts
This Classic Apple Pie Recipe truly feels like a warm hug from the inside out. Every layer—the flaky crust, the spicy-sweet filling—is a reminder of good times with loved ones and simple pleasures. Trust me, once you make this, it’ll become your go-to for celebrations or whenever you want to treat yourself to something special. So, grab those apples and treat yourself to a slice of pure comfort—you deserve it!
Print
Classic Apple Pie Recipe
- Prep Time: 25 minutes
- Cook Time: 55 minutes
- Total Time: 1 hour 20 minutes
- Yield: 8 servings
- Category: Dessert
- Method: Baking
- Cuisine: American
Description
A classic homemade apple pie recipe featuring a buttery and flaky pie crust filled with a warm, spiced apple mixture. This comforting dessert is perfect for any occasion, with tender apples cooked in a cinnamon and brown sugar sauce, topped with a golden, brushed egg wash crust that’s sprinkled with optional coarse sugar for added texture and sweetness.
Ingredients
Crust
- 1 Perfect Pie Crust Recipe*
Filling
- 1/4 cup butter
- 8 cups thinly sliced apples, peeled and cored
- 2/3 cup lightly packed brown sugar
- 1 tablespoon all-purpose flour
- 2 teaspoons cinnamon
- 1 teaspoon lemon juice
- 1/4 teaspoon salt
Topping
- 1 egg
- 1 teaspoon water
- Coarse sugar, optional
Instructions
- Preheat Oven: Set aside a 9-inch pie plate and preheat the oven to 425°F to ensure it reaches the proper temperature for baking the pie.
- Cook Apple Filling: Melt the butter in a large pot over medium-low heat. Add the apples, brown sugar, flour, cinnamon, lemon juice, and salt. Stir together and cook, stirring occasionally, until the apples soften, about 8 to 10 minutes. Remove from heat and let the mixture cool.
- Prepare Pie Crust Bottom: Divide the prepared pie dough in half if not already in discs. On a lightly floured surface, roll out one disc to about 1/8-inch thickness, slightly larger than the pie plate. Transfer the dough carefully into the pie plate, gently pressing it against the bottom and sides.
- Make Egg Wash: In a small bowl, whisk together the egg and water until well combined. Set aside to brush on the pie crust later for a golden finish.
- Assemble Pie: Pour the cooled apple filling into the prepared pie crust. Roll out the second disc of dough similarly and place it over the filling. Alternatively, cut the dough into strips and weave a lattice top. Cut vents in the crust if not braiding. Trim excess dough and crimp edges with your fingers to seal the pie.
- Apply Egg Wash and Sugar: Lightly brush the top crust with the egg wash. Sprinkle coarse sugar evenly over the top if desired, adding a sparkling finish and slight crunch.
- Bake the Pie: Bake in the preheated 425°F oven for 15 minutes. Then reduce the temperature to 350°F and continue baking for approximately 40 minutes, or until the crust is golden brown and the filling bubbles through vents. If the crust browns too quickly, cover loosely with aluminum foil to prevent burning.
- Cool and Serve: Remove the pie from the oven and let it cool completely before slicing to allow filling to set properly and enhance flavors.
Notes
- Use tart, firm apple varieties such as Granny Smith, Honeycrisp, or Braeburn for best texture and flavor.
- Make sure to cook the apple filling until softened but not mushy to maintain good texture.
- The egg wash gives the crust a shiny, golden-brown color and helps coarse sugar adhere.
- If you prefer a lattice crust, use strips cut with a pizza cutter and weave for a decorative top.
- Allow the pie to cool fully before serving to make slicing easier and filling less runny.
- Use aluminum foil to shield crust edges if they brown too quickly during baking.
- Pie crust recipe referred should be a standard flaky pastry dough; ensure it’s chilled before rolling for best results.
Nutrition
- Serving Size: 1 slice (1/8 of pie)
- Calories: 350 kcal
- Sugar: 22 g
- Sodium: 150 mg
- Fat: 15 g
- Saturated Fat: 8 g
- Unsaturated Fat: 6 g
- Trans Fat: 0.3 g
- Carbohydrates: 50 g
- Fiber: 3 g
- Protein: 2 g
- Cholesterol: 45 mg


