
If you’re looking for a cookie recipe that’s brimming with fun, flavor, and a little bit of whimsy, then you’re going to love this one. The Cookie Monster Cookies Recipe is absolutely fan-freaking-tastic, combining that nostalgic blue color we all adore with ooey-gooey chocolate chips and crunchy cookie bits. Trust me, when I first tried this recipe, it instantly became a favorite in my house — and I can’t wait for you to try it too!
Why You’ll Love This Recipe
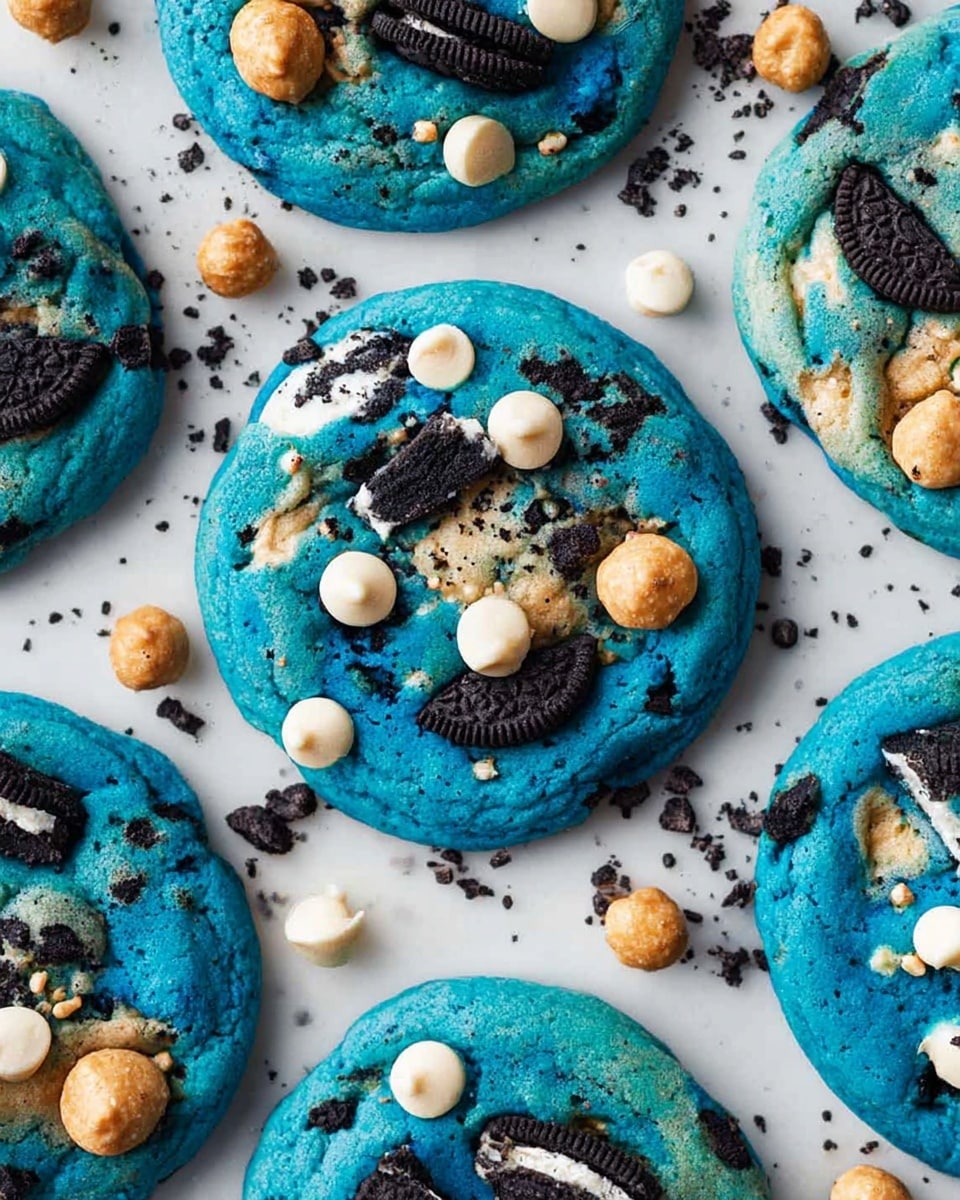
- Eye-Catching Blue Color: Thanks to the blue gel food coloring, these cookies sport a fun, vibrant hue that instantly brightens up any cookie plate.
- Loaded with Texture: Combining dark and white chocolate chips with crushed mini cookies and Oreos gives every bite delightful crunch and melty pockets of chocolate.
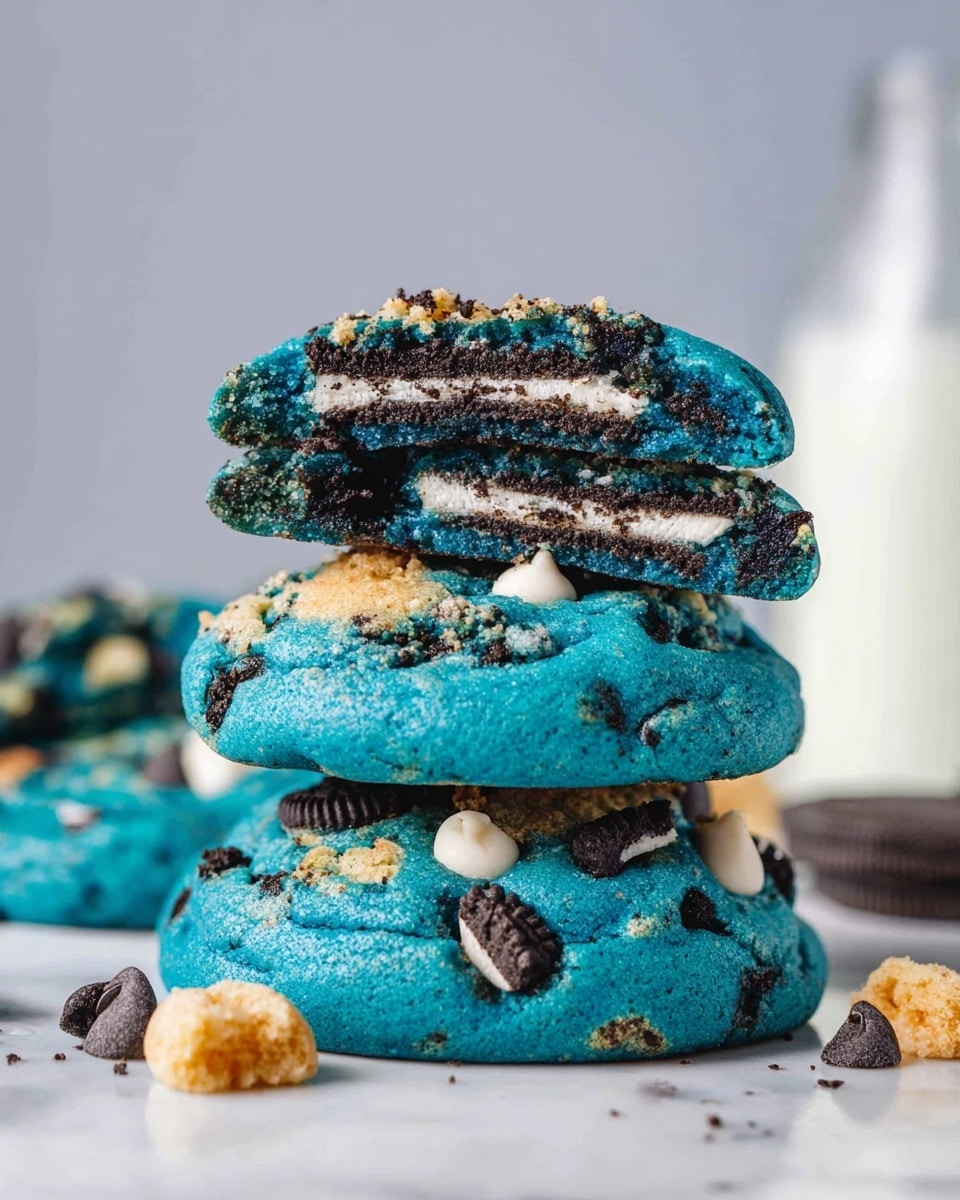
- Surprise Center: Wrapping a whole Oreo inside makes these cookies extra special — a little hidden treasure in every bite!
- Perfect for Sharing: These cookies hold their shape well and travel nicely, making them a hit at parties, school events, or just because.

Ingredients You’ll Need
This Cookie Monster Cookies Recipe uses everyday ingredients that come together beautifully. Every component is chosen to add a specific flavor or texture, making these cookies irresistibly chewy and crunchy at the same time. If you’re hunting for blue gel food coloring, I find the gel type works best here since it doesn’t thin the dough like liquid coloring might.
- Butter: Unsalted and softened is key for creaming with the sugars and creating that tender crumb.
- Granulated Sugar: Adds crispness and balances the sweetness.
- Light Brown Sugar: Brings moisture and a subtle caramel depth that makes the cookie chewy.
- Egg: At room temperature so it blends seamlessly into the dough.
- Vanilla Extract: Classic flavor booster that rounds out sweetness.
- Blue Gel Food Coloring: The magic touch that gives the Cookie Monster vibe!
- All-Purpose Flour: The foundation of our dough, sifted with leavening for even texture.
- Salt: Just a pinch to balance the sweetness and highlight flavors.
- Baking Powder & Baking Soda: These leavening agents help the cookies puff just right.
- Dark Chocolate Chips: Rich and bittersweet, perfect contrast to the blue dough.
- White Chocolate Chips: Sweet pockets that add creamy texture.
- Crushed Mini Cookies: Adds extra crunch and a little extra cookie flavor inside.
- Oreo Cookies: Chopped for mixing in, plus whole Oreos wrapped inside for that fun center surprise.
Variations
I love to keep this Cookie Monster Cookies Recipe adaptable because everyone’s palate is a little different. Don’t hesitate to tinker with add-ins or try different toppings to make it your own. It’s a great base that welcomes creativity!
- Dairy-Free Version: I’ve swapped butter for coconut oil and used dairy-free chocolate chips—just as tasty and still blue!
- Nutty Twist: Adding chopped walnuts or pecans adds a lovely crunch and a toasty flavor that my family enjoys on cooler days.
- Extra Cookie Crumble: For a cookie-in-cookie effect, I sometimes use double-stuffed Oreos or mix in other cookie crumbs like chocolate chip or shortbread.
- Less Sweet: Swap white chocolate chips for more dark chocolate or omit them to make the sweetness just right for you.
How to Make Cookie Monster Cookies Recipe
Step 1: Cream the Butter and Sugars to Perfection
Start by beating the softened butter with the white granulated sugar and light brown sugar for about 2 minutes. I like to do this with an electric mixer on medium speed—you want it creamy and a bit fluffy. This step is crucial because it creates the right texture in the final cookie, and you’ll notice the mixture lighten in color.
Step 2: Add the Egg, Vanilla, and Blue Color
Now, add your egg (at room temp for the best mix), vanilla extract, and that magical blue gel food coloring. Beat everything well for about a minute until you get a smooth batter with a gorgeous, vibrant blue shade. The blue gel packs a good punch without watering down the dough, so your cookies bake up bright and cheerful.
Step 3: Gently Fold in the Dry Ingredients
In a separate bowl, sift together the all-purpose flour, pinch of salt, baking powder, and baking soda. Keeping your flour mixture light and lump-free is the secret to a tender cookie crumb. Use a spatula to fold this into your wet batter just until combined—overmixing here can lead to tougher cookies, so keep it gentle.
Step 4: Mix in the Cookie Crunch and Chocolate Chips
This is my favorite part—fold in the chopped Oreo bits, crushed mini cookies, and those gorgeous dark and white chocolate chips. Don’t overmix; just fold enough to distribute everything evenly.
Step 5: Chill the Dough Before Shaping
Cover your dough with plastic wrap and pop it in the fridge for at least 30 minutes to an hour. Chilling firms up the dough, making it much easier to handle—plus, it helps develop better flavor and thicker cookies. I’ve learned this step is worth every minute for the perfect Cookie Monster Cookie texture.
Step 6: Wrap Oreos Inside Each Cookie
Take small portions of dough and flatten them into discs in your palm. Place a whole Oreo cookie right in the center, then fold the dough completely around it, sealing that Oreo inside like a little blue treasure. This technique always impresses anyone who bites into these cookies!
Step 7: Chill Again Before Baking
Set your shaped cookies on a parchment-lined baking sheet and chill them again—either 30 minutes in the fridge or 15 minutes in the freezer. This final chill stops the cookies from spreading too much, so they stay chunky and perfectly pocketed.
Step 8: Bake Until Just Soft and Golden
Preheat your oven to 180°C (350°F) and bake your Cookie Monster Cookies for about 12-15 minutes. You’re looking for slightly golden edges but still a soft center. The cookies firm up more as they cool, so don’t overbake! Let them rest on the baking sheet briefly before transferring to a wire rack to cool completely.
Pro Tips for Making Cookie Monster Cookies Recipe
- Use Room Temperature Ingredients: I learned that using softened butter and room-temp egg blends more smoothly and yields a better dough texture.
- Don’t Skip the Chill: Chilling dough twice really helps prevent flat cookies and enhances flavors – trust me, it’s worth the wait.
- Seal the Oreos Well: Make sure to completely cover the Oreos to avoid them breaking or leaking during baking.
- Watch the Bake Time Carefully: Pull the cookies when edges just start turning golden, even if centers seem soft—they’ll finish setting as they cool.
How to Serve Cookie Monster Cookies Recipe
Garnishes
I usually skip fancy garnishes because the vibrant blue and chocolate chips make these cookies look incredible on their own. But if you want to get creative, a light dusting of powdered sugar or a drizzle of white chocolate makes a pretty presentation. For parties, you could add edible googly eyes to really channel that playful “Cookie Monster” spirit — kids go nuts for that!
Side Dishes
These cookies are a treat all on their own, but I like serving them with a tall glass of cold milk or a scoop of vanilla ice cream for an extra indulgent snack. They’re also great paired with coffee or hot cocoa for an afternoon pick-me-up.
Creative Ways to Present
For birthdays or cookie swaps, I’ve arranged these cookies in a circle with colorful sprinkles or mini Oreo crumbs sprinkled around the platter. You can also stack them for a fun “cookie tower” centerpiece or package a few in a clear cellophane bag tied with a blue ribbon — it’s always a hit!
Make Ahead and Storage
Storing Leftovers
I keep leftover Cookie Monster Cookies in an airtight container at room temperature, and they stay soft and delicious for up to one week. To retain freshness, I separate layers with parchment paper to prevent sticking and maintain their perfect texture.
Freezing
This recipe freezes beautifully! I’ve frozen the cookie dough balls wrapped individually on a baking sheet, then stored them in a zip-top bag for up to 3 months. You can bake them straight from frozen—you’ll just need to add a couple of extra minutes to the bake time.
Reheating
If you want to warm up leftover cookies, I pop them in a preheated oven at 150°C (300°F) for 5 minutes. This revives the soft centers and melts the chocolate chips just right, making them taste freshly baked all over again.
FAQs
-
Can I use liquid food coloring instead of gel?
Yes, but I don’t recommend it for this recipe. Liquid food coloring can thin out the dough slightly, changing the texture. Gel food coloring is more concentrated and keeps the dough consistency just right while giving you that brilliant blue color.
-
What if I don’t have baking soda?
No worries! You can use a full packet of baking powder as a substitute. It will still give the cookies a nice rise and fluffy texture, just slightly different from the original.
-
How do I avoid Oreos leaking inside the dough?
Make sure to press and fold the dough all the way around the Oreo so no part is exposed. Chilling the shaped cookies before baking also helps keep everything intact.
-
Can I make these cookies gluten-free?
Yes! Use a 1-to-1 gluten-free baking flour blend. Just make sure the blend includes xanthan gum or a similar binder for the best texture. Keep in mind baking times may vary slightly.
-
How many cookies does this recipe make?
This recipe yields about 12 generously sized Cookie Monster Cookies, each with that whole Oreo hidden inside.
Final Thoughts
I absolutely love how these Cookie Monster Cookies turn out—vibrant, chewy, and downright fun to make. If you want to wow your family or friends with a cookie that’s both playful and indulgent, this recipe is your new best friend in the kitchen. From my experience, the best part is seeing the surprise on everyone’s faces when they bite in and find a whole Oreo inside. So go ahead, give this recipe a try—you’ll enjoy every blue-tinted bite, and I promise it’ll become a staple in your cookie rotation just like it is in mine.
Print
Cookie Monster Cookies Recipe
- Prep Time: 10 minutes
- Cook Time: 15 minutes
- Total Time: 25 minutes
- Yield: 12 cookies
- Category: Dessert
- Method: Baking
- Cuisine: American
Description
Delight in the fun and colorful Cookie Monster Cookies, featuring a vibrant blue dough packed with chunks of Oreo cookies, mini cookies, and both dark and white chocolate chips. These soft, chewy cookies have a surprise whole Oreo baked inside each one, making them a playful and indulgent treat perfect for parties or special occasions.
Ingredients
Wet Ingredients
- 120 g (½ cup) unsalted butter, softened
- 1 egg, at room temperature
- 1 tsp vanilla extract
- Blue gel food coloring, as needed
Sugars
- 100 g (½ cup) granulated white sugar
- 50 g (¼ cup) light brown sugar
Dry Ingredients
- 230 g (1 ¾ cups) all-purpose flour
- A pinch of salt
- 1 tsp baking powder
- ½ tsp baking soda
Add-ins
- 40 g (¼ cup) dark chocolate chips
- 40 g (¼ cup) white chocolate chips
- 30 g (¼ cup) crushed mini cookies
- 3 Oreo cookies, chopped
- 12 Oreo cookies, whole
Instructions
- Cream Butter and Sugars: In a large mixing bowl, beat the softened butter with granulated white sugar and light brown sugar for 2 minutes until the mixture is creamy and smooth, forming the base of your cookie dough.
- Add Egg, Vanilla, and Color: Mix in the egg, vanilla extract, and blue gel food coloring using an electric mixer for 1 minute until the batter is smooth and evenly colored with a vibrant blue hue.
- Fold in Dry Ingredients: Sift together the all-purpose flour, salt, baking powder, and baking soda. Gently fold these dry ingredients into the wet mixture using a spatula until just combined to avoid overmixing.
- Incorporate Mix-ins: Add chopped Oreo pieces, crushed mini cookies, white chocolate chips, and dark chocolate chips to the dough. Quickly fold them in to distribute evenly without overworking the dough.
- Chill the Dough: Cover the dough with plastic wrap and refrigerate for 30 minutes to 1 hour to allow it to firm up, which helps in shaping the cookies later.
- Shape the Cookies: Take small portions of the chilled dough and flatten each into a disc in your palm. Place one whole Oreo cookie in the center and carefully wrap the dough around it, fully enclosing the Oreo.
- Chill Again: Arrange the prepared cookies on a parchment-lined baking sheet. Refrigerate for about 30 minutes or freeze for 15 minutes to let them firm up before baking, which prevents spreading.
- Bake: Preheat your oven to 180°C (350°F). Bake the cookies for 12-15 minutes until the edges turn slightly golden while the centers remain soft, creating a perfect chewy texture.
- Cool and Serve: Let the cookies cool briefly on the baking sheet before transferring them to a wire rack or plate. These cookies are best enjoyed warm or at room temperature.
Notes
- Storage: Store the cookies in an airtight container for up to 1 week or freeze for up to 3 months.
- Substitute Baking Soda: If you don’t have baking soda, use a full packet of baking powder instead.
- Shape Uniformly: Use a large round cookie cutter after baking for perfectly round shapes.
- Chill Dough: For enhanced flavor and thicker cookies, chill the dough for at least 1 hour or overnight.
- Measurement Tip: Use a digital scale for ingredient accuracy, measuring in grams unless using cups for sugar.
Nutrition
- Serving Size: 1 cookie
- Calories: 250 kcal
- Sugar: 18 g
- Sodium: 120 mg
- Fat: 13 g
- Saturated Fat: 7 g
- Unsaturated Fat: 5 g
- Trans Fat: 0 g
- Carbohydrates: 29 g
- Fiber: 1 g
- Protein: 3 g
- Cholesterol: 35 mg

