
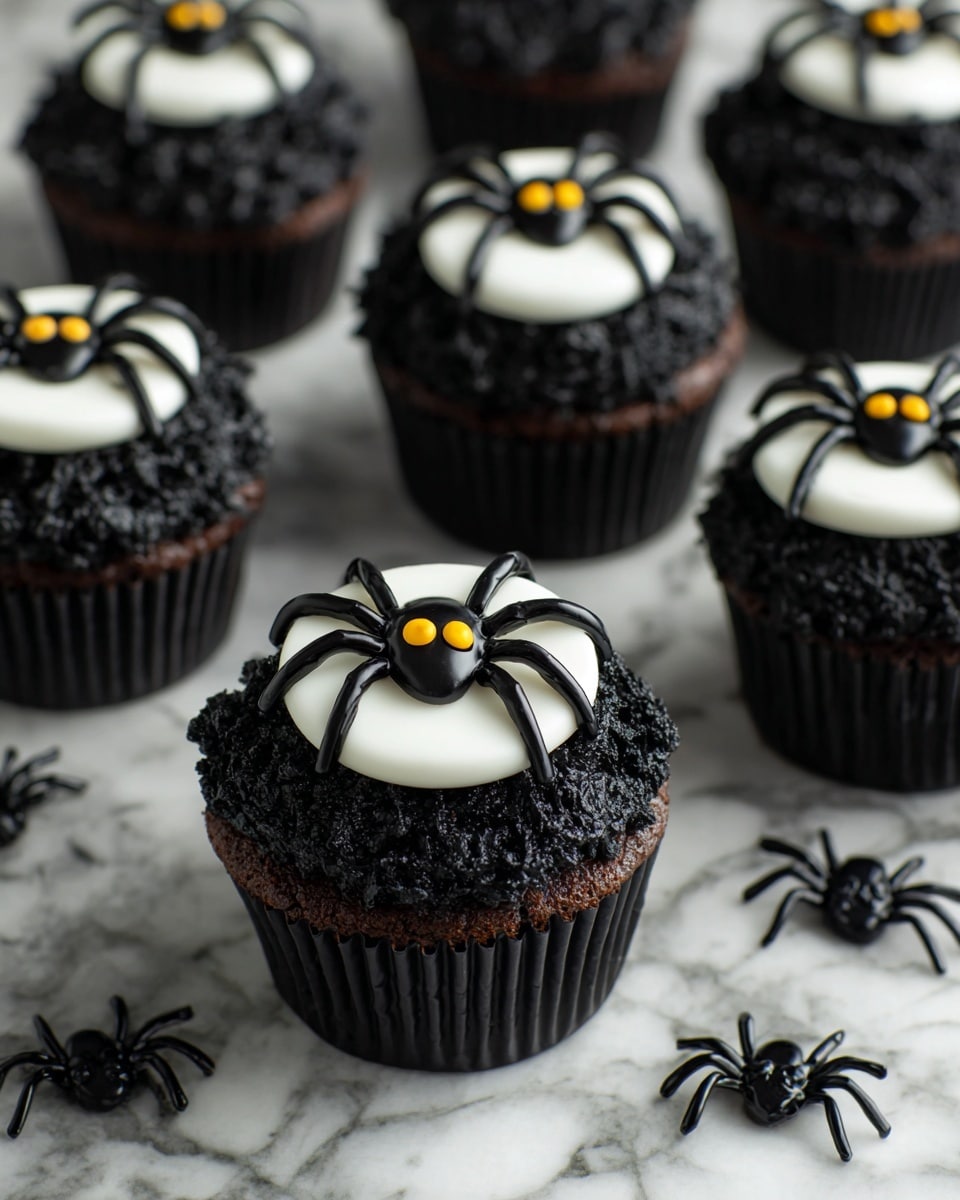
If you’re hunting for a spooky, fun, and utterly delicious treat this Halloween, let me share my secret weapon — the Creepy Halloween Spider Cupcakes Recipe. These cupcakes are not just adorable in their eerie spider presentation, but they’re also rich, moist, and perfectly spiced. I absolutely love how these cupcakes turn out every time, and I know you’ll find the decorating steps surprisingly approachable, even if you’re new to baking or piping frosting. Stick with me, and I’ll walk you through every step to make your Halloween party a total hit!
Why You’ll Love This Recipe
- Perfect Halloween Theme: Cute yet creepy spider cupcakes that will wow your guests and make your party unforgettable.
- Moist, Flavorful Cupcakes: Pumpkin puree and pumpkin spice add a subtle seasonal twist that lifts traditional chocolate cupcakes.
- Step-by-Step Decorating Fun: Decorating with buttercream and fondant spiders makes it creative and totally doable for bakers at any level.
- Crowd-Pleaser: My family goes crazy for these — I promise they’ll be a hit with kids and adults alike!

Ingredients You’ll Need
All the ingredients in this Creepy Halloween Spider Cupcakes Recipe work together to create a tender, chocolate-infused cupcake with just the right spicy warmth from pumpkin pie spice. A quick note: using pumpkin puree instead of pumpkin pie filling keeps it moist without too much sweetness.
- Self-raising flour: Gives your cupcakes that light, fluffy crumb without fussing over separate rising agents.
- Cocoa powder: For that rich chocolate punch — black cocoa powder in the frosting ensures deep color and flavor too.
- Butter (salted): Adds creaminess and flavor; salted butter amps up the overall taste, balancing sweetness.
- Granulated sugar: Classic sweetener to keep the texture just right.
- Eggs: Essential for structure and moisture — I always make sure they’re at room temperature before mixing.
- Pumpkin puree: The star that gives these cupcakes their fall flair and moistness.
- Milk: Adds liquid to balance the batter’s texture.
- Baking powder and salt: For rise and flavor enhancement.
- Pumpkin pie spice: The cozy aromatics that make these cupcakes scream autumn.
- Vanilla extract: A must for rounding out all those flavors elegantly.
- Powdered sugar: Base of the luscious buttercream that holds its shape well.
- Black food coloring: To get that perfect spider-black frosting; gel food coloring works best.
- White fondant: For spider legs and body details — it’s easy to work with and keeps the decor neat.
- Tiny green sprinkles: For the spooky eyes — these little details bring the spiders to life!
Variations
The beautiful thing about this Creepy Halloween Spider Cupcakes Recipe is how you can make it your own. Whether you want to dial up the spice, go dairy-free, or add more creative decorations, there’s room to experiment and make these cupcakes reflect your style.
- Spice it Up: When I first tried adding a pinch of cayenne to the batter, I got a subtle kick that pairs really well with the chocolate and pumpkin – great if you like a little heat!
- Dairy-Free Option: Swap out the butter and milk for coconut oil and almond milk; the cupcakes still turn out moist and delicious.
- Color Variations: Instead of black, try purple or orange frosting for a more vibrant Halloween look; just swap the black food coloring for gel colors.
- Mini Cupcakes: For parties with little fingers, making mini versions speeds up baking and decoration, plus they’re such a cute size for kids.
How to Make Creepy Halloween Spider Cupcakes Recipe
Step 1: Preparing the Batter with Love
Start by preheating your oven to 175°C (350°F) and line your cupcake pan with liners. This step is crucial because you want your cupcakes to bake evenly and release easily from their pans later. I like to whisk the dry ingredients — self-raising flour, cocoa powder, pumpkin pie spice, baking powder, and salt — together and sift them for an ultra-light texture. Trust me, sifting really helps avoid clumps and guarantees smooth cupcakes.
Step 2: Creaming Butter and Sugar Till Fluffy
In a separate bowl, cream the butter and granulated sugar until light and fluffy — about two minutes with an electric mixer on medium speed. I used to rush this step, but now I take my time because I’ve noticed it drastically improves the texture of the cupcakes. Remember to scrape down the sides of your bowl halfway through to make sure everything gets incorporated evenly.
Step 3: Adding Eggs and Pumpkin Puree
Beat in the eggs, one at a time, again scraping the bowl between additions to get everything evenly mixed. Next, fold in the pumpkin puree — don’t be alarmed if the batter looks a bit curdled here; this is totally normal and will even out once the dry ingredients are folded in.
Step 4: Incorporating Dry Ingredients Alternately with Milk
Gently fold in half of the flour mixture, then add the milk, and lastly fold in the remaining flour. My biggest tip here is to avoid overmixing — you want to see some streaks of flour incorporated softly without mushy batter. Overmixing results in denser cupcakes, which we definitely don’t want!
Step 5: Baking to Perfection
Fill each cupcake liner about three-quarters full — I like to use a cookie scoop for consistency. Bake for 15–18 minutes or until a toothpick inserted into the center comes out clean. Pro tip: the exact time can vary depending on your oven, so start checking at 15 minutes. After baking, let the cupcakes rest in the pan for a couple of minutes, then transfer to a cooling rack. Covering them with a kitchen towel while cooling helps keep them moist, a neat little trick I picked up early on.
Step 6: Mixing the Black Buttercream
While your cupcakes cool, whip up the buttercream. Beat the butter until creamy, then sift in powdered sugar and black cocoa powder before mixing on medium speed. Scrape the bowl often to catch any stray bits. Here’s what I learned: letting the frosting rest after mixing intensifies the black color beautifully. If after resting the frosting is still a little gray, add a couple drops of gel-based black food coloring for that perfect eerie shade. Avoid liquid coloring — it can loosen the frosting’s texture, making piping a challenge.
Step 7: Time to Decorate Your Spooky Cupcakes
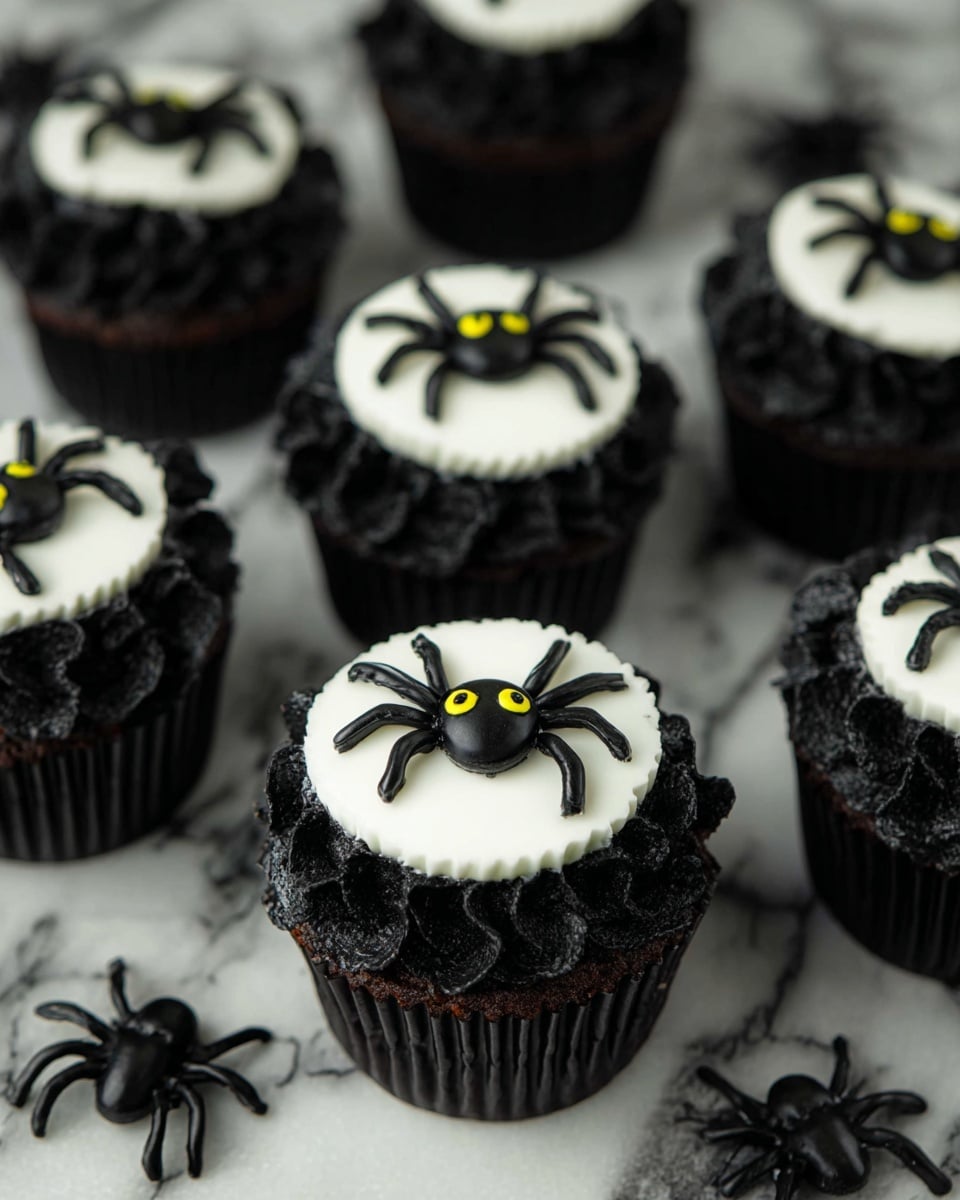
Transfer your black buttercream to a piping bag fitted with a star tip. Pipe reverse stars all around the cupcake in a circle pattern — this creates a textured nest for your spider. Then roll out the fondant and cut small circles to place right in the middle of each cupcake. Switching the piping bags to a small round tip next, pipe the spider’s body: two circles connected with four legs on each side. The grand finale? Use tweezers to place tiny green sprinkles for the spider’s eyes — a little detail that adds so much personality. Your friends won’t believe how spooky and cute these look!
Pro Tips for Making Creepy Halloween Spider Cupcakes Recipe
- Sifting Dry Ingredients: I always sift my flour and cocoa powder to avoid lumps that make cupcakes uneven.
- Don’t Overmix Batter: Just fold gently until combined — overmixing makes cupcakes tough, and no one wants that.
- Use Gel Food Coloring: Gel colors give deep, vivid hues without watering down your buttercream.
- Fondant Handling: Knead well and dust your surface with cornstarch to prevent sticking; also avoid fridge storage to stop fondant sogginess.
How to Serve Creepy Halloween Spider Cupcakes Recipe
Garnishes
I love using tiny green sprinkles for the spider eyes — it’s such a simple detail but it really brings the cupcakes to life. You could also sprinkle some edible glitter for a creepy shimmer or use black licorice strings to create more realistic spider webs across your cupcakes. These tiny additions elevate your presentation and make the cupcakes extra special.
Side Dishes
Pair these cupcakes with a creamy orange spice latte or a chilled blood-red fruit punch to keep with the Halloween vibe. I also like serving them alongside a rich dark chocolate mousse or pumpkin pie for a decadent dessert spread that guests will rave about.
Creative Ways to Present
For a Halloween party, I once arranged the cupcakes on a large platter lined with shredded black paper to mimic a spooky spider nest. Adding plastic spiders and some dry ice fog was a total crowd-pleaser. You could also place each cupcake inside small “cobweb” cupcake wrappers or a decorative Halloween-themed box if gifting.
Make Ahead and Storage
Storing Leftovers
Once decorated, store your cupcakes in an airtight container at room temperature for up to two days. I like to keep them covered loosely with a cake dome to protect the fondant details. Avoid refrigerating because the fondant can sweat and get sticky in humid fridge conditions.
Freezing
You can freeze baked and cooled cupcakes (without frosting) wrapped tightly in plastic wrap and foil for up to 3 months. When you’re ready to eat them, thaw overnight in the fridge, then decorate with fresh buttercream and fondant to maintain that perfect texture.
Reheating
For best results, reheat cupcakes without frosting gently in a microwave for 10-15 seconds to take the chill off. If refrigerated, allow them to come to room temperature naturally before serving; this helps the cupcakes regain their soft, moist texture.
FAQs
-
Can I use regular cocoa powder instead of black cocoa powder for the frosting?
Absolutely! Regular cocoa powder works fine, but the frosting color will be more of a dark brown rather than a pitch black shade. To get a deeper black, you can add black gel food coloring to the frosting as described in the recipe.
-
How do I make sure my cupcakes stay moist?
One trick I discovered is covering your cupcakes with a kitchen towel while they cool to lock in moisture. Using pumpkin puree instead of just butter also adds moisture and keeps these cupcakes soft and tender.
-
Can I make the frosting less sweet?
You can reduce the powdered sugar slightly, but keep in mind that the sugar helps the buttercream hold its shape for piping. Adjust gradually and taste as you go for your preferred sweetness.
-
What if I don’t have fondant for the spider legs and body?
You can pipe the spiders entirely with buttercream using a small round tip, or use black licorice pieces for legs and candy eyes if you want to skip the fondant step. Just get creative!
-
Can the cupcakes be made in advance?
Yes! Bake and cool the cupcakes a day ahead, then frost and decorate them the day you plan to serve. This keeps your fondant details looking fresh and prevents them from becoming soggy.
Final Thoughts
This Creepy Halloween Spider Cupcakes Recipe is truly a treat that brings joy and a little bit of spooky fun to your kitchen. I remember the first time I made these for a Halloween party — they were such a hit that everyone kept asking for the recipe. What I love most is how approachable and rewarding the decorating process is, turning simple cupcakes into festive masterpieces. Give this recipe a try, and I promise you’ll be baking up a storm of smiles and “oooh”s from everyone around you!
Print
Creepy Halloween Spider Cupcakes Recipe
- Prep Time: 20 minutes
- Cook Time: 15 minutes
- Total Time: 1 hour 35 minutes
- Yield: 14 cupcakes
- Category: Dessert
- Method: Baking
- Cuisine: American
Description
Create spooky and delicious Creepy Halloween Spider Cupcakes featuring rich chocolate pumpkin cupcakes topped with intense black buttercream and decorated with fondant spiders. Perfect for Halloween parties, these cupcakes combine moist texture with eye-catching creepy spider decorations.
Ingredients
Chocolate Cupcakes
- 180 g self-raising flour
- 20 g cocoa powder
- 100 g salted butter
- 200 g granulated sugar
- 2 eggs
- 200 g pumpkin puree
- 100 ml milk
- ½ teaspoon baking powder
- ¼ teaspoon salt
- ½ teaspoon pumpkin pie spice
- 1 teaspoon vanilla extract
Buttercream
- 450 g powdered sugar
- 225 g salted butter
- 2 tablespoon black cocoa powder
- 2 tablespoon milk
- 1 teaspoon vanilla extract
- Black food coloring
Decoration
- 175 g white fondant
- Tiny green sprinkles (for the spiders’ eyes)
Instructions
- Bake the cupcakes: Preheat the oven to 175°C and line a cupcake pan with muffin liners. In a mixing bowl, whisk together self-raising flour, cocoa powder, pumpkin spice, baking powder, and salt, then sift and set aside. In another bowl, cream together the sugar and butter until light and fluffy, about 2 minutes at medium speed, scraping the sides halfway. Beat in the eggs one at a time, scraping the bowl between additions. Add the pumpkin puree and mix until combined, even if curdled. Gradually fold half of the dry flour mixture into the wet mixture without overmixing. Add milk and fold again, then fold in the remaining flour mixture. Mix in the vanilla extract thoroughly. Scoop the batter into liners, filling them about three-quarters full. Bake for 15-18 minutes or until a toothpick comes out clean. Let cupcakes rest in the pan for 1-2 minutes, then transfer to a cooling rack to cool completely, covering with a kitchen towel to retain moisture.
- Make the black buttercream frosting: Beat butter in a large bowl until smooth and creamy. Sift in powdered sugar and black cocoa powder, mix lightly with a spatula, then use a mixer on medium speed until fully combined and creamy. Scrape the bowl and beaters well to incorporate all ingredients. Add vanilla extract and beat again. Allow the buttercream to rest for 10-20 minutes to deepen in color. If the color is not dark enough, add a few drops of black food coloring or a combination of red, green, and brown gel colors, mix well, and rest for an additional 10-15 minutes. Transfer the buttercream to a piping bag fitted with a star tip (#1M) and a small round tip (#3) in separate piping bags for decorating.
- Decorate the cupcakes: Using the star tip, pipe rows of reverse stars in a circle on top of each cupcake. Knead the white fondant well until smooth, roll it to about 1/8 inch thickness, and cut out small circles about 2 inches in diameter. Place one fondant circle in the center of each cupcake atop the buttercream. Switch the piping bag to the round tip to pipe spider decorations: pipe a small circle for the spider’s body, a smaller circle in front for the head, then pipe four legs on each side. Use tweezers to attach two tiny green sprinkles as the spider’s eyes. Keep finished cupcakes in an air-conditioned room to prevent fondant sogginess and avoid refrigerating to prevent condensation.
Notes
- Scraping the bowl ensures all ingredients are thoroughly mixed without any unmixed portions.
- Using a cookie or ice cream scoop helps maintain even cupcake sizes.
- Cupcake liners used measure approx. 5 cm bottom diameter and 3.5 cm height; adjust baking time for different sizes.
- Cover cupcakes with a kitchen towel while cooling to retain moisture and avoid drying out.
- Mixing powdered sugar and cocoa with a spatula before beating prevents sugar from flying out when mixing.
- Gel-based food coloring is recommended for vibrant color without affecting frosting texture. A mix of red, green, and brown food coloring can substitute black food coloring.
- Use two piping bags if buttercream quantity exceeds single bag capacity; swap bags as needed during decorating.
- Knead fondant smoothly and dust workspace with icing sugar or cornstarch to prevent sticking before rolling.
- Fondant circles’ size can vary to match cupcake size for best appearance.
- Keep cupcakes at room temperature, not refrigerated, to maintain fondant quality and avoid condensation.
Nutrition
- Serving Size: 1 cupcake
- Calories: 350 kcal
- Sugar: 32 g
- Sodium: 110 mg
- Fat: 18 g
- Saturated Fat: 11 g
- Unsaturated Fat: 6 g
- Trans Fat: 0.3 g
- Carbohydrates: 44 g
- Fiber: 3 g
- Protein: 4 g
- Cholesterol: 65 mg

