
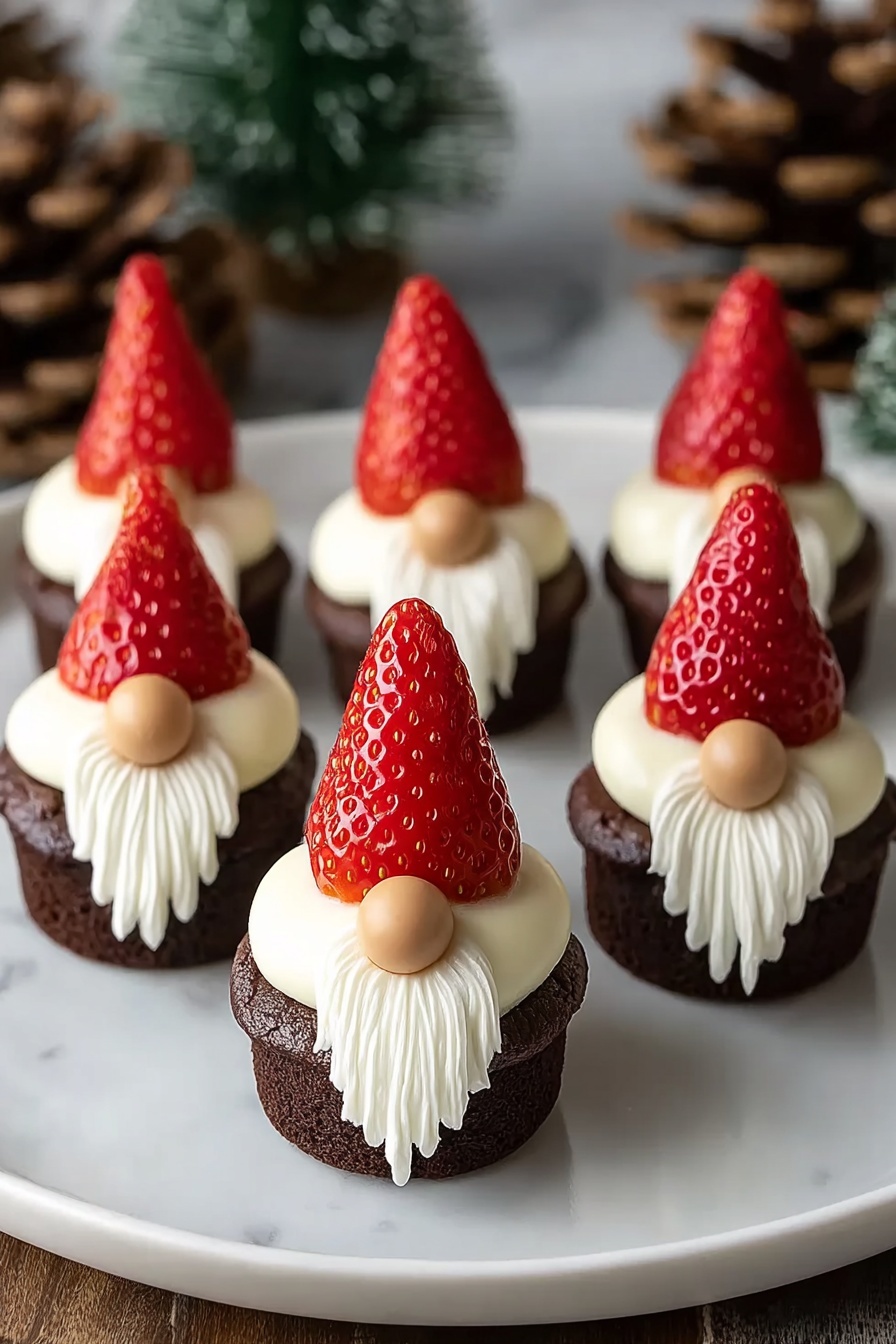
If you’re looking for an adorable and delicious treat to wow your family and friends, look no further than this Cute Brownie Bite Gnome Treats Recipe. I absolutely love how these tiny gnome-inspired brownies come together with just a few simple ingredients, and honestly, they’re as fun to make as they are to eat. Whether you’re prepping for a party, a cozy afternoon snack, or a whimsical holiday dessert, this recipe will have you smiling from start to finish.
Why You’ll Love This Recipe
- Easy and Quick to Make: No baking required if you use store-bought brownie bites, so you can assemble these in no time.
- Fun for All Ages: Kids absolutely love helping with the assembly, which makes this a perfect family activity.
- Visually Delightful: These gnome treats are just so cute and creative — they bring a smile to any gathering!
- Customizable Ingredients: Whether you want to go homemade or grab quick store-bought items, this recipe adapts easily to your preference.

Ingredients You’ll Need
I find that using a combination of store-bought brownie bites and fresh ingredients is a perfect balance between convenience and quality. Shopping for ripe strawberries and creamy frosting can really elevate your gnome treats.
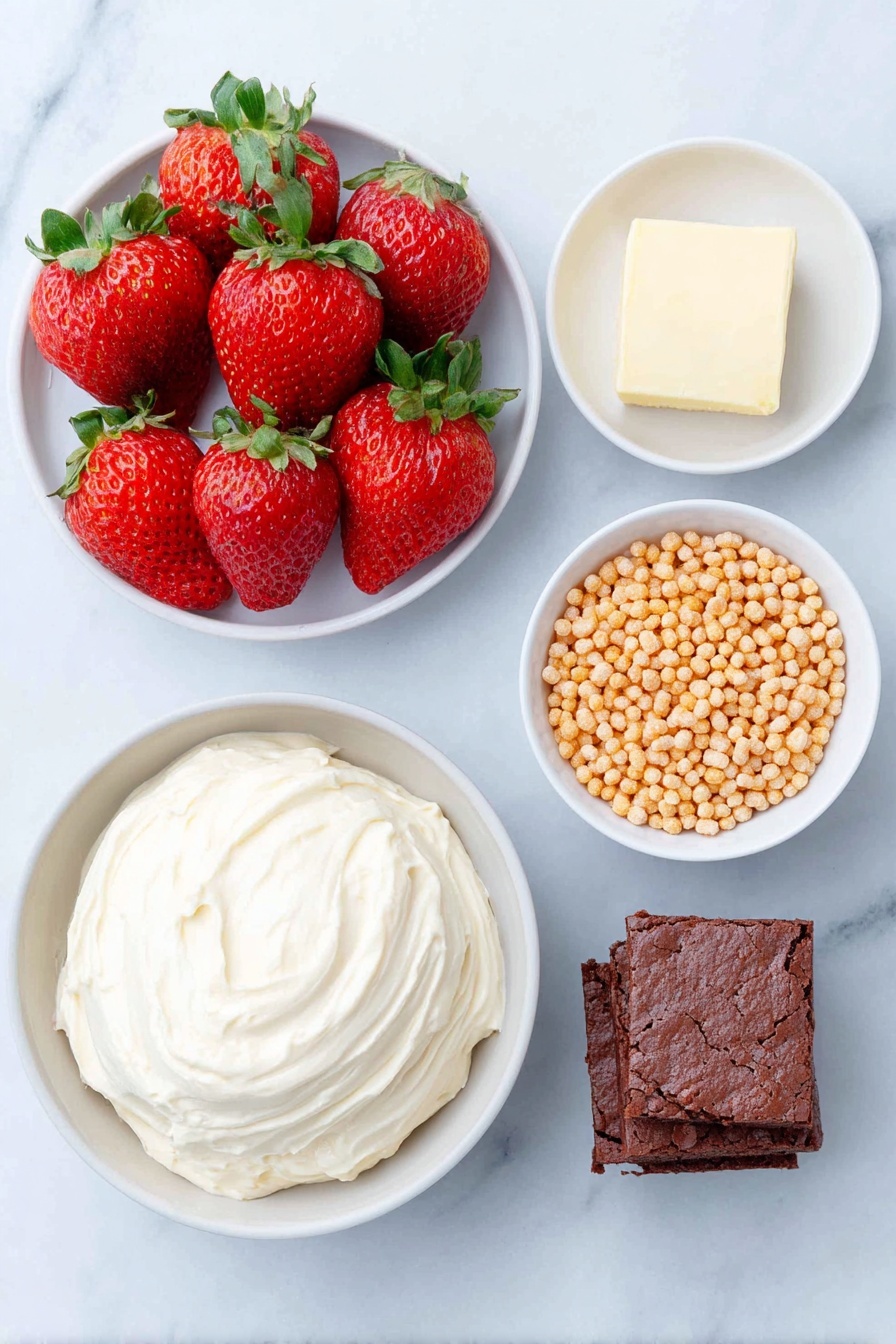
- Brownie Bites: You can go homemade or store-bought — just choose fudgy bites to get that rich chocolatey flavor.
- Cream Cheese Frosting: A creamy frosting works wonders here, adding a smooth texture that contrasts beautifully with the brownie.
- Fresh Strawberries: Make sure they’re firm and dry to avoid sogginess, since they become the gnome’s whimsical hat.
- Reese’s Puffs Cereal: These tiny puffs add the perfect little nose for your gnome, and they’re so fun to work with.
Variations
I love how you can tweak this Cute Brownie Bite Gnome Treats Recipe to fit different occasions or dietary needs. Personally, I’ve swapped out some ingredients depending on what’s in the pantry or what flavor combo I’m craving.
- Chocolate-Loving Twist: Try using chocolate cream cheese frosting or a drizzle of melted chocolate over the brownies for extra indulgence — my family goes crazy for that version!
- Fruit Swaps: If strawberries aren’t in season, I’ve used raspberries or blackberries as the gnome hat — it changes the flavor but keeps the look adorable.
- Nut-Free Version: Simply replace the Reese’s Puffs with mini chocolate chips or small fruit pieces for a nose that’s just as cute but allergy-friendly.
How to Make Cute Brownie Bite Gnome Treats Recipe
Step 1: Prep Your Strawberries
This step is a little delicate, but trust me, it’s worth the care. After washing your strawberries, make sure they’re completely dry — I learned the hard way that wet strawberries can make the brownies soggy. Then, remove the green leafy tops and carefully carve out the stem with a small knife, creating a tiny hole near the top but keeping the berry’s shape intact. This hole is key because it helps the “nose” sit nicely later.
Step 2: Get Your Frosting Ready
Fill a piping bag with cream cheese frosting — if you don’t have a piping bag, I’ve found that a small zip-top sandwich bag with one corner snipped off works just as well. The frosting will become the gnome’s iconic beard, so smooth piping is what you want.
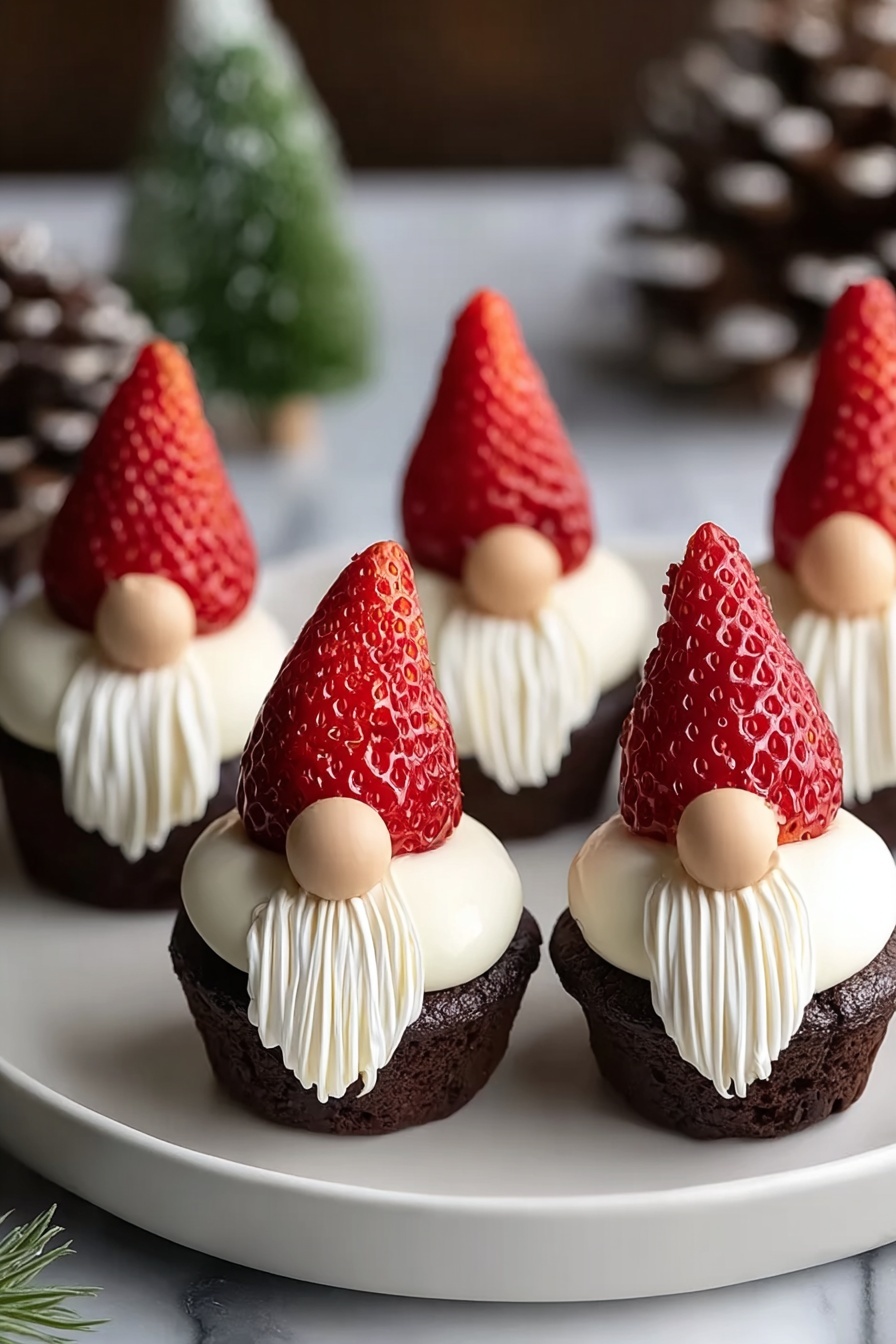
Step 3: Pipe the Frosting Beards
Now for the fun part! Pipe the frosting on top of each brownie bite, letting it cascade down one side of the brownie to mimic a fluffy beard. You’ll want to cover enough of the brownie so the “nose” has a cozy spot and the gnome face really takes shape. Don’t worry about making them perfect — each gnome should have a little personality!
Step 4: Add the Strawberry Hat and Nose
Top each frosted brownie with a strawberry, pressing gently but firmly so it sticks. Then, place a single Reese’s Puffs cereal piece onto the frosting, centered just below the strawberry hat — this is your gnome’s adorable little nose. I love how that pop of orange color makes the whole creation come alive.
Step 5: Chill Before Serving
Place your completed gnome treats in the fridge to chill for at least an hour. This resting time helps the frosting set so your gnomes hold their shape nicely when you serve them. I usually make these an hour or two before a party, but honestly, they’re best the same day you assemble!
Pro Tips for Making Cute Brownie Bite Gnome Treats Recipe
- Keep Strawberries Dry: I can’t stress this enough — dry berries mean no soggy brownies and a perfect texture.
- Piping Without a Bag: Using a plastic sandwich bag with a small corner cut works great and saves you from buying extra tools.
- Use Small Reese’s Puffs: The size is just right for the “nose” and adds a cute crunch without overpowering flavor.
- Serve Chilled: Refrigerate immediately after assembly to keep frosting firm — warm temperatures can make the frosting slide off!
How to Serve Cute Brownie Bite Gnome Treats Recipe
Garnishes
For a finishing touch, I like to dust the platter with a sprinkle of powdered sugar to mimic a dusting of snow around the gnomes — it’s especially magical during the holidays. You can also add tiny decorative leaves or edible glitter to enhance the whimsy.
Side Dishes
These gnome treats pair wonderfully with a simple cup of hot cocoa or a fresh fruit salad for a light contrast. I’ve served them alongside warm apple cider during festive get-togethers, and the combo never disappoints.
Creative Ways to Present
One time, I arranged the brownie bite gnomes on a rustic wooden board in a little “gnome village” scene with mini pinecones and sprigs of rosemary for greenery — it was such a hit at the party! You can also serve them in clear glass jars layered with sprinkles or edible moss for a fairy-tale effect.
Make Ahead and Storage
Storing Leftovers
If you have any leftovers (though that’s rare in my house!), store them in an airtight container in the fridge. They’ll stay fresh and firm for up to two days. Just be careful stacking them so the frosting and hats don’t get squished.
Freezing
I generally don’t freeze these treats because the frosting and strawberry hat don’t hold up as well after thawing. But if you do want to freeze, try assembling the base brownie bites in advance and adding frosting and fruit after thawing for the best texture.
Reheating
Since these treats are best served chilled, I don’t recommend reheating. If you want the brownie warm, try enjoying them separately from the frosting and toppings for the best of both worlds.
FAQs
-
Can I use a different type of frosting for this Cute Brownie Bite Gnome Treats Recipe?
Absolutely! While cream cheese frosting gives a lovely tangy contrast and thick texture for the beard, you can use buttercream, marshmallow fluff, or even whipped cream if you prefer. Just make sure your frosting is thick enough to hold the shape as a beard.
-
What if I can’t find Reese’s Puffs cereal for the gnome nose?
No worries! You can substitute mini chocolate chips, small candy-coated chocolates, or even a tiny piece of marshmallow shaped into a nose. The key is to pick something small that will stick nicely to the frosting.
-
Can I make the brownie bites from scratch instead of buying them?
Definitely! Homemade brownie bites add a personal touch and you can control the level of fudginess. Just bake your brownies in a mini-muffin pan or bake a whole sheet and cut into bite-size squares. Either way works beautifully.
-
How far ahead can I assemble these gnome treats?
It’s best to assemble and chill these treats no more than a few hours before serving. The strawberries release moisture over time, which can affect the texture. Preparing them the day of your event guarantees the freshest, cutest gnomes.
Final Thoughts
This Cute Brownie Bite Gnome Treats Recipe has become a favorite in my kitchen because it’s both simple and utterly charming. I love how it brings out the kid in everyone — you’ll enjoy making them just as much as eating them! So go ahead, gather your ingredients, roll up your sleeves, and create a batch of these tiny gnome treasures that are sure to spread smiles all around.
Print
Cute Brownie Bite Gnome Treats Recipe
- Prep Time: 15 minutes
- Cook Time: 0 minutes
- Total Time: 1 hour 15 minutes
- Yield: 24 brownie bite gnomes
- Category: Dessert
- Method: No-Cook
- Cuisine: American
Description
These Brownie Bite Gnomes are adorable and delicious treats perfect for parties or festive occasions. Made with brownie bites topped with cream cheese frosting, fresh strawberries as hats, and Reese’s Puffs cereal for the nose, these no-bake snacks are fun to assemble and a delight to eat. They require minimal prep time and chilling to set the frosting for best results.
Ingredients
Brownie Bites
- 24 brownie bites, store-bought or homemade
Cream Cheese Frosting
- 1 cup cream cheese frosting, store-bought or homemade
Fruit
- 24 fresh strawberries, washed and dried
Toppings
- 24 Reese’s Puffs cereal pieces
Instructions
- Prepare Strawberries: Wash the strawberries thoroughly and let them dry completely. Remove the green leaves and carefully cut out the stem with a small knife to create a small hole, ensuring you do not cut straight across the tops of the berries to maintain their shape.
- Prepare Frosting Bag: Place the cream cheese frosting into a piping bag, or alternatively place it into a plastic sandwich bag with one small corner snipped off to create a piping nozzle for easy frosting application.
- Pipe Frosting Beard: Pipe the frosting over the top of each brownie bite and down one side to resemble a beard for the gnome face, creating a whimsical and textured look.
- Add Strawberry Hat and Nose: Place a strawberry on top of each brownie bite as the gnome’s hat. Then, press one Reese’s Puffs cereal piece onto the frosting as the nose to complete the gnome’s face.
- Chill and Serve: Refrigerate the completed brownie bite gnomes immediately for at least one hour before serving. This chilling step lets the frosting set firmly. These treats look best the day they are made but can be stored in the refrigerator for one to two additional days.
Notes
- Ensure strawberries are completely dry before assembling to prevent sogginess on the brownie bites.
- If you don’t have a piping bag, a small plastic sandwich bag with a corner cut off works well for piping frosting neatly.
- Use fresh strawberries and consume the gnomes within 2 days for the best taste and appearance.
- Brownie bites can be homemade or store-bought based on your convenience and preference.
- Refrigerate immediately after preparing to keep the frosting firm and the gnomes fresh.
Nutrition
- Serving Size: 1 brownie bite gnome
- Calories: 150
- Sugar: 12g
- Sodium: 90mg
- Fat: 8g
- Saturated Fat: 4g
- Unsaturated Fat: 3g
- Trans Fat: 0g
- Carbohydrates: 18g
- Fiber: 1g
- Protein: 2g
- Cholesterol: 15mg

