
If you’ve ever wanted to bake your own sourdough but felt overwhelmed by kneading and complicated steps, you’re going to absolutely love this Easiest No Knead Sourdough Bread Recipe. Seriously, it’s straightforward, rewarding, and produces a gorgeous loaf with a crisp crust and airy crumb every single time. I still remember the first time I tried it—I was amazed by how little effort it took for such bakery-level results. Grab your ingredients and let’s get baking!
Why You’ll Love This Recipe
- No Kneading Needed: Just mix and let time do the work—no arm workout required.
- Simple Ingredients: Uses basic pantry staples and your active sourdough starter.
- Perfect For Beginners: Foolproof steps that even my non-baker friends swear by.
- Delicious Results: Crispy crust, soft crumb, and that signature tangy flavor you’ll crave again and again.

Ingredients You’ll Need
These ingredients work beautifully together to give you that classic sourdough flavor and texture. I always recommend using filtered water to avoid any chlorine that can interfere with your starter’s activity. Also, if you have bread flour on hand, it’s worth using to get that amazing chewiness.

- Mature Starter: Your lively starter is the hero here—make sure it’s bubbly and active for best results.
- Unbleached Bread Flour or All-Purpose Flour: Unbleached flour enhances flavor and crumb structure.
- Water (90°F): Warm water helps jumpstart fermentation but isn’t hot enough to kill your starter.
- Sea Salt: Adds flavor and strengthens the dough structure without overpowering.
Variations
I love tweaking this Easiest No Knead Sourdough Bread Recipe every now and then depending on what I have in the pantry or what I’m craving. It’s a fantastic base that’ll handle some fun mix-ins or substitutions without losing its signature texture.
- Whole Wheat Addition: I often swap about 100g of bread flour for whole wheat for a nuttier flavor and added fiber; just expect a denser crumb.
- Seeded Loaf: Toss in a couple of tablespoons of sunflower, sesame, or pumpkin seeds into the dough before the first rise—my family goes crazy for the added crunch.
- Gluten Sensitivity: While sourdough can be gentler for some, this recipe uses wheat flour; for gluten-free adaptations, a different approach is needed.
- Flavored Crust: Sprinkling herbs like rosemary or za’atar over the scored dough before baking adds a lovely aroma that always impresses guests.
How to Make Easiest No Knead Sourdough Bread Recipe
Step 1: Build Your Starter the Night Before
Start by mixing 25 grams of your mature starter with 75 grams of flour and 75 grams of warm water (about 90°F) in a clean jar. Stir until all the flour is incorporated and there are no dry spots left. Cover it loosely with plastic wrap and leave it out on the counter overnight—about 8 to 12 hours should do. By morning, you should see a bubbly, doubled mixture that’s bursting with life. This ripe starter is the secret to your bread’s beautiful rise and tang.
Step 2: Mix the Dough in the Morning
Once your starter is ripe, combine 100 grams of it with 300 grams of warm water in a large mixing bowl. Stir until the starter is completely dispersed—you’ll notice the mix looks like cloudy water. Now add 500 grams of bread flour and 10 grams of sea salt. Stir everything with a spoon until a shaggy, sticky dough forms. Don’t stress about the sticky texture; that’s exactly what you want! Then, use your hands to gather it gently into a ball. It will look rough and a bit messy—that’s perfectly normal.
Step 3: First Rise in the Warm Oven
Cover your bowl loosely with plastic wrap and pop it in the oven with just the light on. The light creates a cozy, warm environment that helps your dough rise nicely. Let it rest for 5 to 6 hours until it’s obviously puffed up and roughly doubled—when you gently press it, your finger should leave an indentation that slowly springs back. If your dough feels too warm to the touch, crack the oven door slightly or switch off the light after the first hour to keep things steady. Fermentation is a delicate dance, and this trick keeps it smooth.
Step 4: Shape the Dough
Lightly flour your countertop and gently tip your dough out, keeping the smooth side down. Now, starting at the top edge, stretch and fold it toward the center, then repeat with the bottom, left, and right edges, pinching to seal. Do this folding routine twice—this builds strength without kneading. Next, flip your dough seam-side down and cup it with your hands, rotating as you gently pull the dough towards you to form a tight, smooth ball. This shaping step is where your dough starts looking like a proper loaf. If you’re uncertain, I found watching a quick video really helped me get the feel for it.
Step 5: Second Rise in the Oven
Flour a proofing basket generously (or a bowl lined with a floured kitchen towel if you don’t have one). Place your dough seam-side up inside and dust the top lightly with flour. Cover loosely with plastic wrap and return it to the oven with the light on for another 2 to 3 hours. The dough should puff up and double again. When you press it gently, it should feel airy yet still hold a light indentation. This leisurely second rise develops that classic open crumb and deep flavor.
Step 6: Bake Your Bread
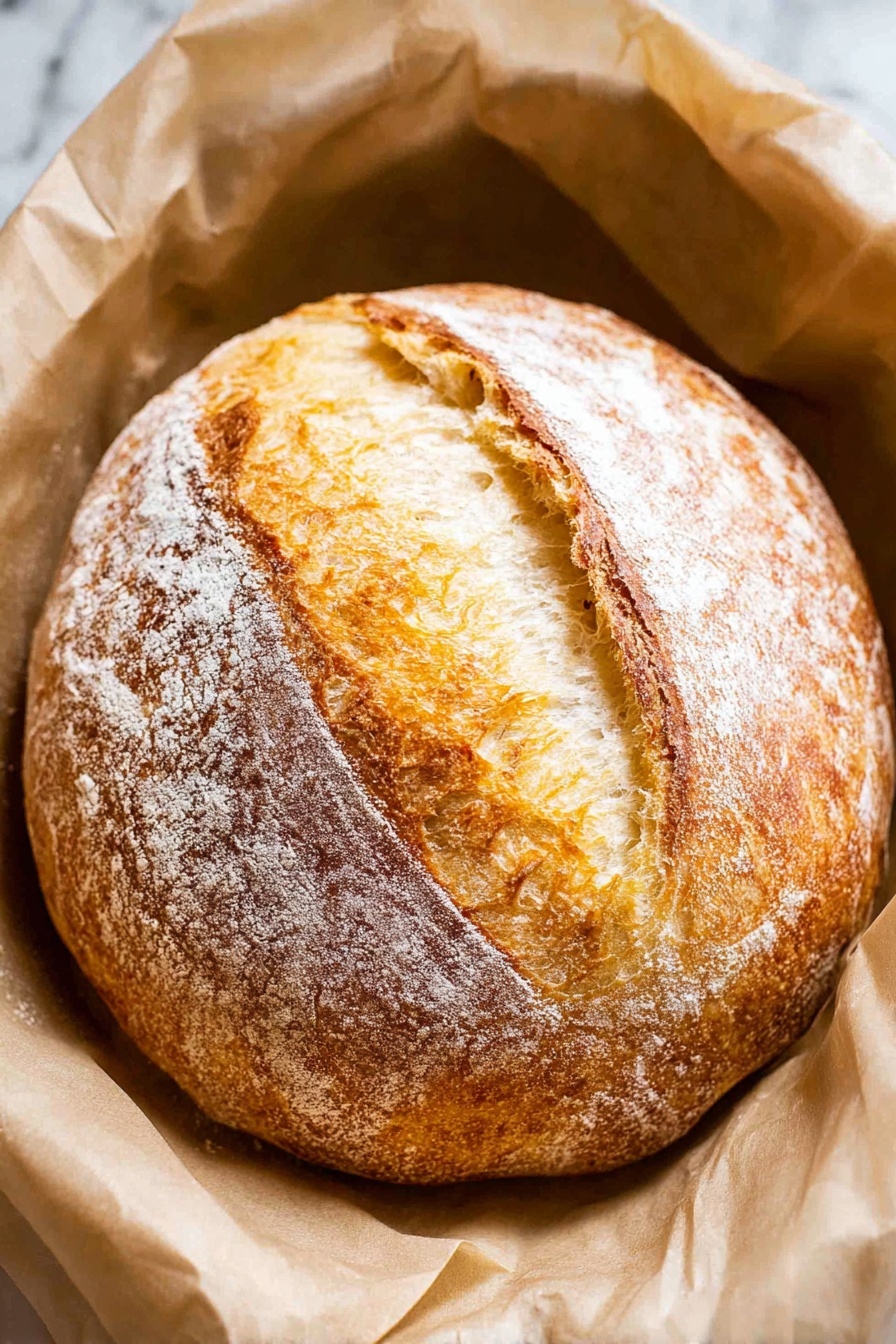
Preheat your oven to 450°F but don’t preheat the Dutch oven for this recipe—surprising, I know! Gently turn your dough onto a sheet of parchment paper, seam-side down. Using a sharp knife or bread lame, score the top with a single lengthwise cut about half an inch deep — confident, decisive scoring helps the bread rise beautifully. Use the parchment edges to lift and place the dough into your Dutch oven. Cover it with the lid, reduce the heat to 425°F, and bake covered for 40 minutes. Then, remove the lid and bake for another 5 to 10 minutes until your loaf is that perfect deep golden color and sounds hollow when tapped.
Step 7: Cool Before Slicing
Once baked, use the parchment to carefully lift the bread out and transfer it to a wire rack. Let it cool completely — at least 2 hours — until the crust crisps and the crumb sets. I admit, it’s tempting to slice early, but waiting really makes a difference in texture and flavor. The internal temperature should read between 190°F and 205°F for perfect doneness.
Pro Tips for Making Easiest No Knead Sourdough Bread Recipe
- Trust the Starter: If your starter doesn’t double or bubble well overnight, wait longer or feed it again—you want it lively for the best rise.
- Oven Light Temperature Check: Feel free to place your hand inside when testing the oven light warmth; it should be just warm, not hot, for the perfect fermentation environment.
- Confident Scoring: Use swift, decisive cuts when scoring; hesitant or shallow cuts can cause uneven expansion or burst crusts.
- Don’t Skip the Cool Down: Slicing too soon can make your bread gummy—wait those full two hours, I promise it’s worth it.
How to Serve Easiest No Knead Sourdough Bread Recipe

Garnishes
When I serve this bread, I love to brush the crust lightly with olive oil as soon as it’s out of the oven for that extra sheen and flavor. A sprinkle of flaky sea salt or a dusting of herb blend (thyme or rosemary) on top before baking adds an inviting rustic touch I adore.
Side Dishes
This bread is so versatile—I enjoy it with a hearty bowl of homemade tomato soup or alongside creamy avocado and fresh tomatoes for a quick lunch. It’s also fantastic with sharp cheeses and charcuterie boards when I’m hosting friends.
Creative Ways to Present
For special occasions, I love to slice the bread into thick wedges and serve it in a rustic bread basket lined with linen. Tucking in fresh herbs or edible flowers atop the pile makes it look effortlessly charming and inviting on the table.
Make Ahead and Storage
Storing Leftovers
I usually store leftover sourdough in a paper bag at room temperature for up to 3 days. This helps the crust stay crisp while the crumb remains soft. Avoid plastic bags unless you like a chewier crust, as it traps moisture.
Freezing
If I’m not going to finish the loaf within a few days, I slice it and freeze the bread in an airtight container. It freezes beautifully and thaws quickly when you take out just a few slices at a time.
Reheating
To refresh your bread, I pop slices in a toaster or warm the whole loaf in a 350°F oven for about 10 minutes wrapped loosely in foil. This restores the crust’s crunch and makes the crumb tender again.
FAQs
-
Can I use all-purpose flour instead of bread flour?
Yes! While bread flour gives a chewier texture due to higher protein, unbleached all-purpose flour works well too and still produces a delicious loaf. Just expect a slightly softer crumb.
-
My dough is too sticky to handle. Is this normal?
Absolutely. The dough will be sticky and shaggy—that’s part of the magic of no-knead sourdough. Don’t add extra flour while mixing; sticky dough contributes to that open crumb and moist texture.
-
What if my starter doesn’t double overnight?
If your starter isn’t bubbly or doubled, it may need more frequent feedings or a warmer spot. It’s crucial your starter is active to ensure your dough rises properly. Try feeding it again and wait for those bubbles before proceeding.
-
Can I prepare the dough ahead of time and bake later?
Yes! After shaping, you can refrigerate the dough overnight for a slow, cold fermentation and bake the next day. Just take it out of the fridge about an hour before baking to warm up and complete its rise.
-
Why does the recipe use the oven light for rising?
The oven light provides a warm, draft-free environment ideal for fermentation, especially if your kitchen is cool. The gentle heat helps the dough rise evenly without over-warming the starter.
Final Thoughts
This Easiest No Knead Sourdough Bread Recipe has truly changed the way I bake at home—it’s approachable, forgiving, and yields incredible flavor with minimal fuss. I remember the pride I felt pulling this golden loaf from my oven, knowing I created something so special from just a few ingredients and a bit of patience. I’m confident you’ll love it as much as I do, whether you’re a seasoned baker or just getting started. So go ahead, give it a try, and let me know how your bread journey unfolds!
Print
Easiest No Knead Sourdough Bread Recipe
- Prep Time: 15 minutes
- Cook Time: 50 minutes
- Total Time: 10 hours 5 minutes
- Yield: 8 servings
- Category: Bread
- Method: Baking
- Cuisine: American
Description
This Easiest Ever Sourdough Bread recipe requires no kneading and yields a delicious, crusty artisan loaf with minimal effort. Using a simple overnight starter build and long fermentation, this bread develops rich flavor and perfect texture. The dough is folded gently, proofed twice, and baked covered in a Dutch oven for a golden, crisp crust and tender crumb.
Ingredients
Starter Build (Night Before)
- 25 grams mature starter (about 2 tablespoons)
- 75 grams unbleached bread flour or all-purpose flour (½ cup + 1 teaspoon)
- 75 grams water, 90℉ (⅓ cup)
Dough
- 100 grams ripe starter (heaping ⅓ cup)
- 300 grams filtered water, 90℉ (1¼ cups + 1 tablespoon)
- 500 grams white bread flour or unbleached all-purpose flour (3½ cups + ½ teaspoon)
- 10 grams sea salt (2⅛ teaspoons)
Instructions
- Build Starter: The evening before baking, mix 25g mature starter with 75g flour and 75g warm water (90°F) in a mason jar. Stir until no dry flour remains. Cover loosely and rest at room temperature 8-12 hours until doubled and bubbly.
- Mix Dough: The next morning, combine 100g ripe starter with 300g warm water in a large bowl and stir until dissolved. Add 500g flour and 10g salt. Mix to form a shaggy, sticky dough ball.
- First Rise: Cover the bowl with plastic wrap. Place in oven with only the light on to keep warm (~80-85°F). Let rise 5-6 hours until doubled and puffy, with a finger dent that slowly fills.
- Shape Dough: Lightly flour counter. Turn dough seam side down. Fold edges (top, bottom, left, right) towards center and pinch closed. Repeat folds once more. Flip seam side down and cup hands to tighten the dough into a smooth ball with a taut yet soft surface.
- Second Rise: Dust a bread basket generously with flour. Place shaped dough seam side up, dust surface with flour, and cover loosely. Return to oven light and proof 2-3 hours until doubled and airy, holding an indentation when pressed.
- Preheat Oven and Prepare Dough: Remove dough and preheat oven to 450°F. Do not preheat Dutch oven. Place parchment on counter, gently invert dough onto it seam side down. Score top lengthwise with a sharp blade ½-inch deep.
- Bake: Using parchment, lift dough into Dutch oven. Cover with lid and reduce oven to 425°F. Bake covered for 40 minutes, then remove lid and bake 5-10 more minutes until dark golden and hollow sounding when tapped.
- Cool: Remove bread using parchment. Transfer to cooling rack and cool completely at least 2 hours until internal temperature reaches 190-205°F. Slice and enjoy fresh.
Notes
- Active, bubbly starter is crucial—if it doesn’t float in water, it’s not ready.
- No proofing basket? Use a large bowl lined with a floured kitchen towel.
- Sticky dough texture is normal and creates artisan crumb.
- Cold kitchens may require longer fermentation; oven light helps maintain warmth.
- Score dough decisively for best oven spring; a simple straight cut works well.
- Bread flour is preferred but all-purpose flour works with good results.
- Store loaf in a paper bag at room temperature up to 3 days or freeze sliced in airtight container up to 3 months.
Nutrition
- Serving Size: 1 slice (approx. 70g)
- Calories: 180
- Sugar: 0.2g
- Sodium: 230mg
- Fat: 1g
- Saturated Fat: 0.1g
- Unsaturated Fat: 0.8g
- Trans Fat: 0g
- Carbohydrates: 38g
- Fiber: 2g
- Protein: 6g
- Cholesterol: 0mg


