
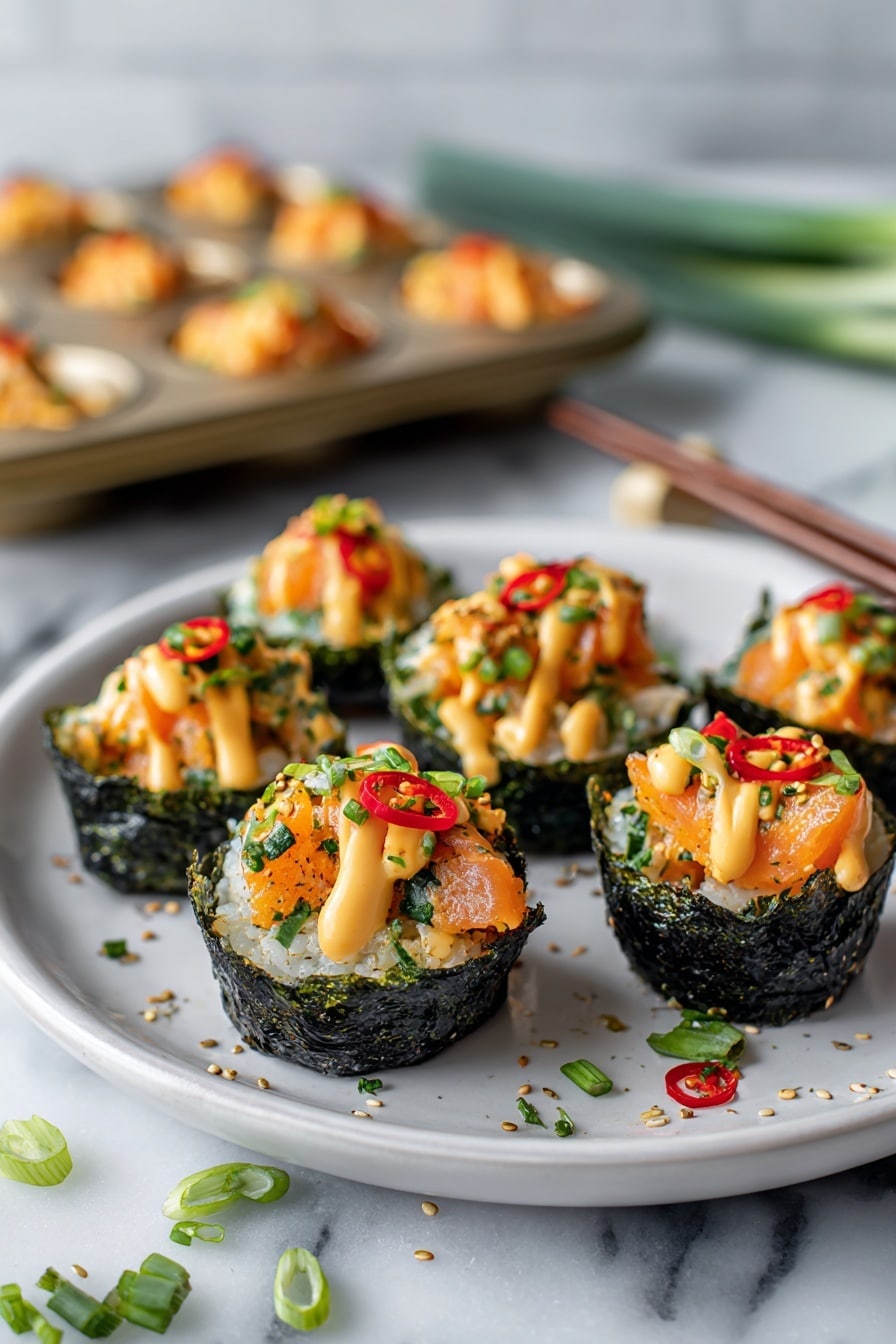
If you’re looking for a fun, flavorful twist on sushi that’s easy to make at home, you’re going to adore this Easy Baked Salmon Sushi Cups Recipe. Seriously, it’s one of those recipes that feels fancy but is so simple you’ll want to make it again and again. Picture tender salmon mixed with a tangy, spicy mayo sauce nestled in crispy nori “cups” filled with perfectly seasoned sushi rice—it’s a total crowd-pleaser and perfect when you want sushi without all the rolling fuss!
Why You’ll Love This Recipe
- Super Simple Prep: No rolling sushi mats—just scoop, layer, and bake.
- Bold Flavors: The combo of spicy mayo, soy, and sesame oil gives a restaurant-quality kick.
- Great for Parties: These bite-sized cups are perfect finger food for get-togethers.
- Customizable: Easy to tweak ingredients or add toppings to suit your taste.

Ingredients You’ll Need
These ingredients come together simply but thoughtfully to create sushi-inspired magic. Make sure your sushi rice is good quality—it’s the base of these cups, so the seasoning is key!
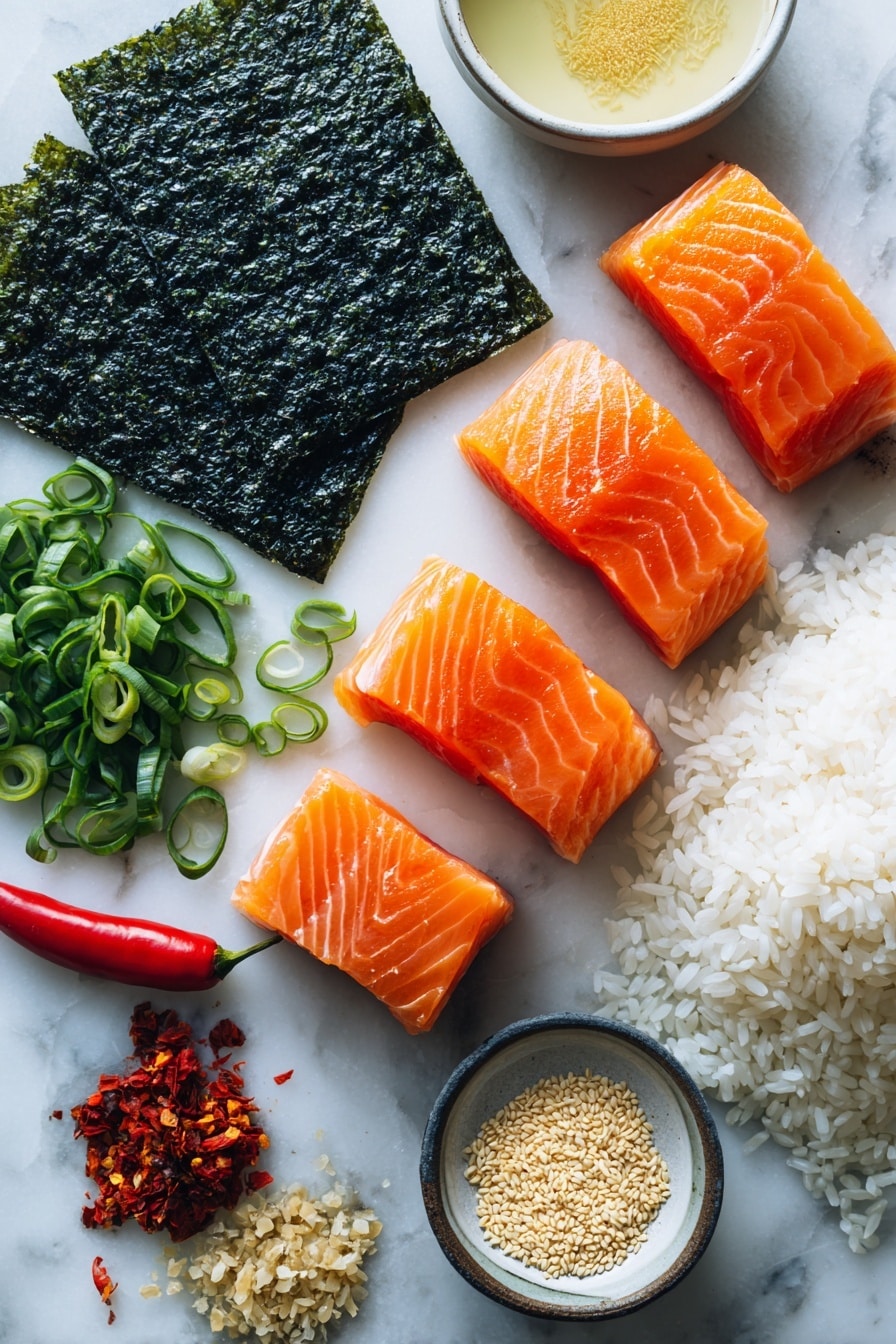
- Salmon (cubed): Fresh, sushi-grade salmon works best for safety and flavor.
- Light Soy Sauce: Adds that classic umami without overpowering the salmon.
- Kewpie Mayo: This Japanese mayo is creamier and less tangy than regular mayo, perfect for sushi.
- Sriracha: Gives a gentle spicy kick; adjust to your heat preference.
- Sesame Oil: Just a touch imparts a nutty aroma and depth of flavor.
- Uncooked Sushi Rice: The short-grain rice is crucial for that sticky, perfect texture.
- Rice Vinegar: Sweetened slightly to season the rice perfectly.
- White Sugar: Balances the vinegar’s tang.
- Nori Sheets: Cut into squares to form your sushi cup bases, crispy and flavorful.
- Furikake: A delicious Japanese seasoning for that extra burst of flavor and crunch.
- Green Onion: Fresh and bright garnish to finish the cups.
- Cooking Spray: To lightly grease the muffin tin so the nori doesn’t stick.
Variations
I love experimenting with this recipe depending on what I have on hand or the occasion—feel free to customize these sushi cups to fit your cravings and dietary needs.
- Veggie Option: Swap salmon for marinated tofu or cooked shiitake mushrooms for a vegetarian version—my friends couldn’t even tell the difference!
- Spice Level: Add more or less sriracha or try a drizzle of wasabi mayo if you want that authentic heat.
- Crunch Boost: Toss in some thinly sliced cucumber or avocado for fresh texture and creaminess.
- Rice Alternatives: You can try brown sushi rice or quinoa if you want a healthier twist—I found the taste changes but still delicious.
How to Make Easy Baked Salmon Sushi Cups Recipe
Step 1: Cook and Season Your Sushi Rice
Start by cooking your sushi rice exactly according to the package—it’s important for texture. While the rice is hot, gently fold in your warmed vinegar and sugar mixture; this seasons the rice perfectly and gives it that classic sticky, tangy sushi flavor. I like to let it cool slightly before assembling so it’s easier to handle.
Step 2: Prepare the Salmon Mixture
While your rice cooks, combine the cubed salmon with soy sauce, Kewpie mayo, sriracha, and sesame oil. I discovered this combo is where the magic happens—it balances creaminess with umami and heat. Give it a good stir so everything’s evenly coated. Let it sit while you prep the nori sheets.
Step 3: Shape Your Nori Cups
Cut your nori sheets into rectangles or squares that will fit snugly inside a muffin tin. Lightly spray the tins with cooking spray so the nori won’t stick. Place each nori square into a muffin cup and press down gently, then add a spoonful of your seasoned sushi rice, pressing lightly to form a base. This is where you can be a bit creative—just make sure the rice is evenly spread for support.
Step 4: Add Salmon and Bake
Top each rice layer with the salmon mixture, spreading it evenly. Pop the muffin tin into a preheated 400℉ oven for about 15 minutes. You’ll want to keep an eye out for the salmon to cook through and the tops to get a nice golden hue—this baking step gives you crispy edges and melds the flavors beautifully.
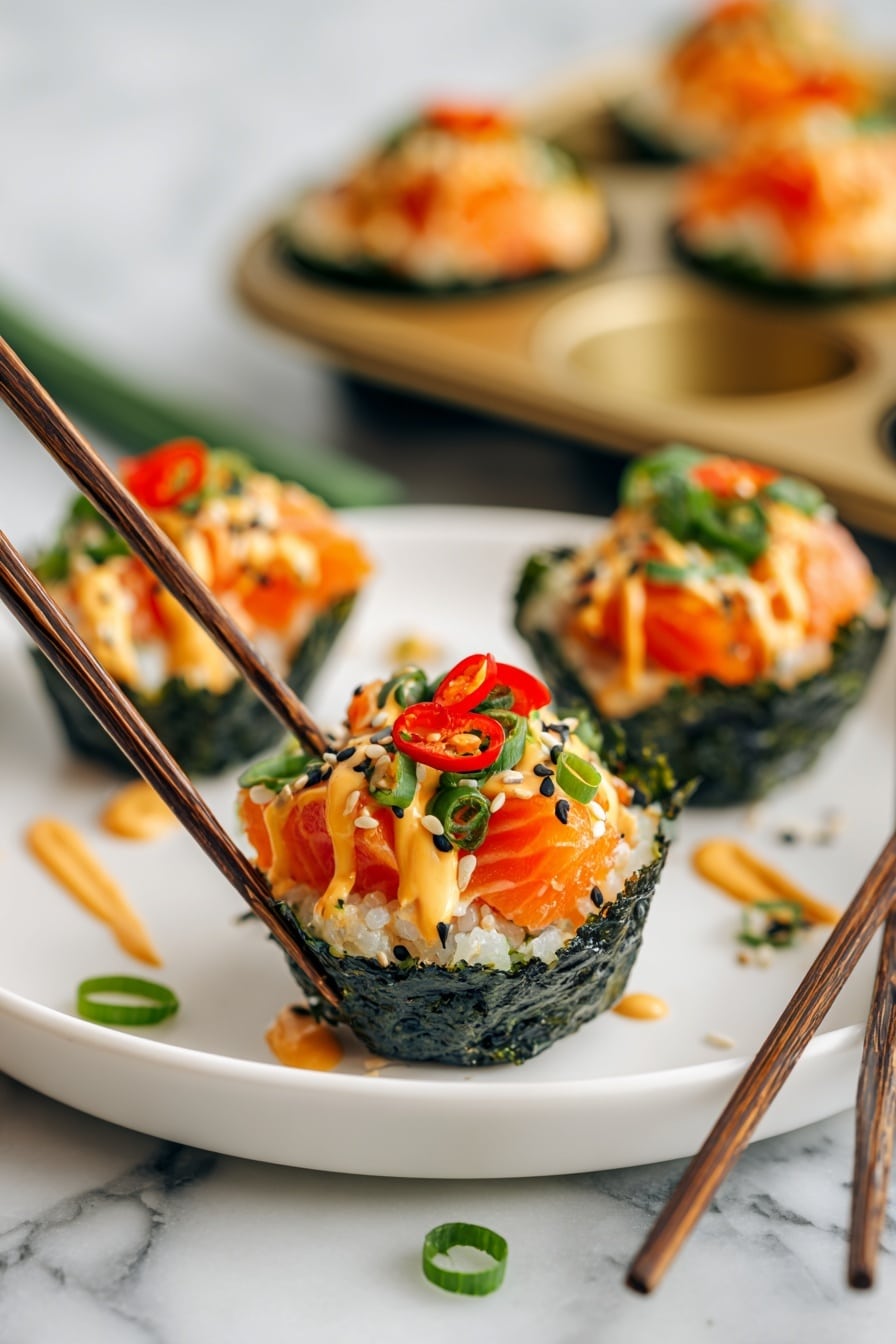
Step 5: Garnish and Serve
Once out of the oven, let your sushi cups cool just a couple of minutes—too hot and they can fall apart. I love drizzling a little extra sriracha or spicy mayo on top, then sprinkling furikake and chopped green onions for that pop of color and flavor. Serve immediately and watch everyone go crazy!
Pro Tips for Making Easy Baked Salmon Sushi Cups Recipe
- Use Sushi-Grade Salmon: I learned the hard way that lower quality salmon changes the flavor and texture drastically, so get the good stuff.
- Don’t Overpack Rice: Press it gently into the muffin tin so the cups hold together without being too dense.
- Adjust Spiciness Carefully: Start with less sriracha in the salmon mix—you can always add more after baking if needed.
- Cool Before Serving: This prevents your sushi cups from falling apart and helps flavors settle beautifully.
How to Serve Easy Baked Salmon Sushi Cups Recipe
Garnishes
I’m a huge fan of finishing these with furikake for that salty, crunchy umami hit plus a sprinkle of fresh green onions to brighten everything up. Sometimes I add tiny dots of pickled ginger on the side for a palate cleanser that’s surprisingly refreshing with these sushi cups.
Side Dishes
Serving these with a simple seaweed salad or a light cucumber salad brings some fresh contrast and balances all the rich flavors. I also love a miso soup on the side to make it a full-on meal without much fuss.
Creative Ways to Present
For a dinner party, I like to serve these sushi cups on a wooden platter scattered with edible flowers and shiso leaves—it makes them feel extra special. You can also put them in colorful mini cupcake liners inside the muffin tin for cute party bites kids and adults both love.
Make Ahead and Storage
Storing Leftovers
If you have leftovers (which is rare in my house!), store them in an airtight container in the fridge for up to 2 days. I recommend keeping the garnishes separate and adding them just before serving to keep everything fresh and vibrant.
Freezing
Freezing isn’t my favorite with this recipe because the texture of cooked sushi rice and nori can change once thawed. But if you want to, freeze the unbaked sushi cups on a tray first, then transfer to a bag. Defrost in the fridge overnight before baking.
Reheating
I gently reheat these in a 350℉ oven for about 5-7 minutes, just enough to warm without drying them out. Avoid microwaving to keep the nori crisp and the salmon tender.
FAQs
-
Can I use other types of fish for this recipe?
Absolutely! While salmon is classic and flavorful, you can try cooked shrimp, crab meat, or even smoked tuna. Just keep in mind the cooking times and whether the fish is already cooked or raw to ensure food safety.
-
How do I make these sushi cups gluten-free?
Swap light soy sauce for tamari or coconut aminos to keep the sauce gluten-free. All other ingredients are naturally gluten-free, so it’s an easy adjustment to accommodate gluten sensitivities.
-
Can I prepare this recipe ahead of time for a party?
You can assemble the sushi cups and refrigerate them unbaked for a few hours before popping them in the oven just before guests arrive. This keeps the nori crisp and the salmon fresh.
-
What if I can’t find Kewpie mayo?
Regular mayo can work, but if you can, mix in a little rice vinegar or lemon juice to mimic Kewpie’s tangy creaminess for the best flavor balance.
Final Thoughts
I absolutely love how these Easy Baked Salmon Sushi Cups turn out every single time—they’re one of those recipes that feels impressive yet comes together without too much fuss. When I first tried making sushi cups, I was worried about the rice texture and how the nori would hold up, but this method solves those problems beautifully. I think you’ll enjoy how simple and delicious this is, and I can’t wait to hear how your family and friends react when you serve these at your next meal or party. Trust me, once you make this, it’ll become a staple in your recipe box!
Print
Easy Baked Salmon Sushi Cups Recipe
- Prep Time: 15 minutes
- Cook Time: 15 minutes
- Total Time: 30 minutes
- Yield: 12 sushi cups
- Category: Appetizer
- Method: Baking
- Cuisine: Japanese
Description
These Easy Baked Salmon Sushi Cups combine the flavors of classic sushi with a convenient, oven-baked twist. Featuring a savory salmon mixture seasoned with soy sauce, Kewpie mayo, sriracha, and sesame oil, layered over seasoned sushi rice and wrapped in nori, these sushi cups are perfect for a quick appetizer or party snack. Garnished with furikake and green onions, they deliver a burst of umami and spice in every bite.
Ingredients
Salmon Mixture
- 1 lb salmon, cubed
- 1 tbsp light soy sauce
- 1 tbsp Kewpie Mayo
- 1 tbsp Sriracha
- 1 tsp sesame oil
Sushi Rice
- 1 ½ cups uncooked sushi rice
- 1 tablespoon rice vinegar
- 2 teaspoons white sugar
Assembly and Garnishes
- 3 large nori sheets
- Furikake, for garnish
- 1 green onion, chopped, for garnish
- Cooking spray, for greasing muffin tin
Instructions
- Cook the Sushi Rice: Prepare the sushi rice according to the package instructions until tender. Drain if necessary and keep warm.
- Season the Rice: In a microwave-safe bowl, mix rice vinegar and sugar. Microwave for about 30 seconds or until the sugar has completely dissolved. Pour this vinegar mixture evenly over the hot cooked rice and gently fold to combine. Set aside to cool slightly.
- Preheat the Oven: Set your oven to 400°F (200°C) to preheat while you prepare the salmon mixture and assemble the sushi cups.
- Prepare the Salmon Mixture: In a bowl, combine cubed salmon, light soy sauce, Kewpie mayo, sriracha, and sesame oil. Stir well to coat evenly and set aside to marinate briefly.
- Prepare the Nori: Cut each nori sheet into 4 rectangles or squares large enough to fit inside the cups of a muffin tin.
- Assemble the Sushi Cups: Lightly grease a muffin tin with cooking spray. Place one nori square into each muffin cup. Press a spoonful of the seasoned sushi rice onto the nori, firmly packing it to create the base. Top the rice layer evenly with a generous spoonful of the salmon mixture.
- Bake: Place the muffin tin in the preheated oven and bake for 15 minutes, or until the salmon is cooked through and slightly golden on top.
- Finish and Serve: Remove the sushi cups from the oven and let cool for a few minutes. Drizzle additional sriracha or spicy mayo on top if desired. Garnish with furikake seasoning and chopped green onions. Serve immediately and enjoy your flavorful sushi cups!
Notes
- You can substitute Kewpie mayo with regular Japanese mayo or a mix of mayonnaise and a little rice vinegar.
- Make sure not to overpack the sushi rice so the cups hold their shape but remain soft.
- If you prefer less spice, reduce or omit the sriracha according to taste.
- Use fresh sushi-grade salmon to ensure safety when baking at this temperature and time.
- These sushi cups are best served fresh but can be refrigerated for up to 24 hours and gently reheated.
Nutrition
- Serving Size: 1 sushi cup
- Calories: 120
- Sugar: 2 g
- Sodium: 350 mg
- Fat: 5 g
- Saturated Fat: 1 g
- Unsaturated Fat: 3 g
- Trans Fat: 0 g
- Carbohydrates: 10 g
- Fiber: 1 g
- Protein: 8 g
- Cholesterol: 30 mg


