
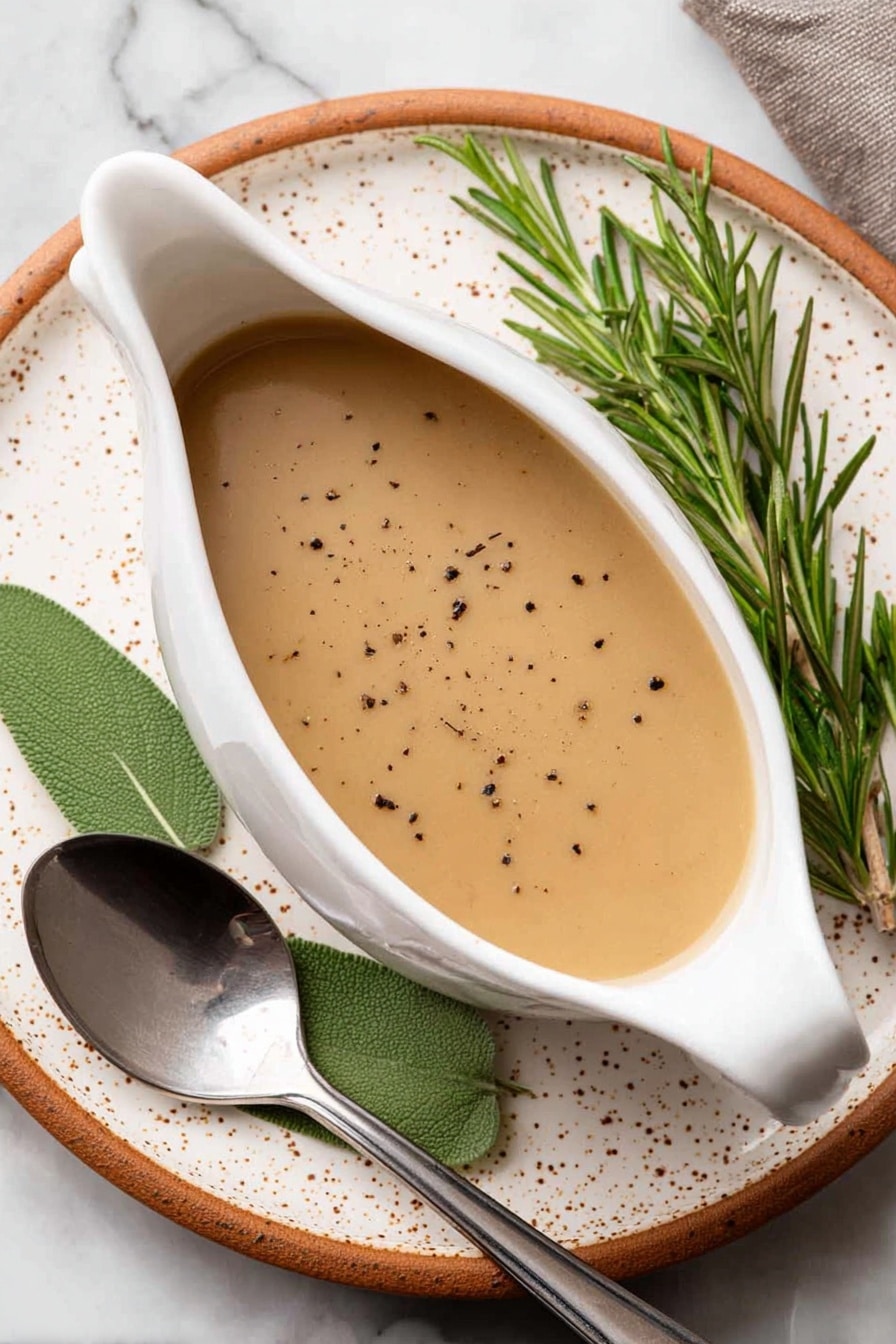
If you’ve ever felt a bit intimidated by making gravy from scratch, I’m here to tell you that it doesn’t have to be complicated. This Easy Turkey Gravy from Drippings Recipe is downright foolproof and unbelievably delicious. I absolutely love how it captures every ounce of flavor from that perfectly roasted bird, turning simple drippings into something magic. Stick with me, and I’ll walk you through making a rich, silky gravy that’s the perfect finishing touch for any turkey feast.
Why You’ll Love This Recipe
- Flavorful and authentic: Made straight from turkey drippings for that rich, homemade taste you just can’t get from store-bought gravy.
- Simple and quick: Only a handful of ingredients and about 20 minutes from start to finish—that’s it!
- Perfect texture every time: The roux technique guarantees a smooth, velvety gravy without lumps.
- Versatile and adaptable: Easy to tweak based on what you have or prefer, whether gluten-free or dairy-free.

Ingredients You’ll Need
What I love about this Easy Turkey Gravy from Drippings Recipe is its simplicity — just a handful of pantry staples and the all-important turkey drippings. Using rendered drippings with aromatics adds depth that store-bought mixes can’t touch.
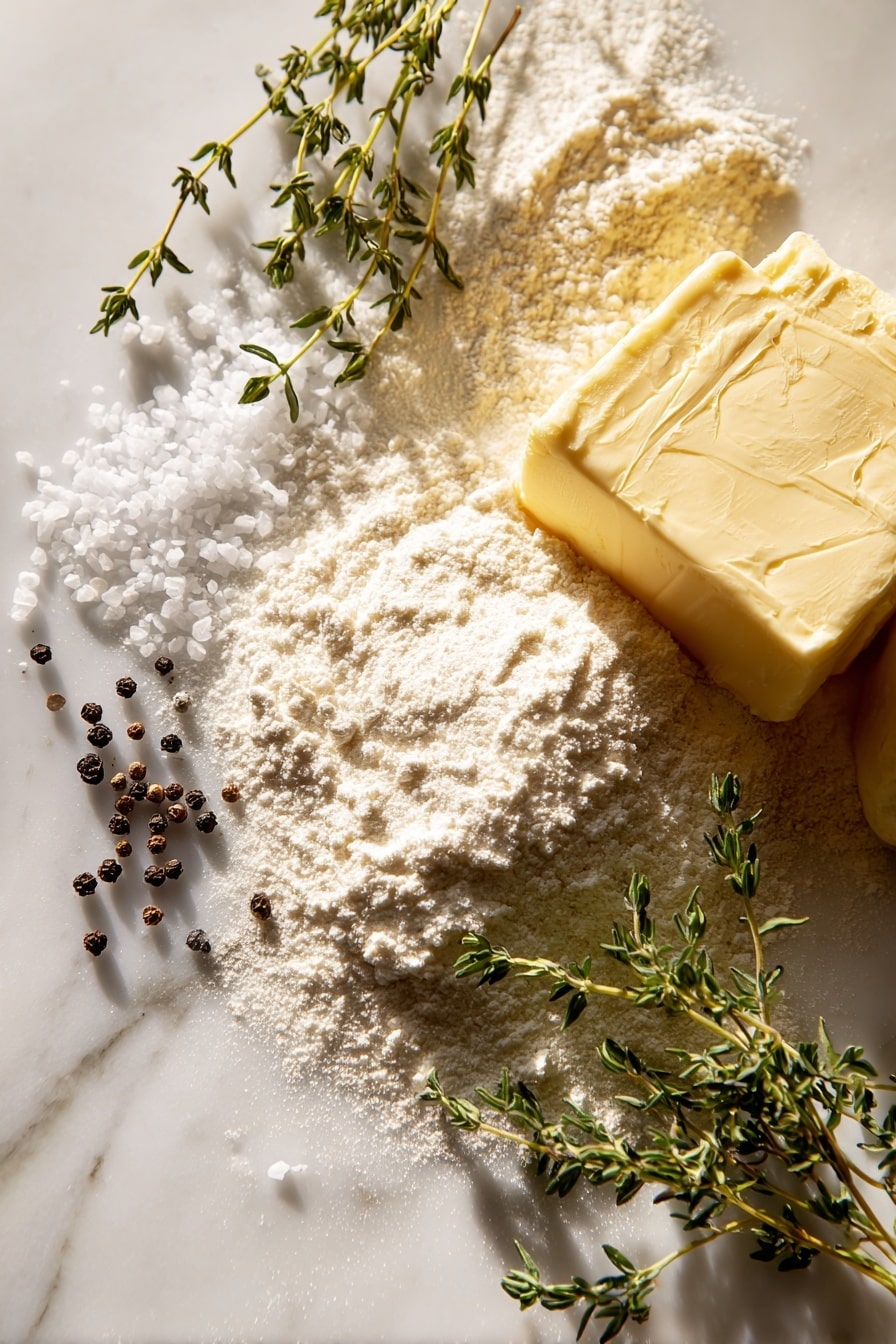
- Turkey drippings: These are the star of the show—make sure to save them carefully and remove excess fat for a balanced gravy.
- Salted butter: I use salted because it adds extra flavor, but unsalted works if you prefer and can control the seasoning carefully.
- All-purpose flour: This acts as the thickener; if you need gluten-free, a 1:1 gluten-free blend is a great substitute.
- Salt and pepper: Simple seasonings that you can adjust to taste once your gravy is thick and luscious.
Variations
I usually stick to the classic method, but sometimes I like to experiment with tweaks that add a bit of extra personality or cater to dietary needs. Feel free to make this recipe your own!
- Herbed Gravy: Adding fresh or dried thyme and rosemary when you whisk in your drippings gives the gravy a lovely earthy note—my family goes crazy for the herbal twist.
- Gluten-Free Option: Swap the all-purpose flour for gluten-free flour blend, adjusting cooking times slightly to get the perfect thickness.
- Dairy-Free Version: Replace butter with olive oil or a dairy-free margarine to make it friendly for those with dairy sensitivities; it still thickens beautifully.
- Extra Savory Boost: A splash of low-sodium soy sauce or Worcestershire sauce can deepen the umami flavor if you want to jazz up your gravy further.
How to Make Easy Turkey Gravy from Drippings Recipe
Step 1: Strain and skim your drippings
Once your turkey is roasted, pour the pan drippings through a fine mesh strainer into a bowl to catch all those flavorful bits. Here’s a trick I swear by: use a turkey baster to scoop off the liquid fat floating on top and discard it. This step stops your gravy from being greasy while keeping all that deep turkey flavor.
Step 2: Make a roux with butter and flour
In a 4-quart saucepan, melt your butter over medium heat. Sprinkle in the flour and whisk constantly. Cooking the roux for about a minute until it thickens and just starts to turn golden brown is essential—it builds that nutty base flavor you won’t want to skip. Don’t rush this part or you’ll lose that lovely depth.
Step 3: Whisk in the turkey drippings
Gradually pour the strained turkey drippings into the roux while whisking continuously. This keeps lumps from forming and helps create a gorgeous smooth texture. Then crank the heat to medium-high and keep stirring frequently as it thickens—usually about 5 to 10 minutes. You’ll see it transform into a luscious gravy right before your eyes.
Step 4: Taste and season
Once thickened, give your gravy a taste. Depending on your drippings and butter, you may want to add salt and pepper to balance the flavors. I like to season lightly and adjust gradually—remember, you can always add more but can’t take it out!
Step 5: Serve and enjoy
Pour your easy, homemade turkey gravy into a gravy boat or serving dish. It looks beautiful drizzled over carved turkey or mashed potatoes, and trust me—guests will ask for seconds. It’s just that good.
Pro Tips for Making Easy Turkey Gravy from Drippings Recipe
- Skim the Fat: Removing excess fat from drippings creates a cleaner, less greasy gravy. I learned this the hard way the first time I made gravy!
- Whisk Like a Pro: Constant whisking during the roux and combining drippings prevents lumps and ensures silky smooth gravy.
- Slow and Steady: Don’t rush cooking the roux or thickening the gravy—the flavors develop best with time and gentle heat.
- Season at the End: Always taste and adjust salt and pepper after the gravy has thickened, so you get just the right balance.
How to Serve Easy Turkey Gravy from Drippings Recipe

Garnishes
I usually keep garnishes simple—fresh chopped parsley sprinkled on top adds a burst of color and fresh flavor. Sometimes a tiny drizzle of melted butter right before serving gives it a beautiful sheen and richness that’s hard to resist.
Side Dishes
This turkey gravy pairs wonderfully with classic Thanksgiving sides like creamy mashed potatoes, roasted vegetables, stuffing, and cranberry sauce. I love pouring it over buttery mashed potatoes—there’s just something so cozy and comforting about that combo.
Creative Ways to Present
If you want to jazz up the presentation, try serving the gravy in a small cast iron skillet or a beautiful vintage gravy boat surrounded by fresh herbs. For holiday dinners, placing a sprig of rosemary or thyme alongside the gravy boat creates a festive vibe. I’ve even ladled mine into mini mason jars for a cute, rustic touch when serving buffet-style.
Make Ahead and Storage
Storing Leftovers
I store leftover turkey gravy in a clean glass jar with a tight lid in the fridge. It keeps beautifully for up to one week. Nothing beats having that flavorful gravy ready to warm up for second-day turkey sandwiches or leftover plates.
Freezing
Freezing turkey gravy is totally doable! I like to portion it out in freezer-safe containers so I can thaw small amounts as needed. When thawed, it retains good flavor and texture, though you might need to whisk it a bit during reheating if it separates.
Reheating
Since turkey gravy thickens when chilled, I reheat it gently in a saucepan over low heat or by spooning it over warm leftovers and microwaving. Stirring occasionally helps it return to that perfect, pourable consistency without breaking.
FAQs
-
Can I make this Easy Turkey Gravy from Drippings Recipe without turkey drippings?
You can use store-bought turkey or chicken broth in a pinch, but you’ll miss out on the deep, rich flavor that drippings provide. For the fullest taste, I highly recommend roasting your own turkey and saving those juices—it really makes all the difference.
-
What if my gravy turns out lumpy? How can I fix it?
Lumps usually come from adding liquids too quickly or not whisking enough. To fix lumpy gravy, you can strain it through a fine mesh sieve or vigorously whisk it over low heat until smooth. Using a whisk while combining roux and drippings helps prevent lumps altogether.
-
Can I prepare this gravy ahead of time?
Absolutely! You can make the gravy a day ahead and store it in the fridge. Just reheat gently before serving and whisk to restore its silky texture. It’s a great way to reduce last-minute stress on the big day.
-
How thick should the gravy be?
The gravy should be thick enough to coat the back of a spoon but still pourable. If it thickens too much, thin it out with a splash of broth or water while reheating. If it’s too thin, continue cooking a bit longer to reduce it.
Final Thoughts
This Easy Turkey Gravy from Drippings Recipe has been a game-changer in my holiday cooking. It’s one of those recipes that makes you feel like a kitchen rockstar without the stress. I love how it takes those beautiful turkey drippings—something you might have tossed before—and transforms them into a silky, flavorful sauce that brings every bite together. You’re going to enjoy the warmth, comfort, and homemade goodness it adds to your table. Trust me, once you try this, you’ll wonder why you ever settled for anything less!
Print
Easy Turkey Gravy from Drippings Recipe
- Prep Time: 5 minutes
- Cook Time: 20 minutes
- Total Time: 25 minutes
- Yield: 24 servings
- Category: Sauce
- Method: Stovetop
- Cuisine: American
Description
This easy turkey gravy from drippings recipe transforms flavorful turkey pan juices into a rich, silky gravy that’s perfect for drizzling over your holiday meal. Made with simple ingredients like turkey drippings, butter, and flour, this classic roux-based gravy is straightforward to prepare and enhances the taste of your roasted turkey and sides.
Ingredients
Turkey Gravy Ingredients
- 4 cups turkey drippings*
- ¼ cup salted butter
- ¼ cup all-purpose flour
- Salt and pepper to taste
Instructions
- Strain the Drippings: Strain the turkey drippings through a fine metal mesh strainer into a bowl. Carefully remove the layer of liquid fat on top with a turkey baster and discard, ensuring the gravy is not greasy.
- Melt Butter: In a 4-quart saucepan, melt the salted butter over medium heat until fully liquefied.
- Make the Roux: Add the all-purpose flour to the melted butter and whisk continuously to combine. Cook the mixture for about 1 minute or until it thickens and just begins to brown, forming a roux.
- Add Drippings: Slowly pour the strained turkey drippings into the roux while whisking continuously to prevent lumps from forming.
- Cook the Gravy: Cook on medium-high heat, stirring frequently, for 5 to 10 minutes until the gravy thickens to your desired consistency.
- Season: Taste the gravy and season with salt and pepper as desired, then remove from heat.
- Serve: Transfer the gravy to a gravy boat and serve warm alongside your turkey and sides.
Notes
- Ingredient Substitutions: Use unsalted butter if preferred; for a gluten-free option, substitute all-purpose flour with a 1:1 gluten-free flour blend.
- Store: Keep leftover gravy in an airtight container, preferably a glass jar, refrigerated for up to 1 week.
- Reheat: Reheat gravy by microwaving a portion on your leftovers or warming the entire batch slowly on the stovetop over low heat. The gravy may thicken when chilled but will return to liquid when reheated.
- Use Aromatics: Incorporate aromatics when roasting your turkey to enhance drippings flavor and yield.
Nutrition
- Serving Size: 1/4 cup
- Calories: 70
- Sugar: 0.1g
- Sodium: 150mg
- Fat: 4.5g
- Saturated Fat: 2.7g
- Unsaturated Fat: 1.6g
- Trans Fat: 0g
- Carbohydrates: 6g
- Fiber: 0.2g
- Protein: 1g
- Cholesterol: 15mg


