
If you’re on the hunt for a dessert that feels like a warm hug wrapped up in a festive package, you’re going to adore this Festive Chocolate Brownie Gift Squares Recipe. I absolutely love how these brownies strike that perfect balance between fudgy richness and a playful holiday vibe. When I first tried this recipe, the joy of turning simple brownies into adorable little gift squares totally won me over — and trust me, your friends and family will go crazy for them too. So let’s dive into how you can make these charming treats your own this season!
Why You’ll Love This Recipe
- Perfectly Fudgy Texture: You’ll enjoy brownies that are chewy and moist without being cakey.
- Festive Presentation: The candy melt “ribbons” make the brownies look like tiny wrapped gifts, perfect for holiday sharing.
- Simple Ingredients: You probably have most of these in your pantry, making it an easy holiday go-to.
- Great for Gifting: These squares are ideal for packaging up and giving as edible presents that’ll impress.

Ingredients You’ll Need
This recipe uses classic brownie ingredients that come together to create a rich, chocolatey base perfect for decoration. I always recommend good-quality cocoa powder because it really packs that deep chocolate flavor, and real butter gives the best texture and taste.
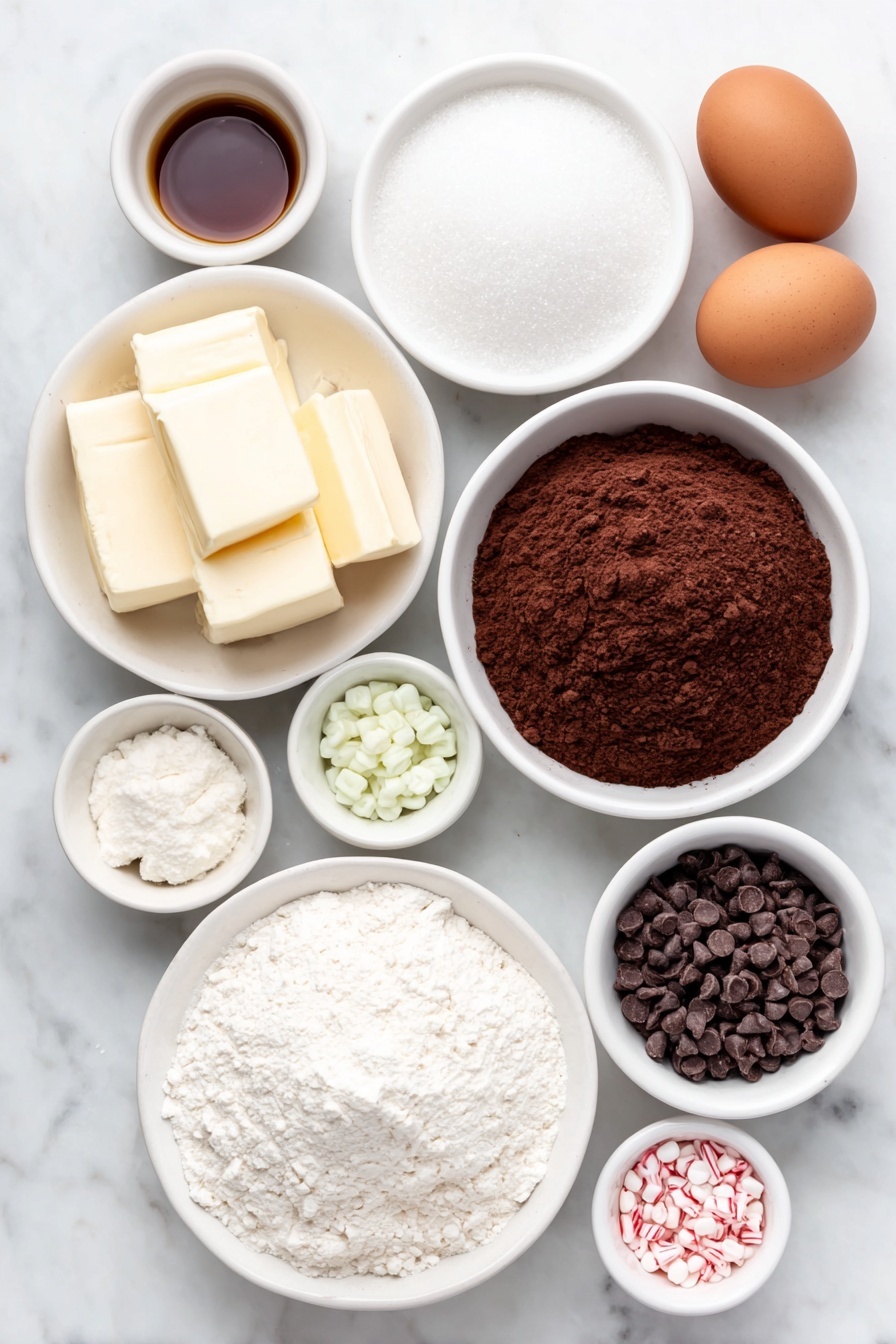
- Unsalted butter: I prefer unsalted so I can control the saltiness in the recipe.
- Granulated sugar: Balances the bitterness of cocoa and brings that lovely sweetness.
- Large eggs: They add structure and richness; make sure they’re at room temperature for easier mixing.
- Vanilla extract: A splash enhances the chocolate flavor, making it more complex.
- All-purpose flour: Just the right amount to keep brownies dense yet tender.
- Unsweetened cocoa powder: Opt for natural or Dutch-process based on your flavor preference.
- Baking powder: Just a pinch to add a tiny lift without losing fudginess.
- Salt: Balances the sweetness and enhances all the flavors.
- Semi-sweet chocolate chips: Optional, but folded in these add pockets of melted chocolate heaven.
- Red, green, and white candy melts: These make decorating a breeze and add festive flair.
- Mini candy bows or holiday sprinkles: The cutest finishing touch that feels extra special.
Variations
I love how versatile this Festive Chocolate Brownie Gift Squares Recipe is—there’s plenty of room to make it your own. Whether you want to tweak it for dietary preferences or add some extra flair, you can easily adapt it to match your style.
- Nutty addition: I sometimes fold in chopped walnuts or pecans for a bit of crunch, which contrasts nicely with the fudgy texture.
- Gluten-free version: You can swap all-purpose flour for a 1:1 gluten-free baking flour blend. Just watch the baking time closely as it might vary slightly.
- Dairy-free tweaks: Use a plant-based butter substitute and dairy-free chocolate chips. I’ve done this successfully and still got great results.
- Spiced brownies: Add a pinch of cinnamon or pumpkin pie spice for a cozy holiday twist I adore every season.
How to Make Festive Chocolate Brownie Gift Squares Recipe
Step 1: Melt Butter and Mix in Sugar
Start by preheating your oven to 350°F (175°C) and lining your 9×13-inch pan with parchment paper, with an overhang on the sides for easy brownie removal later. Melt unsalted butter gently in a saucepan over low heat until completely melted. Remove from heat and whisk in the sugar gradually—this is a trick I learned to help dissolve sugar and create that glossy, smooth base. Let the mixture cool just a bit before moving on so the eggs don’t scramble when added.
Step 2: Whisk in Eggs and Vanilla
Now whisk in the eggs one at a time, making sure each is fully incorporated before adding the next. Add vanilla extract and keep whisking until the batter looks thick and shiny—this step is so satisfying and really sets the foundation for that fudgy texture. Taking time here will pay off!
Step 3: Fold in Dry Ingredients
In a separate bowl, sift together the flour, cocoa powder, baking powder, and salt. I sift mine to avoid lumps and make mixing smoother. Gradually fold this dry mixture into the wet batter using a rubber spatula. This folding technique helps keep the brownies dense rather than cakey—don’t overmix or you’ll lose that chewiness. If you’re going for extra indulgence, gently fold in a cup of semi-sweet chocolate chips here for those melty chocolate pockets.
Step 4: Bake Your Brownies
Pour the batter evenly into your prepared pan and smooth the top with your spatula. Bake for 30 to 35 minutes, but start checking around 28 minutes—remember, a toothpick should come out with a few moist crumbs, not wet batter. I’ve learned that taking them out a bit early guarantees those rich, fudgy brownies everyone raves about. Let your brownies cool completely in the pan before moving on to decorating; impatience here can lead to messy toppings!
Step 5: Cut and Decorate Like Festive Gifts
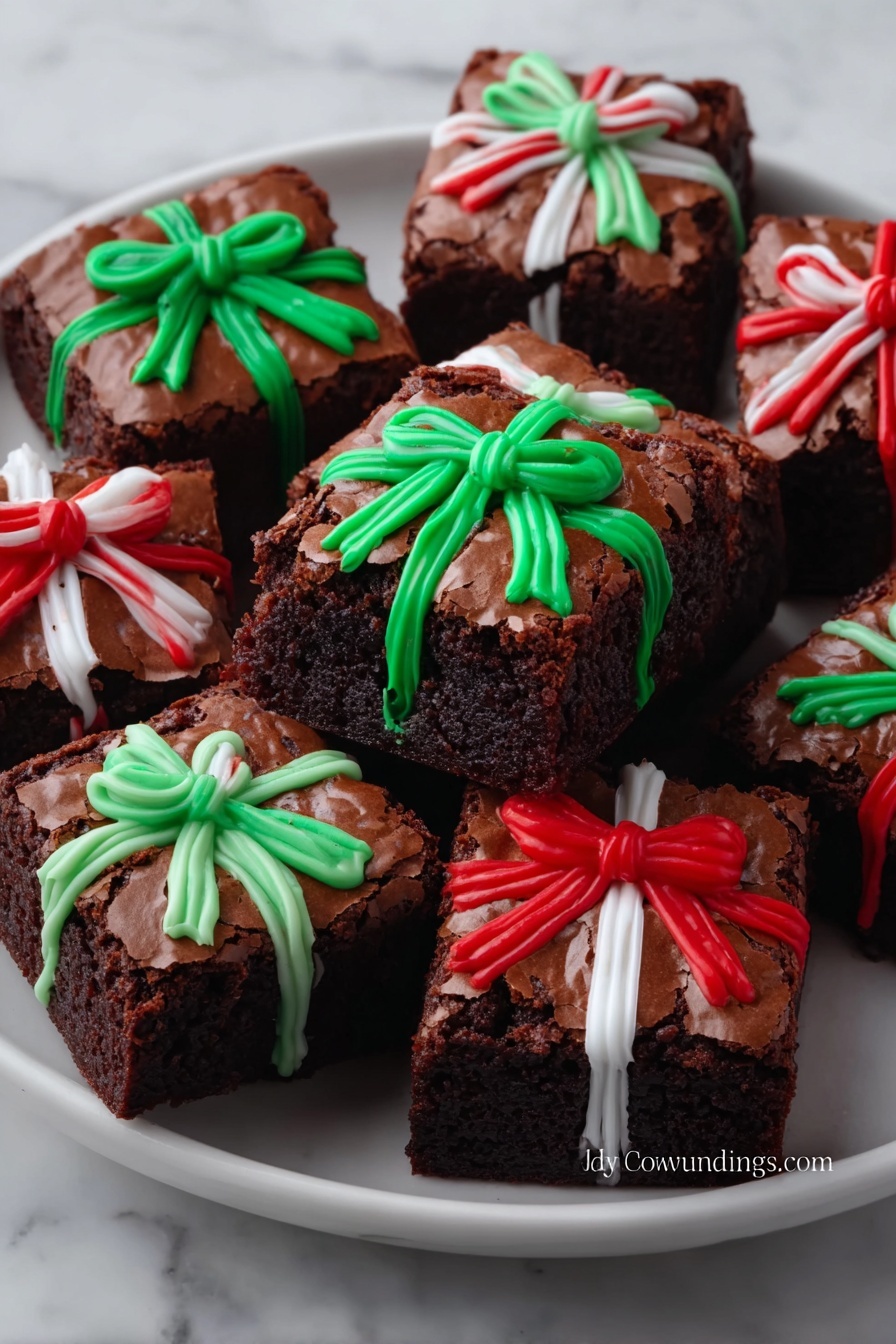
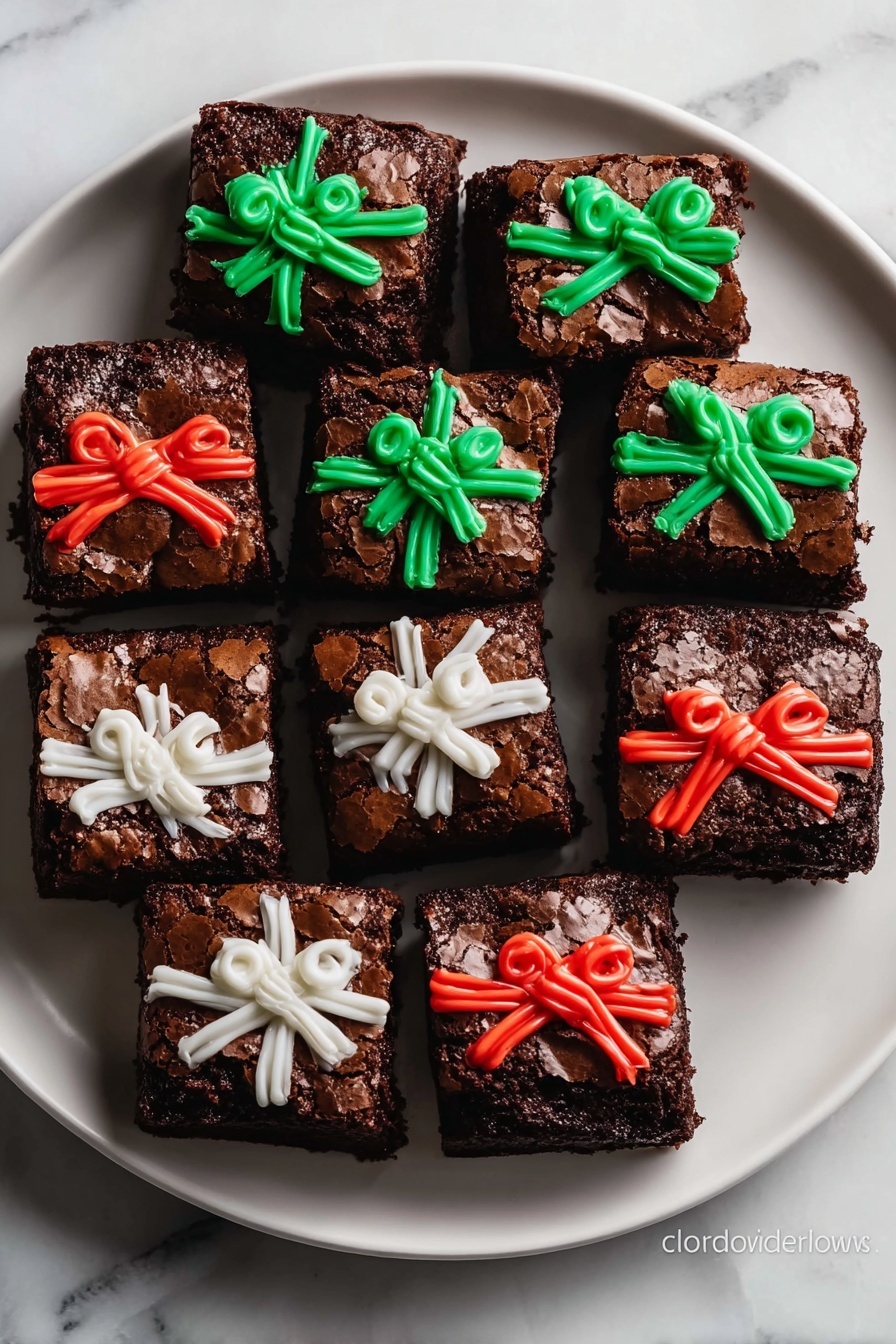
Once cool, lift the brownies out by the parchment overhang and place on a cutting board. Cut into even squares—these are your adorable “presents.” Now melt your red, green, and white candy melts separately in microwave-safe bowls in 15-second bursts, stirring in between until silky smooth. Use a spoon or piping bag to drizzle crisscross lines over each square to mimic ribbons. Adding mini candy bows or festive sprinkles on top really seals the deal. Let the candy sets at room temperature or chill for 10–15 minutes to speed it up.
Pro Tips for Making Festive Chocolate Brownie Gift Squares Recipe
- Use Room Temperature Eggs: This helps the batter come together smoothly without curdling when mixing with warm butter.
- Do Not Overbake: I learned this the hard way—pulling them out a little early keeps them wonderfully fudgy instead of dry.
- Parchment Paper Overhang: Makes removing the brownies from the pan a breeze and prevents breakage when cutting.
- Candy Melt Melting Technique: Heating in short intervals prevents burning and keeps your candy smooth for easy decorating.
How to Serve Festive Chocolate Brownie Gift Squares Recipe
Garnishes
I swear by those mini candy bows and festive sprinkles—not only do they amp up the holiday vibe, but they make the brownies look like little presents straight out of a bakery window. Sometimes I add a light dusting of powdered sugar for an extra snowy touch that’s just charming.
Side Dishes
Pair these brownies with a simple dollop of whipped cream or a scoop of vanilla ice cream for dessert. During holiday parties, they also shine alongside a warm cup of mulled cider or peppermint hot chocolate—combos my family asks for every year!
Creative Ways to Present
I’ve wrapped these gift squares in clear cellophane tied with holiday ribbon and nestled them in festive gift boxes lined with parchment paper. It’s a surefire way to impress your gift recipients and adds a professional touch to your homemade goodies!
Make Ahead and Storage
Storing Leftovers
Store any leftover brownies in an airtight container at room temperature for up to 3 days. I always layer them with parchment paper between squares to prevent sticking—this keeps their decorative ribbons intact and looking fresh.
Freezing
These brownies freeze wonderfully! Just wrap individual squares in plastic wrap and place them in a freezer-safe bag or container. When I thaw them overnight in the fridge, the texture stays just as decadent as fresh.
Reheating
If you want warm brownies, pop one in the microwave for 10–15 seconds. The candy melt ribbons will stay intact but soften slightly, creating a dreamy, gooey bite that I can never resist.
FAQs
-
Can I use dark chocolate instead of cocoa powder in this recipe?
While cocoa powder gives these brownies a concentrated chocolate flavor and the right texture, using chopped dark chocolate instead means you’d need to adjust the amounts of other ingredients and melting steps. I recommend sticking to the cocoa powder for consistent results, but feel free to add chocolate chips for extra richness.
-
How do I prevent the candy melts from cracking?
Properly melting candy melts in short intervals and stirring well helps avoid overheating, which causes cracking. Once decorated, let them set at room temperature instead of the fridge if you’re worried about cracking—just give a bit more time to harden.
-
Can I make these brownies without the festive decorations?
Absolutely! The brownies themselves are delicious on their own. The festive decorations add a visual wow-factor for holidays or gifting, but you can enjoy them plain or topped with something simple like powdered sugar or a drizzle of chocolate ganache.
-
What’s the best way to cut the brownies into neat squares?
Using a sharp knife dipped briefly in hot water and wiped dry between cuts results in clean edges without tearing. The parchment paper lining also helps lift the entire slab out, making cutting easier and less messy.
Final Thoughts
This Festive Chocolate Brownie Gift Squares Recipe has become my go-to holiday treat because it combines classic comfort with playful presentation. It’s one of those recipes that brings smiles and “wow” moments every time I share it. I hope you’ll enjoy making and gifting these as much as I do—they’re a little bit of chocolate magic wrapped up just for you and your loved ones.
Print
Festive Chocolate Brownie Gift Squares Recipe
- Prep Time: 20 minutes
- Cook Time: 35 minutes
- Total Time: 55 minutes
- Yield: 12 brownies
- Category: Dessert
- Method: Baking
- Cuisine: American
Description
Delight in these festive Christmas Present Brownies, rich and fudgy with a buttery cocoa base, topped with colorful candy melt ribbons and festive decorations. Perfect for holiday gifting or a seasonal treat that looks as charming as it tastes.
Ingredients
Brownie Batter
- 1 cup (2 sticks) unsalted butter
- 2 cups granulated sugar
- 4 large eggs
- 1 teaspoon vanilla extract
- 1 cup all-purpose flour
- 1 cup unsweetened cocoa powder
- ½ teaspoon baking powder
- ¼ teaspoon salt
- 1 cup semi-sweet chocolate chips (optional)
Decorations
- Red, green, and white candy melts
- Mini candy bows or holiday sprinkles (optional)
Instructions
- Prepare the brownie batter: Preheat your oven to 350°F (175°C) and line a 9×13-inch baking pan with parchment paper, leaving an overhang for easy removal. Melt the butter in a medium saucepan over low heat. Remove from heat and whisk in sugar until smooth and shiny. Let cool slightly, then whisk in eggs and vanilla until thick and glossy.
- Add the dry ingredients: Sift together flour, cocoa powder, baking powder, and salt in a separate bowl. Gradually fold these dry ingredients into the wet mixture with a rubber spatula until combined, taking care not to overmix. Optionally fold in chocolate chips for extra fudginess.
- Bake the brownies: Pour batter into prepared pan and smooth surface. Bake for 30–35 minutes until a toothpick inserted in the center comes out with moist crumbs. Remove from oven and cool completely in the pan.
- Cut and decorate like gifts: Lift cooled brownies using parchment paper and place on a cutting board. Cut into even squares. Melt red, green, and white candy melts in separate bowls in the microwave using 15-second bursts, stirring until smooth. Drizzle or pipe the candy melts in crisscross lines resembling ribbons across each brownie. Add mini bows or festive sprinkles on top.
- Let the decorations set: Allow candy melts to harden at room temperature or refrigerate for 10–15 minutes. Once set, arrange brownies on a platter or gift box lined with parchment paper and serve or gift with festive cheer.
Notes
- Do not overbake the brownies to keep them fudgy and chewy.
- If using chocolate chips, fold them in gently to maintain the batter texture.
- Use parchment paper in the pan for easy removal and clean edges.
- Allow candy melts to fully set before handling to prevent smudging the decorations.
- Decorations can be customized with any holiday-themed sprinkles or candies of your choice.
Nutrition
- Serving Size: 1 brownie (approx. 1/12 of batch)
- Calories: 350 kcal
- Sugar: 32 g
- Sodium: 90 mg
- Fat: 20 g
- Saturated Fat: 12 g
- Unsaturated Fat: 7 g
- Trans Fat: 0.2 g
- Carbohydrates: 43 g
- Fiber: 4 g
- Protein: 4 g
- Cholesterol: 75 mg


