

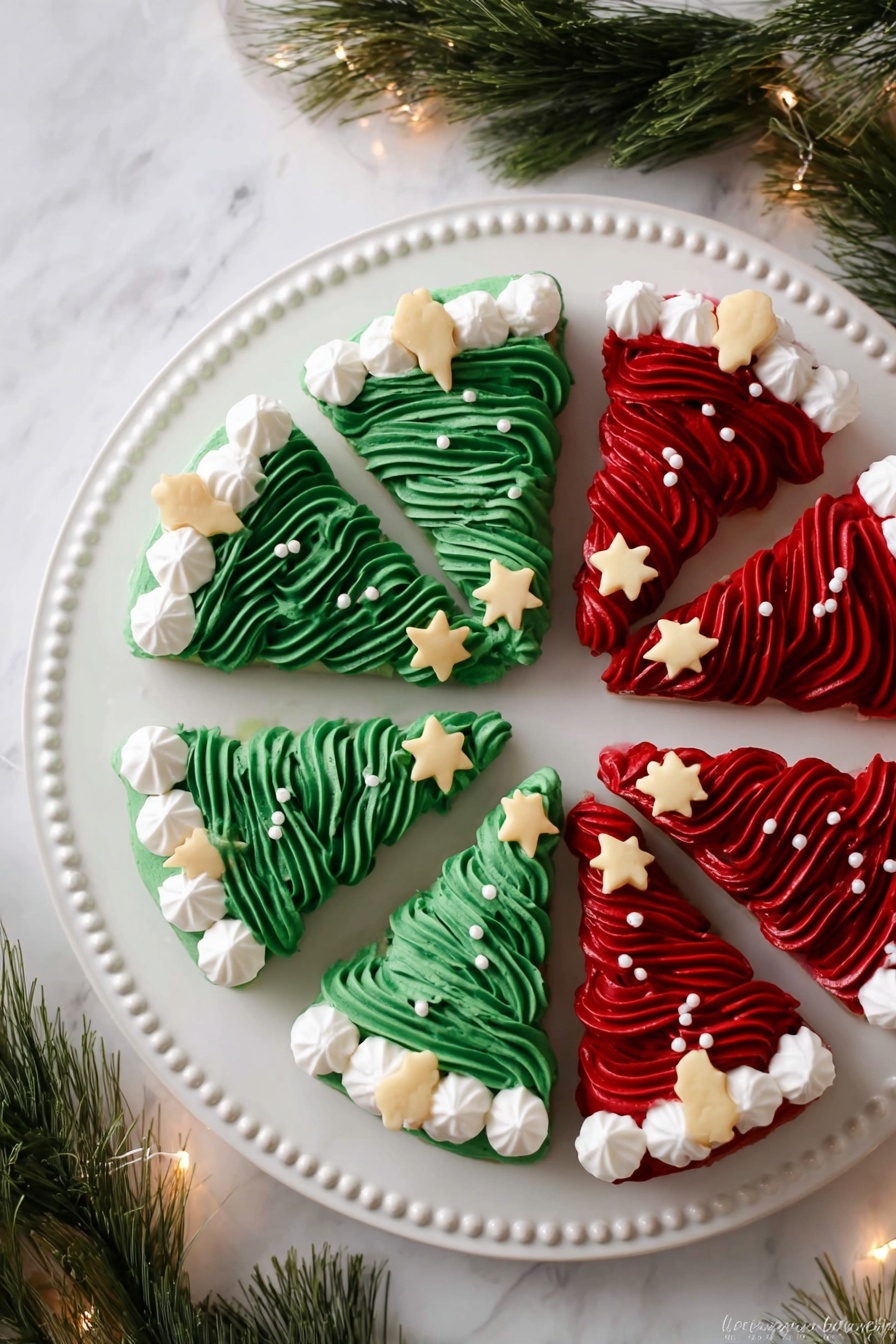
If you’re dreaming of holiday treats that are both festive and downright delicious, you’ll love this Frosted Christmas Brownies Recipe. Imagine thick, fudgy brownies dressed up with swirls of red, green, and white frosting, sprinkled with tiny edible gold stars and pearl sprinkles—it’s like Christmas in every bite! This recipe is perfect for holiday parties, gift-giving, or just cozying up with a cup of cocoa. Stick around, and I’ll walk you through every step to make these beauties come out perfect every time.
Why You’ll Love This Recipe
- Festive and Eye-Catching: The colorful frosting and sprinkles turn simple brownies into show-stopping holiday treats.
- Simple and Adaptable: Use boxed brownie mix for ease or make your own batter from scratch if you’re feeling ambitious.
- Perfect Texture: Thick, fudgy brownies with just the right amount of creamy frosting—no dry bites here.
- Fun for All Ages: Decorating these brownies feels like a holiday craft project everyone can enjoy.

Ingredients You’ll Need
This Frosted Christmas Brownies Recipe keeps it joyful and straightforward. The ingredients come together in a way that’s foolproof—plus, you can find everything easily in your local store during the holidays.
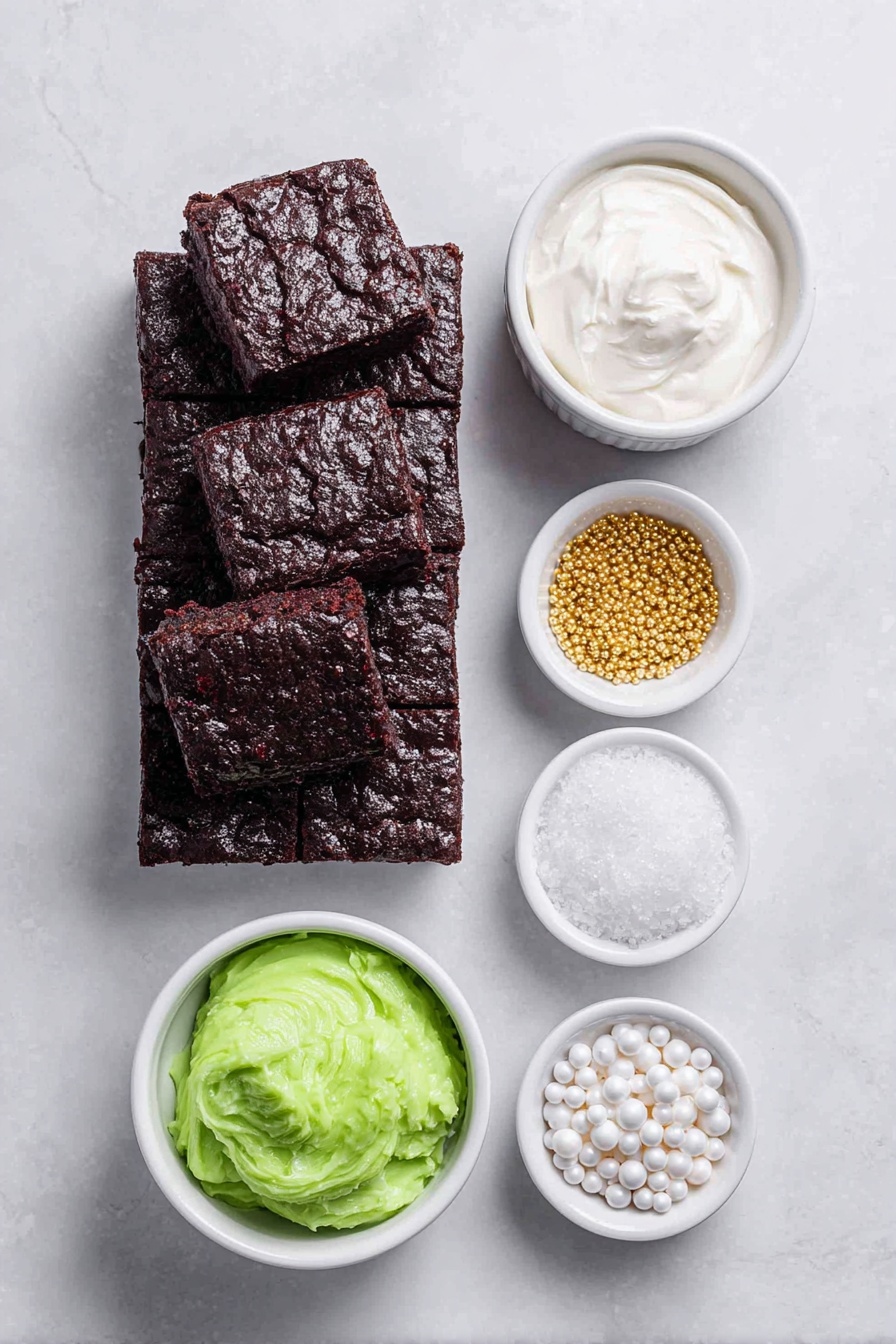
- Brownie Mix: I usually grab two boxes to make extra thick brownies, but you can do one if you prefer a thinner treat.
- White Frosting: This is your canvas—choose a good-quality frosting or whip your own for a homemade touch.
- Edible Gel Food Coloring: I like gels because they give vibrant color without watering down the frosting.
- Edible Gold Stars: They add that magical festive sparkle that feels like holiday cheer on a tiny scale.
- White Pearl Sprinkles: These add texture and elegance, making each bite festive and fun.
- Icing Bags and Frosting Tips: A large star tip (like 1M) helps you make those beautiful swirls effortlessly.
Variations
One of the best parts about this Frosted Christmas Brownies Recipe is how easily you can make it your own. I love switching up frosting colors or trying different types of sprinkles, so don’t be shy to personalize it for your tastes or dietary needs.
- Gluten-Free Variation: Use a gluten-free brownie mix or homemade gluten-free batter to accommodate friends with sensitivities—I did this last year and everyone was none the wiser!
- Dairy-Free Option: Swap the frosting with a coconut milk-based version and check for dairy-free stars and sprinkles to keep it allergy-friendly.
- Minty Twist: Add a drop of peppermint extract to the frosting for a refreshing holiday flavor that your guests will rave about.
- Nutty Crunch: Sprinkle chopped nuts like pistachios or walnuts on the frosting just before serving for extra texture.
How to Make Frosted Christmas Brownies Recipe
Step 1: Mix and Bake the Brownies
First things first: preheat your oven according to the instructions on your brownie mix box. I like to use a 9-inch springform pan because it makes it easy to release the brownies later without cracking. Be sure to spray it well with oil or use parchment paper if you prefer. Mix both boxes of the brownie mix (or prepare a double batch of your homemade batter) thoroughly, then pour it evenly into the pan. Because I double the mix, I’ve found the baking time is a bit longer—about 5 to 10 minutes more than the package suggests. To be sure, test with a toothpick; it should come out clean or with just a few moist crumbs. Don’t rush this part or you might end up with gooey centers that are a little too soft to frost easily.
Step 2: Cool and Cut into Triangles
Once baked, let your brownies cool completely in the pan so the edges set nicely. I’ve learned that if you try to frost while still warm, the frosting melts and loses that pretty texture we’re after. When your brownies are ready, carefully remove the springform ring and transfer the slab onto a cutting board. Instead of squares, slice your brownies into 8 triangles—these look like little Christmas tree shapes, perfect for decorating!
Step 3: Color the Frosting
It’s time to get festive! In one small bowl, mix your white frosting with red gel food coloring until you reach the shade of red you like. Repeat with a second bowl and green gel color. The great thing about gel is you can add a little at a time until it’s just right—no worrying about thin frosting here. Leave some frosting white for contrast and variety on your brownies.
Step 4: Fill Icing Bags and Decorate
Fill separate icing bags with the red, green, and white frosting. Use a large star tip (1M is my go-to) to pipe swirls or zigzags on top of your brownies. Decorate your “Christmas tree” brownies with green frosting, then sprinkle pearl sprinkles and edible gold stars like tiny ornaments right onto the frosting. For a Santa hat look, use a blend of red and white frosting—just pipe a red triangle with a white fluffy trim and a white dot at the tip. This is always such a fun step and the kids love getting involved here!
Pro Tips for Making Frosted Christmas Brownies Recipe
- Use a Springform Pan: I discovered this trick when I struggled with removing brownies from a regular pan—springform pans save your edges every time.
- Color Your Own Shades: Start with a little gel food coloring and build up—it’s easier to add more than fix overly bright frosting.
- Let Brownies Cool Completely: Trying to frost warm brownies will make your frosting melt and slide off, trust me on this.
- Pipe with Confidence: Don’t worry if your swirls aren’t perfect—the frosting hides a lot, and homemade charm always wins!
How to Serve Frosted Christmas Brownies Recipe
Garnishes
I love to finish these brownies with extra edible gold stars and white pearl sprinkles for that magical holiday sparkle. Sometimes I add tiny crushed candy canes for a minty crunch, but the classic stars and pearls never fail to impress.
Side Dishes
These brownies pair beautifully with a hot cup of peppermint tea or classic eggnog. If you’re hosting a party, set them alongside warm mulled wine or a rich hot chocolate bar to complement the festive mood.
Creative Ways to Present
For holiday gatherings, I like arranging these brownies on a large platter dusted lightly with powdered sugar to mimic snow. You can also stack them to create a “brownie Christmas tree,” adding fairy lights around the plate for a wow factor. Gift-wrapping individual brownies in clear cellophane with a festive ribbon makes for a delightful homemade gift, too!
Make Ahead and Storage
Storing Leftovers
After decorating, I recommend storing leftover brownies in an airtight container at room temperature for up to 3 days. This keeps the frosting nice and creamy without drying out. If your home is warm, refrigeration also works, but bring them back to room temp before serving for the best texture.
Freezing
I’ve frozen these brownies several times by freezing unfrosted slices first on a baking sheet, then wrapping them tightly in plastic wrap and foil. When ready, thaw them overnight, then pipe on fresh frosting and decorate—this way, your frosting looks fresh and vibrant.
Reheating
If you want to warm up your brownies, 10-15 seconds in the microwave does the trick, but be careful not to melt the frosting. I usually remove a slice from the fridge, let it sit out for 30 minutes, then optionally warm just a little—perfect for that gooey brownie feel!
FAQs
-
Can I make this Frosted Christmas Brownies Recipe with homemade brownies instead of a mix?
Absolutely! Using homemade brownies works wonderfully. Just make sure they’re thick enough so the frosting stands out nicely. My favorite homemade chocolate brownie recipe is rich and fudgy, and it pairs perfectly with the festive frosting.
-
How long does the frosting take to set on the brownies?
The frosting doesn’t take long to set—it firms up a bit at room temperature within 20-30 minutes, but it stays soft and creamy. For firmer frosting, you can chill the brownies briefly after decorating.
-
Can I prepare these brownies a day ahead of my party?
Yes! You can bake and cool the brownies a day ahead. I usually frost and decorate them the day of the party to keep everything looking fresh, but if you have a busy schedule, frosting the night before and storing in the fridge works well too.
-
What if I don’t have a springform pan?
No worries! Any 9×9-inch or similarly sized pan will do—just line it with parchment paper and let the edges hang over to lift the brownies out easily after baking.
Final Thoughts
I absolutely love how this Frosted Christmas Brownies Recipe brings a touch of magic and fun to my holiday baking. It started as a simple idea to make brownies more festive, and now it’s a family favorite that sparks smiles every year. I truly hope you enjoy making and sharing these as much as I do—they’re perfect for cozy get-togethers or last-minute gifts that look like you spent hours in the kitchen. Give it a try, and I promise you’ll be hooked on this festive chocolaty joy!
Print
Frosted Christmas Brownies Recipe
- Prep Time: 15 minutes
- Cook Time: 35-45 minutes (depending on brownie thickness and oven)
- Total Time: 50-60 minutes
- Yield: 8 large triangle brownies
- Category: Dessert
- Method: Baking
- Cuisine: American
Description
Celebrate the holidays with these festive Frosted Christmas Brownies featuring rich, fudgy brownies topped with colorful red, green, and white frostings, decorated with edible gold stars and white pearl sprinkles. Perfect for holiday gatherings, these brownies combine the classic chocolatey flavor with vibrant frosting designs inspired by Christmas trees and Santa hats.
Ingredients
Brownies
- 2 Boxes of Brownie Mix, or a double batch of homemade brownies
- Non-stick spray oil (for greasing pan)
Frosting & Decorations
- 1-3 jars White Frosting (amount varies based on desired thickness)
- Edible Gel Food Coloring (red and green, alternative: no artificial dye food coloring)
- Edible Gold Stars
- White Pearl Sprinkles
- Icing Bags
- Frosting Tips (large star tip – 1M)
Instructions
- Preheat and Prepare Pan: Preheat your oven according to the brownie mix packaging instructions. Spray a 9-inch springform pan evenly with non-stick spray oil to prevent sticking.
- Mix and Bake Brownies: Combine both boxes of brownie mix (or prepare a double batch if making homemade brownies) thoroughly and pour the batter into the prepared springform pan. Bake following the package instructions or until a toothpick inserted in the center comes out clean, noting that baking time may be longer for the double batch.
- Cool and Cut Brownies: Allow the brownies to cool completely before removing the springform ring. Transfer the baked brownies onto a cutting board and cut into 8 even triangular pieces.
- Prepare Colored Frosting: In two separate small bowls, divide white frosting and add red food coloring to one and green food coloring to the other, mixing well to achieve your preferred color intensity. Leave some frosting white for additional decoration.
- Fill Icing Bags: Spoon the red, green, and white frostings into individual icing bags fitted with your favorite frosting tips, such as the large star tip 1M for decorative piping.
- Decorate Brownies: Pipe the green frosting in tree shapes on some brownies and add white pearl sprinkles and edible gold stars for a festive look. On other brownies, create Santa Claus hat designs using a combination of green and white frosting.
- Serve and Enjoy: Arrange your decorated brownies on a festive platter and serve immediately to delight guests with holiday cheer!
Notes
- You can use just one box or batch of brownies if you prefer thinner brownies; two boxes produce extra thick brownies.
- Baking time may be longer for a double batch; follow the toothpick test to ensure doneness.
- The amount of frosting and coloring depends on how thick and vibrant you want your decorations.
Nutrition
- Serving Size: 1 brownie (1 of 8 pieces)
- Calories: 320
- Sugar: 30g
- Sodium: 210mg
- Fat: 15g
- Saturated Fat: 7g
- Unsaturated Fat: 7g
- Trans Fat: 0g
- Carbohydrates: 45g
- Fiber: 2g
- Protein: 3g
- Cholesterol: 30mg


