
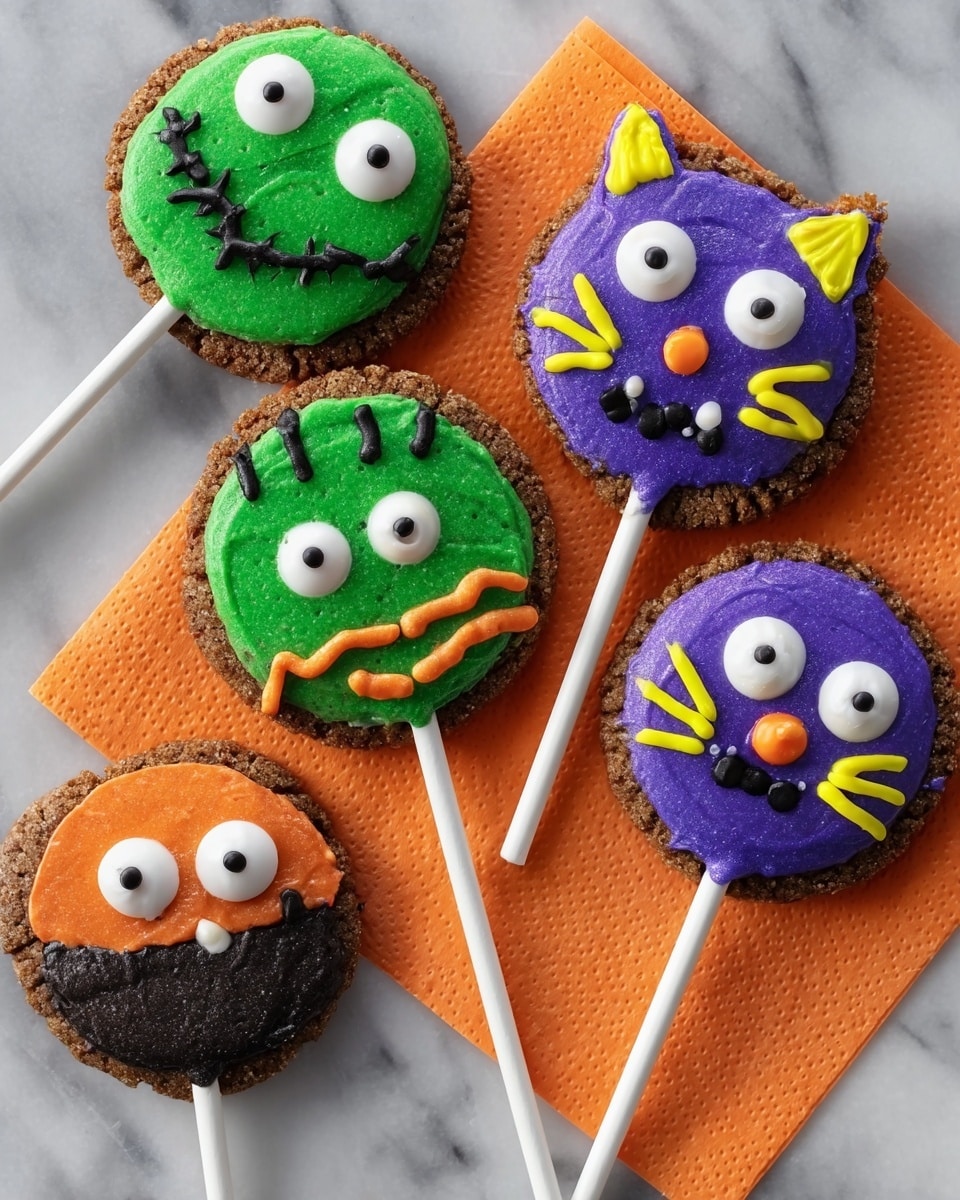
If you’re looking for a show-stopping treat for your spooky celebrations, this Halloween Chocolate Cookie Pops Recipe is an absolute game-changer. I remember the first time I made these—they turned out rich, chocolatey, and irresistibly fun to decorate. Plus, they’re perfect for parties or just a fun afternoon baking session with the kids. Trust me, once you try this recipe, you’ll want to keep it in your Halloween tradition year after year!
Why You’ll Love This Recipe
- Perfect Balance of Chocolate: The blend of cocoa and sugar creates a rich, fudgy cookie that’s not too sweet.
- Fun & Interactive: Decorating these pops is a blast, making them great for kids and adults alike.
- Easy to Shape & Bake: The dough holds together well, making the cookie pops sturdy and perfect for holding onto the lollipop stick.
- Customizable Decorations: You can dress them up with candy corn, eyeballs, or your favorite Halloween-themed candies.

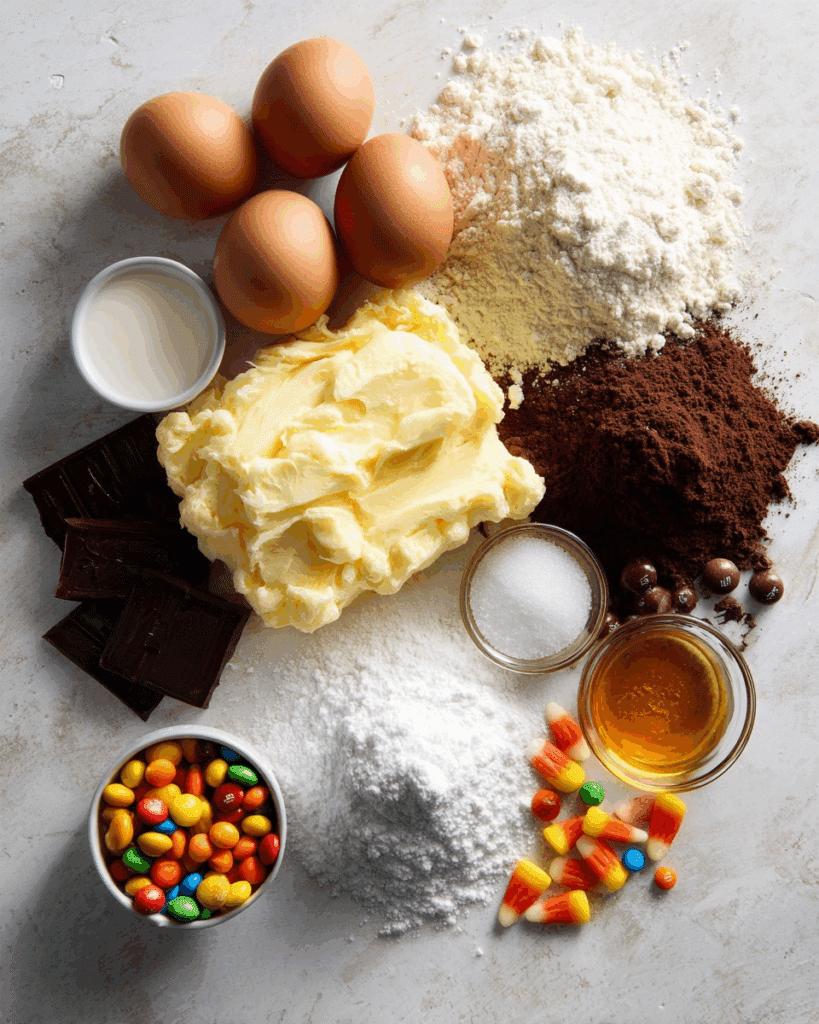
Ingredients You’ll Need
Every ingredient in this Halloween Chocolate Cookie Pops Recipe plays a key role in the texture and flavor, and I’ve found that using high-quality cocoa and fresh eggs really makes a difference. Shopping tip: grab softened butter that’s just at room temp — it’ll cream easier and help your dough come together wonderfully.
- Butter: Softened butter creams nicely with sugar for that perfect cookie base.
- Sugar: Regular granulated sugar provides a subtle crispness to the texture.
- Eggs: Room temperature eggs mix better for fluffier cookies.
- Vanilla Extract: Adds warmth and depth to the chocolate flavor.
- All-Purpose Flour: Provides the structural foundation of your cookie pops.
- Baking Cocoa: Use unsweetened cocoa for a rich chocolate taste.
- Baking Powder & Baking Soda: Both leavening agents ensure your cookies bake evenly.
- Salt: Enhances the chocolate flavor and balances sweetness.
- Lollipop Sticks: The star of the presentation—make sure they’re sturdy!
- Vanilla Frosting: Gives you a smooth canvas to decorate your spooky creations.
- Food Coloring & Decorating Gels: Bring those Halloween colors to life.
- Optional Decorations: Candy corn, candy eyeballs, mini M&M’s, and cinnamon hearts add character and fun textures.
Variations
I love how versatile this Halloween Chocolate Cookie Pops Recipe is! Feel free to customize it to fit your taste or dietary needs. I’ve tried a few twists over the years that really made these cookie pops even more exciting.
- Gluten-Free Version: I swapped the flour for a gluten-free blend once, and while the texture was a little softer, the flavor stayed just as indulgent.
- Spiced Chocolate: Adding a pinch of cinnamon and cayenne gave the cookies a fun, unexpected twist that’s perfect for fall.
- White Chocolate Drizzle: After frosting, I drizzled white chocolate over the pops for a pretty contrast and extra sweetness.
- Vegan Adaptation: I once used vegan butter and a flaxseed egg substitute—turns out, they come out just as delicious!
How to Make Halloween Chocolate Cookie Pops Recipe
Step 1: Cream Butter and Sugar Until Fluffy
Start by preheating your oven to 350°F. In a large bowl, beat the softened butter and sugar together until the mixture looks light and fluffy—trust me, this step is key for tender cookies. I use a handheld electric mixer on medium speed, and usually, this takes about 2-3 minutes. If you rush it, your cookies might turn out dense, so take your time!
Step 2: Mix in Eggs and Vanilla
Add your eggs one at a time to the butter-sugar mix, beating well after each addition. Then stir in the vanilla extract. This not only adds flavor but helps the dough bind together better. Using room temperature eggs here really improves the blend and makes the dough smooth.
Step 3: Combine Dry Ingredients and Slowly Add to Wet Mix
In a separate bowl, whisk together your flour, baking cocoa, baking powder, baking soda, and salt. Gradually add these dry ingredients into the wet mixture, beating at low speed just until combined. Over-mixing can lead to tough cookies, so stop as soon as you don’t see flour streaks.
Step 4: Shape Dough Balls and Insert Lollipop Sticks
Here’s where the fun begins! Roll your dough into 1½-inch balls—you want them uniform so they bake evenly. Place each ball about 3 inches apart on greased baking sheets. Gently insert a lollipop stick into each dough ball, pushing it about halfway through. This gave me a sturdy handle that stayed put during baking.
Step 5: Flatten and Bake
Dip a glass in sugar to prevent sticking, then gently press each cookie ball flat. This spreads out the dough just enough while keeping a nice thickness. Bake the pops for 10-12 minutes, or until they’re set—avoid overbaking so they stay soft yet firm enough to hold. When done, transfer them to wire racks to cool completely before decorating.
Step 6: Frost and Decorate Your Cookie Pops
Once cooled, tint your vanilla frosting with your favorite food coloring and generously frost each cookie pop. This frosting not only adds sweetness but acts like glue for your decorations. This is where your creativity can shine—use decorating gels to draw spooky designs, and stick on candy eyeballs, cinnamon hearts, or candy corn for that extra Halloween spirit.
Pro Tips for Making Halloween Chocolate Cookie Pops Recipe
- Softened Butter Matters: Using butter straight from the fridge won’t cream properly, so leave it out for at least 30 minutes before mixing.
- Sugar-Dipped Glass Trick: Dip your pressing glass in sugar to avoid dough sticking—it helps keep the cookie shape perfect every time.
- Cool Completely Before Decorating: Frosting warm cookies melts and slides off; cold cookies make decorating a breeze.
- Stick Stability Test: Press the lollipop sticks in gently but firmly so they don’t wobble or fall out after baking.
How to Serve Halloween Chocolate Cookie Pops Recipe

Garnishes
I like using black and yellow decorating gels for that authentic Halloween vibe—nothing beats those striking colors! Sometimes I’ll sprinkle edible glitter or edible confetti as a fun surprise. Candy eyeballs are my go-to for that creepy yet adorable look; they really make the cookie pops pop!
Side Dishes
Pair your cookie pops with a spooky punch or a warm caramel apple cider for a complete fall feast. My family also loves serving these alongside simple roasted pumpkin seeds or caramel popcorn to keep the snack table festive and fun.
Creative Ways to Present
I’ve had success arranging these pops upright in a decorated foam block covered with shredded orange and black paper—it look so festive! Another idea is placing them in small treat bags tied with orange ribbons for party favors. At one Halloween party, I created a “witch’s cauldron” centerpiece with the cookie pops fanning out—it was a total crowd-pleaser!
Make Ahead and Storage
Storing Leftovers
Once decorated, I store these cookie pops in an airtight container layered with parchment paper to keep them from sticking. They stay fresh at room temperature for about 3 days—perfect if you’re hosting a party and want to prep in advance.
Freezing
If you want to save them longer, freezing works well. I freeze the undecorated baked cookies first on a tray, then transfer them to freezer bags. When ready, thaw and decorate fresh—it keeps the frosting bright and smooth.
Reheating
These cookie pops are best enjoyed at room temperature, so I usually just let frozen ones thaw naturally on the counter. Avoid microwaving because frosting can melt and candy decorations might lose their shape.
FAQs
-
Can I use store-bought frosting for this recipe?
Absolutely! Store-bought vanilla frosting works great for decorating these Halloween Chocolate Cookie Pops. If you want to customize colors, you can easily tint store-bought frosting with food coloring. Just be sure to stir well for an even shade.
-
How do I keep the cookie pops from breaking on the sticks?
The key is to insert the sticks firmly but gently before baking, and not to bake cookies too thin or fragile. Using a sugar-dipped glass to flatten the cookies helps maintain a sturdy thickness that supports the stick during and after baking.
-
Can I make this recipe dairy-free?
Yes! Substitute the butter with a plant-based margarine or coconut oil, and use a dairy-free frosting. The texture changes slightly but the cookies still taste fantastic and hold up well as pops.
-
How should I store decorated cookie pops if I’m making them ahead?
Store them in a single layer in an airtight container at room temperature. Place parchment paper between layers if stacking. Avoid refrigerating if possible, as frosting may sweat and decorations could run.
-
Is there a way to make these cookie pops less sweet?
You could reduce the sugar slightly or opt for a less sweet frosting option, like cream cheese frosting with less sugar. Just keep in mind that sugar helps with texture, so adjustments might affect the cookie’s consistency.
Final Thoughts
Making these Halloween Chocolate Cookie Pops has become one of my favorite festive traditions. They’re not only tasty but a perfect excuse to get creative and have fun with seasonal decorations. I hope you enjoy making them as much as my family and I do—because honestly, there’s nothing like biting into a homemade chocolate cookie pop topped with colorful frosting and spooky candies. Give it a try, and you’ll see what I mean. Happy baking and have a fang-tastic Halloween!
Print
Halloween Chocolate Cookie Pops Recipe
- Prep Time: 25 minutes
- Cook Time: 10-12 minutes
- Total Time: 37 minutes
- Yield: 24 cookie pops
- Category: Dessert
- Method: Baking
- Cuisine: American
- Diet: Vegetarian
Description
Halloween Chocolate Cookie Pops are festive chocolate cookies on sticks, perfect for spooky celebrations. These soft, cocoa-rich cookies are decorated with colorful vanilla frosting, black and yellow gels, and fun candy toppings like candy corn and candy eyeballs, making them ideal treats for Halloween parties or trick-or-treaters.
Ingredients
Cookie Dough
- 1 cup butter, softened
- 2 cups sugar
- 2 large eggs, room temperature
- 3 teaspoons vanilla extract
- 3 cups all-purpose flour
- 1 cup baking cocoa
- 1/2 teaspoon baking powder
- 1/2 teaspoon baking soda
- 1/2 teaspoon salt
Assembly
- 24 lollipop sticks
- Prepared vanilla frosting
- Food coloring
- Black and yellow decorating gels
- Optional decorations: Candy corn, candy eyeballs, M&M’s minis, and cinnamon hearts
Instructions
- Preheat Oven: Preheat your oven to 350°F (175°C) to prepare for baking the cookie pops.
- Mix Butter and Sugar: In a large bowl, beat the softened butter and sugar together until well blended and creamy.
- Add Eggs and Vanilla: Beat in the eggs one at a time along with the vanilla extract until the mixture is smooth and uniform.
- Combine Dry Ingredients: In a separate small bowl, whisk together the all-purpose flour, baking cocoa, baking powder, baking soda, and salt to evenly distribute the leavening agents and cocoa.
- Incorporate Dry Ingredients: Gradually beat the dry ingredient mixture into the sugar and butter mixture until fully combined into a soft dough.
- Shape Dough Balls: Shape the dough into 1 1/2-inch balls, spacing them 3 inches apart on greased baking sheets to allow room for spreading.
- Insert Lollipop Sticks: Gently insert one lollipop stick into each dough ball, taking care not to push too far through the dough.
- Flatten Cookies: Flatten each cookie slightly by pressing with a glass dipped in sugar, lending the cookie an even surface for decoration.
- Bake Cookies: Bake in the preheated oven for 10 to 12 minutes until cookies are set but not overly hard; they should be soft and chewy.
- Cool Cookies: Remove cookies from the baking sheets and transfer them to wire racks to cool completely before decorating.
- Prepare Frosting: Tint prepared vanilla frosting with desired food coloring to create festive Halloween colors.
- Frost and Decorate: Spread or pipe the colored frosting onto each cooled cookie pop, then decorate with black and yellow gels and optional candies such as candy corn, candy eyeballs, mini M&Ms, and cinnamon hearts as desired for a spooky finish.
Notes
- Use room temperature eggs to ensure better incorporation into the dough and smoother texture.
- Dipping the glass in sugar before flattening the cookies helps prevent sticking and adds a slight sugary crunch.
- Ensure cookies are completely cool before frosting to avoid melting the frosting.
- Customize frosting colors and decorations to your Halloween theme or party colors.
- Store cookie pops in an airtight container at room temperature for up to 3 days for optimal freshness.
Nutrition
- Serving Size: 1 cookie pop
- Calories: 180
- Sugar: 14g
- Sodium: 110mg
- Fat: 9g
- Saturated Fat: 5g
- Unsaturated Fat: 3g
- Trans Fat: 0g
- Carbohydrates: 22g
- Fiber: 2g
- Protein: 2g
- Cholesterol: 35mg


