
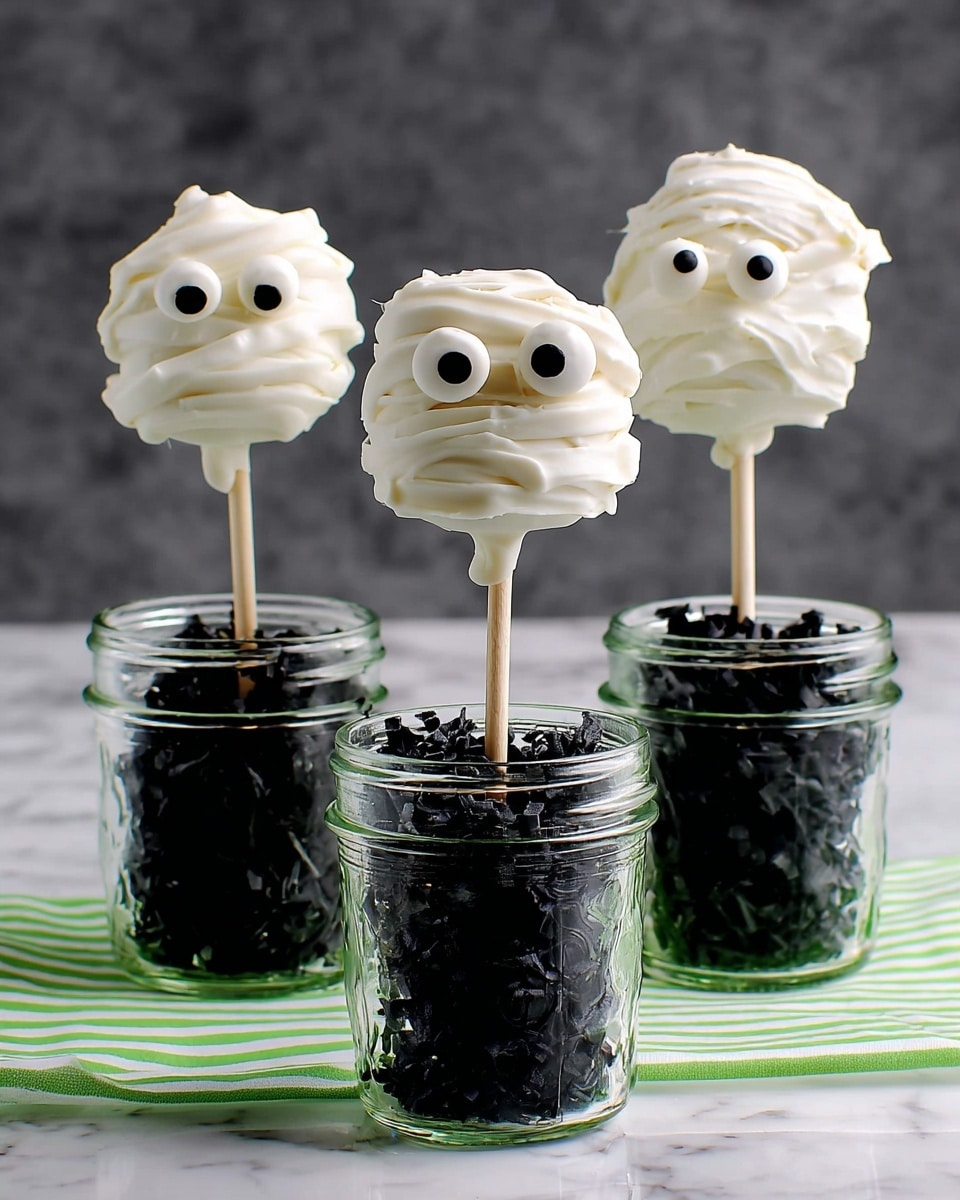
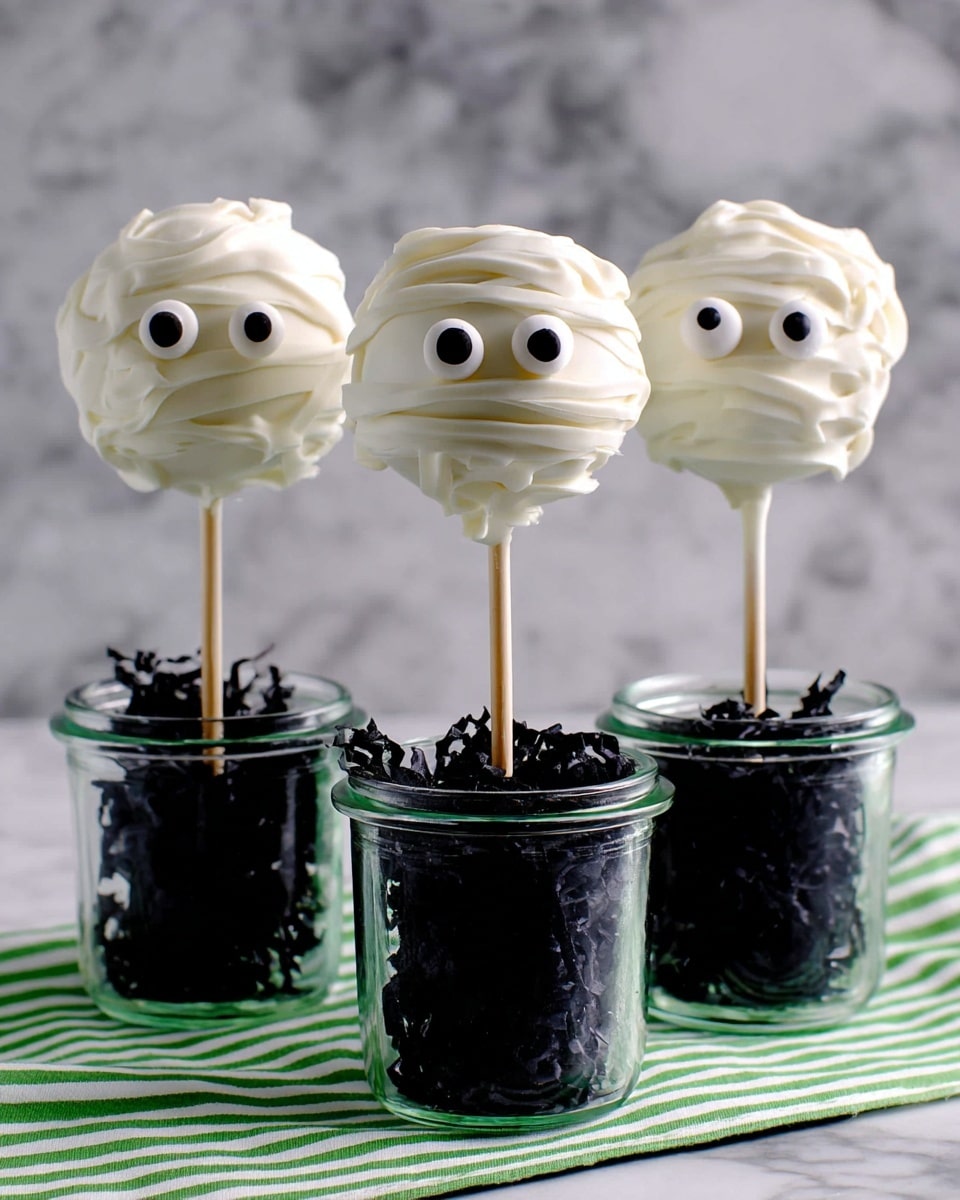
If you’re looking for a fun, spooky, and utterly delicious treat to wow your friends and family this fall, you’ve got to try this Halloween Mummy Brownie Pops Recipe. These little brownie balls wrapped up like cute mummies on sticks always bring out the smiles—and the sugar rush! I absolutely love how this recipe combines simple ingredients into an irresistible Halloween snack that’s as fun to make as it is to eat. Stick with me because I’m going to share all my best tips to make your mummy pops look perfect and taste heavenly.
Why You’ll Love This Recipe
- Easy to Make: Uses a boxed brownie mix with a few tasty add-ins to keep things simple yet impressive.
- Fun & Kid-Friendly: Everyone loves assembling and decorating their own mummy pops—it’s a total party activity.
- Perfect Halloween Treat: The candy eyes and white chocolate “bandages” nail the spooky vibe without being scary.
- Great for Gifting or Parties: These pops look adorable on a display and last well when refrigerated.

Ingredients You’ll Need
Each ingredient plays a part in making your Halloween Mummy Brownie Pops Recipe both delicious and easy to pull off. I like keeping ingredients simple and accessible, which is why this recipe leans on a quality brownie mix and ready-made frosting. Plus, adding chopped Butterfinger candy bars lifts the flavor for a rich, peanut-buttery crunch that your guests will buzz about.
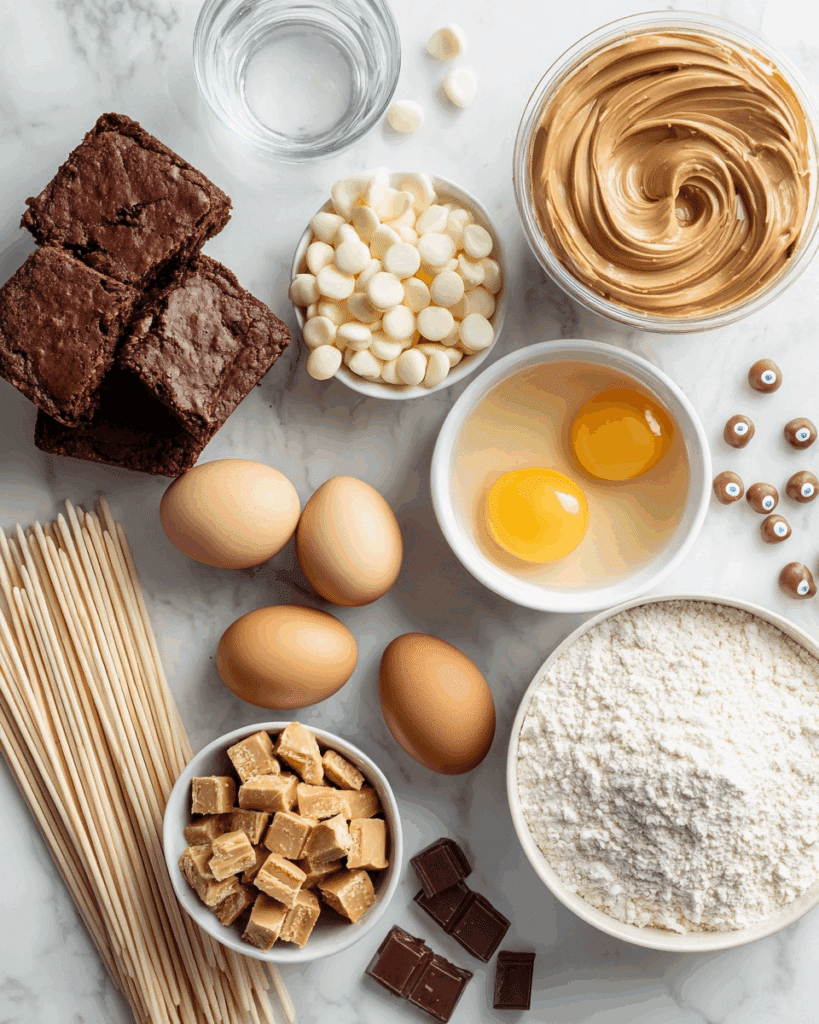
- Betty Crocker™ Milk Chocolate Brownie Mix: Using a boxed mix makes baking quick and foolproof.
- Water, vegetable oil, and eggs: These are your basic ingredients to bake the brownies from the box instructions.
- Betty Crocker™ Rich & Creamy Milk Chocolate Frosting: Adds moisture and binds your brownie crumbs for easy shaping.
- Creamy peanut butter: Blends beautifully with frosting to give that subtle nutty flavor and richness.
- Chopped Butterfinger™ candy bars: These add a fun, crispy texture that’s surprisingly addictive.
- White candy melts or coating wafers: These melt into a smooth coating for wrapping your brownie pops like mummies.
- Paper lollipop sticks: Essential for holding your pops and making them fun to eat.
- Candy eyes: The adorable finishing detail that really brings these mummies to life!
- Block of plastic foam: It’s great for standing your pops upright while the coating sets.
Variations
One of my favorite things about this Halloween Mummy Brownie Pops Recipe is how easy it is to tweak to suit your taste or dietary needs. Whether you want to switch up the candy or make it allergy-friendly, these mummy pops are pretty versatile.
- Nut-Free Variation: I swapped out the peanut butter frosting mix for extra frosting and crushed toffee bits, and it still tasted fantastic without nuts.
- Flavor Twist: Try adding a teaspoon of peppermint extract to the frosting mix for a minty surprise that’s great for Halloween or winter celebrations.
- Chocolate Lovers: Use dark chocolate candy melts instead of white for a spooky black mummy look.
- Mini Pops: Make smaller pops for bite-sized treats—the kids loved these at my last Halloween gathering.
How to Make Halloween Mummy Brownie Pops Recipe
Step 1: Bake and Crumble Your Brownies
Start by making the brownies according to the box instructions, aiming for cakelike brownies using water, oil, and eggs. Don’t overbake—they should be moist but set. Once cooled, crumble the brownies into a large bowl, discarding any hard edges. This crumb base is the perfect texture to mix with your frosting and peanut butter, creating the gooey-yet-firm mixture you’ll shape.
Step 2: Mix, Shape, and Chill
In a small bowl, whisk together the frosting and peanut butter until creamy. Stir in the chopped Butterfinger candy bars for that magical crunch. Add this mixture to your brownie crumbs and blend well — you want a sticky dough that holds together. Shape into 1-inch balls (about walnut sized) and place on a wax paper-lined cookie sheet. Refrigerate until firm, about 30 minutes or so; this step is key for easier dipping later.
Step 3: Insert Sticks and Chill Again
Next, dip the tip of each lollipop stick into your melted candy coating, then insert it halfway into each brownie ball. This “glue” helps keep the pops secure when you dip and decorate later. Place them back on the wax paper and chill in the fridge for another 30 minutes to set solid.
Step 4: Dip Pops and Decorate Mummies
Now for the fun part—dip each brownie pop into the remaining melted white candy coating, gently tapping off any excess. Stand them up to dry (I like poking them into a foam block). While the coating is still wet, pipe on crisscrossed lines with the reserved melted candy to mimic mummy bandages, then add the candy eyes right on top. Don’t wait too long here; the candy dries quickly and the eyes won’t stick if the coating has hardened.
Pro Tips for Making Halloween Mummy Brownie Pops Recipe
- Use Cakelike Brownies: I learned that sticking to the cakelike brownie setting on the box keeps the texture just right—not too crumbly or dense for shaping.
- Keep Your Hands Cool: When shaping balls, I chilled my hands with cold water first to prevent the peanut butter-frosting mix from getting too sticky.
- Try Piping Bags for Bandages: Using a small corner snip on a plastic bag for piping the candy coating lines makes decorating so much easier and looks sharp.
- Don’t Skip the Foam Block: Letting pops dry upright in foam avoids smudges and dripping—this trick saved me from cleanup headaches last year.
How to Serve Halloween Mummy Brownie Pops Recipe
Garnishes
I keep things simple with candy eyes and the white chocolate bandages, but sometimes I sprinkle orange or black edible glitter on top for a little extra Halloween sparkle. If you want a colorful twist, crushed mini Halloween candies or sprinkles add a festive pop.
Side Dishes
These mummy pops are sweet enough to stand alone, but I like pairing them with a bowl of spiced apple cider or pumpkin-flavored hot chocolate. For a party, some simple fruit slices or caramel popcorn balance the rich chocolate flavors beautifully.
Creative Ways to Present
For Halloween parties, I arrange the pops standing upright in a decorated foam block or inside a carved pumpkin for a centerpiece. Wrapping each pop in a tiny cellophane bag with a ribbon makes them perfect party favors. Another fun idea: insert them into a styrofoam “graveyard” covered with crushed Oreos to look like dirt—kids love that spooky scene!
Make Ahead and Storage
Storing Leftovers
I store leftover mummy brownie pops in an airtight container in the fridge, lined with wax paper between layers so they don’t stick together. They keep well for up to 5 days, perfect if you want to prep ahead of time or save some treats for later.
Freezing
You can freeze these pops for up to a month. I wrap each one individually in plastic wrap and place them in a freezer-friendly container. When you’re ready, thaw them slowly in the fridge to keep the frosting and candy coating smooth and glossy.
Reheating
Since these are no-bake beyond the brownie base, reheating isn’t necessary and I don’t recommend it—best served chilled or at room temperature. If your coating dulls a bit in the fridge, just let the pops sit out for 10 minutes before serving to soften the chocolate aroma.
FAQs
-
Can I use homemade brownies instead of boxed mix for the Halloween Mummy Brownie Pops Recipe?
Absolutely! Homemade brownies work great, just be sure they have a cakey texture rather than fudgy and dense. This helps the mixture crumble easily for shaping. If your brownies are too moist or fudgy, try refrigerating them first to make handling easier.
-
What if I’m allergic to peanuts—can I skip the peanut butter?
Yes, you can skip the peanut butter or use a peanut-free alternative like sunflower seed butter. If avoiding nuts altogether, simply add a little extra frosting to bind everything together and consider mixing in crushed toffee or allergy-safe candy bars for texture.
-
How do I melt candy melts without burning them?
I recommend melting candy melts in short bursts (20-30 seconds) in the microwave, stirring in between. Alternatively, use a double boiler to gently melt without overheating. Avoid any water contact during melting to prevent the candy from seizing.
-
Can I make the mummy pops gluten-free?
Definitely! Just substitute the brownie mix with a gluten-free version and confirm the candy bars and other ingredients are gluten-free as well. The rest of the recipe stays the same and still tastes amazing.
-
How long do the Halloween Mummy Brownie Pops last?
Stored in the fridge in an airtight container, these pops last about 5 days. For longer storage, freezing is ideal, and you can keep them up to a month when wrapped properly.
Final Thoughts
I’m telling you, this Halloween Mummy Brownie Pops Recipe has become a staple in my Halloween arsenal. It’s charming, tasty, and a little bit nostalgic with those candy eyes staring back at you. Whenever I serve these at my Halloween parties, they’re the first to disappear—and everyone asks for the recipe. Give it a go yourself; I promise you’ll have just as much fun making them as eating them. Happy haunting in the kitchen!
Print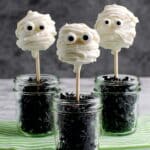
Halloween Mummy Brownie Pops Recipe
- Prep Time: 60 min
- Cook Time: 40 min
- Total Time: 3 hr 40 min
- Yield: 38 pops
- Category: Dessert
- Method: No-Cook
- Cuisine: American
Description
Celebrate Halloween with these spooky and delicious Halloween Mummy Brownie Pops. Made from cakelike chocolate brownies mixed with creamy peanut butter frosting and topped with white candy melts decorated as mummy bandages and candy eyes, these pops are perfect for parties and treats.
Ingredients
Brownie Base
- 1 box Betty Crocker™ Milk Chocolate Brownie Mix
- Water, vegetable oil, and eggs as required on brownie mix box (for cakelike brownies)
Frosting Mixture
- 1/3 cup from 1 tub (16 oz) Betty Crocker™ Rich & Creamy Milk Chocolate Frosting
- 2 tablespoons creamy peanut butter
- 1 cup chopped Butterfinger™ candy bars (from 10-oz package)
Decoration & Assembly
- 4 cups white candy melts or coating wafers, melted
- 38 paper lollipop sticks
- 76 candy eyes
- Block of plastic foam (for drying)
Instructions
- Prepare Brownies: Make and bake the brownie mix as directed on the box to achieve cakelike brownies, using water, oil, and eggs. Once baked, cool completely. Line a cookie sheet with waxed paper.
- Mix Frosting and Batter: In a small bowl, blend the chocolate frosting with peanut butter until smooth. Crumble the cooled brownies into a large bowl, discarding the edges, and stir in the chopped Butterfinger candy bars. Add the frosting mixture and mix thoroughly to combine.
- Shape Brownie Balls: Form the mixture into 1-inch balls and place them onto the prepared cookie sheet. Refrigerate the brownie balls until firm, approximately 30 to 60 minutes.
- Insert Lollipop Sticks: Reserve 1 cup of melted white candy melts. Dip the tip of each lollipop stick about 1/2 inch into the remaining melted candy and insert the stick halfway into each brownie ball. Place the sticks with brownie balls back onto the cookie sheet and refrigerate for 30 minutes to set.
- Coat the Brownie Pops: Remove brownie pops from the refrigerator a few at a time. Dip each ball fully into the melted white candy coating, tapping off excess. Allow to stand until the coating is set.
- Decorate as Mummies: Spoon the reserved melted candy melts into a resealable plastic bag, seal, and cut a small corner off the bag. Pipe crisscross lines onto each coated brownie ball to create mummy bandage effects. Immediately attach two candy eyes per pop. Poke the opposite end of each stick into a block of plastic foam to allow the mummy pops to stand and set completely.
Notes
- Use cakelike brownies for easier shaping and better consistency.
- Chilling the brownie balls helps them hold their shape and makes coating easier.
- White candy melts can be found at baking supply stores or online; they provide a smooth coating for decorating.
- Use candy eyes for a fun and spooky mummy look, perfect for Halloween parties.
- Store the finished pops in an airtight container at room temperature or refrigerated for up to 3 days.
Nutrition
- Serving Size: 1 brownie pop
- Calories: 190
- Sugar: 20g
- Sodium: 120mg
- Fat: 10g
- Saturated Fat: 4g
- Unsaturated Fat: 5g
- Trans Fat: 0g
- Carbohydrates: 24g
- Fiber: 1g
- Protein: 2g
- Cholesterol: 15mg


