
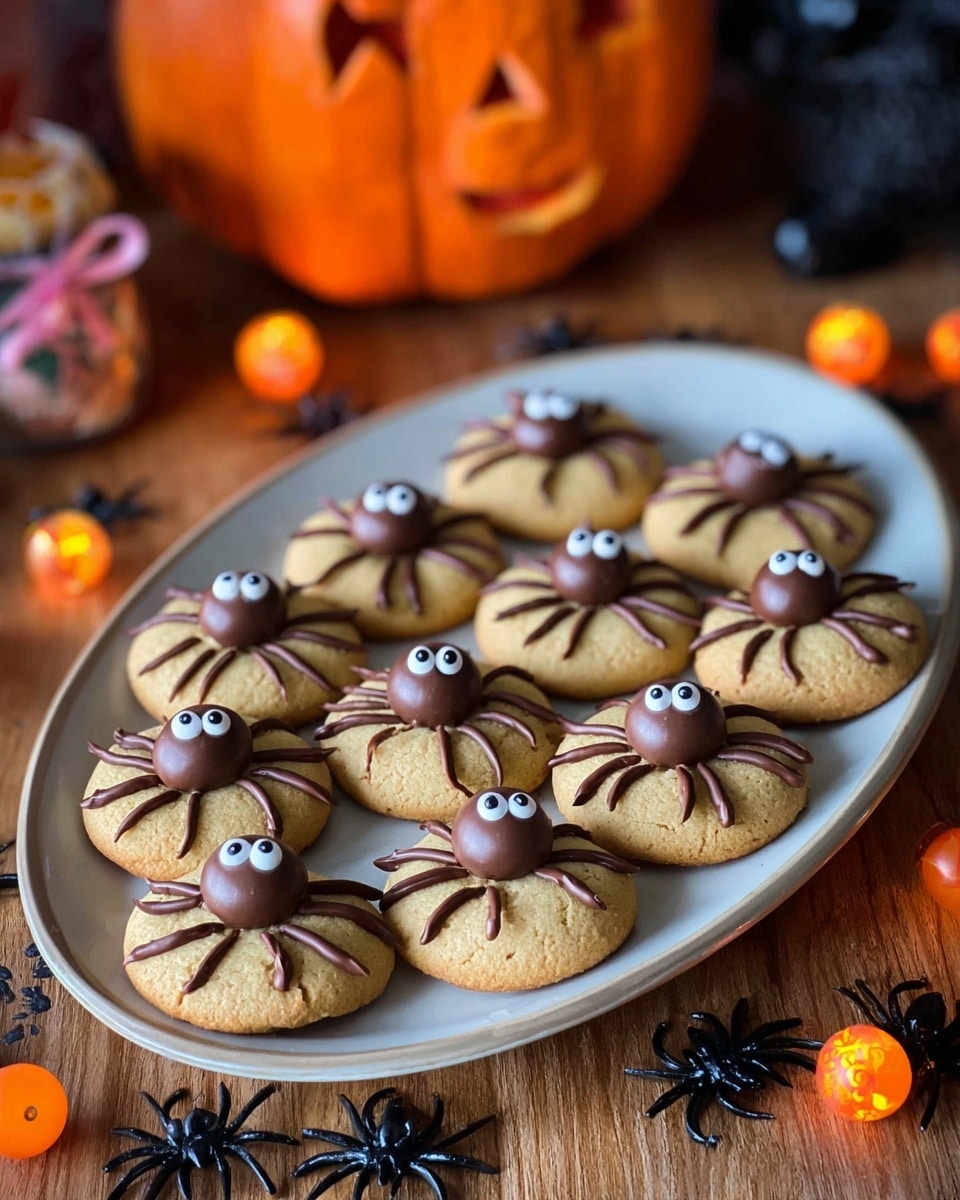
If you’re looking for a super fun and show-stopping treat this Halloween, you’ve got to try this Halloween Spider Cookies Recipe. Trust me, these little spider delights are not only adorable but downright delicious—perfect for parties, trick-or-treaters, or just a spooky snack to enjoy with your family. They’re soft, buttery, and decorated with chocolate legs and Malteser bodies that will make you smile every time you take a bite. Stick around and I’ll walk you through all the tips and tricks that make this recipe a guaranteed hit!
Why You’ll Love This Recipe
- Perfect Balance of Soft and Slightly Crisp: The cookies bake up tender in the middle with just the right golden edges for texture.
- Super Easy Decoration: Using Maltesers and melted chocolate means you don’t have to be an artist to get an impressive spooky look.
- Kid-Friendly and Crowd-Pleasing: My family goes crazy for these every year, and kids love helping with the decorating.
- Great Make-Ahead Option: You can prep the dough ahead and decorate them close to serving time — super convenient for busy Halloween days.

Ingredients You’ll Need
This Halloween Spider Cookies Recipe uses simple pantry staples that come together beautifully. I especially love how the cornflour keeps the cookies soft and tender, while the mix of brown and white sugars adds a mild caramel flavor — so good!
- Butter: Room temperature or melted, it adds richness and helps create a soft texture.
- Brown Sugar: Brings moisture and depth of flavor, plus that lovely slight chewiness.
- White Sugar: Balances out the sweetness and helps with crisp edges.
- Egg: Binds the dough and gives structure.
- Vanilla Essence: Adds warmth and enhances overall flavor.
- Plain Flour: The base of the dough, sifted for lightness.
- Salt: Just a pinch to highlight the sweet flavors.
- Baking Soda: Helps the cookies rise slightly and get that tender crumb.
- Cornflour: This is the secret to keeping your cookies soft and melt-in-your-mouth.
- Maltesers: For the spider bodies — crunchy, chocolatey, and perfect size.
- Dark Chocolate (melted): Used to pipe spider legs — easy and tasty decoration!
- White Icing: For the spooky eyes, adding those cute finishing touches.
Variations
I love that this Halloween Spider Cookies Recipe is so flexible. Feel free to customize it to suit your vibe or dietary needs! I often tweak the decoration or add chocolate chips for extra yum.
- Chocolate Chip Version: I like adding a cup of chocolate chips right into the dough for little bursts of melty chocolate inside — kids adore this twist.
- Candy Eyeballs: For an extra creepy-cute look, swap the white icing eyes for candy eyeballs available at specialty stores — makes decorating hands-free!
- Gluten-Free: You can swap the plain flour with a gluten-free all-purpose blend; just check you have some binder in it for the best texture.
- Vegan Option: Try using a vegan butter alternative and substitute the egg with a flax egg or applesauce to keep the dough soft.
How to Make Halloween Spider Cookies Recipe
Step 1: Soften and Mix the Butter and Sugars
Start by melting your butter gently in the microwave for about 30 to 50 seconds — warm, but not hot. Whisk it thoroughly so it’s smooth and creamy, then add both the brown and white sugars, the egg, and vanilla essence. Mix everything until super smooth and lump-free. This part is where you start building that soft, chewy texture we love!
Step 2: Combine the Dry Ingredients and Make the Dough
Sift together the plain flour, salt, baking soda, and cornflour directly over your wet mixture. Then fold everything together gently until just combined. The dough will be pretty soft and thick at this point — if it feels too warm or sticky, pop it into the fridge or freezer for a bit until it firms up enough to roll.
Step 3: Shape and Bake the Cookies
Preheat your oven to 170°C fanbake (or 340°F). Using a cookie scoop or spoon, roll the dough into balls about 2 tablespoons (30-40g) each and place them on a lined baking tray. Gently press each ball down a little to flatten them — this helps the cookies bake evenly. Bake for 12 to 15 minutes until the edges look golden but the center is still soft. This is key to keeping them tender inside!
Step 4: Add the Spooky Spider Bodies
Right after taking the cookies out of the oven — while they’re still warm — press two Maltesers into each cookie to form the spider’s body. Then leave the cookies on the tray for about 10 minutes before transferring them to a wire rack to cool completely.
Step 5: Pipe Legs and Eyes for the Full Spider Effect
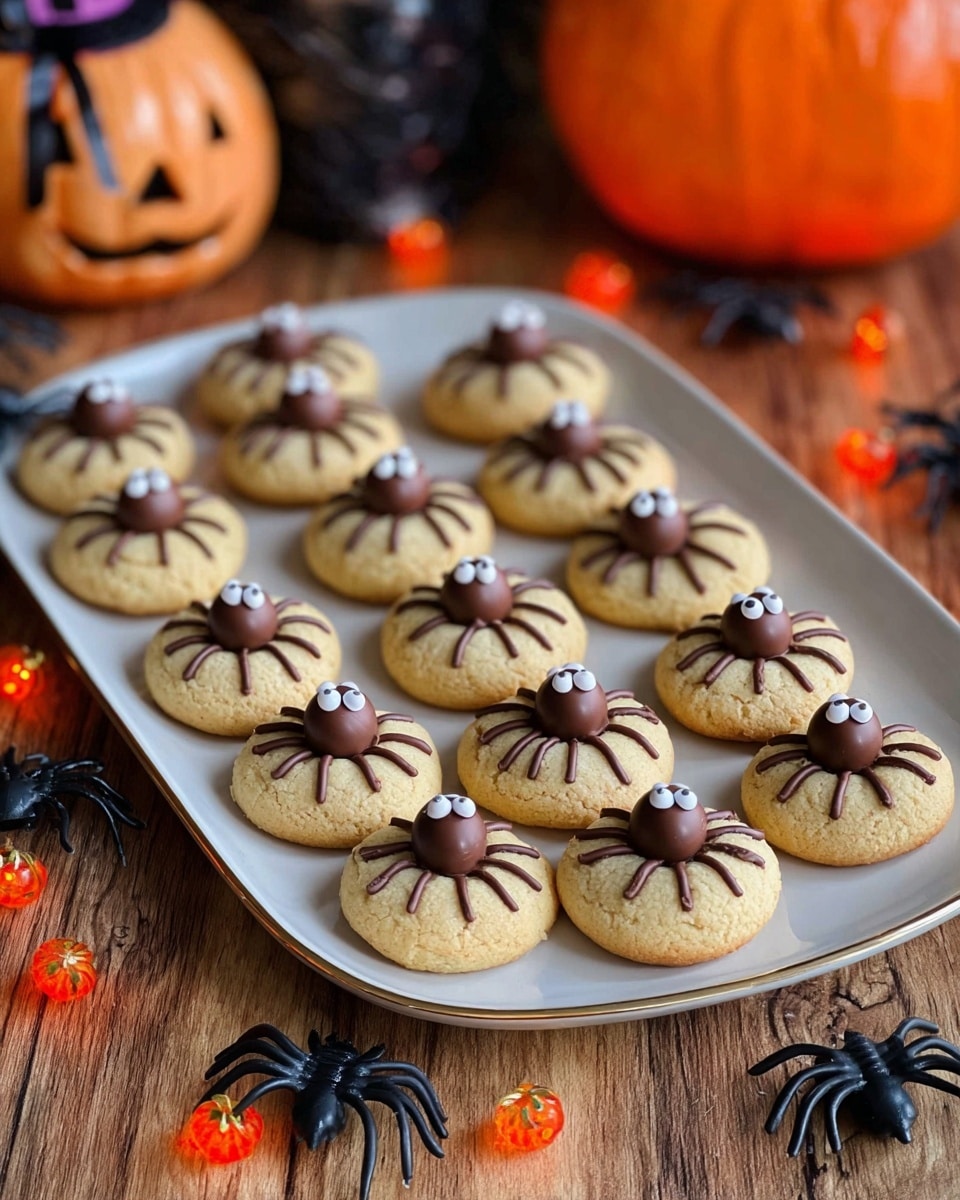
Melt your dark chocolate and pour it into a small ziplock bag, snipping a tiny hole in one corner. Pipe four thin legs coming from each side of the Malteser bodies — the chocolate hardens quickly to hold its shape. Then, use your white icing to dot on two eyes for each spider, finishing with a tiny dab of melted chocolate inside for pupils. Let everything set and voila — adorable spider cookies ready to spook and delight!
Pro Tips for Making Halloween Spider Cookies Recipe
- Chill the Dough If Too Soft: This makes rolling easier and keeps cookies from spreading too much in the oven.
- Don’t Overbake: The cookies will look a bit soft and pale but they set up as they cool, staying tender inside.
- Pipe Legs on a Cool Cookie: Decorating is easier when the cookie is at room temperature so the chocolate sets nicely.
- Use a Small Piping Tip For Details: A tiny hole in the bag helps you create fine legs and neat eyes — making all the difference!
How to Serve Halloween Spider Cookies Recipe
Garnishes
I tend to keep the decorations simple: Maltesers for the bodies and chocolate legs with white icing eyes. But sometimes I sprinkle a tiny pinch of edible glitter or use candy eyeballs if I’m feeling fancy. It’s all about that creepy-cute vibe that kids (and adults!) can’t resist.
Side Dishes
Pair these Halloween Spider Cookies with a big mug of hot chocolate or a spooky punch bowl. I also like to set out bowls of candy corn and popcorn for a full Halloween treat spread — the cookies always take center stage, though!
Creative Ways to Present
One of my favorite presentation ideas is arranging these spiders around a “web” made out of spun sugar or piped icing on a dark plate. Another time, I used little black cupcake liners for each cookie to make them extra special. Kids love helping with this part and it makes your Halloween table look super fun.
Make Ahead and Storage
Storing Leftovers
Once decorated, these cookies keep best in an airtight container at room temperature for up to a week. I always separate layers with parchment paper to protect the delicate chocolate legs. Even after a few days, they’re still soft and yummy — just as good as fresh!
Freezing
If you want to freeze the dough, shape it into a log or balls and wrap them tightly in plastic wrap and foil. When ready to bake, just thaw in the fridge overnight and bake as usual. I don’t recommend freezing the decorated cookies because the legs can break or the icing might not hold up well.
Reheating
Sometimes I like my cookies just slightly warm, so I pop them in a 150°C (300°F) oven for 5 minutes. This brings out that fresh-baked softness without melting the chocolate decorations. Just watch them closely so they don’t overheat or dry out.
FAQs
-
Can I use other chocolates instead of Maltesers for the spider body?
Absolutely! I’ve used Reese’s Pieces, M&Ms, or even small chocolate truffles for variation. Just pick something that fits nicely on the cookie and holds it shape when baked.
-
Can I make these cookies vegan or gluten-free?
Yes! For a vegan version, swap the butter with vegan margarine and use a flax or chia egg replacement. Gluten-free baking flour works well too, but be sure to include a binder like xanthan gum for the best texture.
-
How do I prevent the cookies from spreading too much?
Chilling the dough before shaping is your best friend here. Also, make sure your butter isn’t too melted or warm — a cooler dough helps cookies hold their shape better during baking.
-
Can I decorate the cookies ahead of time?
It’s best to decorate the cookies on the day you plan to serve them. The melted chocolate legs and icing eyes set best on fresh or fully cooled cookies, and this keeps everything looking perfect and fresh.
-
How should I store leftover Halloween Spider Cookies?
Store them in an airtight container at room temperature, layering with parchment paper to protect the delicate decorations. They keep well for up to a week without losing that soft, chewy texture.
Final Thoughts
I absolutely love how this Halloween Spider Cookies Recipe brings a little magic (and maybe a little mischief) to the kitchen. They’re playful enough to get kids excited about baking and eating cookies but simple enough that you won’t feel overwhelmed. When I first tried this recipe, I was blown away by how soft and flavorful the cookies were, and the spider decorations never fail to get a laugh or a smile. If you want a memorable Halloween treat that’s easy to make and fun to share, this recipe is your go-to. Grab your ingredients, gather your family or friends, and enjoy creating some spooky-cute spiders together!
Print
Halloween Spider Cookies Recipe
- Prep Time: 20 minutes
- Cook Time: 12-15 minutes
- Total Time: 32-35 minutes
- Yield: About 18-20 cookies
- Category: Dessert/Cookies
- Method: Baking
- Cuisine: Western/International
Description
These fun and festive Halloween Spider Cookies are soft, buttery treats decorated with Maltesers, melted chocolate, and white icing to resemble creepy crawly spiders. Perfect for Halloween parties or a spooky snack, they combine a tender cookie base with playful candy decorations for an eye-catching dessert.
Ingredients
Cookie Dough
- 150g butter
- ½ cup brown sugar (100g)
- ½ cup white sugar (110g)
- 1 egg
- 1 tsp vanilla essence
- 2 cups plain flour (300g)
- ¼ tsp salt
- 1 tsp baking soda
- 2 Tbsp cornflour
Decorations
- 140g bag Maltesers
- 100g dark chocolate, melted
- 1 small tube white icing
Instructions
- Melt Butter and Mix Wet Ingredients: In a large glass bowl, melt the butter in the microwave for 30 to 50 seconds. Whisk the melted butter, then add the brown sugar, white sugar, egg, and vanilla essence. Mix these together until the mixture is smooth and free of lumps.
- Add Dry Ingredients and Form Dough: Sift the plain flour, salt, baking soda, and cornflour over the wet mixture. Fold everything together gently until fully combined. The dough will be soft but thick. If it feels too warm or soft, chill it in the fridge or freezer until it firms up enough to roll.
- Preheat Oven: Preheat your oven to 170°C fanbake (about 338°F).
- Shape Cookies: Roll the dough into balls weighing approximately 30-40g each (about 2 tablespoons or use a 40mm cookie scoop). Place the dough balls on a lined baking tray and gently press them down slightly to flatten.
- Bake Cookies: Bake the cookies for 12-15 minutes until they are golden on the outside but still very soft in the center. Remove them from the oven carefully.
- Insert Maltesers: While the cookies are still warm, push two Maltesers into each cookie to create the spider’s body and head. Let the cookies cool on the tray for 10 minutes before transferring them to a wire rack to cool completely.
- Decorate Legs with Chocolate: Melt the dark chocolate and place it into a small ziplock bag. Cut a tiny hole in one corner of the bag and pipe four chocolate legs on each side of the Maltesers on each cookie.
- Add Eyes with Icing and Chocolate: Use white icing to pipe two dots on each spider for eyes. Then add small dots of melted chocolate inside each white dot to form pupils and make realistic eyeballs.
- Set and Serve: Allow the chocolate legs and eyes to harden at room temperature. Once fully set, your spider cookies are ready to enjoy. Store leftovers in an airtight container for up to one week.
Notes
- You can use a size 40mm cookie dough scoop to shape the cookies evenly.
- To make chocolate chip cookies, add 1 cup of chocolate chips to the dough mixture before refrigerating.
- Candy eyeballs from specialty cooking stores can be used as an alternative to piped icing eyes for a quicker decoration.
Nutrition
- Serving Size: 1 cookie (approx. 40g)
- Calories: 180 kcal
- Sugar: 15 g
- Sodium: 80 mg
- Fat: 9 g
- Saturated Fat: 5 g
- Unsaturated Fat: 3.5 g
- Trans Fat: 0 g
- Carbohydrates: 22 g
- Fiber: 1 g
- Protein: 2 g
- Cholesterol: 30 mg

