
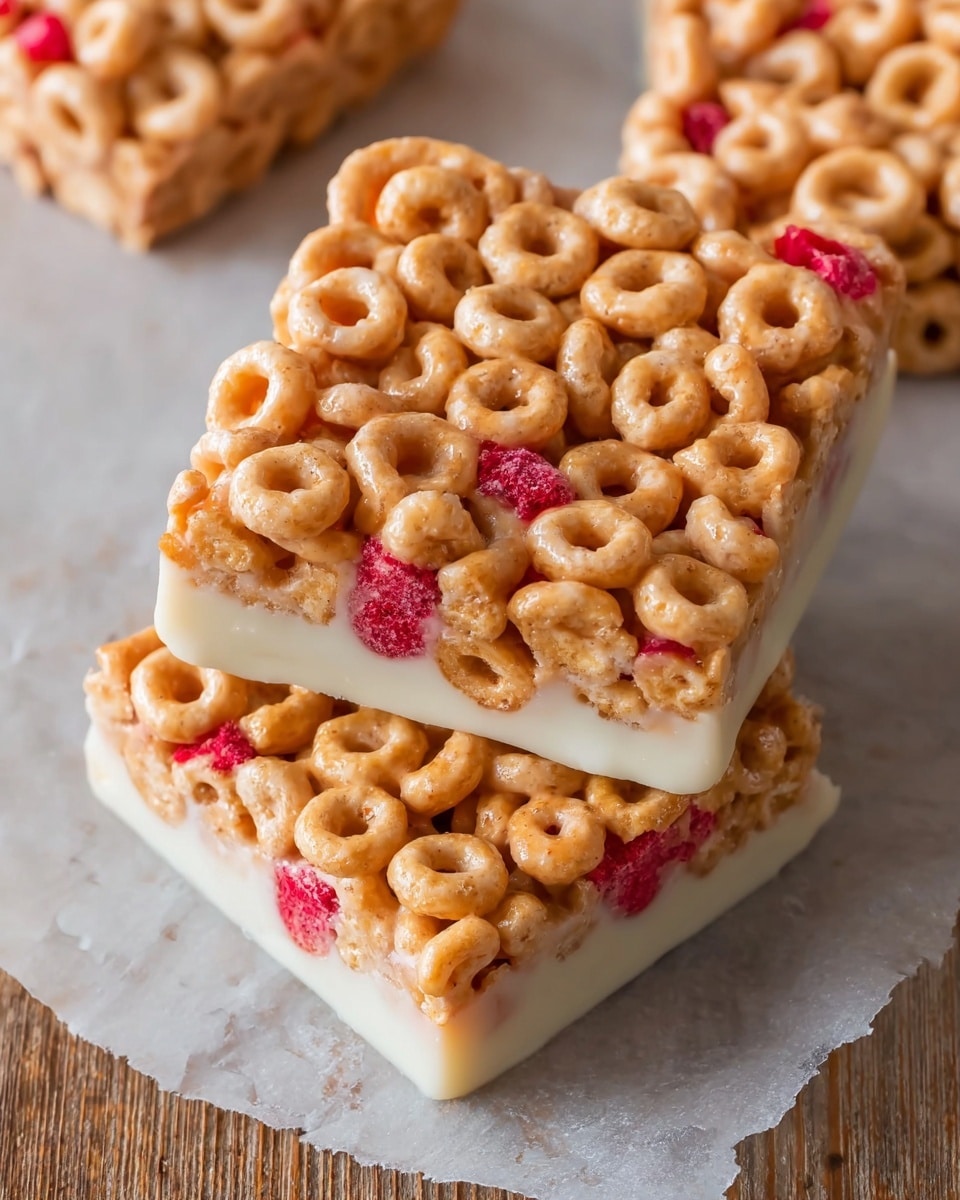
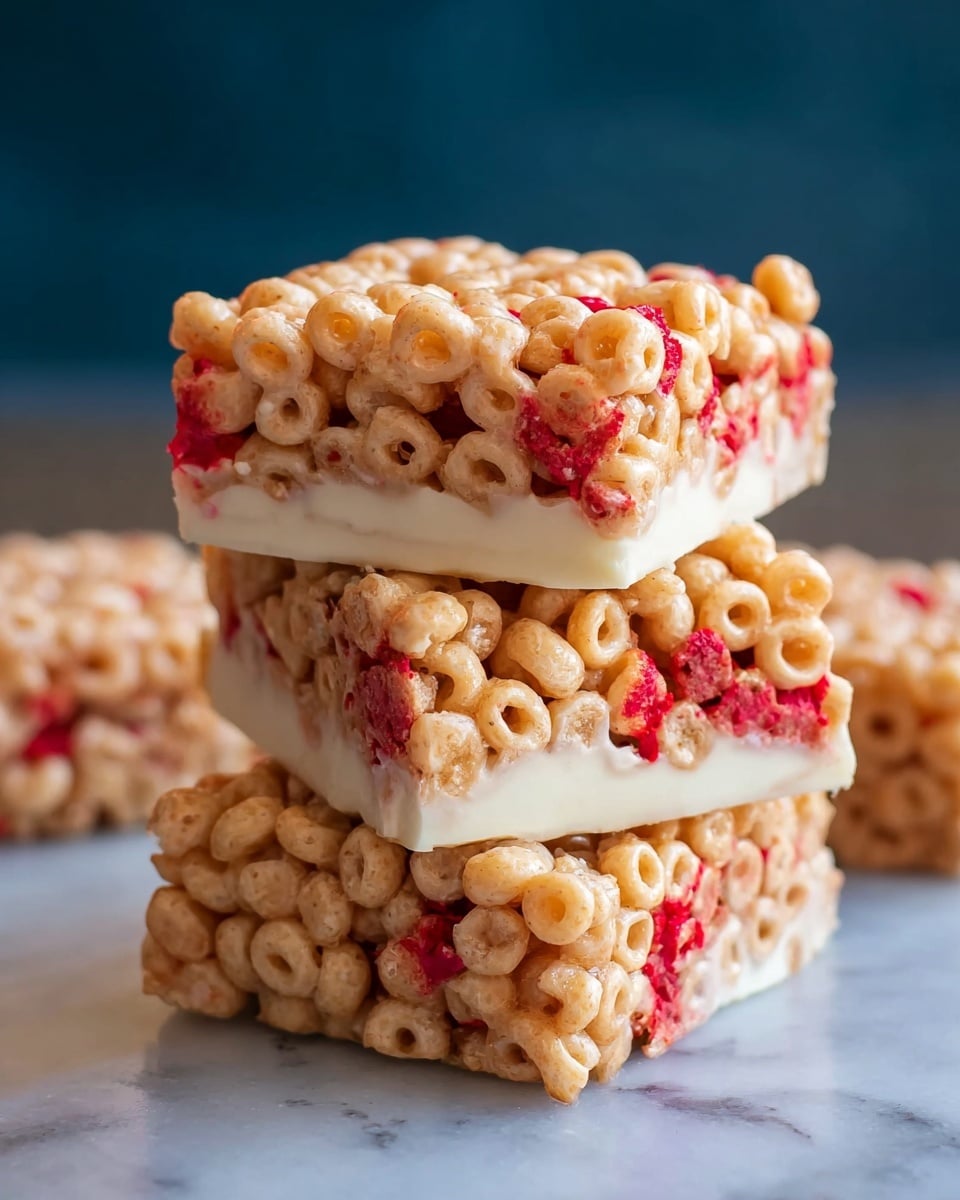
I absolutely love this Homemade Cereal Bars Recipe because it’s so simple, flexible, and perfect for busy mornings or an on-the-go snack. When I first tried making cereal bars at home, I was amazed at how easy it was to customize them with whatever cereal and nut butter I had on hand—and the best part? They actually stick together without turning into a crumbly mess. You’ll find that these bars are way better than store-bought versions, plus you control exactly what goes in, which is a big win for anyone mindful of ingredients.
Whether you’re packing lunches, looking for a quick post-workout bite, or just want something wholesome to munch on throughout the day, this Homemade Cereal Bars Recipe has got you covered. It’s one of those recipes that I keep coming back to because it’s fast, forgiving, and endlessly adaptable. Once you get the hang of pressing the bars firmly, you’ll see how satisfying it is to pull these out of the fridge or freezer anytime you need a boost.
Why You’ll Love This Recipe
- Quick and Easy: You’ll have a batch ready in about 5 minutes—perfect when time’s tight.
- Customizable: Swap cereals, nut butters, and sweeteners to match your taste or pantry.
- No Baking Required: Simply press, chill, and slice—great for hot days or beginner cooks.
- Kid-Friendly and Portable: My kids love taking them to school, and they make a great grab-and-go snack.

Ingredients You’ll Need
The magic of this Homemade Cereal Bars Recipe is how pantry staples come together seamlessly. Each component plays a vital role—cereal for crunch, nut butter to bind, and a natural sweetener to help everything stick without overloading on sugar.
- Cereal of choice: I love using whole-grain or gluten-free cereals for texture and health benefits; lightly crushed cereals work best for compact bars.
- Peanut butter or nut butter of choice: Choose natural, creamy nut butter with no added oils for easier blending and a clean flavor.
- Agave, honey, or brown rice syrup: These natural sweeteners lend just the right stickiness—honey is my personal favorite for a richer taste.
- Salt (optional): A pinch amps up all the flavors; don’t skip if you want a perfectly balanced bar.
- Protein powder (optional): Great to boost nutrition, especially post-workout, but totally optional if you prefer bars lighter on protein.
Variations
I’m a big fan of mixing things up so these cereal bars never get boring. Experimenting with different cereals, adding dried fruit, or even swapping nut butter for sunflower seed butter makes this Homemade Cereal Bars Recipe endlessly fun to tweak.
- Chocolate Chip Twist: Add mini chocolate chips for a sweet touch—my family goes crazy for this one around the holidays.
- Nut-Free Option: Swap nut butter for sunflower seed or soy butter; perfect for allergy-friendly snacks at school.
- Energy Boost: Stir in chia seeds or flaxseed meal to give your bars an omega-3 punch.
- Seasonal Flavors: Try pumpkin spice cereal and a dash of cinnamon for fall vibes—I discovered this combo last autumn and it’s a winner!
How to Make Homemade Cereal Bars Recipe
Step 1: Prep and Soften Your Nut Butter
Start by warming your nut butter just slightly—30 seconds in the microwave usually does the trick. This step is key because it makes stirring everything together so much easier and prevents clumps. Just keep an eye on it; you want it soft, not hot or runny.
Step 2: Mix Your Ingredients Gently but Thoroughly
In a large bowl, combine your cereal, nut butter, sweetener of choice, and any optional add-ins like salt or protein powder. Stir until every piece of cereal is coated—this ensures the bars hold together when chilled. I use a big wooden spoon, but a spatula works fine too. If it seems dry, add a tiny drizzle more of your sweetener.
Step 3: Press Firmly into the Pan
Line an 8-inch pan with parchment paper, pour the mixture inside, and cover with another parchment sheet. Here’s the secret: press down really firmly using your hands or the back of a measuring cup. This step is what keeps your bars from crumbling after cutting. I learned the hard way that gentle pressing leads to crumbly bars, so press hard!
Step 4: Chill Until Firm
Pop the pan in the freezer for about 30 minutes or until the bars are firm enough to slice cleanly. I like to chill them rather than refrigerate for longer because it creates a sturdier bar that holds its shape better when handled.
Step 5: Slice and Enjoy
Once firm, lift the bars out of the pan using the parchment edges and cut into squares or rectangles. I find using a sharp knife warmed under hot water makes slicing neat and easy. From there, enjoy immediately or store for later—either way, they’re a tasty treat.
Pro Tips for Making Homemade Cereal Bars Recipe
- Firm Pressing is Crucial: Don’t shy away from pressing the mixture down hard; it’s what makes cutting and eating tidy.
- Warm Nut Butter Gently: Too hot and it won’t hold texture; just soft enough to stir smoothly is perfect.
- Use Parchment Paper for Easy Removal: Trust me on this one—it saves you from wrestling bars out of the pan.
- Cut Bars When Cold: Attempting to slice bars too soon or at room temp usually leads to mess—it’s worth the wait!
How to Serve Homemade Cereal Bars Recipe
Garnishes
I usually skip extra garnishes since the bars are hearty on their own, but a light drizzle of dark chocolate or a sprinkle of sea salt on top before chilling can seriously elevate these. For a fresh twist, occasionally I add toasted coconut flakes on top right before pressing.
Side Dishes
Pair these cereal bars with a hot cup of coffee or a smoothie in the morning for a complete breakfast. My personal fave is pairing them with a yogurt parfait—adds creamy texture and fresh fruit brightness.
Creative Ways to Present
For special occasions or gifting, I wrap individual bars in parchment paper tied with twine—that rustic look always gets compliments. You can also layer them with wax paper inside decorative tins for a charming homemade gift.
Make Ahead and Storage
Storing Leftovers
I store leftover bars in an airtight container lined with parchment paper to keep them from sticking together; they last about a week in the fridge. I’ve kept them on the counter for a few days in a cool, dry spot, but I recommend refrigeration in warmer seasons.
Freezing
Freezing works wonderfully for these bars—simply wrap each bar individually and place them in a sealed freezer bag. When you want a snack, just thaw at room temperature for 10-15 minutes or eat them chilled like a cool treat.
Reheating
Usually, I don’t reheat cereal bars, but if you want to soften them, popping for a few seconds in the microwave works. Be careful not to overheat, or they might get oily from the nut butter. Generally, these taste best straight from fridge or freezer.
FAQs
-
Can I use any type of cereal for this homemade cereal bars recipe?
Yes! You can use pretty much any cereal, but it’s best to use ones that are sturdy without turning to mush when mixed with nut butter and sweetener. Whole grain or oat-based cereals hold up well. Avoid overly powdery or very light cereals that might not bind well.
-
What’s the best sweetener to use for homemade cereal bars?
Honey and agave nectar are my go-to favorite sweeteners because they add natural sweetness and also help the bars stick together. Brown rice syrup is another great option, especially if you prefer a less sweet but thick binder. Avoid watery sweeteners that won’t hold the mixture properly.
-
How do I make sure the cereal bars don’t fall apart?
Pressing the mixture firmly into the pan before chilling is essential. Don’t be afraid to use your hands or a flat object to compact the ingredients tightly. Also, make sure the nut butter and sweetener are well combined and warm enough to coat the cereal evenly.
-
Can I add protein powder to this recipe?
Absolutely! Protein powder is a fantastic addition if you want a more filling bar, especially post-workout. Start with about 3 tablespoons mixed into your other ingredients, but keep an eye on texture—it may need a slight extra drizzle of sweetener if it feels too dry.
Final Thoughts
This Homemade Cereal Bars Recipe has honestly become one of my kitchen staples because it’s incredibly adaptable, requires minimal effort, and satisfies every time. I love sharing it with friends because it’s approachable—no fancy equipment or weird ingredients needed. Give it a try next time you want a tasty, homemade snack that you can feel good about. I’m sure you’ll enjoy making these as much as I do!
Print
Homemade Cereal Bars Recipe
- Prep Time: 5 minutes
- Cook Time: 0 minutes
- Total Time: 5 minutes
- Yield: 9 cereal bars
- Category: Snack
- Method: No-Cook
- Cuisine: American
- Diet: Vegetarian
Description
These easy-to-make Cereal Bars are a perfect no-bake snack combining your favorite cereal with peanut butter and a natural sweetener like honey or agave. They are versatile, customizable with optional protein powder and salt, and ideal for a quick energy boost or a wholesome treat.
Ingredients
Main Ingredients
- 3 cups cereal of choice
- 2/3 cup peanut butter or nut butter of choice
- 1/2 cup agave, honey, or brown rice syrup
- Optional: 1/2 tsp salt
- Optional: 3 tbsp protein powder
Instructions
- Prepare the pan: Line an 8-inch pan with wax or parchment paper to prevent sticking. If making a larger batch, use a 9×13-inch pan and double the recipe accordingly.
- Warm nut butter: If your nut butter is too stiff, gently warm it until it becomes easily stirrable, ensuring it blends smoothly with the other ingredients.
- Mix ingredients: In a large bowl, combine the cereal, nut butter, sweetener of choice, and if desired, add salt and protein powder. Stir thoroughly until all components are evenly distributed.
- Transfer mixture to pan: Pour the cereal mixture into the prepared pan. Place a second sheet of parchment paper on top and press down very firmly to compact the mixture, which helps the bars hold together after slicing.
- Chill and set: Freeze the pan for at least 30 minutes or until the mixture is firm enough to cut into bars.
- Store: Cover any leftover bars and keep them refrigerated, frozen, or stored in a cool, dry place at room temperature for freshness.
Notes
- Use any cereal you prefer – oats, granola, rice cereal, or a gluten-free option work well.
- Adjust sweetness by varying the amount or type of syrup used.
- Adding protein powder increases nutritional value and makes the bars more filling.
- Pressing the mixture firmly before chilling is key to prevent crumbly bars.
- Bars can be customized with mix-ins like dried fruit, chocolate chips, or seeds for extra flavor and texture.
Nutrition
- Serving Size: 1 bar (based on 9 bars total)
- Calories: 180
- Sugar: 10g
- Sodium: 110mg
- Fat: 9g
- Saturated Fat: 2g
- Unsaturated Fat: 6g
- Trans Fat: 0g
- Carbohydrates: 22g
- Fiber: 2g
- Protein: 5g
- Cholesterol: 0mg


