
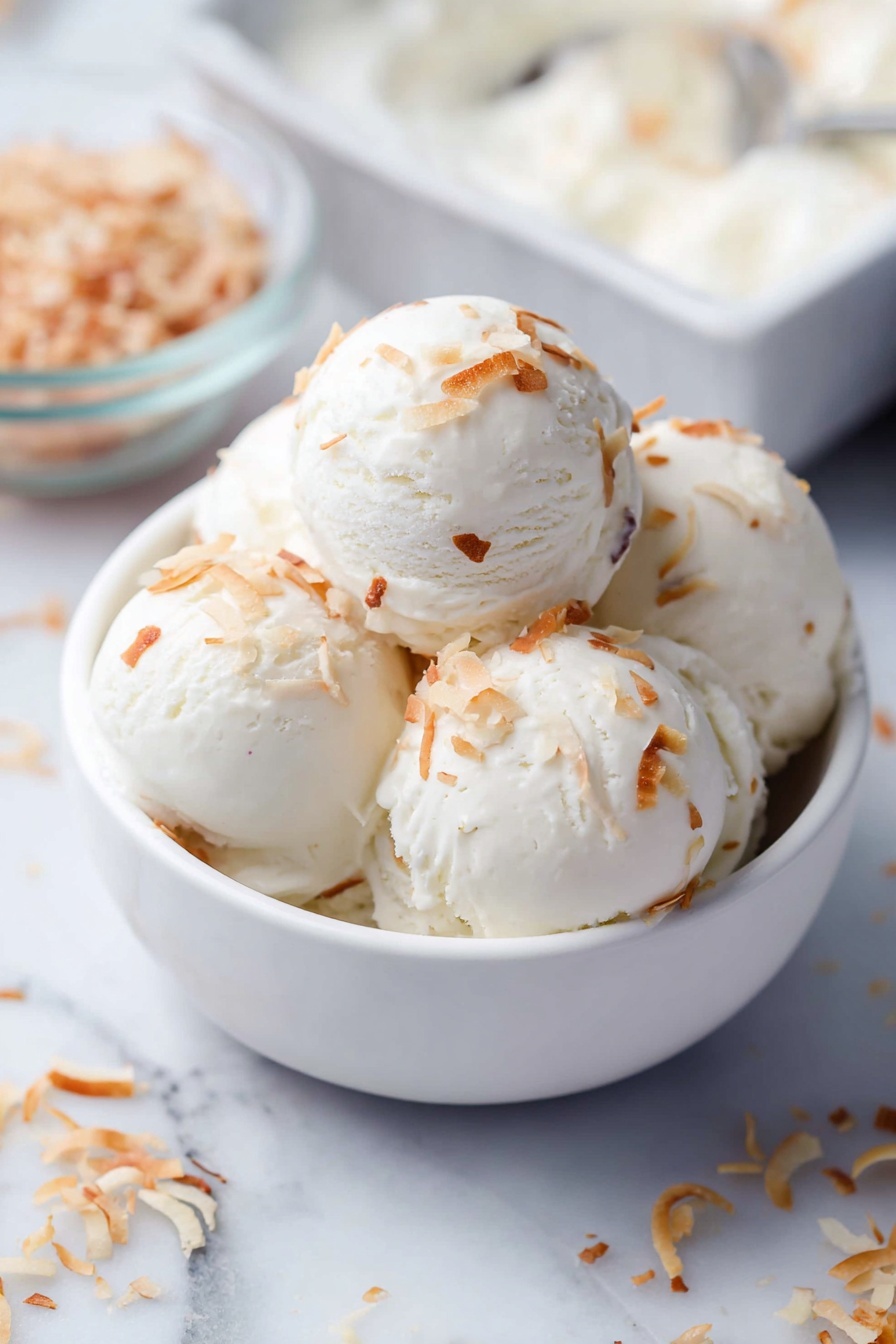
If you’re a coconut lover like me, then you’re going to absolutely adore this Homemade Coconut Ice Cream Recipe. I promise it’s fan-freaking-tastic and surprisingly easy to whip up right in your kitchen without any fancy ice cream maker. When I first tried this, I was blown away by how creamy and richly coconutty it tastes. Keep reading, because I’m sharing all my best tips to make sure your batch turns out perfect every time!
Why You’ll Love This Recipe
- Rich Coconut Flavor: The combination of full-fat coconut milk and toasted coconut flakes gives it authentic coconut deliciousness.
- No Ice Cream Maker Needed: You can make this creamy treat with just a hand blender and some patience.
- Super Creamy Texture: Whipping the cream until stiff peaks makes all the difference for that luxurious mouthfeel.
- Customizable: You can easily adjust the coconut extract or add mix-ins like chocolate chips or nuts to make it your own.

Ingredients You’ll Need
All the ingredients come together beautifully in this Homemade Coconut Ice Cream Recipe to create a silky texture and balanced sweetness. Here’s a quick tip: using cold ingredients really helps speed up the freezing process and gives you a smoother ice cream.

- Heavy Cream / Whipping Cream: Make sure it’s very cold; this is what gives the ice cream its creamy fluffiness.
- Powdered Sugar: It dissolves better than granulated sugar, ensuring your ice cream stays smooth and sweet.
- Vanilla Extract: Just a little to deepen the flavor and balance the coconut sweetness.
- Coconut Milk (Full Fat): The base for coconut flavor; go for canned full-fat for richness.
- Sweetened Condensed Milk: Adds creaminess and natural sweetness, no need for extra sugar.
- Coconut Extract (optional): A small amount amplifies the coconut essence without overpowering.
- Dry Shredded Coconut / Coconut Flakes (toasted & unsweetened): This is where that signature coconut crunch and nutty flavor come from.
Variations
I love tweaking this Homemade Coconut Ice Cream Recipe depending on the season and what I have on hand. Feel free to get creative! This is one recipe where the base is so versatile that it welcomes all sorts of twists.
- Chocolate Chip Coconut Ice Cream: I once added mini chocolate chips, and trust me, my family went crazy for the combo!
- Dairy-Free Version: Substitute whipping cream with full-fat coconut cream for a vegan spin without sacrificing creaminess.
- Tropical Twist: Add diced pineapple or mango for a fresh island-inspired treat.
- Less Sweet: If you prefer less sugar, reduce the condensed milk a bit and add a splash of maple syrup to taste.
How to Make Homemade Coconut Ice Cream Recipe
Step 1: Whip the Cream to Perfection
Start by taking your cold heavy cream, powdered sugar, and vanilla extract into a big bowl. I use my hand blender here because it’s quick and easy. Whip the cream until it doubles in volume and forms stiff peaks—this means when you lift the whisk, the peaks stand tall without falling over. It might take about 3-5 minutes. This step is crucial because it traps air, making your ice cream light and creamy. Be patient and don’t overwhip or it will turn buttery.
Step 2: Mix the Coconut Base
In a separate bowl, combine the cold coconut milk, sweetened condensed milk, and coconut extract (if you’re using it). Stir until everything is well mixed. This mixture brings that luscious coconut flavor and sweetness to the ice cream, and keeping it cold ensures faster freezing later.
Step 3: Fold it All Together
This is where your technique really counts. Take a couple of scoops of whipped cream and gently fold it into the coconut milk mixture first—this helps aerate the coconut mixture and keeps your ice cream fluffy. Then, pour the coconut mixture in two batches into the whipped cream bowl, folding gently with a spatula each time. The key word here is “fold” not “stir.” You want to preserve as much air as possible here. The texture at this point should feel light and creamy, almost mousse-like.
Step 4: Add Toasted Coconut Flakes and Freeze
Toast your shredded coconut flakes in a dry pan until golden brown and fragrant, then fold these into the ice cream mixture for an extra nutty crunch. Pour everything into a shallow rectangular container and cover the surface directly with cling wrap or parchment paper to prevent ice crystals. Seal the whole container with a lid or foil. Then patiently freeze it for at least 8 hours or overnight. The cold ingredients really speed up this process compared to traditional methods.
Step 5: Rest before Serving
Before scooping, remove the cling wrap from the surface and let the ice cream sit at room temperature for about 5 minutes. This softens it slightly and makes scooping a breeze, plus you’ll taste the full creamy goodness better.
Pro Tips for Making Homemade Coconut Ice Cream Recipe
- Keep Everything Cold: I discovered keeping all your liquids and bowls chilled helps the ice cream set faster and get creamier.
- Be Gentle When Folding: Folding carefully preserves the air bubbles that make this ice cream so soft and dreamy—don’t rush it!
- Toast Your Coconut: Toast the coconut flakes lightly to bring out an amazing nutty aroma that makes this recipe extra special.
- Watch Your Extract: Coconut extract is powerful; I once added too much and it overwhelmed the balance—stick to the recommended amount or less if you’re sensitive.
How to Serve Homemade Coconut Ice Cream Recipe

Garnishes
My go-to garnishes are extra toasted coconut flakes sprinkled on top because they add beautiful texture and that lovely golden color. Sometimes, I drizzle a little honey or a splash of dark rum for a boozy twist when hosting friends. Chopped fresh mango or a few ripe berries work amazingly well too!
Side Dishes
I like serving this ice cream alongside warm pineapple upside-down cake or even a simple banana bread. The contrast of warm slices and cold, creamy coconut ice cream is absolutely irresistible. It also pairs wonderfully with macadamia nut cookies or mojito fruit salads for a tropical vibe.
Creative Ways to Present
Once, for a summer party, I scooped this ice cream into fresh coconut halves—talk about presentation! You can also serve it in mini waffle cones topped with crushed pistachios or make elegant ice cream sandwiches by sandwiching it between two coconut macarons. Little touches make all the difference.
Make Ahead and Storage
Storing Leftovers
After serving, make sure to press a piece of cling wrap directly onto the ice cream surface before covering and returning to the freezer. This keeps ice crystals from forming and preserves the creamy texture. I store mine in an airtight container and it lasts beautifully up to a week.
Freezing
I’ve found that freezing in a shallow container helps the ice cream freeze evenly and quicker. The cold liquid ingredients really speed this up, so you don’t have to wait forever to enjoy it. Just give yourself that 8-hour minimum overnight rest for the best results.
Reheating
This isn’t the kind of recipe you ‘reheat,’ but letting your ice cream sit at room temperature for 5 minutes before scooping softens it perfectly without melting or compromising texture. If you find it too hard in the freezer, just plan ahead and remove it a bit earlier next time.
FAQs
-
Can I make this Homemade Coconut Ice Cream Recipe without an ice cream maker?
Absolutely! This recipe is designed specifically to be made without an ice cream maker. By whipping the cream and folding everything carefully, you incorporate enough air to keep it creamy and smooth during freezing.
-
Do I have to use sweetened condensed milk?
Sweetened condensed milk adds creaminess and sweetness all in one, which simplifies the recipe. You can experiment with other sweeteners, but it may affect the texture and freezing time.
-
Is coconut extract necessary?
Not strictly necessary, but it enhances the coconut flavor beautifully. Use it sparingly to avoid an overpowering taste—about 1/8 teaspoon is usually enough.
-
How long can I store Homemade Coconut Ice Cream in the freezer?
If stored properly in an airtight container with cling wrap pressed on the surface, it should stay delicious for up to a week without ice crystal build-up.
Final Thoughts
I honestly can’t recommend this Homemade Coconut Ice Cream Recipe enough. Every time I make it, I get so excited to dig in because it tastes like a tropical vacation in a bowl—creamy, dreamy, and packed with coconut goodness. Plus, it’s such a joy to make with simple ingredients and no special equipment. Give it a try for your next dessert craving; I’m betting it’ll become a family favorite in no time!
Print
Homemade Coconut Ice Cream Recipe
- Prep Time: 15 minutes
- Cook Time: 0 minutes
- Total Time: 12 hours 15 minutes
- Yield: 10 servings
- Category: Dessert, Ice Cream
- Method: No-Cook
- Cuisine: American, Tropical
Description
This homemade coconut ice cream recipe is a creamy, dairy-rich treat that combines the tropical flavor of coconut milk and toasted coconut flakes with the richness of heavy cream and sweetened condensed milk. Whipped to airy perfection and frozen overnight, it delivers a smooth, luscious texture without the need for an ice cream maker.
Ingredients
Dairy
- 1.5 cup Heavy Cream / Whipping Cream (cold)
- ½ can Sweetened Condensed Milk (400 grams can, cold)
Liquids & Extracts
- 2 cups Coconut Milk Full Fat (cold)
- 1 teaspoon Vanilla Extract
- ⅛ teaspoon Coconut Extract (optional)
Sweeteners
- ¾ cup Powdered Sugar
Others
- ½ cup Dry shredded Coconut / Coconut flakes (toasted & unsweetened)
Instructions
- Whip the Cream: In a large bowl, combine the cold whipping cream, powdered sugar, and vanilla extract. Using a hand blender, whip the cream until it doubles in volume and forms stiff peaks, creating a light and airy base.
- Mix Coconut Base: In a separate bowl, thoroughly mix together the cold full-fat coconut milk, sweetened condensed milk, and coconut extract if using. This blend forms the creamy, flavorful coconut layer of the ice cream.
- Aerate the Coconut Mixture: Take a few scoops of the whipped cream and gently fold it into the coconut milk mixture. This step introduces air, helping to lighten the overall texture.
- Combine Mixtures: Gradually fold the coconut milk mixture into the remaining whipped cream in two batches. Use a spatula and fold carefully to maintain as much air in the mixture as possible for creaminess.
- Prepare for Freezing: Pour the fully combined mixture into a rectangular shallow container. Smooth the surface and place a piece of cling wrap or baking paper directly on top to prevent ice crystals.
- Freeze: Cover the container tightly with a lid, cling wrap, or foil. Freeze the ice cream for at least 8 hours or preferably overnight to allow it to set properly.
- Serve: Before serving, remove the cling wrap from the surface and let the ice cream sit at room temperature for about 5 minutes to soften slightly for easier scooping.
Notes
- Keeping all the liquid ingredients cold helps the ice cream freeze faster and achieves a better texture.
- Coconut extract has a strong flavor; 1/8 teaspoon imparts a subtle coconut taste, but you can increase it up to 1/4 teaspoon for a more intense flavor.
- To toast shredded coconut, spread it evenly on a baking tray and toast in a preheated oven at 350°F (175°C) for 5-7 minutes, stirring occasionally, until golden and fragrant.
- This recipe does not require an ice cream maker, making it easy and accessible for any home cook.
Nutrition
- Serving Size: 1/10 of recipe (~120g)
- Calories: 320
- Sugar: 28g
- Sodium: 40mg
- Fat: 24g
- Saturated Fat: 20g
- Unsaturated Fat: 3g
- Trans Fat: 0g
- Carbohydrates: 24g
- Fiber: 1g
- Protein: 3g
- Cholesterol: 75mg


