
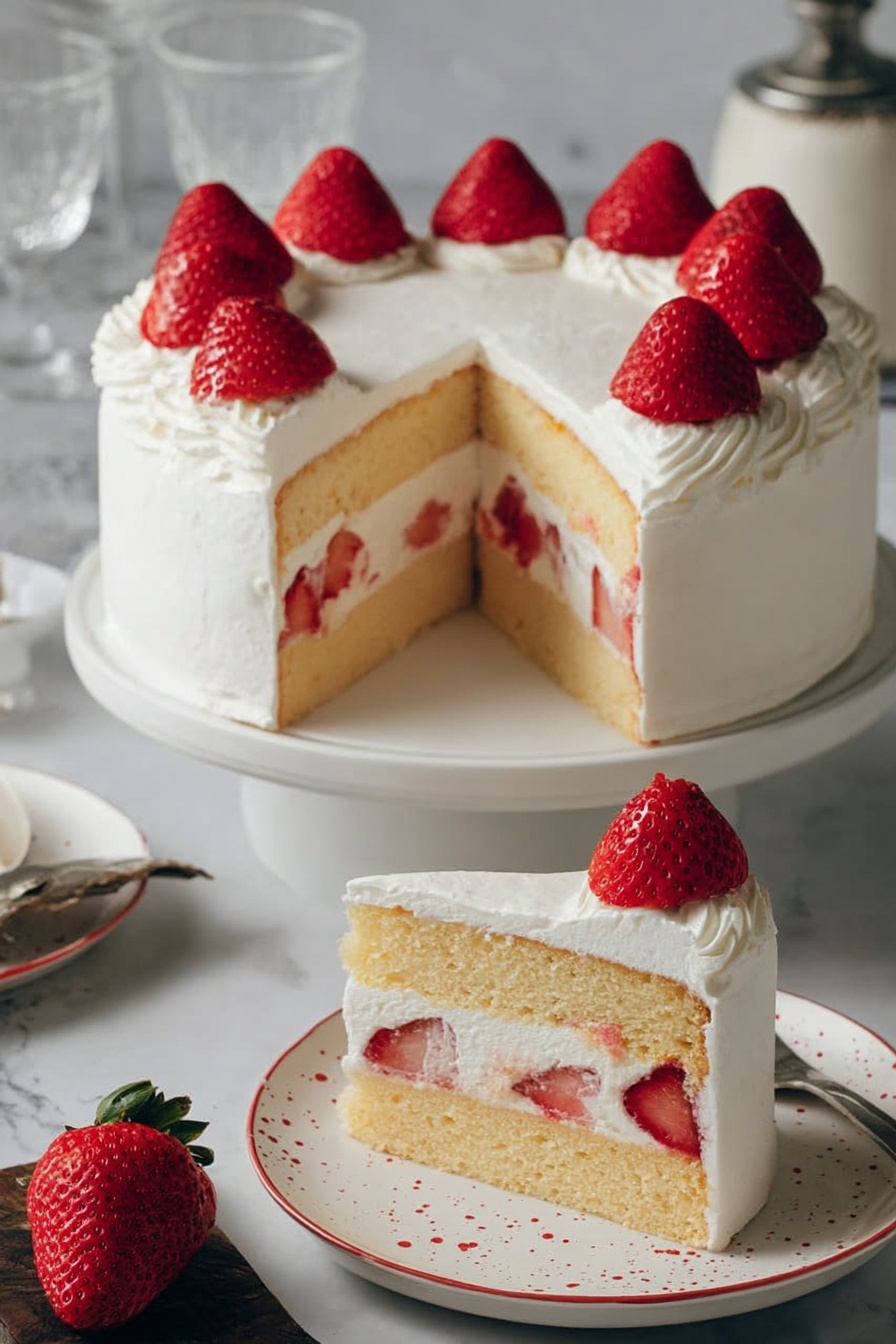
If you’ve ever indulged in a melt-in-your-mouth dessert that feels light yet decadently sweet, you’re going to adore this Japanese Strawberry Cake Recipe. I absolutely love how this cake captures the delicate balance of fluffy sponge, fresh strawberries, and cloud-like whipped cream — it’s a fan-freaking-tastic treat that always impresses. Whether you’re baking for a special occasion or just craving a slice of happiness, stick with me and I’ll walk you through every step to nail it perfectly!
Why You’ll Love This Recipe
- Light & Fluffy Texture: It’s incredibly airy thanks to the gentle folding technique and water bath baking method.
- Fresh & Fruity Flavor: The macerated strawberries soak into the cake subtly, elevating the natural sweetness without overpowering.
- Elegant yet Simple: It looks fancy but isn’t complicated—you’ll feel proud plating this masterpiece!
- Versatile & Customizable: You can tweak the whipped cream and fruit layers to fit your taste or dietary needs.

Ingredients You’ll Need
All the ingredients in this Japanese Strawberry Cake Recipe come together beautifully to make that iconic soft sponge and luscious cream pairing. Fresh strawberries are key, and choosing cake flour instead of all-purpose gives it that delicate crumb you’re after.

- Whole milk: Adds moisture and richness without weighing the cake down.
- Unsalted butter: Melted gently to blend in smoothly with the milk and flour.
- Cake flour: The secret to that super soft, tender crumb—you won’t get the same effect with all-purpose.
- Egg yolks: Provide richness and color to the sponge.
- Egg whites: Beaten to medium peaks for that incredible airy lift.
- Sugar (caster if possible): Dissolves quickly in the egg whites for a smooth texture.
- Strawberries: Fresh and ripe are best—they get macerated with a little sugar to boost their natural sweetness.
- Heavy whipping cream: Whipped into soft peaks for the frosting with just a touch of confectioners’ sugar.
- Gelatin (optional): If you want a stabilized cream that holds its shape longer—great if you need to prep ahead.
- Sugar and hot water (for syrup): Light syrup to brush the cake layers moist and tender.
Variations
While this Japanese Strawberry Cake Recipe is perfect as is, I love to mix it up sometimes depending on what I have on hand or the vibe I want to create. Feel free to personalize it!
- Change the Fruit: I’ve swapped strawberries for fresh raspberries or mixed berries, which adds a fun tang and color variation.
- Use Stabilized Whipped Cream: If you want to keep it fresh for hours, gelatin helps your cream hold up beautifully without losing flavor.
- Try Matcha Powder: Adding a teaspoon of matcha to the batter turns it into a stunning green tea strawberry cake for a Japanese twist!
- Make it Dairy-Free: Using coconut cream instead of heavy cream works well for the frosting and keeps it luscious.
How to Make Japanese Strawberry Cake Recipe
Step 1: Prepare the Cake Batter for the Perfect Sponge
Start by prepping your cake pan with parchment paper—you want that perfect non-stick base. Then melt the butter and milk gently, mix in sifted cake flour carefully, and beat your egg yolks into the batter. The trick here is folding the whipped egg whites in gently: take one-quarter of the whites to lighten your yolk batter first, then fold the rest in until smooth but not overmixed. This makes the cake super airy and prevents deflating the batter.
Step 2: Baking the Cake Using a Water Bath
Baking in a water bath is key for this cake’s moist texture. Pour your batter into the lined pan, tap the pan on the counter a couple of times to release bubbles, and place it in a larger pan filled with hot water. Bake at a gentle 325°F (160°C) for about 90 minutes. Don’t even think about opening the oven before the first hour — I learned the hard way that premature peeking shrinks the cake! Once done, cool completely before moving on.
Step 3: Macerate Strawberries & Prepare the Whipped Cream
While the cake cools, slice up around two-thirds of your strawberries, sprinkle with a bit of sugar, and let them sit for at least an hour. This softens them and pulls out their natural juices, which you’ll use to flavor the syrup. For the frosting, whip the heavy cream with confectioners’ sugar to soft or firm peaks depending on your preference, and if you’re stabilizing it with gelatin, fold that in carefully for longer-lasting cream.
Step 4: Assemble Like a Pro
Once cool, trim the browned top of your cake and slice it horizontally to create two even layers. Brush each layer with syrup made from sugar, hot water, and the strawberry soaking liquid for extra flavor. Spread a thin layer of whipped cream on the bottom layer, stack on the macerated strawberries, then add another layer of cream. Sandwich with the top layer of cake and finish frosting the outside with more cream. Smooth with an offset spatula and decorate with the remaining strawberries. I find using a rotating cake stand makes this step a breeze!
Pro Tips for Making Japanese Strawberry Cake Recipe
- Folding Technique: Always fold gently with a rubber spatula in a figure-eight motion to keep the batter full of air.
- Water Bath Baking: Make sure your pan is well wrapped in foil if it’s a springform to prevent leaks and soggy cake sides.
- Strawberry Prep: Use ripe but firm strawberries so they hold shape after macerating and don’t turn mushy inside the cake.
- Whipped Cream Consistency: Don’t overwhip or cream will separate; aim for soft to medium peaks for best spreadability and smooth finish.
How to Serve Japanese Strawberry Cake Recipe

Garnishes
I love keeping it classic with fresh whole strawberries on top for that bright, inviting look. Sometimes I add a few mint leaves or a light dusting of powdered sugar for a touch of elegance. Little edible flowers can make it extra special if you’re serving guests.
Side Dishes
This cake is a dessert star, so I usually serve it alongside a light green tea or a fruit-forward sparkling wine. For a casual gathering, pair with fresh fruit salad or a small scoop of matcha ice cream to complement the flavor.
Creative Ways to Present
For birthdays or celebrations, I’ve piped soft rosettes all over the cake and placed whole strawberries in a spiral pattern on top. Another fun way is to cut the cake into neat squares and serve with a drizzle of condensed milk or chocolate sauce for a Japanese café vibe.
Make Ahead and Storage
Storing Leftovers
After slicing, I keep leftovers covered tightly in the fridge to prevent the whipped cream from drying out. Using an airtight container works great if you want to avoid refrigerator odors affecting the cake. The cake stays moist and fresh for up to 2 days.
Freezing
I’ve frozen this cake layered and frosted successfully by wrapping it tightly in plastic wrap and then foil. When thawing, leave it in the fridge overnight. The texture softens slightly but remains delicious—a nice option if you want to prep ahead!
Reheating
This cake is best served chilled, but if you prefer the sponge a little less cool, bringing it to room temperature for about an hour before serving works wonders. Just avoid microwaving as it can melt the cream and spoil the delicate texture.
FAQs
-
Can I use all-purpose flour instead of cake flour in this Japanese Strawberry Cake Recipe?
While you can substitute all-purpose flour, cake flour is preferable due to its lower protein content, which leads to a softer, more tender crumb. If you only have all-purpose flour, try removing 2 tablespoons per cup and replacing them with cornstarch to mimic cake flour.
-
What’s the best way to stabilize whipped cream for decorating?
Using gelatin is my go-to method. Bloom it in cold water, then gently warm to melt and mix into some whipped cream before folding it into the rest. This helps the whipped cream hold its shape longer, especially in warmer climates or for cakes that need to sit out during events.
-
How do I know when the Japanese Strawberry Cake is fully baked?
After about 1 hour and 30 minutes in the water bath, insert a skewer into the center. It’s done when the skewer comes out clean or with just a few dry crumbs. The cake should also slightly pull away from the sides of the pan.
-
Can I prepare this cake a day ahead?
Absolutely! The flavors deepen overnight, especially the strawberry and cream layers. Just cover well and keep refrigerated. If you use unstabilized cream, it’s best served within 24 hours for optimal freshness.
Final Thoughts
When I first tried making this Japanese Strawberry Cake Recipe, I quickly fell in love with its elegance and the way it feels like a special reward without being complicated. It’s the kind of dessert you want to share with friends and family because everyone goes crazy for its fluffy texture and fresh strawberry goodness. I promise if you follow these steps and tips, you’ll end up with a cake that’s every bit as beautiful and delicious as the patisseries in Japan. Give it a go—your kitchen deserves a little magic like this!
Print
Japanese Strawberry Cake Recipe
- Prep Time: 1 hour
- Cook Time: 1 hour 30 minutes
- Total Time: 3 hours 30 minutes
- Yield: 8 servings
- Category: Dessert
- Method: Baking
- Cuisine: Japanese
- Diet: Vegetarian
Description
Japanese Strawberry Cake is a delicate and airy sponge cake layered with sweet macerated strawberries and fluffy whipped cream. This recipe features a moist, soft cake made using a water bath for a perfect texture, complemented by rich, lightly sweetened cream and juicy strawberries. It’s a classic Japanese style dessert, ideal for special occasions or enjoying with tea.
Ingredients
Cake
- 80 g (1/3 cup) whole milk
- 50 g (3 1/2 tablespoons) unsalted butter
- 75 g (1/2 cup + 1/2 tablespoon) cake flour
- 4 large egg yolks
- 4 large egg whites
- 70 g (5 1/2 tablespoons) sugar (caster sugar if available)
Strawberries
- 12 oz to 1 lb (340 g to 450 g) strawberries, divided
- 1 1/2 teaspoons sugar
Whipped Cream Frosting
- 280 g (10 oz) heavy whipping cream
- 2 tablespoons confectioners sugar
- 3/4 teaspoon gelatin (Optional)
- 2 tablespoons cold water (Optional)
Cake Syrup
- 2 tablespoons sugar
- 3 tablespoons hot water
Instructions
- Prepare the cake lining and oven: Cut a piece of parchment paper to fit the bottom of an 8” round cake pan and line the pan. Preheat the oven to 325°F (160°C). Prepare a high-walled pan or baking dish as a water bath and boil water to fill it to 1 inch (2.5 cm) depth.
- Melt butter and mix batter base: Combine milk and butter in a heatproof bowl and microwave until melted. Stir well. Sift cake flour into this mixture and gently mix until smooth. Add egg yolks and mix to combine.
- Whip egg whites: Using a stand or hand mixer, beat egg whites on medium high speed until frothy. Gradually add sugar while beating until glossy medium peaks form.
- Combine egg mixtures: Fold one-quarter of the egg whites into the yolk mixture to lighten it. Pour the lightened yolk mixture back into the remaining egg whites and gently fold together until just smooth without large egg white pieces.
- Bake the cake in a water bath: Pour batter into prepared pan. Drop the pan twice from 5” height to release bubbles. Place cake pan in water bath pan with hot water covering 1 inch. Bake for 1 hour 30 minutes until a skewer comes out clean and cake pulls away from pan edges. Do not open oven early.
- Cool the cake: Run knife along edge, invert onto cooling rack, and cool completely before decorating.
- Macerate strawberries: Slice 8 oz (225 g) strawberries into 1/4” slices, mix with sugar, and let sit for 1 to 2 hours until glossy and syrupy. Reserve the soaking liquid separately.
- Prepare cake syrup: Dissolve sugar in hot water to make syrup. Optionally mix in reserved strawberry liquid for enhanced flavor and slight pink coloring.
- Make stabilized whipped cream (optional): Soften gelatin in cold water for 5 minutes, then melt. Whip heavy cream with confectioners sugar until soft peaks form. Mix some whipped cream into gelatin then fold back into cream and whip briefly to soft peaks. Avoid over-whipping.
- Make regular whipped cream: Whip heavy cream and confectioners sugar until firm peaks form if not using gelatin.
- Assemble the cake: Once cooled, level cake using toothpicks and serrated knife to remove browned top and slice into two thin layers. Place bottom layer cut-side up on cake stand and brush with syrup. Flip top layer upside down and brush with syrup.
- Add cream and strawberries: Spread a thin layer of whipped cream on bottom layer, top with as many strawberries as will fit, then add another thin layer of cream over strawberries.
- Layer the top cake and decorate: Place top layer of cake onto bottom layer, align edges, and add dollops of cream to cover and smooth sides. Apply a thicker cream layer on top and sides. Use remaining cream to pipe decorations if desired.
- Finish and chill: Decorate with remaining strawberries on top. If stabilized cream was used, refrigerate uncovered for at least 30 minutes to set. Serve immediately with regular cream or refrigerate and serve within a few hours.
- Serving: Slice carefully with serrated knife once ready to serve, allowing stabilized cream cakes to come to room temperature for best texture.
Notes
- If you do not have a spinning cake stand, create one by inverting a bowl or cake pan, then placing a flat plate or removable pie pan bottom on top to rotate cake while decorating.
- Do not open the oven for the first hour of baking to prevent collapsing cake.
- Use gelatin only if you want stabilized cream that holds its shape longer; otherwise, regular whipped cream is fine.
- Reserve strawberry soaking liquid to add extra flavor to syrup if desired.
- Use a water bath during baking to create a moist, tender cake texture typical of Japanese sponge cakes.
Nutrition
- Serving Size: 1 slice (approx. 1/8 cake)
- Calories: 310 kcal
- Sugar: 21 g
- Sodium: 70 mg
- Fat: 18 g
- Saturated Fat: 11 g
- Unsaturated Fat: 6 g
- Trans Fat: 0 g
- Carbohydrates: 29 g
- Fiber: 2 g
- Protein: 5 g
- Cholesterol: 110 mg


