
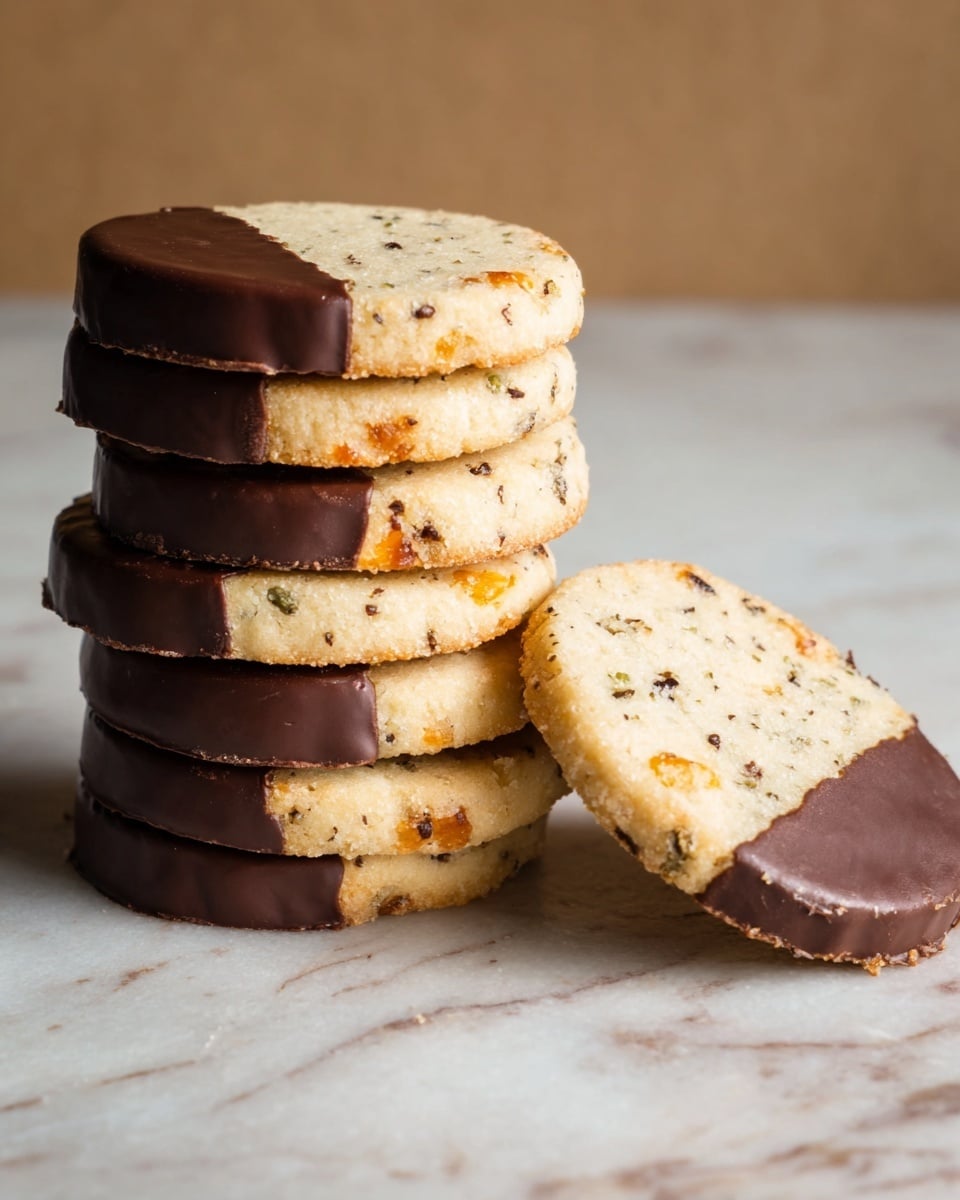
If you’re anything like me and love a cookie that’s as stunning as it is delicious, this Jeweled Butter Cookies Recipe is an absolute must-try. I love how these cookies come loaded with beautiful pops of pistachios, apricots, and sour cherries, making each bite a delightful mix of buttery richness and fruity sweetness. Plus, the buttery base is tender but sturdy enough to hold all those vibrant “jewels” beautifully.
Whenever I’m prepping for a special occasion or a festive cookie exchange, these cookies steal the show. You’ll find that the chocolate glaze adds just the right touch of elegance and a hint of bittersweet balance without overpowering the delicate flavors. Trust me, once you make these, you’ll want to keep a stash for yourself and for sharing—they’re that good!
Why You’ll Love This Recipe
- Beautiful, Flavorful Mix: The blend of pistachios, apricots, and cherries gives these cookies a vibrant, jewel-like appearance and bursts of flavor.
- Perfect Texture: Buttery and tender, yet sturdy enough to hold all the mix-ins without crumbling apart.
- Versatile for Any Occasion: Elegant enough for gifts and parties, but simple enough for cozy afternoon baking sessions.
- Simple Yet Impressive: Uses straightforward ingredients and techniques to create a stunning finished cookie.

Ingredients You’ll Need
The magic of this Jeweled Butter Cookies Recipe lies in the harmony between simple staple ingredients and those gorgeous mix-ins that elevate the cookies beyond ordinary. When shopping, fresh butter and quality dried fruits will make a noticeable difference.
- Unsalted butter: Make sure it’s at room temperature for easy creaming and smooth dough.
- Granulated sugar: For sweetness and a bit of cookie crispness.
- Egg yolks: Adds richness and helps bind the dough.
- Fresh orange zest: Brightens up the flavor with a lovely citrus note.
- All-purpose flour: The base of the cookie structure.
- Baking powder: Just enough to give a gentle lift.
- Kosher salt: Balances the sweetness and enhances flavor.
- Pistachios: Roughly chopped for a crunchy, nutty bite with pretty green hues.
- Dried apricots: Chopped to add chewy sweetness and a sunny color.
- Dried sour cherries: Their tartness adds that perfect contrast.
- Bittersweet chocolate: For a decadent dipping glaze.
- Neutral oil (coconut or vegetable): Mixed with melted chocolate to keep the glaze smooth and shiny.
Variations
I often change up the mix-ins depending on what I have on hand or the season. Don’t hesitate to personalize this Jeweled Butter Cookies Recipe — it’s a super flexible base that you can customize to your taste.
- Nut-Free Version: Replace pistachios with sunflower seeds and swap out dried fruit for chopped dates or figs—this keeps the texture but is allergy-friendly.
- Chocolate Lover’s Twist: Add mini chocolate chips right into the dough or swirl in some cocoa powder for a chocolaty base.
- Seasonal Mix-Ins: I’ve used dried cranberries and orange peel during the holidays, which add beautiful, festive flavors.
- Vegan Adaptation: While this recipe traditionally uses egg yolks and butter, try vegan butter and a flaxseed “egg” for a plant-based take that still works nicely.
How to Make Jeweled Butter Cookies Recipe
Step 1: Cream Butter and Sugar, Then Mix Your Dough
Start by beating the softened butter and granulated sugar with an electric mixer on medium speed until fluffy and combined—this usually takes about 2 minutes. This step is key for that tender, almost melt-in-your-mouth texture. Next, add the egg yolks and freshly grated orange zest, beating again until just mixed. Then, gently add the all-purpose flour, baking powder, and salt, mixing till it just comes together. Finally, toss in the pistachios, dried apricots, and sour cherries—beat only until everything looks evenly spread throughout the dough so those jewels don’t get crushed.
Step 2: Shape Into Cylinders and Freeze
Divide the dough into two equal halves and gently roll each onto plastic wrap to form a 2-inch-wide cylinder. I like making two smaller rolls because it’s way easier to slice evenly and keeps the dough cold. Pop the wrapped cylinders into the freezer for at least 2 hours, or until solid. This chilling step helps the cookies hold their shape while baking and makes slicing a breeze.
Step 3: Slice and Bake
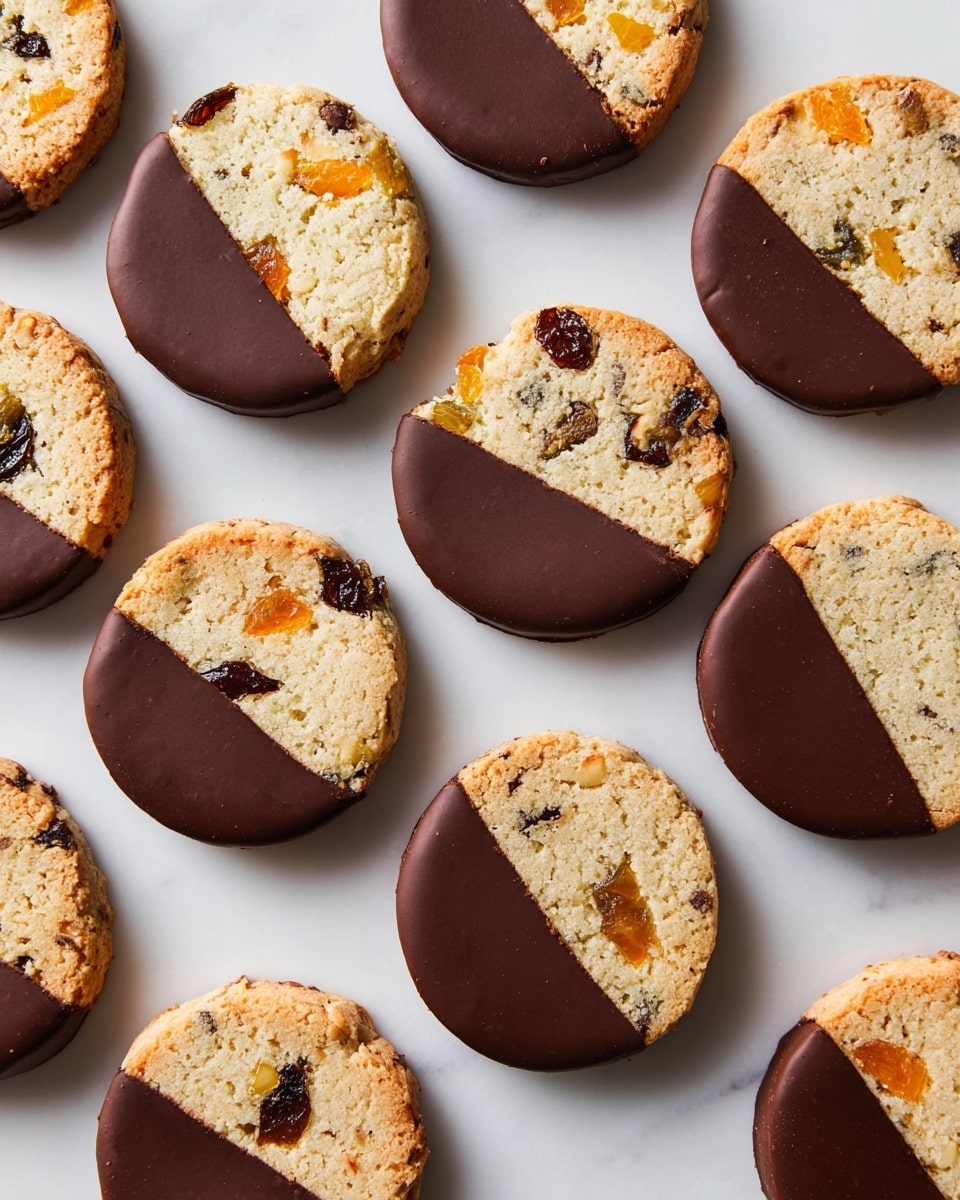
Preheat your oven to 350°F (175°C). Using a sharp knife, slice the frozen dough into thin ¼-inch rounds—that’s thin enough for delicate bites but thick enough to see all the colorful mix-ins. Place the slices on parchment-lined baking sheets, spaced evenly, and bake for about 15 minutes or until the edges turn a lovely golden color. Once baked, transfer them onto a wire rack to cool completely. I’ve learned not to crowd the baking sheet to get the best even baking results and avoid merged cookies.
Step 4: Dip in Chocolate Glaze and Set
While the cookies cool, melt your bittersweet chocolate and stir in a teaspoon of neutral oil. This addition makes the glaze smoother and shinier, perfect for dipping. Pour the chocolate into a narrow vessel just wide enough to dip your cookies, so you get a nice coating without a huge mess. Dip each cooled cookie halfway or just the edges, depending on your mood, and lay them back on parchment-lined trays. Let the chocolate set at room temperature or pop them in the fridge if you’re impatient like me. Store them in an airtight container, and they’ll stay fresh for about a week—if they last that long!
Pro Tips for Making Jeweled Butter Cookies Recipe
- Use Room Temperature Butter: Soft butter creams better with sugar, which helps create that tender crumb.
- Freeze Dough Cylinders Firmly: Make sure the dough is completely frozen before slicing to keep the shapes neat and clean.
- Don’t Overmix with the Dried Fruit and Nuts: Over-beating can break them down, so fold in gently for better texture.
- Chocolate Dipping Trick: Adding a little oil to the chocolate stops it from hardening too quickly and makes the glaze shiny and smooth.
How to Serve Jeweled Butter Cookies Recipe
Garnishes
I honestly keep garnishes simple because the cookies themselves are already so pretty! Occasionally, I add a light dusting of powdered sugar or a sprinkle of extra chopped pistachios after the chocolate sets for a little added texture and color. Fresh orange zest can also add a lovely fresh scent if you’re serving right away.
Side Dishes
These cookies pair beautifully with a warm cup of tea, especially a delicate green or jasmine tea, to balance the buttery richness and fruitiness. I also love them alongside a light coffee or even a glass of milk for a classic combo. If you’re serving around the holidays, spiced cider is a fantastic match.
Creative Ways to Present
For holiday parties or gift-giving, I arrange these Jeweled Butter Cookies on a tiered decorative tray alongside fresh herbs like rosemary or sprigs of holly for a festive touch. You could also box them in clear cellophane bags tied with bright ribbons to highlight those colorful jewels inside. Another fun idea I tried was stacking them with parchment circles in between for a spectacular cookie “tower” centerpiece.
Make Ahead and Storage
Storing Leftovers
I store leftover Jeweled Butter Cookies in an airtight container at room temperature, layering parchment paper between them to prevent sticking. This usually keeps them fresh for up to a week, though they rarely last that long in my house!
Freezing
If you want to prep ahead, I freeze the dough cylinders wrapped tightly in plastic wrap and placed in a freezer bag up to a month. When ready, just slice and bake straight from frozen! You can also freeze the baked cookies after they’ve cooled (especially pre-chocolate dip) by layering with parchment in a freezer-safe container.
Reheating
When I reheat leftover cookies, I briefly warm them in a 300°F oven for about 5 minutes just to restore their softness without melting the chocolate glaze. It works great if you want that fresh-baked feel when serving to guests.
FAQs
-
Can I use other dried fruits in the Jeweled Butter Cookies Recipe?
Absolutely! The dried apricots and sour cherries are traditional, but feel free to swap them out for dried cranberries, cherries, raisins, or even chopped dried figs depending on what you love or have on hand.
-
Is it necessary to freeze the dough before slicing?
Yes, freezing firms up the dough so you can slice neat, even rounds without the cookies losing shape during baking. It also helps control spreading, keeping them beautifully thick but tender.
-
Can I skip the chocolate glaze?
You can definitely enjoy these cookies plain if you prefer. The glaze adds a wonderful touch of richness and visual appeal, but they’re delicious on their own or dusted lightly with powdered sugar.
-
How long do Jeweled Butter Cookies last?
Stored in an airtight container at room temperature, they usually stay fresh for up to a week. You can also freeze them for longer storage if needed.
Final Thoughts
This Jeweled Butter Cookies Recipe is truly one of those delights that feels both special and approachable. I’ve made them countless times, and each batch brings that same joy of biting into buttery sweetness speckled with colorful jewels. If you’re looking to wow your guests or just want a little luxury in your cookie jar, I can’t recommend this recipe enough. So why not give it a try? I have a feeling you’ll keep coming back for more!
Print
Jeweled Butter Cookies Recipe
- Prep Time: 2 hours 10 minutes
- Cook Time: 15 minutes
- Total Time: 2 hours 25 minutes
- Yield: 3 ½ dozen (approximately 42 cookies)
- Category: Baking
- Method: Baking
- Cuisine: American
Description
Jeweled Butter Cookies are delicate, buttery treats studded with vibrant dried fruits and pistachios, offering a perfect balance of sweet and nutty flavors. Enhanced with a subtle hint of orange zest and dipped in a rich bittersweet chocolate glaze, these cookies make an elegant and festive dessert or gift.
Ingredients
For the cookies:
- 1 cup (2 sticks) unsalted butter, at room temperature
- 3/4 cup granulated sugar
- 3 large egg yolks
- 1 teaspoon freshly grated orange zest
- 2 1/2 cups all-purpose flour
- 1/2 teaspoon baking powder
- 1/2 teaspoon kosher salt
- 1/2 cup pistachios, roughly chopped
- 1/2 cup dried apricots, roughly chopped
- 1/2 cup dried sour cherries, roughly chopped
For the chocolate glaze:
- 4 ounces bittersweet chocolate, melted
- 1 teaspoon neutral oil, such as coconut or vegetable oil
Instructions
- Make the cookies: In a large bowl, using an electric mixer on medium speed, beat the unsalted butter and granulated sugar together until the mixture is fluffy and well combined, about 2 minutes. Add the egg yolks and freshly grated orange zest, beating until incorporated. Gradually add the all-purpose flour, baking powder, and kosher salt, mixing until just combined. Fold in the chopped pistachios, dried apricots, and dried sour cherries until evenly distributed throughout the dough.
- Shape and chill: Divide the dough into two equal parts. Place each half onto a sheet of plastic wrap and roll them into 2-inch diameter cylinders. Wrapping tightly in the plastic wrap, freeze the cylinders until they are firm and solid, approximately 2 to 4 hours, to make slicing easier and maintain shape during baking.
- Bake the cookies: Preheat the oven to 350°F (175°C). Remove one dough cylinder from the freezer and, using a sharp knife, slice it into 1/4-inch thick rounds. Place the cookie slices on parchment paper-lined baking sheets, spaced evenly. Bake in the preheated oven for about 15 minutes, or until the cookies are set and lightly golden around the edges. Remove from the oven and transfer to a wire rack to cool completely.
- Dip the cookies: Line two cookie sheets with parchment paper for cooling. Stir the neutral oil into the warm melted bittersweet chocolate to create a smooth, glossy glaze. Pour the chocolate into a short glass or ramekin that allows for easy dipping with enough depth to coat the cookies. Dip each cooled cookie halfway or fully into the chocolate, then place them on the prepared parchment-lined sheets. Allow the chocolate to set at room temperature or refrigerate for faster setting.
- Storage: Once set, store the cookies in an airtight container. They will keep fresh and flavorful for up to one week.
Notes
- Freezing the dough cylinders solid before slicing prevents the cookies from losing their shape while baking.
- You can substitute the dried fruits for other favorites like dried cranberries or figs.
- If bittersweet chocolate is too intense, use semisweet chocolate for a sweeter glaze.
- Ensure the butter is at room temperature for easier mixing and a smoother dough.
- Dipping cookies in chocolate can be done partially or fully depending on your preference.
Nutrition
- Serving Size: 1 cookie (based on 42 cookies yield)
- Calories: 110
- Sugar: 6g
- Sodium: 75mg
- Fat: 7g
- Saturated Fat: 4g
- Unsaturated Fat: 2.5g
- Trans Fat: 0g
- Carbohydrates: 12g
- Fiber: 1g
- Protein: 1.5g
- Cholesterol: 25mg
