
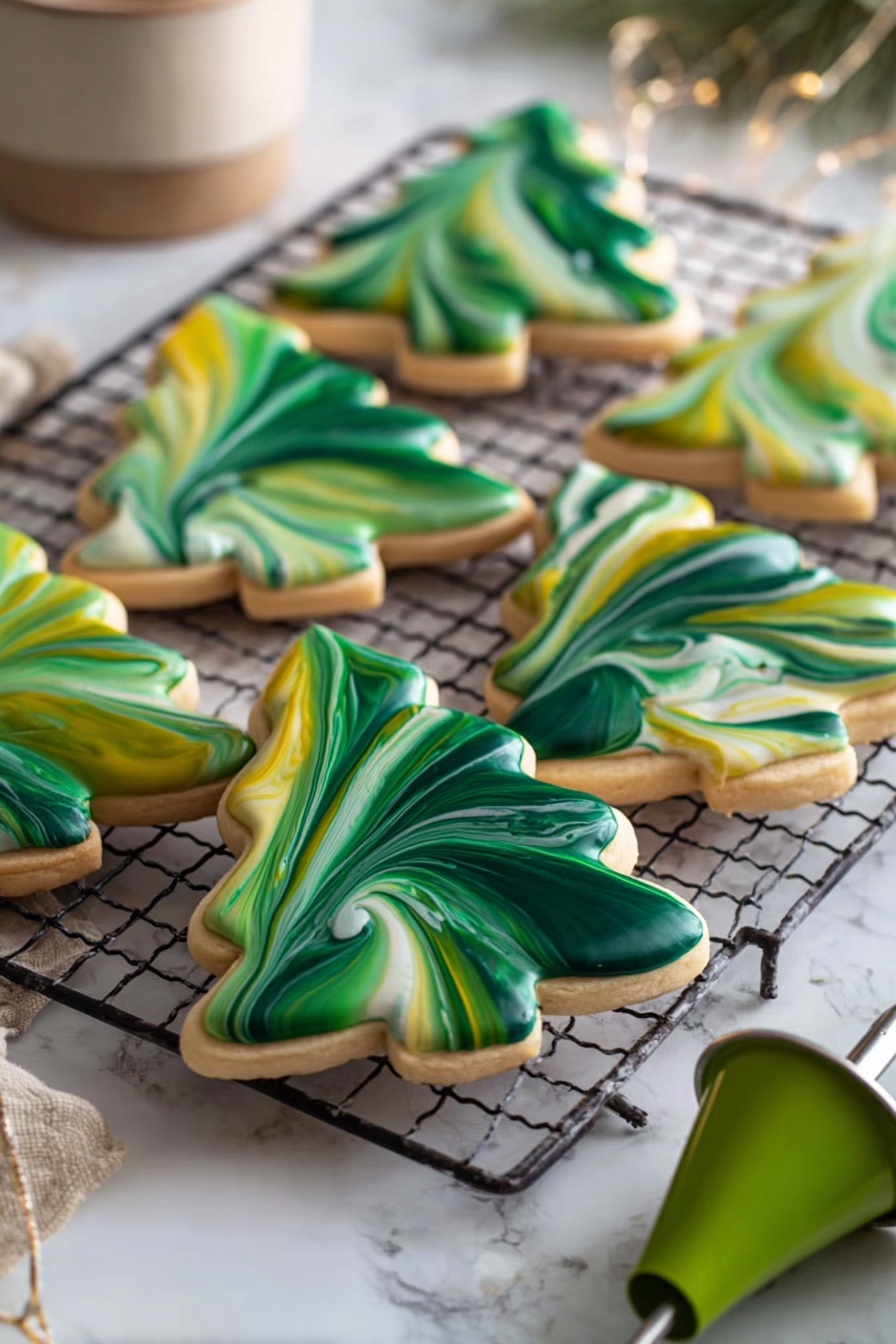
If you’re searching for a delightful treat that’s both classic and eye-catching, you’re in for a real treat with this Marbled Sugar Cookies with Royal Icing Recipe. I absolutely love how these cookies combine a soft, tender cream cheese sugar cookie base with a stunning swirled royal icing finish that always impresses guests—and trust me, they’re easier to make than they look! Whether you’re baking for a special occasion or just craving something sweet and fun, this recipe will quickly become your new favorite.
Why You’ll Love This Recipe
- Soft and Creamy Cookies: Thanks to the cream cheese in the dough, these cookies are ultra tender with a subtle tang that elevates their flavor.
- Show-Stopping Design: The marbled royal icing creates a gorgeous, artistic swirl that makes every cookie look professionally decorated.
- Simple Ingredients: All the ingredients are pantry staples, so you can whip these up without a special trip to the store.
- Kid-Friendly Fun: The dipping and swirling process is a blast for kids (and adults!), turning cookie decorating into a joyful activity.

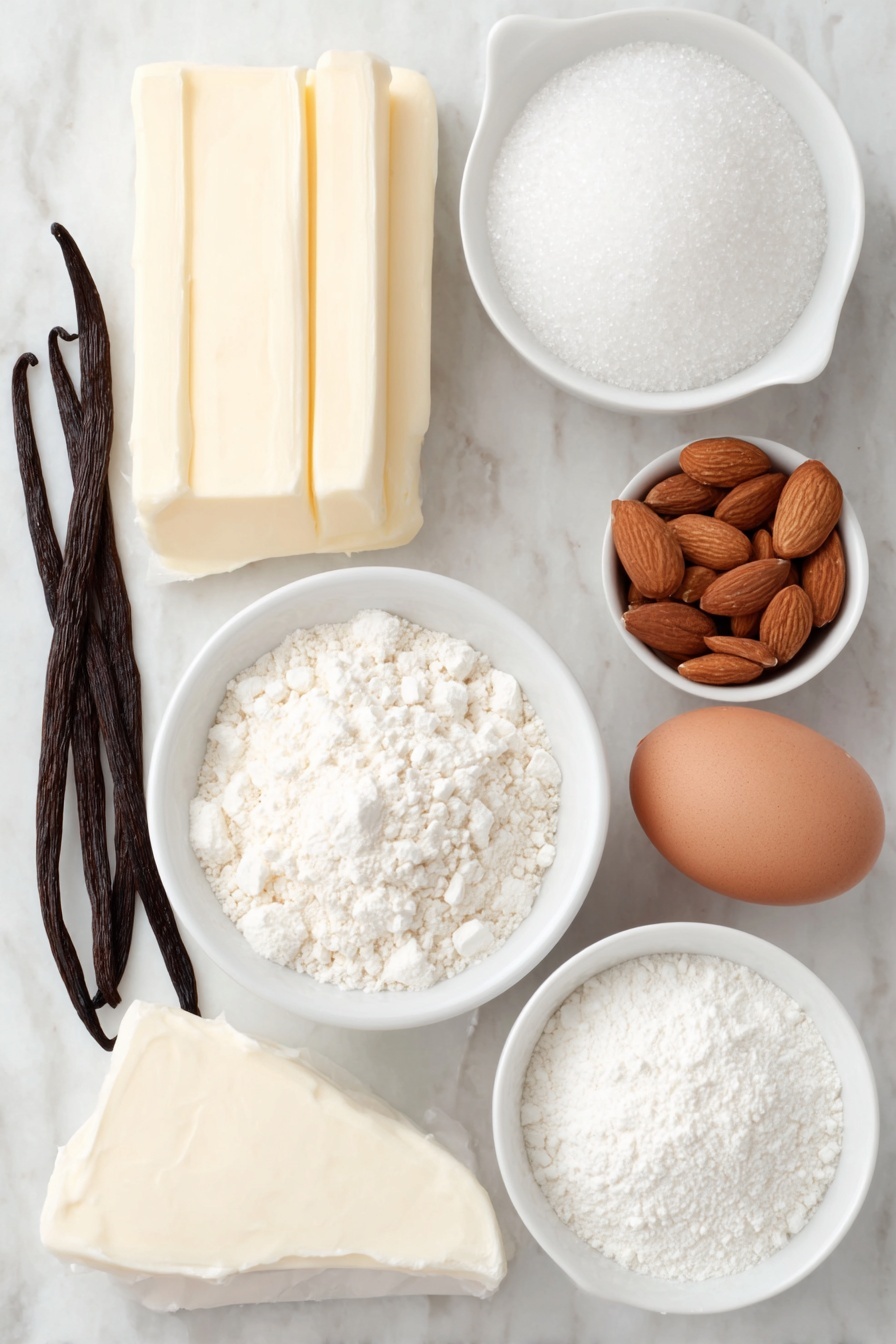
Ingredients You’ll Need
Each component of this Marbled Sugar Cookies with Royal Icing Recipe has been thoughtfully chosen to balance taste and texture. The cream cheese keeps the cookies soft, while the meringue powder in the icing gives it that perfect stiff yet smooth finish for decorating. Make sure to use gel food coloring for vibrant swirls without thinning the icing.
- Unsalted Butter: Room temperature butter ensures smooth mixing and tender cookie texture.
- Cream Cheese: Full-fat cream cheese adds richness and a lovely tender crumb.
- Granulated Sugar: Sweetens and slightly lightens the cookie dough when well creamed.
- Egg: Binds ingredients and provides structure to the cookies.
- Vanilla Extract or Vanilla Bean Paste: Adds warm, comforting flavor—bean paste intensifies the vanilla notes.
- Almond Extract (Optional): Just a touch adds a delicate depth to the flavor.
- All-Purpose Flour: The sturdy base for the cookies—make sure to measure properly by spooning into the cup and leveling off.
- Cornstarch: Keeps cookies soft and tender by giving a slightly delicate texture.
- Baking Powder: Helps with a slight rise so your cookies aren’t too dense.
- Fine Salt: Balances sweetness and intensifies flavors.
- Powdered Sugar: For that silky smooth royal icing finish.
- Meringue Powder: A key ingredient for royal icing that stiffens the mixture without using raw egg whites.
- Water: Used carefully to achieve the perfect flooding consistency in the icing.
- Gel Food Coloring: Creates vivid colors without watering down your icing.
Variations
I love to play around with the colors and flavors to suit the occasion or my mood. The marbled royal icing design is so versatile—you can customize colors easily to match holidays, themes, or even simply your favorite palettes!
- Flavor Variations: Swap almond extract for lemon or orange extract for a fresh citrus twist that pairs deliciously with the cream cheese base.
- Color Themes: For a festive vibe, try red and green for Christmas or pastel pinks and purples for spring celebrations—my family loves the creativity this allows.
- Dietary Adjustments: For a dairy-free option, substitute vegan butter and cream cheese alternatives; note this may slightly alter texture and flavor.
- Texture Twist: Add a bit of finely chopped nuts or sprinkles to the dough for extra crunch and fun surprises inside your cookies.
How to Make Marbled Sugar Cookies with Royal Icing Recipe
Step 1: Cream the Butter and Cream Cheese Until Silky Smooth
Start by beating your softened butter and cream cheese together on medium speed. I love how this step gives the cookies their signature creaminess. It usually takes about 2-3 minutes until the mixture is smooth and uniform. Getting this right means your cookies will have that melt-in-your-mouth softness you want.
Step 2: Sweeten, Flavor, and Add the Egg
Next, mix in the sugar until the batter lightens up. This aeration is what helps keep these cookies nice and tender. After that, add your egg, vanilla, and optional almond extract. I always stick to room temperature eggs here because it helps everything blend perfectly without curdling.
Step 3: Combine Dry Ingredients and Mix Into Dough
Whisk together the flour, cornstarch, baking powder, and salt in a separate bowl. Adding dry to wet in two parts and mixing on low speed creates a dough that’s just incorporated—not overworked—to keep your cookies soft and chewy, not tough.
Step 4: Chill and Prepare to Roll
Dividing your sticky dough in half and flattening it before chilling makes rolling out dough a breeze later on. Trust me, I always try to stick to the recommended chill times—it really helps the dough firm up and ensures clean, crisp cookie edges after baking.
Step 5: Roll Out, Cut Shapes, and Chill Again
Rolling out your dough on plastic wrap avoids a big mess and makes cleanup so much easier. Be generous with your flour on both sides of the dough and the rolling pin to prevent sticking without drying the dough out. I like my cookies about one-third of an inch thick—this keeps them soft but sturdy enough to hold up to the icing. After cutting shapes, chilling the cut cookies again before baking helps them keep their shape—don’t skip this step!
Step 6: Bake and Cool
Bake your cookies on the top rack to get even heat, watching closely for 10-12 minutes. Pull them out right before the edges begin to brown—that’s the sweet spot for soft cookies. Cooling the cookies on the pan lets them set up slightly before moving them to a wire rack to fully cool. This step is crucial because warm cookies won’t dry the royal icing properly.
Step 7: Whip Up the Royal Icing
While the cookies cool, mix the powdered sugar, meringue powder, water, and flavoring until you get stiff peaks—as if you’re making meringue. This royal icing base dries hard but stays smooth, perfect for dipping. The little “Figure 8 test” is a fun trick I picked up that guarantees the icing consistency is just right—you’ll want the figure 8 to vanish in about 8 seconds. A stopwatch really helps here!
Step 8: Create Your Marbled Colors
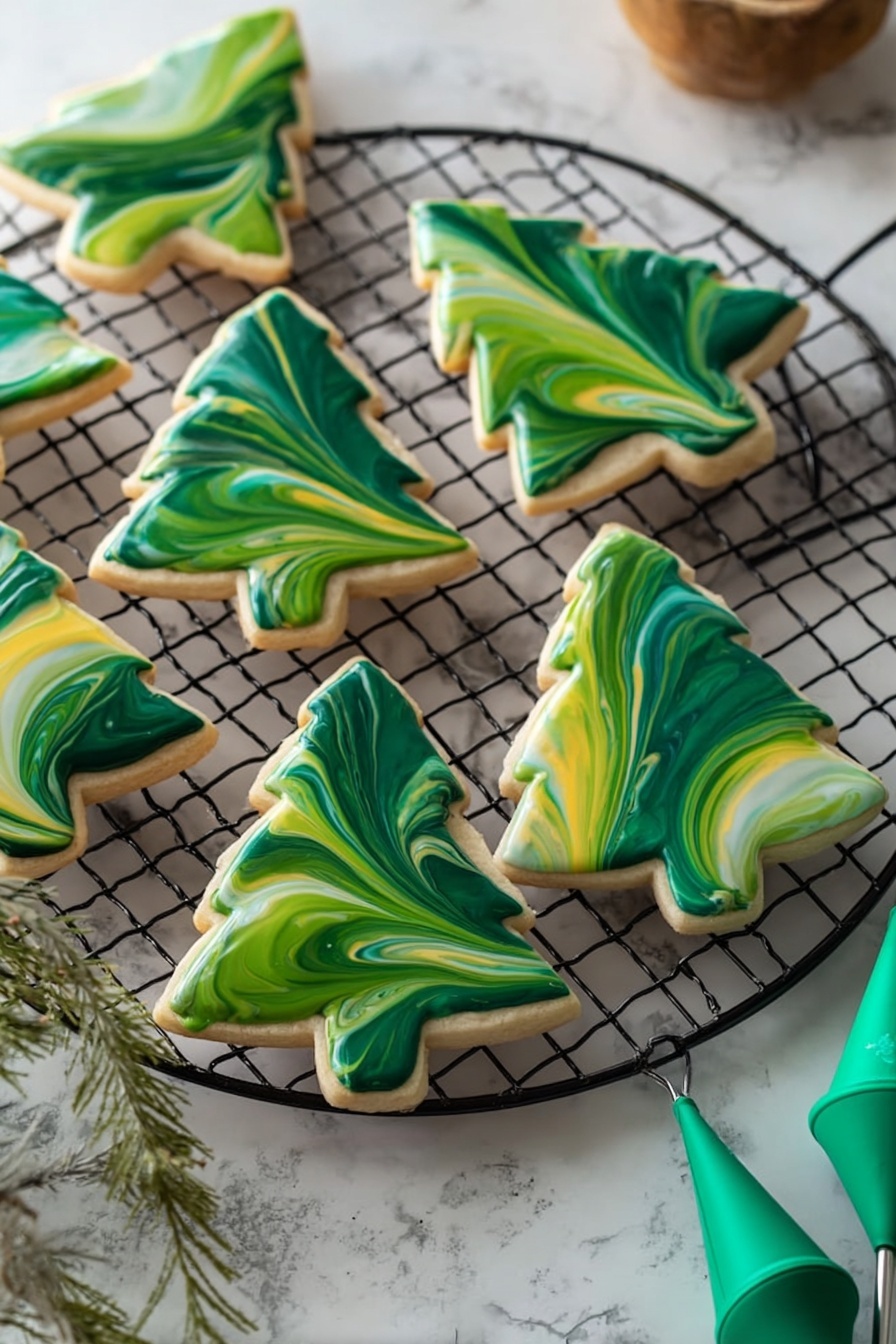
Divide your icing into three small portions for coloring—using different shades in the same color family creates that amazing marbled effect. I found using lime, leaf, and moss green gel colors gives a fresh, natural look. Fill small piping bags with each color, seal them, and be ready to drizzle.
Step 9: Dip and Swirl to Marble Your Cookies
Pour your uncolored base icing into a shallow bowl for dipping. Then drizzle the colored icing over the surface and swirl gently using a toothpick or scribe tool in figure 8 motions—that swirl is what truly makes these cookies pop. Dunk your cookie into the icing, covering it completely, then gently shake off excess and place it to dry. I keep a damp cloth nearby to wipe my fingers after each dip—it gets messy, but it’s so much fun!
Step 10: Let Cookies Dry Thoroughly
Patience is key here. Let your cookies dry for about an hour at room temperature, or until the icing is firm to the touch. This prevents smudging and lets the icing harden perfectly. Then, you have yourself some stunning, tasty treats to enjoy or gift!
Pro Tips for Making Marbled Sugar Cookies with Royal Icing Recipe
- Chill for Cleaner Shapes: I always chill the dough twice—before rolling and after cutting—to get perfect edges that don’t puff or spread.
- Figure 8 Test for Icing: Using a stopwatch to time the icing drip clarity saved me many messy batches—do this and your glaze will be perfect every time.
- Keep Icing Covered: I learned the hard way that royal icing crusts quickly if left uncovered, so always press plastic wrap directly on the surface between uses.
- Work in Batches: To avoid the glaze drying mid-dip, I keep the icing bowl covered and refresh the surface if it starts to skin over before I dip the next cookie.
How to Serve Marbled Sugar Cookies with Royal Icing Recipe
Garnishes
I often add a sprinkle of edible gold dust or shimmer powder right after dipping for a bit of sparkle that’s hard to resist. Tiny edible pearls or colored sanding sugar can also be gently pressed onto the icing while it’s still wet to elevate the look without overpowering the marbling.
Side Dishes
These cookies shine with a cozy cup of tea, fresh coffee, or even chilled milk for the kids. I also like serving them alongside fresh fruit platters or light salads at brunches—they’re a sweet contrast to fresher flavors!
Creative Ways to Present
For parties or gift-giving, I arrange these cookies on tiered trays or nestle them in decorative boxes with shredded paper. One fun idea is to incorporate seasonal colors for holidays or birthdays, accenting with fresh flowers or ribbons tied around cookie bags to make them extra special.
Make Ahead and Storage
Storing Leftovers
I store these cookies in an airtight container layered with parchment paper at room temperature, and they keep beautifully for up to 2 days. The royal icing hardens into a nice shell that keeps everything tasting fresh, but I recommend enjoying them sooner rather than later for peak softness. Avoid refrigerating if possible, as this can make cookies a bit tougher.
Freezing
If you want to prep early, these cookies freeze well after baking but before icing. I freeze cut and baked cookies layered with parchment, then thaw completely before decorating with royal icing. I don’t recommend freezing iced cookies as the icing can crack or shift.
Reheating
Since these are sugar cookies, reheating isn’t necessary—if anything, leaving them at room temp helps maintain their soft crumb. But if you do want a just-baked warmth, a few seconds in the microwave will do the trick without compromising icing too much.
FAQs
-
Can I make the dough ahead of time?
Absolutely! You can prepare the cookie dough, wrap it tightly in plastic wrap, and store it in the fridge for up to 3 days or freeze it for up to 1 month. Just be sure to let it thaw and chill again before rolling out for best results.
-
What if my royal icing is too thick or too thin?
If the icing is too thick, add a teaspoon of water at a time until you reach flooding consistency. If it’s too thin, mix in small amounts of powdered sugar to thicken. The Figure 8 test is a great way to dial in the perfect consistency.
-
Can I use food coloring other than gels?
Gel food coloring is best because it won’t affect the icing’s consistency much. Liquid food coloring can thin royal icing too much, causing it to lose structure and making it harder to achieve that beautiful marbled effect.
-
How long does it take for the royal icing to dry?
Typically, royal icing dries to the touch within 1-2 hours at room temperature. However, to ensure cookies are fully set and ready to stack or package, I recommend letting them dry for at least an hour, depending on humidity.
Final Thoughts
I still remember the first time I made these Marbled Sugar Cookies with Royal Icing Recipe and how everyone marveled at the swirled colors and tender bite. It’s become my go-to for special occasions and simple tea-time treats alike. The best part? It’s a joy to make, from mixing to decorating. I genuinely recommend giving this recipe a go—you’ll love the process as much as the result, and the smiles around your kitchen table will tell you it was totally worth it.
Print
Marbled Sugar Cookies with Royal Icing Recipe
- Prep Time: 20 minutes
- Cook Time: 11 minutes
- Total Time: 2 hours 1 minute
- Yield: 36 cookies
- Category: Dessert
- Method: Baking
- Cuisine: American
Description
These Marbled Sugar Cookies feature a tender cream cheese sugar cookie base combined with beautiful marbled royal icing, creating a perfect balance of soft, flavorful cookie and stunning decorative finish. The dough is chilled and rolled to ensure shape retention, while the colorful marbled glaze adds an artistic touch making these cookies ideal for special occasions or gifting.
Ingredients
Cream Cheese Sugar Cookies
- 3/4 cup (1 1/2 sticks) unsalted butter, room temperature (170g)
- 1/2 cup or 4 oz. full fat cream cheese, room temperature (113g)
- 1 1/2 cups granulated sugar (300g)
- 1 large egg, room temperature (56g)
- 2 tsp vanilla extract or vanilla bean paste (8g)
- 1 tsp almond extract – optional (5g)
- 3 cups all-purpose flour (375g)
- 1 Tbsp cornstarch (8g)
- 1/2 tsp baking powder (2g)
- 1/2 tsp fine salt (3g)
Marbled Royal Icing (adapted from Wilton)
- 3 cups powdered sugar (375g)
- 3 Tbsp meringue powder (30g)
- 1/4 cup water, room temperature (60g)
- 2 tsp vanilla or almond extract (8g)
- Additional water to bring to flooding consistency (approximately 3 Tbsp)
- Gel food coloring (various shades for marbling)
Instructions
- Prepare the cookie dough: In a large bowl or stand mixer bowl, beat the butter and cream cheese on medium speed until smooth and creamy. Add the granulated sugar and mix on medium-high until the mixture lightens in color, about 2 minutes. Incorporate the egg, vanilla extract (or vanilla bean paste), and almond extract if using, mixing on medium speed until evenly combined.
- Combine dry ingredients: In a separate bowl, whisk together flour, cornstarch, baking powder, and salt to ensure an even distribution of leavening and seasoning.
- Mix dough: Gradually add the dry ingredients to the wet butter mixture in two parts, mixing on low speed just until incorporated after each addition. Scrape the sides of the bowl with a spatula to ensure even mixing. The dough will be sticky.
- Chill dough: Divide the dough in half, flatten each into a rectangle about 1/2 inch thick, wrap tightly in plastic wrap, and chill in the fridge for 2 hours or in the freezer for 30 minutes. This resting firms the dough for easier rolling and better shape retention when baking.
- Preheat oven and prepare baking sheets: About 30 minutes before baking, preheat oven to 350°F (175°C) and line two large baking sheets with silicone mats or parchment paper.
- Roll and cut cookies: Remove one chilled dough portion, unwrap, and place plastic wrap beneath. Lightly flour both sides of the dough and the rolling pin, then roll the dough to about 1/3 inch thickness. Use a floured cookie cutter to cut shapes, brushing off excess flour with a kitchen brush. Place cookies about 1 inch apart on prepared baking sheets.
- Chill cut-out cookies: Chill cut cookies in refrigerator for 15 minutes (or freezer for 5 minutes) to help them maintain shape while baking.
- Bake cookies: Bake one sheet at a time on the top oven rack for 10-12 minutes, watching closely to prevent browning edges. The baking time might vary depending on cookie size and thickness.
- Cool cookies: Let cookies cool on the baking sheet for 15 minutes, then transfer to a wire rack to cool completely. Meanwhile, knead leftover dough scraps together, rewrap, and refrigerate to reuse.
- Repeat rolling and baking: Repeat the rolling, chilling, and baking steps with the second dough portion and the leftover scraps until all dough is used.
- Prepare royal icing: Whisk powdered sugar and meringue powder in a large bowl or mixer bowl. Add 1/4 cup water and vanilla or almond extract. Mix initially on low speed to incorporate, then increase to medium speed and beat until stiff peaks form, approximately 4 minutes.
- Adjust icing consistency: Add water 1 Tbsp at a time (approx. 3 Tbsp total) until the icing reaches flooding consistency, verified by the Figure 8 test where the icing trail disappears in about 8 seconds.
- Prevent crusting: Cover the bowl of royal icing with plastic wrap directly on the surface to prevent crust formation while decorating.
- Color and prepare icing for marbling: Divide 2/3 cup of the royal icing into separate bowls. Tint each portion using gel food coloring to create 3 different shades of the same color family (e.g., lime green, leaf green, moss green). Transfer each color to small piping bags, sealing tops with rubber bands.
- Marble the glaze: Pour the uncolored royal icing into a smaller bowl for dipping. Cut about 1/4 inch off the piping bag tips containing colored icing. Drizzle colored icings onto the plain icing, then use a toothpick or scribe tool to drag through the colors creating swirled patterns for a marbled effect.
- Dip and decorate cookies: Dip each cooled cookie into the marbled glaze completely, shake off excess icing, flip cookie onto cooling rack, then drizzle additional colored icing patterns over the top for enhanced marbling. Wipe fingers as needed due to sticky glaze.
- Dry cookies: Allow decorated cookies to dry uncovered for about 1 hour or until completely firm to the touch.
- Store: Store cookies in an airtight container at room temperature for up to 2 days for best freshness.
Notes
- The dough can be frozen before rolling for convenience; thaw in fridge overnight before use.
- Using plastic wrap beneath the dough while rolling helps with easy cleanup and prevents sticking.
- Chilling cut-out cookies before baking helps maintain sharp edges and prevents spreading.
- Adjust water in royal icing gradually to reach perfect flooding consistency; too thin icing won’t hold details, too thick won’t spread evenly.
- Cover icing with plastic wrap directly on surface to avoid crusting during decorating process.
- Gel food coloring is preferred for royal icing as it does not alter consistency.
- Watch baking time closely as cookies can become too brown quickly if left too long.
- Cookies store best in airtight containers to maintain softness and prevent icing from cracking.
Nutrition
- Serving Size: 1 cookie
- Calories: 130
- Sugar: 12g
- Sodium: 55mg
- Fat: 6g
- Saturated Fat: 3.5g
- Unsaturated Fat: 2g
- Trans Fat: 0g
- Carbohydrates: 18g
- Fiber: 0.5g
- Protein: 1.5g
- Cholesterol: 25mg


