
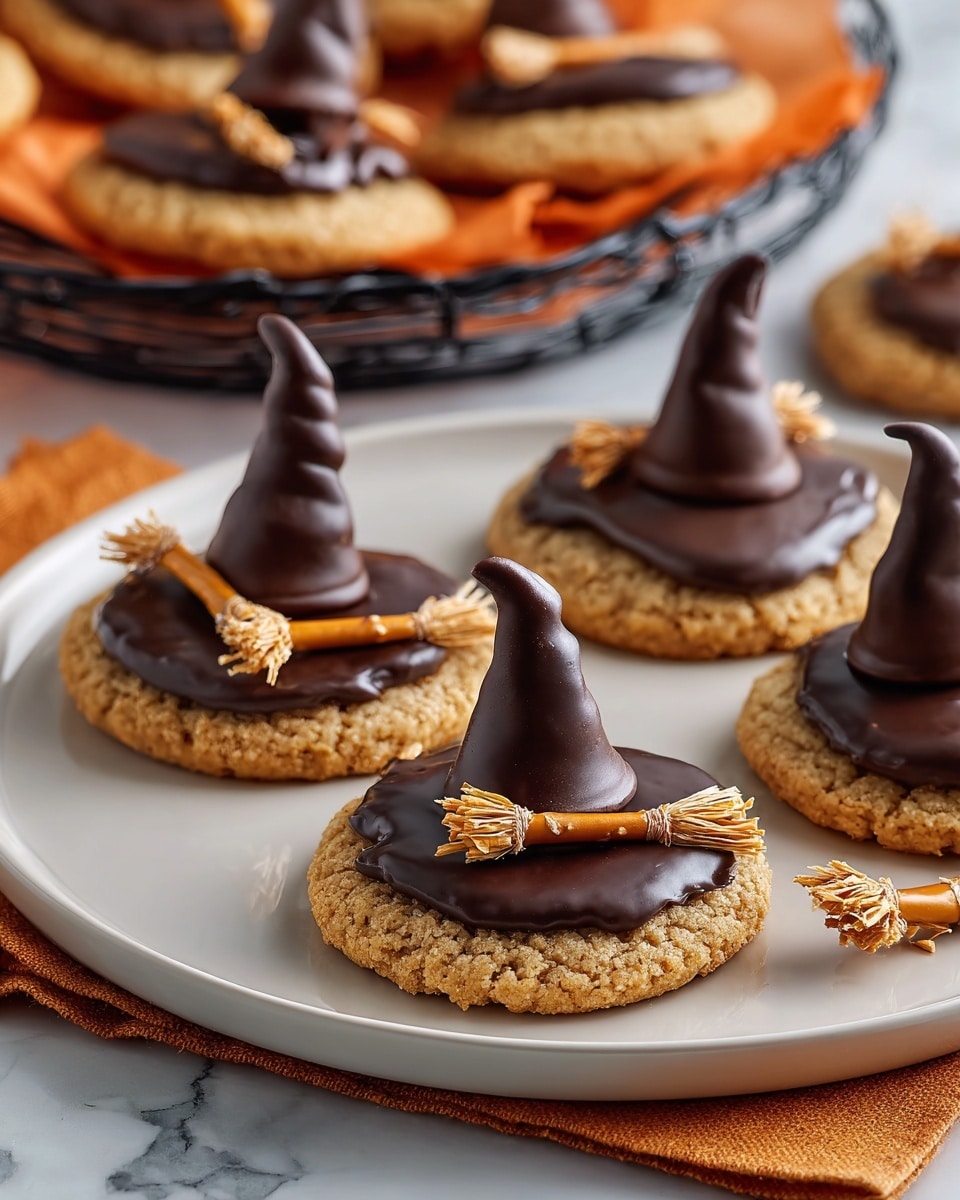
If you’re anything like me and absolutely adore Halloween treats that are both festive and fun to make, then you are going to fall head over heels for this Melted Witch Cookies Recipe. Not only are these little witch hats and brooms adorable, but the combination of peanut butter cookies with chocolate and crunchy snacks creates a flavor and texture combo that’s just downright irresistible. Stick around because I’ll walk you through every step to make sure your batch turns out perfectly magical!
Why You’ll Love This Recipe
- Fun Halloween Flair: These cookies double as cute decorations and delicious treats that your whole family will rave about.
- Simple Ingredients: With a Betty Crocker cookie mix and some fun snacks, you can whip up these cookies without stressing over complex baking.
- Perfect for Kids: A hands-on recipe that’s fun to make with little helpers, excellent for Halloween parties or classroom treats.
- Delicious Flavor Combo: Peanut butter, chocolate, and crunchy textures come together for a cookie that’s truly memorable.

Ingredients You’ll Need
This recipe brilliantly balances the rich, nutty flavor of peanut butter cookies with the bittersweet taste of cocoa candy melts and the crunch of Bugles and pretzels. Shopping for these ingredients is a breeze — the key is to have good-quality candy melts and fresh snacks for the best results.
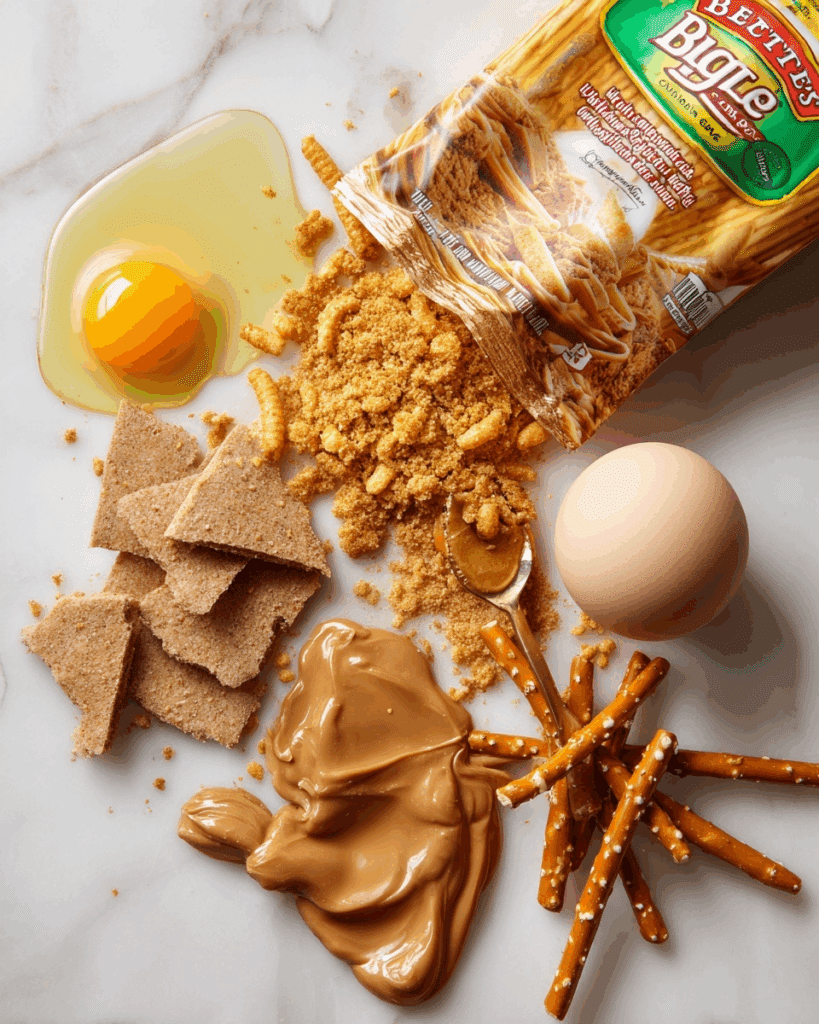
- Betty Crocker™ peanut butter cookie mix: The base for these cookies; using a good quality mix makes for soft, chewy cookies every time.
- Vegetable oil: Helps keep the cookies moist without overpowering flavor.
- Water: Needed to bring the mix together into dough.
- Egg: Acts as a binder for the cookie dough and adds richness.
- Bugles® snacks: These act as the witch hat bodies; their shape is perfect and adds a nice salty crunch.
- Light cocoa candy melts: Melt these down to coat the Bugles and frost the cookies for that classic witchy look.
- Pretzel sticks: Broken in half, these become the broomsticks—a fun and salty detail.
- Whole wheat cereal biscuit: Crushed to mimic broom bristles; adds a bit of rustic texture and fiber.
Variations
If you love putting your own spin on recipes like I do, this Melted Witch Cookies Recipe is a great canvas for creativity. Whether you need diet-friendly swaps or want a seasonal twist, it’s easy to customize.
- Nut-free variation: Replace peanut butter cookie mix with a nut-free cookie base, and swap peanut butter flavoring with vanilla or cinnamon to avoid allergies.
- Chocolate delight: Add mini chocolate chips into the cookie dough for extra chocolatey goodness; my family goes crazy for the extra melty bits.
- Seasonal toppings: Try crushed pumpkin seeds or colored sprinkles on the broomsticks for fall-themed flair.
- Gluten-free twist: Use a gluten-free cookie mix and gluten-free snacks to keep the holiday spirit alive for everyone at your table.
How to Make Melted Witch Cookies Recipe
Step 1: Mix Up the Perfect Peanut Butter Dough
Start by heating your oven to 375°F. In a large bowl, stir together the Betty Crocker peanut butter cookie mix, vegetable oil, water, and egg. You’ll want to keep stirring until you get a soft, pliable dough — it should be tacky but not sticky. I always find it helps to use a sturdy spoon or my hands to really bring it together. When the dough’s ready, drop tablespoons rounded up onto ungreased cookie sheets, spacing them about 2 inches apart so they have room to spread.
Step 2: Bake and Cool Your Cookies
Bake the cookies for 9 to 11 minutes or until you see they’re set but still soft — don’t overbake or the cookies will get too crisp. Let them cool on the sheets for about a minute before transferring them to wire racks to cool completely. This waiting part is important because it makes frosting and decorating easier and keeps your cookies from breaking.
Step 3: Coat Those Bugles and Get Ready to Decorate
While your cookies cool, line a cookie sheet with waxed paper. Melt the light cocoa candy melts according to the package instructions—if they start to thicken too much, just gently reheat them to keep them smooth and glossy. Dip each Bugle snack into the melted candy and gently tap off excess. Place the coated Bugles on the waxed paper and pop them in the fridge until they’re firm to the touch. This step creates your witches’ hats, and patience here pays off with a beautiful finish.
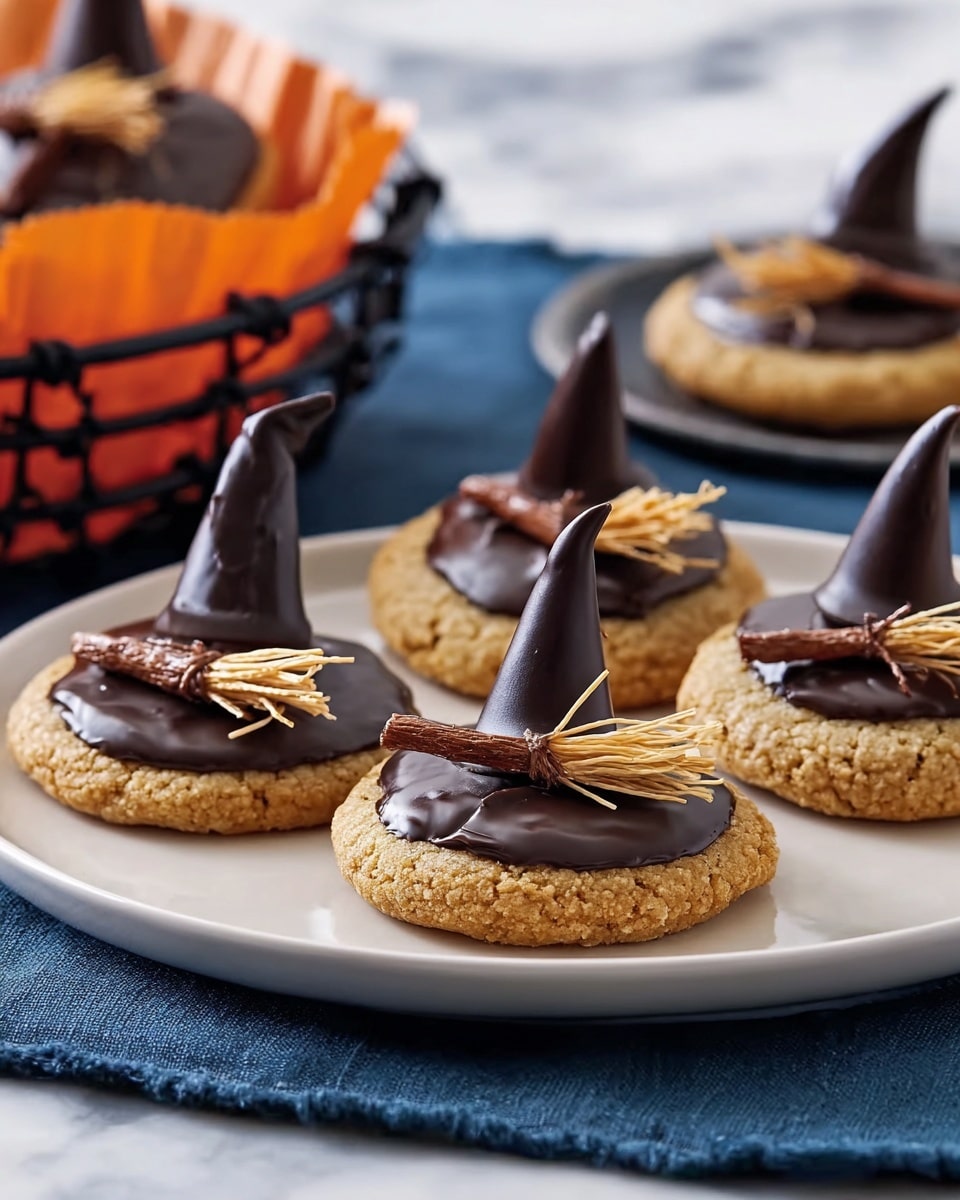
Step 4: Assemble Your Witches
Reheat the remaining candy melts if needed, then use them to frost each cookie with a generous layer, spreading it to look like a puddle—that’s the witch’s cloak! While the candy is still sticky, press half a pretzel stick onto each cookie for the broom handle. Then sprinkle crushed shredded cereal biscuit right at the base of the pretzel so it looks like broom bristles. Now for the finishing touch! Dip the wide end of each chocolate-coated Bugle in melted candy and stand it upright in the center of each cookie to form the witch’s hat. Let them set completely before moving—if you’re anything like me, that’s the hardest part.
Pro Tips for Making Melted Witch Cookies Recipe
- Consistent Cookie Size: Using a rounded tablespoon to scoop dough helps your cookies bake evenly and fit better with the decorations.
- Candy Melts Handling: Reheat candy melts in short bursts to avoid seizing, which can wreck your smooth coating.
- Use Waxed Paper: It makes clean-up a breeze and ensures your coats of candy setting flat and neat.
- Assembly Timing: Work quickly once frosting the cookies so the pretzels stick firmly without sliding off.
How to Serve Melted Witch Cookies Recipe
Garnishes
I love sprinkling a little extra crushed cereal or cocoa powder around the cookies on a serving plate to add a bit of drama and make them look even more enchanted. Sometimes I add edible glitter or Halloween-themed sprinkles on top of the frosting for parties—everyone howls with delight at those little touches!
Side Dishes
Since these cookies are sweet with a hint of salty crunch, I like serving them with simple sides like a cold glass of milk or hot cocoa with whipped cream. They’re also fantastic alongside fruit slices, which provide a fresh balance to the richness of the candy and cookie.
Creative Ways to Present
For Halloween parties, I’ve set these cookies on black or purple serving trays surrounded by spider-web napkins and little plastic spiders for extra spook factor. Another fun idea: arrange them in a circle to resemble a witch’s cauldron bubbling over—kids love the storytelling aspect!
Make Ahead and Storage
Storing Leftovers
I store leftover Melted Witch Cookies in an airtight container at room temperature. They usually stay fresh and chewy for up to three days, although to be honest, mine rarely last that long—everyone wants more! If the candy gets a bit soft, a quick pop in the fridge can help firm them back up.
Freezing
If you want to make these in advance, you can freeze the fully assembled cookies in a single layer on a baking sheet first, then transfer them to a freezer-safe container. Just be sure to separate layers with parchment to prevent sticking. When you thaw them, do so at room temperature for best texture.
Reheating
Since these are best enjoyed fresh, I usually don’t reheat them, but if the cookies have firmed up too much in the fridge, warming them for a few seconds in the microwave (about 10 seconds) brings back their soft, chewy magic. Just watch carefully so you don’t melt the candy decorations!
FAQs
-
Can I make Melted Witch Cookies Recipe without the Bugles snacks?
Absolutely! While Bugles have the perfect shape and crunch for the witch hats, you can substitute with mini waffle cones coated in chocolate or even chocolate-dipped ice cream cones cut to size. Just make sure whatever snack you choose holds up well when dipped in candy melts.
-
What if I don’t have candy melts? Can I use chocolate chips?
You can melt chocolate chips, but they tend to be less stable than candy melts and can seize or get grainy if not handled carefully. To mimic candy melts, add a small amount of vegetable shortening when melting chocolate chips to keep them smooth and workable.
-
How do I prevent the pretzels from sliding off the cookies?
The key is to attach the pretzels while the melted candy frosting on the cookie is still warm and tacky. Press gently but firmly and hold for a few seconds if possible. Also, work efficiently before the candy sets completely, so everything sticks in place perfectly.
-
Can I prepare parts of this recipe ahead of time?
Yes! You can bake the cookies and let them cool, and prep the candy-coated Bugles ahead of time, storing them separately in airtight containers. Assemble everything on the day you plan to serve for the freshest look and texture.
Final Thoughts
This Melted Witch Cookies Recipe has become a personal favorite not just because it’s delicious but because it brings so much joy to the kitchen. My kids and I love how crafting the little witches really sparks our creativity—it’s more than just baking; it’s a fun family tradition. If you’re looking for a festive, unique treat that’s sure to impress and satisfy, give this a try. Trust me, you’ll be casting a delicious spell on everyone who tries them!
Print
Melted Witch Cookies Recipe
- Prep Time: 20 min
- Cook Time: 11 min
- Total Time: 1 hr 45 min
- Yield: 30 cookies
- Category: Dessert
- Method: Baking
- Cuisine: American
Description
Melted Witch Cookies are festive Halloween treats featuring peanut butter cookies decorated with light cocoa candy melts, Bugles snacks as witch hats, pretzel sticks as broom handles, and shredded whole wheat cereal for broom bristles. These fun and creative cookies are perfect for holiday parties and gatherings.
Ingredients
Cookie Base
- 1 pouch Betty Crocker™ peanut butter cookie mix
- 3 tablespoons vegetable oil
- 1 tablespoon water
- 1 egg
Decorations
- 30 Bugles® snacks
- 1 bag (12 oz) light cocoa candy melts, melted
- 15 pretzel sticks, broken in half
- 1 large shredded whole wheat cereal biscuit, crushed
Instructions
- Prepare Cookie Dough: Heat oven to 375°F. In a large bowl, stir together the Betty Crocker peanut butter cookie mix, vegetable oil, water, and egg until a soft dough forms. Using a rounded tablespoon, drop dough onto ungreased cookie sheets about 2 inches apart.
- Bake Cookies: Bake the cookies for 9 to 11 minutes or until they are set. Remove from oven and cool for 1 minute on the cookie sheet before transferring them to cooling racks to cool completely.
- Prepare Decorations: Line a cookie sheet with waxed paper. Dip the Bugles snacks into the melted light cocoa candy melts, tapping off excess candy. Place the candy-coated Bugles on the cookie sheet and refrigerate until the candy is firm.
- Assemble Cookies: Reheat remaining candy melts if needed. Frost each cooled cookie with melted candy to form a puddle shape. Immediately attach one pretzel stick half to each cookie to serve as the broom handle. Sprinkle crushed shredded whole wheat cereal at the bottom of the pretzel piece to resemble broom bristles. Dip the wide end of each chocolate-coated Bugle into melted candy and place upright in the center of each cookie to represent the witch’s hat. Allow to stand until set.
Notes
- Ensure candy melts are not too hot when dipping to maintain shape.
- Use waxed paper on the cookie sheet to prevent sticking when setting decorations.
- Store finished cookies in an airtight container to keep them fresh.
- For a gluten-free option, use a gluten-free cookie mix and check ingredients of decorations.
- Cool cookies completely before decorating to prevent melting or sliding of candy.
Nutrition
- Serving Size: 1 cookie
- Calories: 140
- Sugar: 10g
- Sodium: 110mg
- Fat: 7g
- Saturated Fat: 3g
- Unsaturated Fat: 3g
- Trans Fat: 0g
- Carbohydrates: 17g
- Fiber: 1g
- Protein: 2g
- Cholesterol: 20mg
