
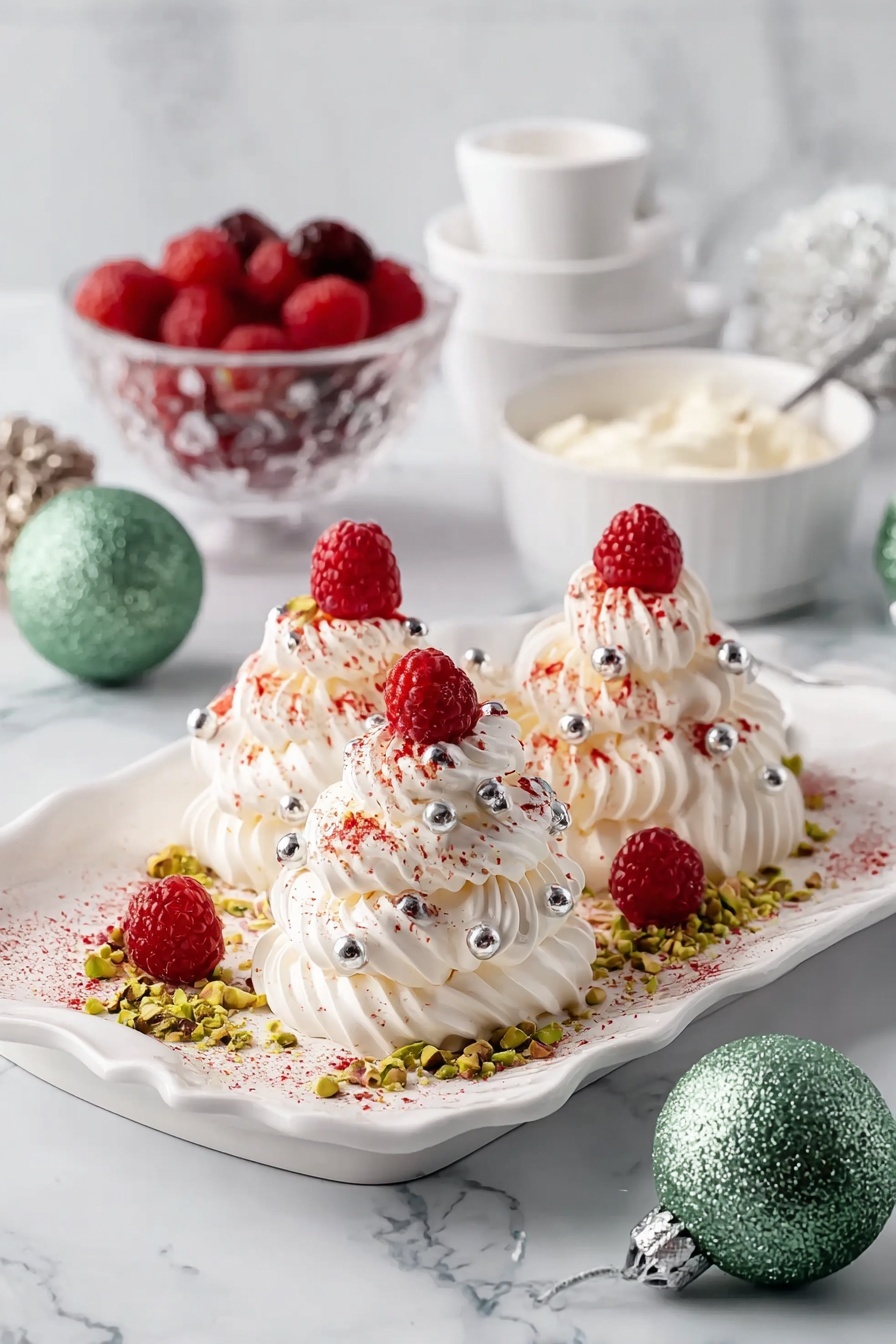
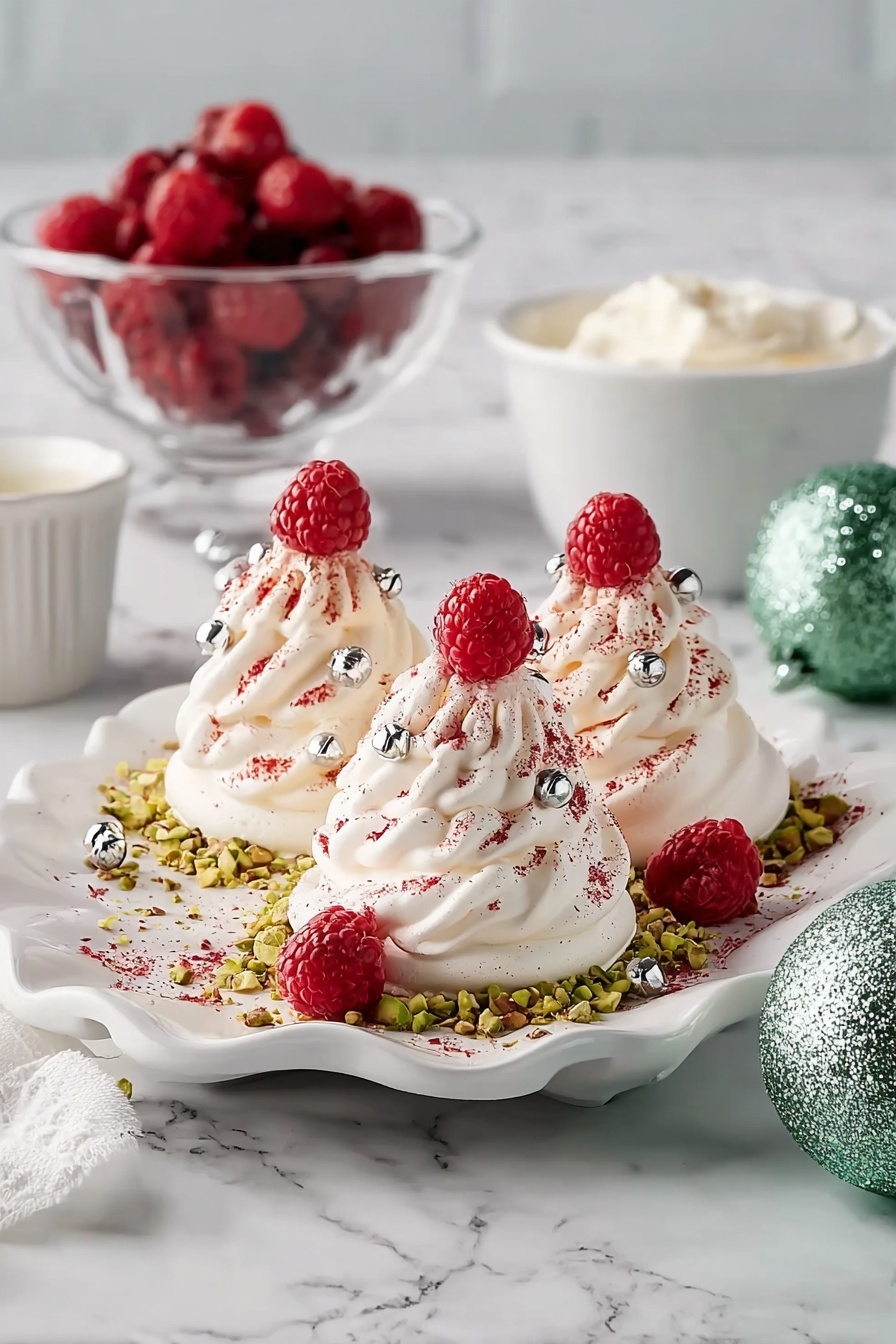
If you’re looking for a festive treat that’s as delightful to eat as it is to look at, I’ve got just the thing for you: Mini Pavlova Christmas Trees Recipe. These adorable little pavlovas are not only a feast for the eyes but also melt-in-your-mouth delicious, making them the perfect sweet centerpiece for holiday gatherings. I absolutely love how this recipe transforms simple meringue into something magical and fun — you’ll find that once you make these, they instantly become your go-to Christmas dessert.
Why You’ll Love This Recipe
- Festive Fun Factor: The tree shape is festive and playful — kids and adults alike get a kick out of decorating and eating them.
- Light &airy Texture: The meringue base is crisp yet light, giving you that classic pavlova crunch with a soft, marshmallow-y center.
- Customizable Decorations: You can dress these up any way you like with fresh berries, nuts, or even edible glitter.
- Perfect for Holiday Entertaining: They’re elegant but surprisingly easy to make, so they won’t stress you out on a busy day.

Ingredients You’ll Need
I love that the ingredients for this Mini Pavlova Christmas Trees Recipe are simple but come together to create extraordinary flavors and textures. Using room temperature egg whites and quality nuts really elevates the final result, and a tiny splash of rosewater adds that special seasonal touch.
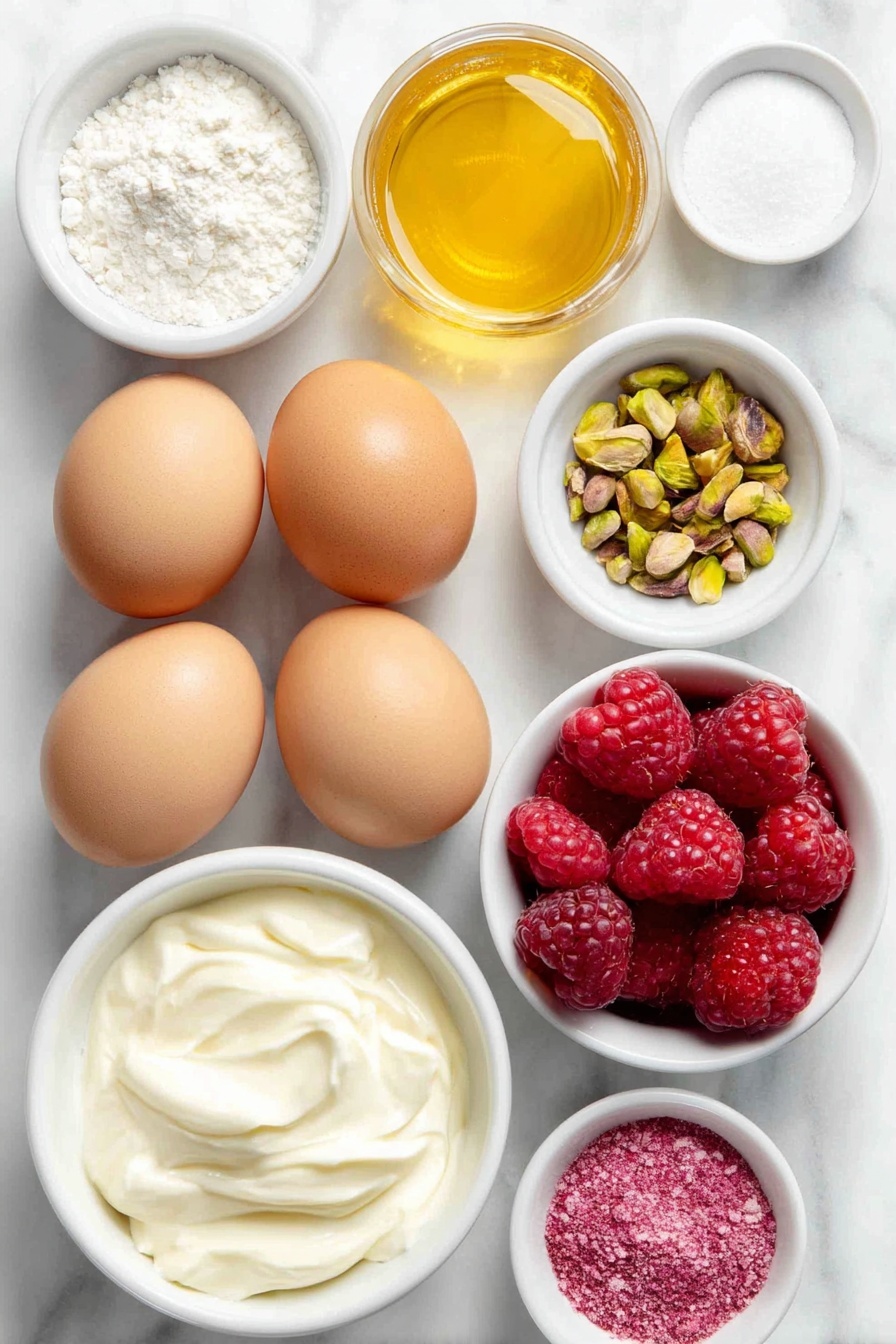
- Free-range egg whites: Bringing them to room temperature helps you whip the meringue to perfect peaks faster and more reliably.
- Caster sugar: Fine sugar dissolves easily and gives the pavlova that classic glossy finish.
- White vinegar: A little acidity stabilizes the meringue, ensuring it bakes into crisp, light shells.
- Cornflour: This is the secret to that soft, cloud-like center inside your meringue.
- Australian pistachios: I prefer these for their buttery flavor and vibrant color, which contrast beautifully with the white meringue.
- Thickened cream: Whipped to soft peaks, it adds a luscious richness that balances the sweet and tart toppings.
- Pure icing sugar: For sweetening the cream just right without being overpowering.
- Rosewater: Adds a delicate floral note that makes each bite feel a little more special.
- Silver cachous, raspberries, freeze-dried raspberry powder, strawberries: These fun garnishes add color, texture, and a festive sparkle to your mini trees.
Variations
One of the things I love most about this Mini Pavlova Christmas Trees Recipe is how easy it is to tweak. I often change up the toppings depending on what’s in season or the vibe of the party — and honestly, it’s always a crowd-pleaser no matter the variation.
- Nut-Free Version: I once made these replacing pistachios with finely crushed toasted coconut flakes, which gave a lovely texture and kept things allergy-friendly.
- Chocolate Drizzle: For a richer take, try drizzling melted dark chocolate over your trees before serving—it adds a beautiful contrast and tastes decadent.
- Vegan Meringue Alternative: If you’re feeling experimental, aquafaba (chickpea water) can be whipped to a meringue-like consistency for a vegan spin—just keep in mind the texture won’t be quite the same.
- Extra Fruity: I sometimes mix in pomegranate arils and kiwi slices for pops of color that really brighten the plate.
How to Make Mini Pavlova Christmas Trees Recipe
Step 1: Get Your Oven and Trays Ready
Start by preheating your oven to 100°C fan-forced (or 120°C conventional). I like to grease two large oven trays to prevent sticking. Then, take two baking paper sheets and, on the back side, mark four 4.5cm circles each. This is your guide for piping uniform pavlova bases. Place the paper, marked side down, on the trays so the circles don’t get disturbed during piping.
Step 2: Whip Up the Meringue Base
This is where the magic happens! Using an electric mixer, beat your room-temperature egg whites into soft peaks. I like to do this at medium speed until they start getting fluffy. Then, add the caster sugar gradually—a tablespoon at a time—making sure it dissolves completely before adding more. This slow incorporation is key for a glossy, stable meringue. Next, add the vinegar and cornflour, and beat until everything comes together into a thick, shiny mixture.
Step 3: Pipe the Base and Build the Trees
Take 1/4 of your meringue and fill a large piping bag fitted with a 1cm plain nozzle. Pipe small, neat mounds onto your circle guides on the trays. This will be the core of your trees. Then, switch to a piping bag with a 0.5cm fluted nozzle and use the rest of the meringue to pipe three rows of small vertical layers starting from the base around those mounds — this technique creates the “branches” of your Christmas tree. Don’t worry if it’s your first time; just take it slow and steady!
Step 4: Bake and Cool to Perfection
Bake your mini pavlova trees for about 50 minutes to 1 hour. You’re aiming for crisp edges without any color – a pale golden is okay, but don’t let them brown. After baking, turn the oven off and leave the trays inside with the door slightly ajar to cool. This gentle cooling prevents cracking and keeps the inside delightfully soft and marshmallow-y.
Step 5: Prepare Your Pistachio Crumbs and Whip Cream
While the pavlovas bake and cool, pulse your pistachios in a small food processor until you have fine crumbs — these add crunch and that gorgeous green pop. Then, whip the cream with icing sugar and rosewater until you get just-firm peaks. I find that using rosewater here adds that subtle floral note which makes these feel so festive and special.
Step 6: Decorate Your Mini Pavlova Christmas Trees
Fill a piping bag fitted with a small plain nozzle with some of your whipped cream. Pipe little dots onto your pavlova trees — this is your “glue” for the silver cachous and fresh raspberries. Sprinkle on the crushed pistachios and finish with a dusting of freeze-dried raspberry powder. Serve with sliced strawberries and the remaining cream on the side. Watching these get devoured by family and friends never gets old!
Pro Tips for Making Mini Pavlova Christmas Trees Recipe
- Room Temperature Egg Whites: Taking them out of the fridge an hour before whipping really speeds up and improves your meringue texture.
- Sugar Dissolution Check: I always rub a bit of meringue between my fingers after adding sugar to ensure no graininess — it makes a huge difference in the final crispness.
- Piping Practice: If you’re nervous, practice your piping on a spare sheet before working on the actual pavlovas — this helped me get my “tree branches” just right.
- Slow Cooling: Leaving the pavlovas to cool completely in the oven avoids cracks and keeps them chewy inside instead of brittle.
How to Serve Mini Pavlova Christmas Trees Recipe
Garnishes
I keep my garnishes simple and elegant: silver cachous sprinkle a festive sparkle, raspberries add tart bursts, and freeze-dried raspberry powder provides a lovely color accent. The pistachio crumbs are my favorite finish — they add a little unexpected crunch and gorgeous color contrast to the white meringue.
Side Dishes
These Mini Pavlova Christmas Trees pair wonderfully with a crisp glass of sparkling wine or a cup of fresh mint tea. For a more substantial dessert spread, consider adding a bowl of fresh berries or a creamy custard on the side.
Creative Ways to Present
Once, I arranged these mini pavlovas on a large wooden platter lined with fresh pine branches and edible flowers — it felt like bringing a mini winter forest to the table. Wrapping each tree’s base with a tiny gold ribbon also looks adorable and festive for gifting at parties or family dinners.
Make Ahead and Storage
Storing Leftovers
If you somehow have leftovers (which rarely happens!), store the pavlova bases in an airtight container at room temperature to keep them crisp. Keep whipped cream separate in the fridge and assemble just before serving to prevent sogginess.
Freezing
I’ve found that freezing whole pavlova trees isn’t ideal because they lose their crispness. However, you can freeze the pavlova bases separately—wrapped tightly in parchment and then foil—and thaw them at room temperature on serving day.
Reheating
Pavlovas aren’t really meant to be reheated, but if you want to freshen them up slightly, pop the bases in a low oven (90°C) for 5-7 minutes to crisp them again before adding cream and decorations.
FAQs
-
Can I make the Mini Pavlova Christmas Trees Recipe ahead of time?
Yes! You can bake and cool the pavlova bases up to two days in advance, keeping them stored in an airtight container at room temperature. Just add the cream and decorations shortly before serving for the best texture and freshness.
-
Can I use regular vinegar instead of white vinegar?
White vinegar is preferred because it’s flavor-neutral and helps stabilize the meringue. Using other vinegars like apple cider might alter the taste slightly, but in small amounts, it’s generally fine.
-
What’s the best way to pipe the meringue for the tree shape?
Start with a base mound using a 1cm plain nozzle, then use a smaller fluted nozzle to pipe three rows of vertical lines around it to mimic branches. Practicing piping on spare paper first really helps nail the shape!
-
Can I substitute pistachios with another nut?
Absolutely! Almonds, walnuts, or toasted coconut all work well. I encourage you to use what you enjoy or have on hand—just pulse them to a fine crumb for sprinkling.
Final Thoughts
When I first tried this Mini Pavlova Christmas Trees Recipe, it instantly became a holiday tradition — one that brings smiles every year. The combination of delicate meringue, fluffy cream, and festive decorations is a total crowd-pleaser. If you want to wow your guests without sweating over a complicated dessert, trust me, this is the one to make. I can’t wait for you to try it and see how it becomes your festive favorite, just like it did for me!
Print
Mini Pavlova Christmas Trees Recipe
- Prep Time: 20 minutes
- Cook Time: 1 hour
- Total Time: 1 hour 20 minutes
- Yield: 8 servings
- Category: Dessert
- Method: Baking
- Cuisine: Australian
Description
Mini Pavlova Christmas Trees are elegant and festive meringue treats perfect for holiday celebrations. Crisp on the outside and light and airy inside, these individual pavlovas are beautifully decorated with whipped cream, silver cachous, raspberries, pistachios, and strawberries to resemble miniature Christmas trees, making them a delightful centerpiece dessert.
Ingredients
Meringue
- 6 free-range egg whites, at room temperature
- 1½ cups caster sugar
- 1 tsp white vinegar
- 3 tsp cornflour
Decoration
- ¼ cup Sunbeam Australian Pistachios
- 300ml thickened cream
- 1 tsp pure icing sugar
- 1 tsp rosewater
- Silver cachous
- Raspberries
- Freeze-dried raspberry powder
- Strawberries, to serve
Instructions
- Prepare Oven and Baking Sheets: Preheat the oven to 100°C fan-forced (120°C conventional). Grease two large oven trays. On two sheets of baking paper, draw four 4.5cm circles spaced apart. Place the sheets marked side down onto the trays to use as guides for piping.
- Make Meringue Mixture: Using an electric mixer, beat the egg whites until soft peaks form. Gradually add the caster sugar, one tablespoon at a time, beating well after each addition until the sugar is fully dissolved. Add the white vinegar and cornflour then beat until the mixture is glossy and well combined.
- Pipe the Pavlova Bases and Tree Layers: Spoon a quarter of the meringue mixture into a large piping bag fitted with a 1cm plain nozzle. Pipe small mounds of meringue onto the prepared baking paper circles. Place the remaining meringue into another piping bag fitted with a 0.5cm fluted nozzle. Around each mound, pipe three rows of small vertical layers starting at the base to form the shape of a Christmas tree.
- Bake the Meringues: Bake for 50 minutes to 1 hour or until the edges of the pavlovas are crisp but not browned. Turn off the oven and leave the meringues to cool inside with the door slightly open to prevent cracking.
- Prepare Pistachio Crumbs: Pulse the pistachios in a small food processor until they form fine crumbs for garnishing.
- Whip the Cream: Beat the thickened cream together with icing sugar and rosewater using an electric mixer until just-firm peaks form. Place a quarter of the whipped cream into a piping bag fitted with a small plain nozzle.
- Decorate the Pavlovas: Pipe small rounds of whipped cream onto the meringue trees to help the silver cachous adhere. Decorate with silver cachous, fresh raspberries, and sprinkle with freeze-dried raspberry powder and pistachio crumbs. Serve with fresh strawberries and the remaining whipped cream on the side.
Notes
- Ensure egg whites are at room temperature for better volume when beaten.
- Adding vinegar and cornflour helps stabilize the meringue and keep it crisp.
- Cooling meringues inside the oven with the door ajar reduces the risk of cracking.
- Use a piping bag with the correct nozzle sizes to create detailed tree shapes.
- Store any leftover meringues in an airtight container to maintain crispness.
Nutrition
- Serving Size: 1 mini pavlova tree
- Calories: 220 kcal
- Sugar: 25 g
- Sodium: 20 mg
- Fat: 11 g
- Saturated Fat: 7 g
- Unsaturated Fat: 3 g
- Trans Fat: 0 g
- Carbohydrates: 28 g
- Fiber: 1 g
- Protein: 3 g
- Cholesterol: 45 mg
