
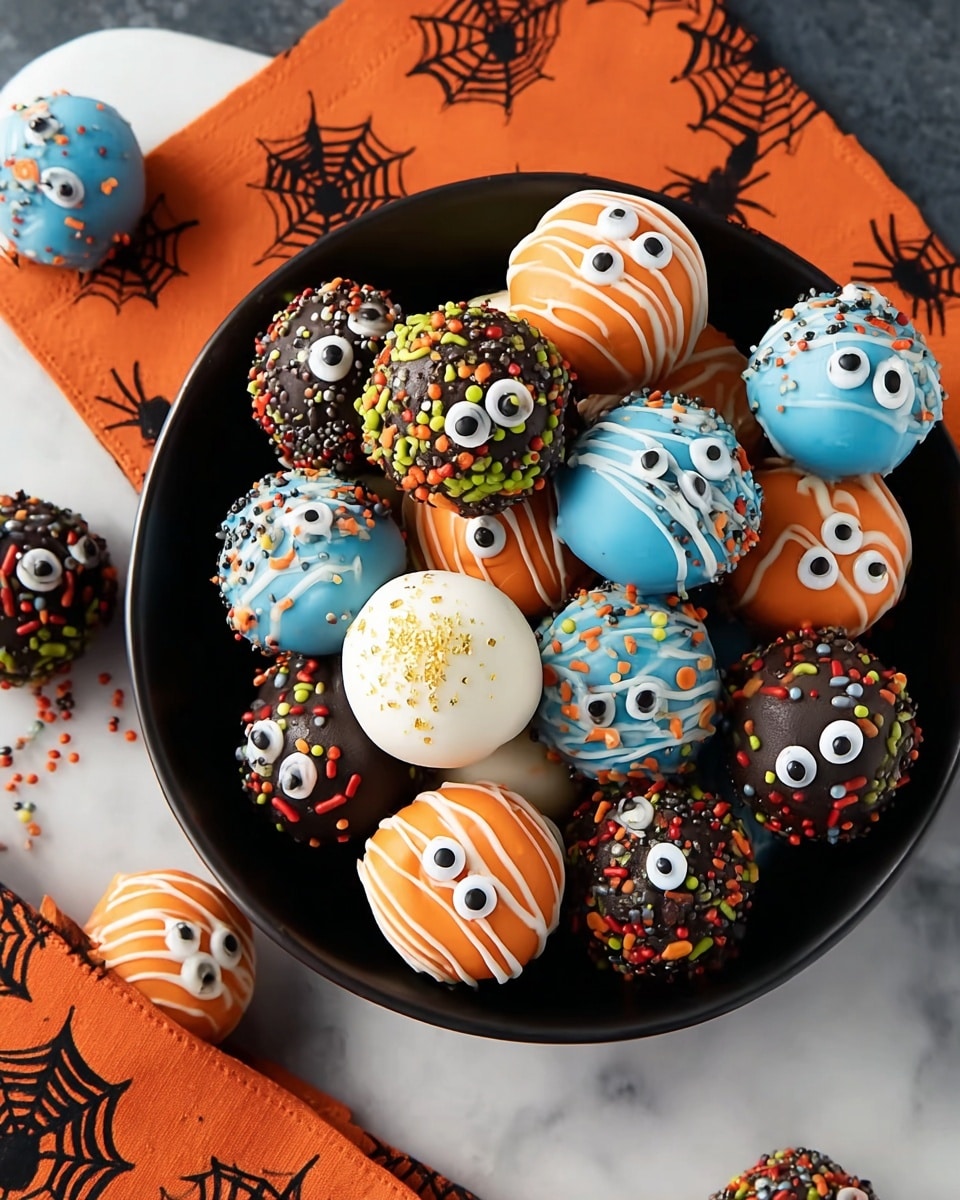
If you’re looking for a show-stopping treat that’s as fun to make as it is to eat, you’re going to adore this Monster Cake Balls Recipe. These colorful little cake bites are perfectly moist, covered in smooth candy melts, and decorated with googly candy eyes and sprinkles that bring out their playful, monster-like charm. I promise, whether you’re making these for a party, a holiday, or just to brighten up a regular day, they’ll be a wild hit with everyone who tries them.
Why You’ll Love This Recipe
- Easy to Make: You don’t need fancy baking skills to pull these off – just a little mixing, shaping, and dipping!
- Customizable Fun: The candy melts and decorations let you get creative with colors and patterns your kiddos or guests will love.
- Perfect Party Treats: These cake balls are bite-sized, mess-free, and ideal for celebrations or Halloween gatherings.
- Make Ahead Friendly: You can prep them in advance and store them well so you’re stress-free on event day.

Ingredients You’ll Need
The magic behind this Monster Cake Balls Recipe is in the balance of moist cake, creamy frosting, and that smooth candy coating that hardens just right. I like using the classic Betty Crocker™ yellow cake mix because it’s reliably moist and flavorful, but really, any cake mix you love will work. Just be sure to pick frosting and candy melts in complementary flavors and the fun colors that fit your monster theme!
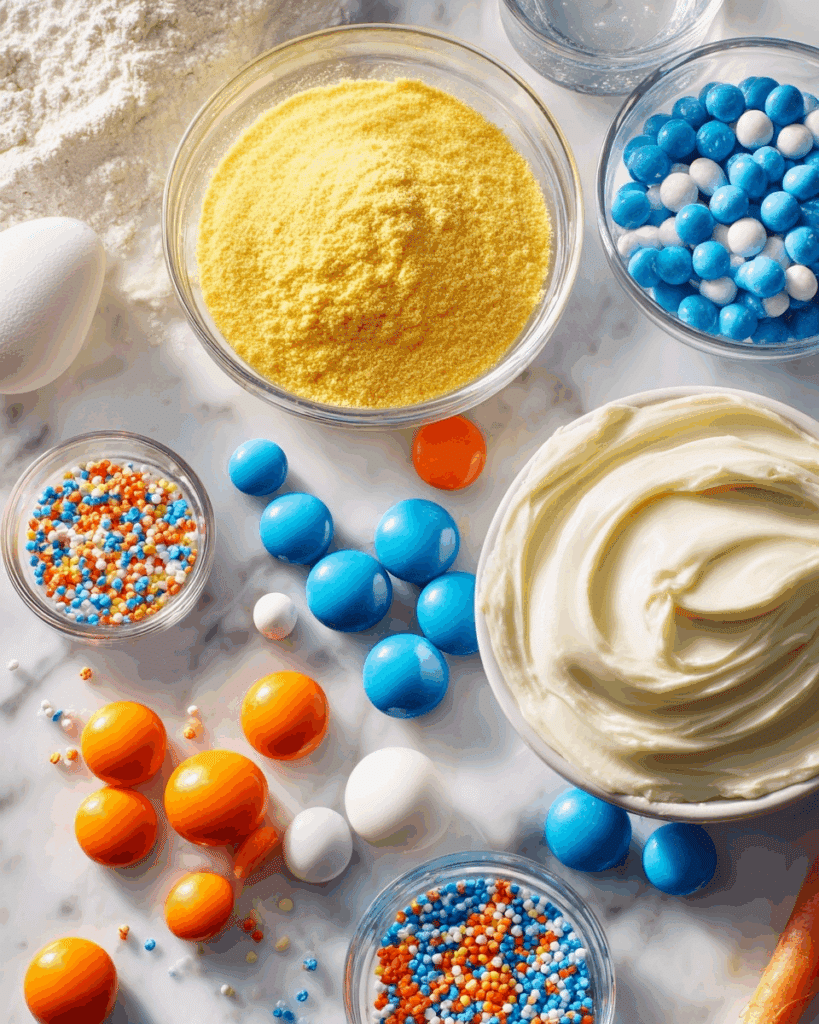
- Yellow Cake Mix: I use the Betty Crocker™ Super Moist™ because it bakes up flavorful and tender every time, making a great base for the balls.
- Water, Vegetable Oil, Eggs: These are just the usual ingredients called for on the cake mix box; they keep things simple and foolproof.
- Vanilla Frosting: The Rich & Creamy kind adds just the right amount of sweetness and moisture to hold the cake balls together without making them too sticky.
- Light Blue, Orange, and White Candy Melts: These are key for coating the cake balls and creating that vibrant monster vibe! I recommend melting them gently in the microwave to keep them smooth.
- Candy Eyeballs and Decorating Sprinkles: This is where the personality of your monsters comes alive – go wild with googly eyes and colorful sprinkles to make each cake ball unique and fun.
Variations
I love playing around with this Monster Cake Balls Recipe depending on the occasion—sometimes I tweak flavors or swap in different colors to give it a unique twist. Don’t hesitate to customize it to your taste or dietary needs; the cake balls are forgiving and adaptable.
- Chocolate Monster Balls: I once swapped the yellow cake for chocolate cake and used dark chocolate melts – my family went crazy for the richer flavor combo!
- Gluten-Free Version: Using a gluten-free cake mix works great too, so those with dietary restrictions won’t miss out on the fun.
- Festive Colors: For Halloween, I keep with the light blue, orange, and white candy melts, but you could try green and purple for a spooky twist or pastels for spring celebrations.
- Nutty Surprise: Add finely chopped nuts or coconut flakes to the cake/frosting mixture for extra texture—just be mindful of allergies.
How to Make Monster Cake Balls Recipe
Step 1: Bake and Cool Your Cake
Start by heating your oven to 350°F (or 325°F if you’re using a dark or nonstick pan). Follow the directions on your cake mix box to bake the cake in a 13×9-inch pan. This usually takes about 30–35 minutes. The key here is to let the cake cool completely—this can take about an hour. I use the waiting time to get my toppings and candy melts ready since working with warm cake will make rolling the balls harder and messier.
Step 2: Crumble, Mix, and Shape Your Cake Balls
Once cooled, crumble your cake into a large bowl until it’s like fine crumbs. Add 1 cup of vanilla frosting and mix it thoroughly to combine. The mixture should be moist enough to hold together when rolled but not overly sticky. If you find it too wet, add a bit more cake crumbs. shape the mixture into 42 balls, about 1 ½ inches each – I like using a small cookie scoop to keep balls uniform in size. Place them on a wax paper-lined cookie sheet. Pop them into the freezer for about an hour until firm, then move them to the refrigerator; this makes it much easier to dip them in candy melts later while maintaining their shape.
Step 3: Melt Candy Coating Perfectly
Place one color of candy melts in a microwavable bowl. Microwave uncovered on Medium (50%) for 1 minute 30 seconds, then stir well. Continue to microwave and stir in 30-second bursts until smooth and fully melted. Candy melts can seize if overheated, so I always microwave at half power and stir often—it keeps things silky and easy to work with. If they get too thick, add a tiny bit of vegetable oil or shortening to loosen the coat.
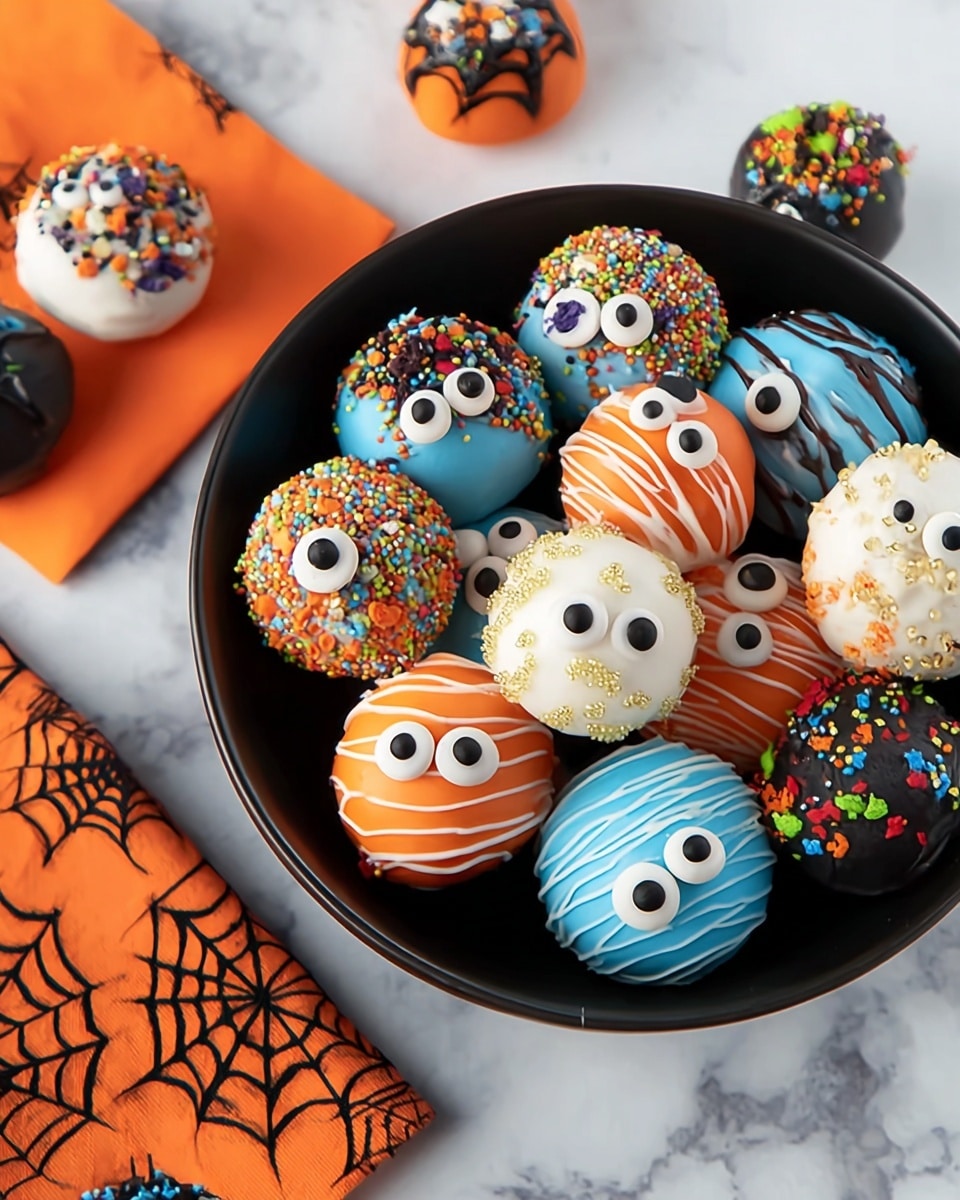
Step 4: Dip, Decorate, and Chill
Remove about 14 cake balls from the refrigerator and place them on a separate wax paper-lined tray. Using two forks, dip each cake ball into the melted candy coating, roll it to cover fully, and gently shake off any excess coating. Place the dipped balls back on the lined tray. Immediately press candy eyeballs onto them, then sprinkle on your decorations before the candy sets. If the coating cools too much while you’re working, just give it another gentle melt in the microwave. Chill them in the fridge for about 10 minutes to set.
Step 5: Repeat with All Colors
Repeat the melting, dipping, and decorating process with the orange candy melts for another 14 cake balls, then again with the white candy melts and finish decorating the last 14. Watching those candy-coated monsters come to life is honestly one of my favorite parts about this recipe!
Step 6: Store Your Monster Cake Balls
Once decorated and set, keep the monster cake balls covered in the refrigerator until you’re ready to serve. They hold up nicely and stay fresh for several days – but good luck keeping them around that long once people taste them!
Pro Tips for Making Monster Cake Balls Recipe
- Keep Cake Cool: Always cool the cake completely before crumbling – warm cake will make your mixture too sticky and hard to shape.
- Freeze Before Dipping: Freezing the shaped balls makes dipping so much easier and keeps them from falling apart in the candy coating.
- Use Two Forks to Dip: This technique lets excess candy drip off neatly and keeps your hands clean.
- Work Quickly with Decorations: Add your candy eyes and sprinkles right away before the coating sets – it sticks best fresh.
How to Serve Monster Cake Balls Recipe
Garnishes
I love using candy eyeballs because they add so much character—it’s like each cake ball gets its own little personality! Bright sprinkles and colored sugar set the mood and take these bites from cute to delightfully spooky. You could also try edible glitter for a magical shimmering effect that kids always adore.
Side Dishes
To keep the party going, I often serve Monster Cake Balls alongside a simple fruit platter or a cool vanilla milkshake. The fresh fruit balances the sweetness really well, and the milkshake? Well, it’s just the perfect cozy companion for these colorful little monsters.
Creative Ways to Present
One of my favorite presentations is to stick the cake balls on colorful lollipop sticks and arrange them like a monster bouquet in a fun jar or vase. It’s great for birthday parties or Halloween gatherings — people always comment on how adorable and easy that setup is. You can also place them on tiered dessert stands, mixing up the candy melt colors in patterns for extra impact.
Make Ahead and Storage
Storing Leftovers
I store leftovers in an airtight container in the refrigerator, layering the cake balls between sheets of parchment or wax paper. This prevents them from sticking together or losing their perfect shape. They taste just as fresh for up to 4 days, but frankly, they rarely last that long in my house!
Freezing
Want to prep early? These cake balls freeze beautifully. I wrap them individually in plastic wrap, then pop them in a freezer-safe container or bag. When you’re ready, thaw them overnight in the fridge before serving to preserve that soft, moist texture and vibrant candy coating.
Reheating
No need to reheat these — they’re best served chilled or at room temperature. If you prefer them a bit softer, take them out of the fridge 15 minutes in advance. The candy coating stays firm but not hard, making each bite a perfect monster party in your mouth.
FAQs
-
Can I use homemade cake instead of box mix for this Monster Cake Balls Recipe?
Absolutely! Homemade cake works beautifully as long as it’s fully cooled and you crumble it finely. Homemade recipes can add extra flavor or texture, and the key is still mixing it well with frosting to hold the balls together.
-
What if my candy melts get too thick or start to harden?
Just microwave them briefly in 15–30 second intervals at half power and stir well each time. If needed, add a small teaspoon of vegetable oil or shortening to thin the mixture, which will make dipping easier and smoother.
-
How do I prevent cake balls from falling apart while dipping?
Freezing the cake balls for at least an hour before dipping really helps them stay firm. Also, use two forks to dip and shake off excess, which helps keep the shape intact.
-
Can I make Monster Cake Balls Recipe vegan or dairy-free?
With some ingredient swaps – like using vegan cake mix, plant-based frosting, and dairy-free candy melts – you can definitely make this recipe work vegan or dairy-free. Just check labels to be sure your decorations are compatible too.
-
How long do Monster Cake Balls stay fresh?
Stored covered in the fridge, they stay fresh and tasty for 3–4 days. Beyond that, the cake may start to dry out and the candy coating could lose its shine.
Final Thoughts
I absolutely love how this Monster Cake Balls Recipe brings a little joy and whimsy to any occasion—kids adore the googly eyes, and adults appreciate the perfectly balanced flavors and moist, rich cake. When I first made these, I was blown away by how quickly they disappeared, and now they’re a staple whenever I want a fun, easy dessert that feels homemade but special. Give this recipe a try—you’ll find it’s as enjoyable to make as it is to eat, and it’s sure to become your go-to treat for parties or any day you want a sweet little monster surprise!
Print
Monster Cake Balls Recipe
- Prep Time: 60 min
- Cook Time: 35 min
- Total Time: 3 hr 45 min
- Yield: 42 cake balls
- Category: Dessert
- Method: Baking
- Cuisine: American
- Diet: Vegetarian
Description
Delightfully spooky Monster Cake Balls made from moist yellow cake mixed with creamy vanilla frosting, coated in colorful candy melts, and decorated with fun edible eyes and sprinkles. These bite-sized treats are perfect for Halloween parties or any festive occasion, offering a playful and delicious dessert that’s as eye-catching as it is tasty.
Ingredients
Cake Balls
- 1 box Betty Crocker™ Super Moist™ Yellow Cake Mix
- Water, vegetable oil, and eggs as called for on cake mix box
- 1 cup from 1 tub (16 oz) Betty Crocker™ Rich & Creamy Vanilla Frosting
Coatings and Decorations
- 1 3/4 cups light blue candy melts (from 12-oz bag)
- 1 3/4 cups orange candy melts (from 12-oz bag)
- 1 3/4 cups white candy melts (from 12-oz bag)
- Betty Crocker™ Dessert Decorations Candy Eyeballs
- Betty Crocker™ Decorating Sprinkles and Sugars (assorted colors)
Instructions
- Prepare the Cake: Heat oven to 350°F (325°F for dark or nonstick pan). Make and bake the yellow cake mix as directed on the box using a 13×9-inch pan. Allow cake to cool completely, about 1 hour.
- Form Cake Balls: Line a large cookie sheet with waxed paper. Crumble the cooled cake into a large bowl. Add 1 cup of vanilla frosting and mix well to combine. Shape the mixture into 42 balls, approximately 1 1/2 inches each, and place them on the lined cookie sheet. Freeze the balls for about 1 hour or until firm. Once firm, transfer them to the refrigerator to keep chilled.
- Melt Candy Coating – Blue: In a 2-quart microwavable bowl, microwave 1 3/4 cups blue candy melts uncovered on Medium (50%) power for 1 minute 30 seconds. Stir, then continue microwaving in 30-second increments, stirring after each, until the candy melts are melted and smooth.
- Dip and Decorate Blue Cake Balls: Remove one-third (14) of the cake balls from the refrigerator. Place them on a second cookie sheet lined with waxed paper. Using two forks, dip and roll each cake ball individually in the melted blue candy coating, gently shaking off excess. Place the coated balls on the lined cookie sheet. Immediately press candy eyeballs onto the cake balls and decorate with sprinkles as desired. If the candy coating becomes too cool and thick, reheat as needed. Refrigerate the coated cake balls for 10 minutes.
- Melt Candy Coating – Orange and White: Repeat the melting, dipping, and decorating process with the remaining 14 cake balls using the orange candy melts. Then repeat again with the last 14 cake balls using the white candy melts, following the same dipping, shaking, decorating, and refrigeration steps.
- Storage: Store the completed, decorated monster cake balls covered in the refrigerator until ready to serve.
Notes
- Make sure cake is completely cooled before crumbling to prevent the frosting from melting prematurely.
- The cake balls must be firm before dipping to avoid breaking apart in the candy coating.
- Use two forks to dip for easier handling and to help shake off excess candy coating.
- Reheat candy melts gently as needed to maintain a smooth coating consistency for dipping.
- Store finished cake balls refrigerated in an airtight container to keep them fresh for up to one week.
- Customize decorations with various colored sprinkles and edible eyes to create unique monster designs.
Nutrition
- Serving Size: 1 cake ball
- Calories: 120
- Sugar: 15g
- Sodium: 110mg
- Fat: 5g
- Saturated Fat: 3g
- Unsaturated Fat: 1.5g
- Trans Fat: 0g
- Carbohydrates: 20g
- Fiber: 0.5g
- Protein: 1g
- Cholesterol: 15mg
