

If you’re on the hunt for a fun, whimsical treat that’s just as delightful to make as it is to eat, you’ve come to the right place. I absolutely love this Monster Eyeball Sugar Cookies Recipe because it turns ordinary sugar cookies into something spooky-cute that everyone—kids and adults alike—will rave about. When I first tried this recipe, the mix of crunchy colored sugar and those goofy candy eyeballs made for a really memorable baking session that my family still talks about. Stick around, and I’ll share all my best tips and tricks to nail this recipe perfectly!
Why You’ll Love This Recipe
- Quick and Easy: Uses a sugar cookie mix for speedy prep without sacrificing taste.
- Eye-Catching Design: Candy eyeballs and colored sugar turn simple cookies into a festive hit.
- Kid-Friendly Fun: Great activity for baking with kids and making memories.
- Perfect for Parties: Ideal for Halloween or any spooky-themed gathering that needs a little monster magic.

Ingredients You’ll Need
One thing I appreciate about this Monster Eyeball Sugar Cookies Recipe is how all the ingredients work together so harmoniously to create fun texture and flavor. Using a ready-made cookie mix means less fuss, and the colorful sugars paired with candy eyeballs bring that monster vibe to life. When you shop for these, try to grab good-quality sprinkles and candy eyes—they really make a difference!
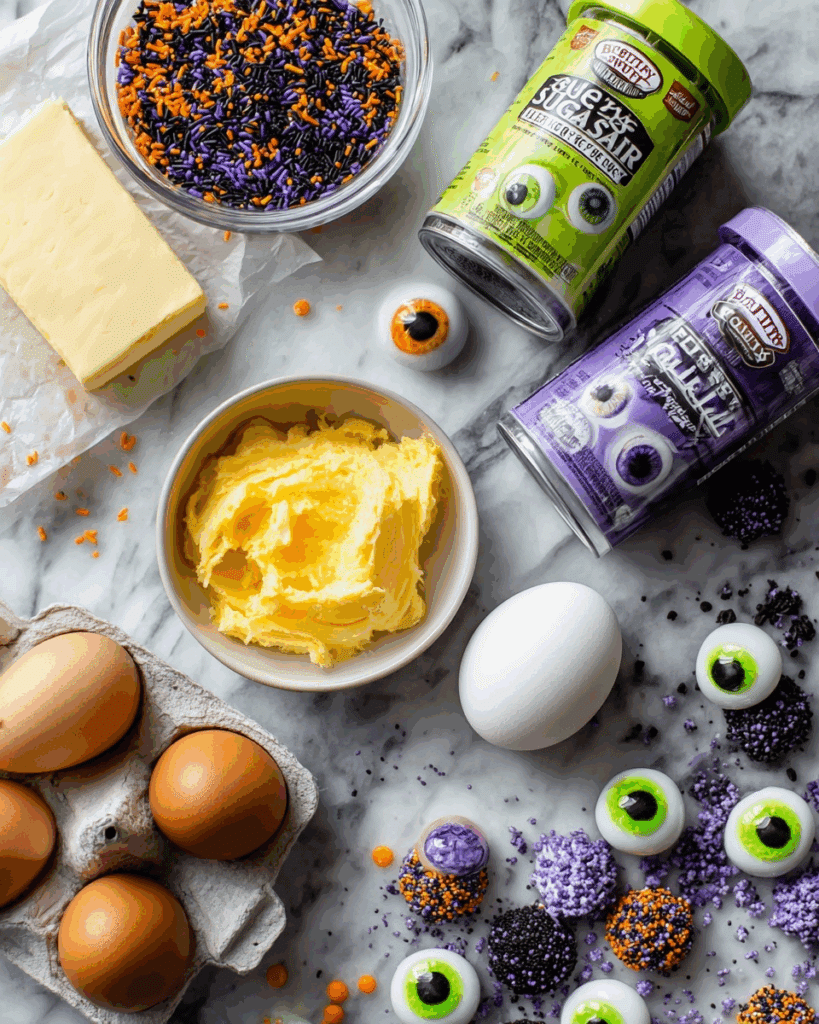
- Betty Crocker™ Sugar Cookie Mix: This mix gives you a consistently great dough without the guesswork.
- Butter: Use softened butter to blend smoothly into your dough for a tender cookie.
- Egg: Acts as a binding agent here; fresh is best for taste and texture.
- Betty Crocker™ Spooky Sprinkles: Adds a pop of festive color and a bit of crunch inside the dough.
- Colored Sugar (Black, Green, or Orange): This coats the cookie balls and gives that jewel-like sparkle on the outside.
- Betty Crocker™ Candy Eyeballs: The star of the show—stick these on fresh from the oven for a little monster personality.
Variations
I like to switch up the look and feel of these Monster Eyeball Sugar Cookies depending on the occasion. Feel free to play around with different colored sugars or sprinkles—my family is partial to the green sugar for that eerie monster vibe. Plus, you can easily make these dairy-free by swapping out the butter for a vegan alternative and using egg replacers. Whatever you choose, make it your own!
- Gluten-Free: Use a gluten-free sugar cookie mix; just make sure your candy decorations are GF too. I tried this once and the texture was just as soft and fun!
- Extra Spooky: Add red icing drizzle or edible “blood” gel around the eyeballs for a creepier effect.
- Mini Version: Shape smaller dough balls for bite-sized treats—perfect for party platters.
- Different Flavors: Mix in a teaspoon of almond or vanilla extract for a subtle flavor twist I discovered that my friends really love.
How to Make Monster Eyeball Sugar Cookies Recipe
Step 1: Whip Up the Dough
Start by preheating your oven to 375°F—this temperature ensures perfectly baked edges that have just a hint of golden crunch. In a medium bowl, stir together the sugar cookie mix, softened butter, and egg until a soft dough forms. Don’t rush this part; get everything well mixed but avoid overworking the dough to keep your cookies tender. Then add in a generous 1/4 cup of the spooky sprinkles for that hidden pop of color and sparkle. This little trick makes the cookies extra festive inside and out.
Step 2: Shape and Sugar-Coat
Now the fun really begins. Shape the dough into 36 balls about 1 1/4 inch in diameter. I like to keep a little bowl of colored sugar nearby to heavily roll each ball before placing it on the cookie sheet. Use black, green, or orange sugar to suit your spooky vibe. Make sure to space them about 2 inches apart because they’ll spread a bit during baking. A quick tip: discard any leftover colored sugar after rolling, so the coating stays bright and fresh.
Step 3: Bake and Add Eyeballs
Bake those beauties for 7 to 9 minutes, watching closely for the edges to turn a light golden brown. Here’s where patience pays off—pull them out too early, and they can be doughy; wait too long, and they get too crunchy. After baking, let them cool on the cookie sheet for just a minute, then carefully transfer them to a wire rack. While they’re still warm, press one candy eyeball right in the middle of each cookie. This helps the eye stick perfectly and keeps the spooky monster look intact. Let them cool completely before storing or serving.
Pro Tips for Making Monster Eyeball Sugar Cookies Recipe
- Soft Butter Makes a Difference: Always use butter softened at room temperature, never melted—that keeps your dough cohesive and your cookies tender.
- Don’t Skip the Roll in Sugar: Rolling the dough balls heavily in colored sugar ensures that gorgeous sparkle and extra crunch on the exterior.
- Press Eyes While Warm: Adding candy eyeballs immediately out of the oven helps them stick firmly while the cookie surface is still pliable.
- Use Parchment Paper: Baking on parchment prevents sticking and helps you tidy up without scrubbing the sheets.
How to Serve Monster Eyeball Sugar Cookies Recipe

Garnishes
Honestly, I keep the garnishes simple because the candy eyeballs do such a fantastic job stealing the spotlight. But sometimes, I like to add a light dusting of powdered sugar or a drizzle of white chocolate to give it a ghostly sheen—makes these treats stand out at our Halloween parties. If you’re feeling extra crafty, a little red gel icing around the eyeball gives a “bloody” effect that my kids get a kick out of.
Side Dishes
I love pairing these monster eyeball cookies with a glass of cold milk (the classic combo you can’t beat) or a warm cup of spiced apple cider. For parties, they look amazing alongside bowls of colorful candy corn or popcorn mixed with candy sprinkles for a sweet-and-salty contrast. These little cookies really amp up the fun on any dessert table.
Creative Ways to Present
One of my favorite ways to present these monster eye cookies is on a black or blood-red platter, with whipped cream “webs” pulled around the edges for a spooky atmosphere. I’ve also tried stacking them in cupcake liners like mini monsters with the eyes peeking out—such a hit with party-goers! If you want a unique twist, place a cookie on top of a cupcake to create creepy monster cupcake-cookie combos.
Make Ahead and Storage
Storing Leftovers
I usually keep leftovers in an airtight container at room temperature, and they stay fresh and soft for about 4-5 days. If you notice they’re getting a little stale, a quick 10-second zap in the microwave softens them back up. Just be sure not to cover them tightly with eyeballs on or the candy can get stuck to the container!
Freezing
Freezing the unbaked dough balls works great if you want to prepare ahead. I freeze them spaced out on a baking sheet first, then transfer to a freezer bag. When you’re ready, pop them in the oven straight from frozen—adding a minute or two to baking time. I’ve tried freezing fully baked cookies too; just be sure to add eyeballs after thawing to keep them looking fresh.
Reheating
Whenever I reheat leftover cookies, I place them on a baking sheet for 3-5 minutes at 300°F just to refresh the texture. This little trick makes the colored sugar sparkle again, and the cookie edges get delightfully crisp while the centers stay soft. Avoid reheating too long or at high temps to keep the candy eyeballs intact.
FAQs
-
Can I make Monster Eyeball Sugar Cookies without a cookie mix?
Absolutely! While this recipe uses a sugar cookie mix to keep things simple, you can use your favorite homemade sugar cookie recipe instead. Just make sure the dough is firm enough to roll into balls so the colored sugar sticks well and the cookies bake evenly.
-
How do I keep the candy eyeballs from melting in the oven?
The secret is to add the candy eyeballs right after baking, when the cookies have cooled for about a minute but are still warm. Pressing them in at this stage allows the candy to adhere without melting or losing shape. Avoid placing them on before baking.
-
Can I substitute the colored sugar with regular granulated sugar?
Yes, but using colored sugar really enhances the spooky look of these monster eyeball cookies. If you substitute with regular sugar, consider adding sprinkles or a dash of food coloring to recreate that fun colorful sparkle.
-
How should I store Monster Eyeball Sugar Cookies?
Store your baked and cooled cookies in an airtight container at room temperature for up to 5 days. Make sure they’re completely cooled before storing to prevent moisture buildup, which can make cookies soggy.
Final Thoughts
I seriously can’t recommend this Monster Eyeball Sugar Cookies Recipe enough if you want to sprinkle some fun into your baking routine. It’s quick, it’s creative, and it’s just downright charming. Plus, those candy eyeballs? They bring out everyone’s inner kid and spark a lot of smiles (and a little bit of harmless fright). So next time you want a spooky, sweet treat that’s fun to make and share, give this recipe a try—you might just find it becoming a beloved tradition in your kitchen like it did in mine!
Print
Monster Eyeball Sugar Cookies Recipe
- Prep Time: 15 minutes
- Cook Time: 9 minutes
- Total Time: 1 hour 15 minutes
- Yield: 36 cookies
- Category: Dessert
- Method: Baking
- Cuisine: American
Description
Delightfully spooky Monster Eyeball Sugar Cookies made with Betty Crocker Sugar Cookie Mix, decorated with colorful sugar and candy eyeballs for a fun Halloween treat. These crunchy-on-the-outside, soft-on-the-inside cookies are perfect for parties and festive celebrations.
Ingredients
Cookie Dough
- 1 pouch (17.5 oz) Betty Crocker™ Sugar Cookie Mix
- Butter and egg called for on cookie mix pouch (typically 1/2 cup softened butter and 1 egg)
- 1/4 cup from 1 container (1.70 oz) Betty Crocker™ Spooky Sprinkles
Decorations
- 1 container (2.25 oz) Betty Crocker™ Black Sugar, Green Sugar or Orange Sugar (about 1/3 cup)
- 1 package (0.88 oz) Betty Crocker™ Dessert Decorations Candy Eyeballs
Instructions
- Prepare the dough: Heat oven to 375°F. In a medium bowl, combine the sugar cookie mix, softened butter, and egg. Stir until a soft dough forms. Then fold in 1/4 cup of Betty Crocker™ Spooky Sprinkles to evenly disperse color and texture into the dough.
- Shape and coat cookies: Form the dough into 36 balls, each about 1 1/4 inches in diameter. Roll each ball heavily in the colored sugar (black, green, or orange) until completely coated. Place the sugar-coated dough balls 2 inches apart on ungreased cookie sheets to allow for spreading. Discard any leftover colored sugar after rolling.
- Bake: Bake the cookies in the preheated oven for 7 to 9 minutes or until the edges are light golden brown, indicating they are perfectly baked with a slight crunch.
- Cool and decorate: Let the cookies cool on the cookie sheets for 1 minute, then transfer them to a cooling rack. While still warm but cool enough to handle, immediately press one candy eyeball on top of each cookie to create the monster eyeball effect. Allow the cookies to cool completely for about 30 minutes so the decorations set firmly.
- Store: Once cooled, store the cookies covered at room temperature to maintain freshness and crispness for several days.
Notes
- Ensure the butter is softened to room temperature to help the dough come together smoothly.
- Do not grease the cookie sheets; the sugars help prevent sticking and create texture.
- Discarding excess colored sugar after rolling is important to avoid overly sweet or gritty cookies.
- Press candy eyeballs onto slightly warm cookies to ensure they stick well without melting.
- Cookies are best enjoyed within 3-4 days for optimal freshness.
Nutrition
- Serving Size: 1 cookie
- Calories: 110
- Sugar: 9g
- Sodium: 90mg
- Fat: 4g
- Saturated Fat: 2.5g
- Unsaturated Fat: 1.2g
- Trans Fat: 0g
- Carbohydrates: 16g
- Fiber: 0.3g
- Protein: 1g
- Cholesterol: 15mg


