
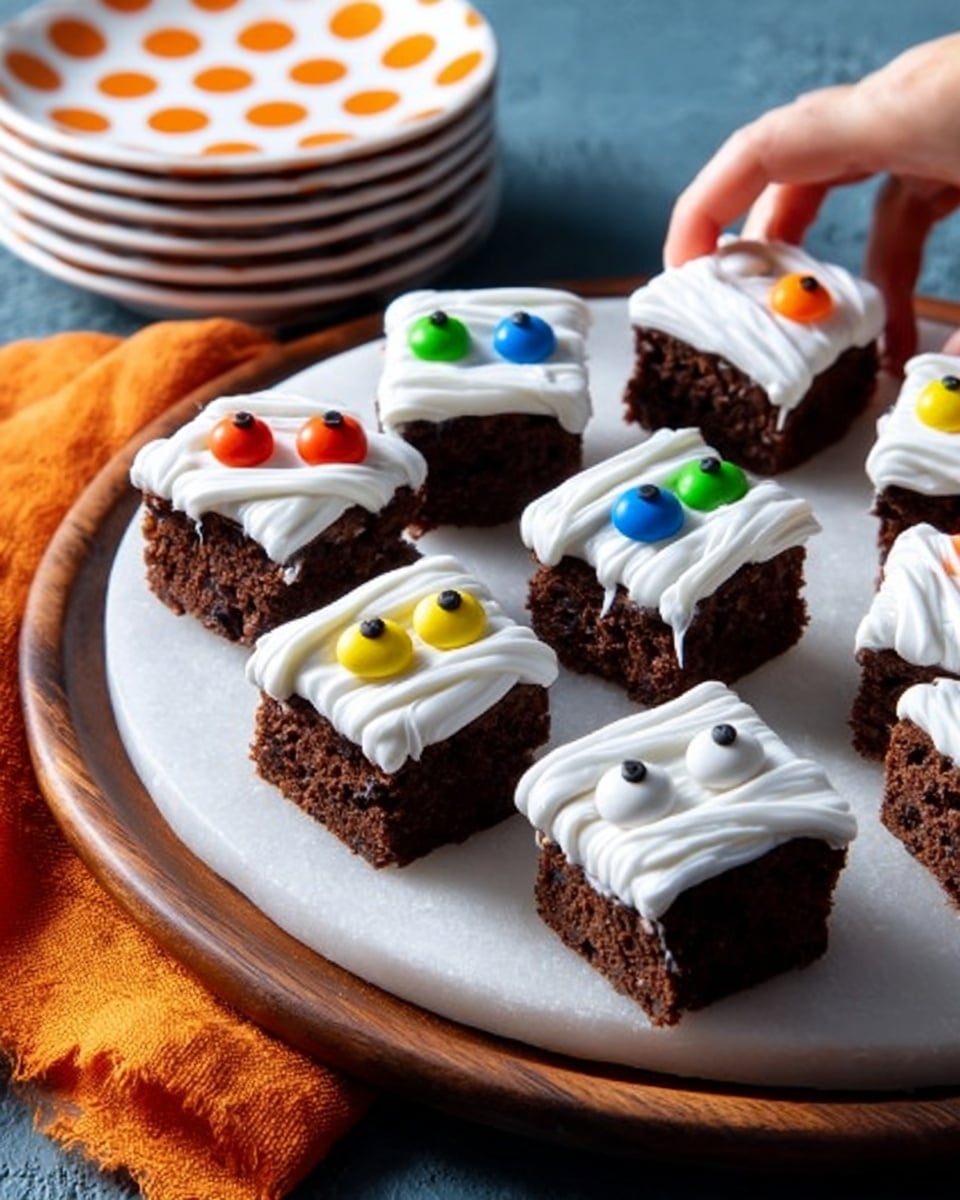
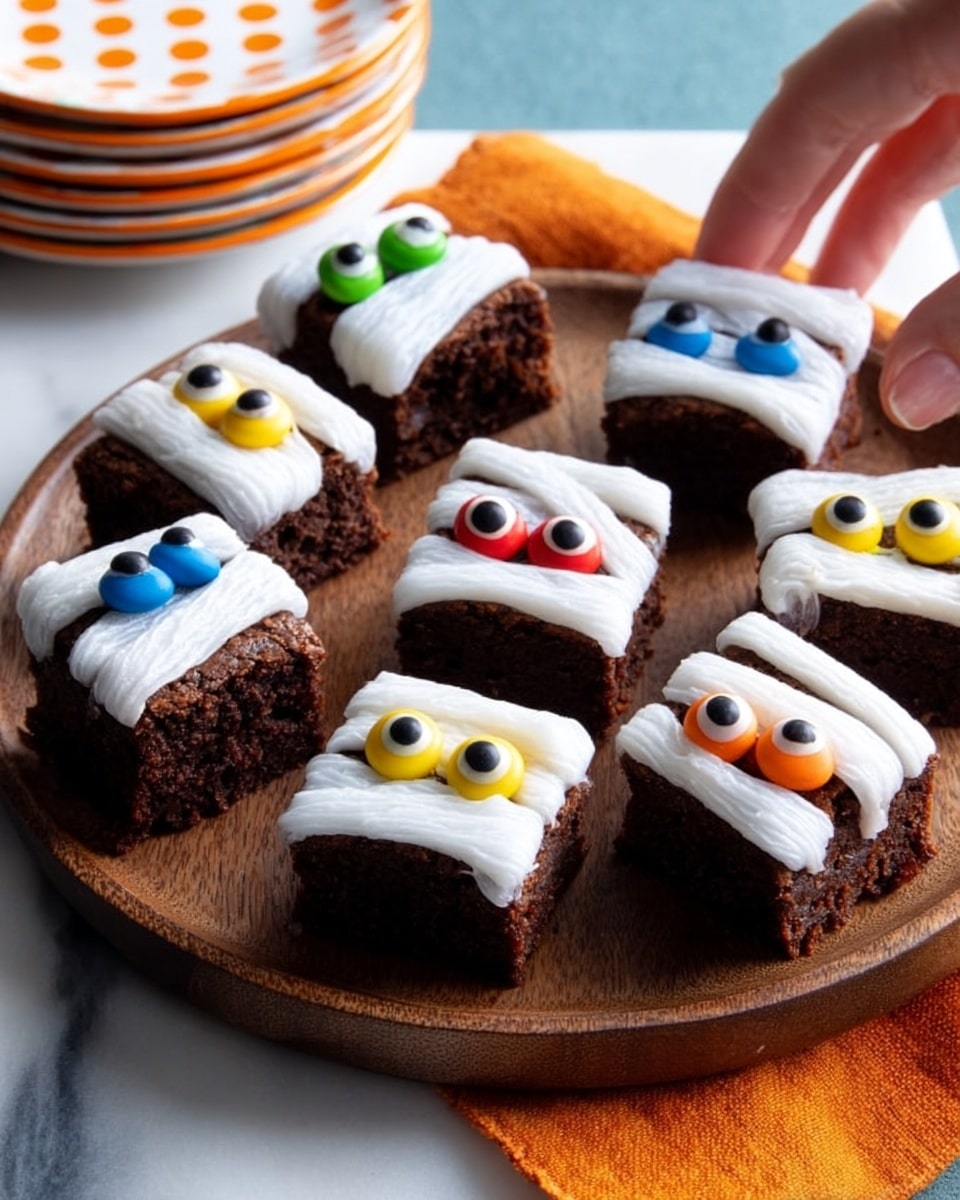
If you’re searching for a fun, festive dessert that will wow your family and friends, you’ve just found it. This Mummy Brownies Recipe is one of my absolute favorites because it’s not only deliciously fudgy but also super easy to dress up for Halloween or any spooky celebration. Trust me, once you make these, you’ll love how simple it is to turn a classic brownie into a crowd-pleasing, creepy-cute treat.
Why You’ll Love This Recipe
- Easy Halloween Fun: Transform simple brownies into festive mummies with minimal effort.
- Rich, Fudgy Flavor: The chocolate and butter combo creates that perfect dense texture I crave.
- Kid-Friendly Decorating: Using candy eyes and piped frosting is a fun activity to do with little helpers.
- Make-Ahead Convenience: These brownies hold up well for parties or school events—you can prep them a day ahead stress-free.

Ingredients You’ll Need
These ingredients come together to make the most decadent, fudgy brownies, while the simple frosting and candy eyes turn them into spooky mummies. I always suggest using good-quality unsweetened chocolate because it makes a big difference in flavor.
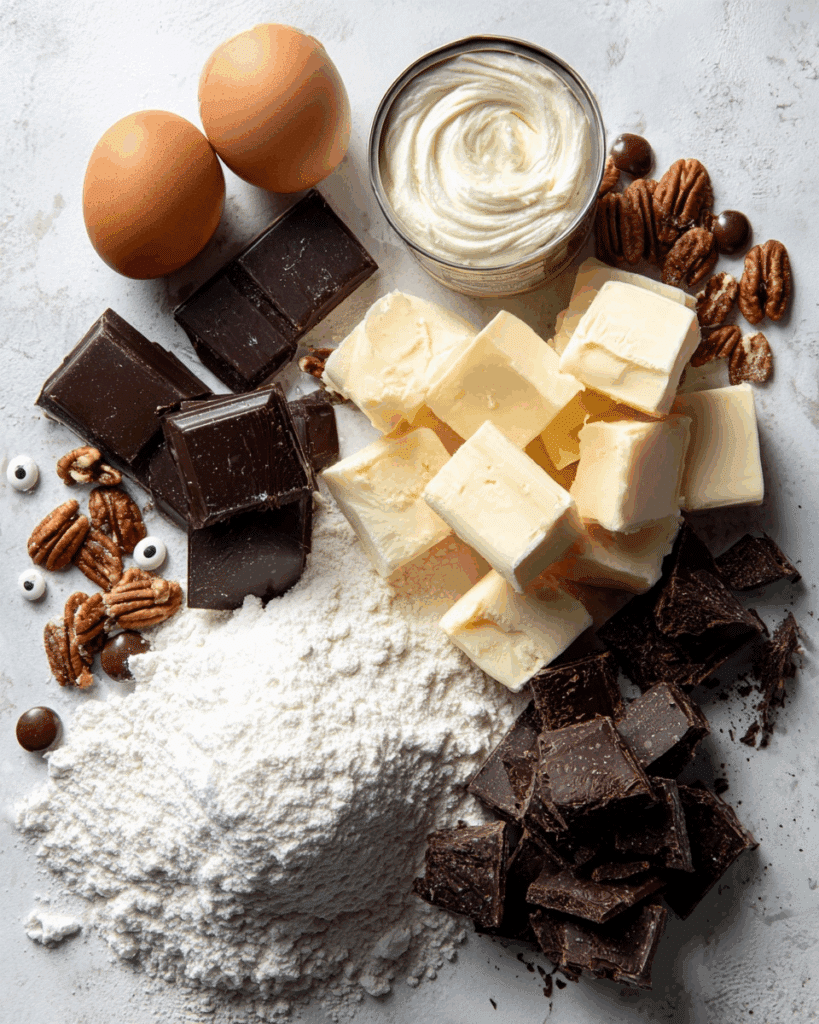
- Butter: Cubed butter melts evenly and helps you avoid lumps—trust me, it’s worth taking this step seriously.
- Unsweetened chocolate: Chopped is best—it melts smoothly without clumping.
- Eggs: Room temperature eggs blend better with sugar and chocolate for a luscious texture.
- Sugar: Regular granulated sugar sweetens perfectly without overpowering that chocolatey goodness.
- Vanilla extract: Just a teaspoon enhances all the flavors without being too obvious.
- All-purpose flour: Provides structure without making the brownies cakey.
- Salt: A tiny pinch balances the sweetness beautifully.
- Chopped pecans (optional): Adds a nice crunch, but only if you’re up for that extra texture.
- Vanilla frosting: Canned frosting works wonders for piping mummy bandages without any fuss.
- Candy eyes: The fun finishing touch that brings these brownies to life.
Variations
I love how adaptable this Mummy Brownies Recipe is. Depending on your mood or dietary needs, you can mix things up to keep it just right for your kitchen and crew.
- Nut-Free Version: Skip the pecans and maybe add chocolate chips instead—my nephew has allergies, and this change keeps everyone safe and just as happy.
- Spicy Kick: Add a pinch of cayenne or cinnamon to the batter for a subtle warmth—I discovered that surprise twist makes these brownies extra memorable.
- Vegan Swap: Use egg replacers and dairy-free chocolate with vegan frosting to make these mummy brownies accessible to all.
- Frosting Flavors: Try cream cheese frosting tinted with food coloring to match different themes; I once did green “alien” brownies using this trick!
How to Make Mummy Brownies Recipe
Step 1: Melt and Mix Your Chocolate Base
Start by preheating your oven to 350°F and lining two 8-inch square pans with foil—make sure the foil edges extend beyond the pans for easy brownie removal later. Melt the cubed butter and chopped unsweetened chocolate together in the microwave, stirring every 30 seconds until smooth and glossy. I’ve found letting it cool just a bit before adding it to eggs keeps things from cooking the eggs prematurely, so don’t skip that part!
Step 2: Beat Eggs and Sugar, Then Combine
In a large bowl, beat the room temperature eggs with sugar until well combined and a tiny bit frothy—that little airiness helps the brownies stay moist yet tender. Stir in vanilla extract and then gently fold your cooled chocolate mixture into the eggs. This marriage of temperature and texture is what gives these brownies their perfect fudgy bite.
Step 3: Add Flour, Salt, and Pecans (Optional)
Mix the flour and salt in a separate bowl, then gradually add this to your chocolate mixture. Avoid over-mixing here—stir just until combined to keep your brownies delightfully dense instead of cakey. If you’re adding pecans for that extra crunch, now’s the time to fold them in gently.
Step 4: Bake Until Perfectly Set
Divide the batter evenly between your prepared pans and smooth the tops with a spatula. Bake for 35 to 40 minutes, checking for doneness by inserting a toothpick into the center—it should come out mostly clean but with a few moist crumbs. I learned that baking just until this point keeps the brownies chewy and not dry, so trust this test rather than the clock alone.
Step 5: Cool and Decorate Your Mummies
Allow the brownies to cool completely in the pans on a wire rack—this is key for neat frosting. Once cool, use the foil edges to lift the brownies out easily. Cut into bars, then use a piping bag with a No. 46 pastry tip to pipe thin lines of vanilla frosting across each bar for a bandage effect. Finally, press candy eyes onto the frosting to bring your mummy brownies to life. My kids think this part is the most fun, and it turns the baking day into a mini party!
Pro Tips for Making Mummy Brownies Recipe
- Use Room Temperature Eggs: This helps the eggs blend smoothly with sugar and chocolate, avoiding a grainy batter.
- Don’t Overbake: I learned early on that baking even a few minutes too long drys these brownies out—trust the toothpick test, not just the timer.
- Cooling is Key: Frosting on warm brownies slides right off—cool completely to get neat mummy bandages.
- Easy Cleanup Trick: Using foil in the pans means you can lift the whole batch out easily, and cleanup is way faster.
How to Serve Mummy Brownies Recipe
Garnishes
While candy eyes are the classic and cutest touch, I sometimes add a sprinkle of edible glitter or colored sugar on the frosting to catch the light and make the brownies sparkle at parties. If you want a twist, mini gummy worms peeking out from under the “bandages” add an extra creepy factor kids adore.
Side Dishes
These mummy brownies are sweet and rich, so I like pairing them with fresh fruit like raspberries or orange slices to balance flavors. For a cozy Halloween gathering, a scoop of vanilla ice cream or a dollop of whipped cream makes a lovely companion.
Creative Ways to Present
For parties, I’ve laid out the mummy brownies on black plates with faux spider webs in the background—trust me, it gives a spooky vibe that guests love. Another fun idea is to serve them in mini cupcake liners to make individual mummy treats easy for little hands at school events or potlucks.
Make Ahead and Storage
Storing Leftovers
Once decorated, keep your mummy brownies covered at room temperature in an airtight container. I usually finish mine within a couple of days, but they can last up to 3 days without drying out if stored properly. Keeping them in one layer prevents frosting smudging.
Freezing
If you want to prepare these ahead for a big event, you can bake and cool brownies without frosting, then freeze in an airtight container or wrapped tightly in foil and plastic wrap. When ready, thaw overnight in the fridge before decorating. This trick saved me multiple times when life got crazy!
Reheating
Since these brownies are best served at room temperature or slightly chilled, I recommend skipping reheating once frosted. If you have unfrosted leftover brownies, a quick 10-15 second zap in the microwave revives that gooey texture wonderfully.
FAQs
-
Can I use store-bought brownies for the Mummy Brownies Recipe?
Absolutely! While I love making these from scratch for the rich flavor and texture, you can definitely use store-bought brownies. Just be sure they’re fully cooled before decorating with frosting and candy eyes for the best look and taste.
-
What’s the best way to pipe the frosting to create the mummy look?
I use a piping bag fitted with a small round tip (like a No. 46) to pipe thin, slightly overlapping lines back and forth across each brownie bar. It’s okay if the lines aren’t perfect—that’s part of the mummy charm! Take your time and pipe lightly for a delicate look.
-
Can I prepare these brownies a day ahead?
Yes! I recommend baking and cooling the brownies a day before, then decorating them right before serving. This keeps the frosting fresh and prevents smudging if you need to transport them.
-
Are pecans necessary for this recipe?
Pecans add a lovely crunch, but they’re totally optional. If you or your guests prefer nut-free treats, just skip them or swap in chocolate chips for a different texture.
-
What if I don’t have candy eyes?
No worries! You could use small dots of black icing, chocolate chips, or even tiny marshmallows with dots of melted chocolate for pupils. The goal is to get that playful mummy look, so get creative!
Final Thoughts
I absolutely love how this Mummy Brownies Recipe combines classic homemade brownies with just the right amount of Halloween whimsy. It’s become a tradition in my house each year, and I’m always amazed at how much joy those little candy eyes and swirly frosting bandages bring. If you want a dessert that’s as fun to make as it is to eat, give this recipe a try—you’ll end up with smiles, happy tummies, and a kitchen filled with festive spirit. I can’t wait for you to try it and share your own decorating twists!
Print
Mummy Brownies Recipe
- Prep Time: 15 minutes
- Cook Time: 35 minutes
- Total Time: 50 minutes
- Yield: 32 brownies
- Category: Dessert
- Method: Baking
- Cuisine: American
Description
These spooky Mummy Brownies are a fun and festive treat perfect for Halloween parties. Rich, fudgy brownies are topped with creamy vanilla frosting piped to look like mummy bandages, complete with candy eyes for an adorable and eerie effect. With a mix of chocolate, pecans, and smooth frosting, these brownies delight both kids and adults alike.
Ingredients
Brownies
- 1/2 cup butter, cubed
- 4 ounces unsweetened chocolate, chopped
- 4 large eggs, room temperature
- 2 cups sugar
- 1 teaspoon vanilla extract
- 1/2 cup all-purpose flour
- 1/2 teaspoon salt
- 2 cups chopped pecans (optional)
Decoration
- 2 cans (16 ounces each) vanilla frosting
- Candy eyes
Instructions
- Prepare oven and pans: Preheat the oven to 350°F. Line two 8-inch square baking pans with foil, extending the ends up the sides for easy removal, then grease the foil thoroughly to prevent sticking.
- Melt butter and chocolate: In the microwave, melt the cubed butter and chopped unsweetened chocolate together, stirring frequently until the mixture is smooth and fully combined. Allow to cool slightly so it won’t cook the eggs in the next step.
- Mix wet ingredients: In a large bowl, beat the eggs and sugar together until well combined and slightly thickened. Stir in the vanilla extract and the melted chocolate mixture until smooth.
- Combine dry ingredients: In a separate bowl, whisk together the all-purpose flour and salt. Gradually add this dry mixture into the chocolate batter, mixing thoroughly but gently to avoid overmixing.
- Add pecans: If using, fold in the chopped pecans evenly throughout the batter for added texture and flavor.
- Bake the brownies: Spread the brownie batter evenly into the prepared pans. Bake in the preheated oven for 35 to 40 minutes or until a toothpick inserted in the center comes out clean or with just a few moist crumbs.
- Cool the brownies: Once baked, place the pans on a wire rack and allow the brownies to cool completely in the pans. This ensures they set properly and retain moisture.
- Remove brownies from pans: Use the foil overhang to lift the brownies out of the pans carefully. Place on a cutting board and slice into bars of desired size, typically 32 pieces from both pans combined.
- Frost the brownies: Using a piping bag fitted with a No. 46 pastry tip, pipe the vanilla frosting over each brownie bar to resemble mummy bandages with overlapping lines.
- Decorate with candy eyes: Place candy eyes on each frosted brownie to complete the mummy look, making sure they adhere well to the frosting.
Notes
- For best results, use room temperature eggs to ensure proper mixing and texture.
- The pecans are optional but add a nice crunch; you can substitute with walnuts or omit nuts entirely for a nut-free version.
- The No. 46 pastry tip creates thick, defined frosting lines; if unavailable, use a similar round tip or spread with a knife for a less detailed finish.
- Store brownies in an airtight container at room temperature for up to 3 days or refrigerate to prolong freshness.
- To soften frosting slightly for easier piping, warm cans in warm water briefly before opening.
Nutrition
- Serving Size: 1 brownie
- Calories: 220
- Sugar: 19 g
- Sodium: 110 mg
- Fat: 13 g
- Saturated Fat: 6 g
- Unsaturated Fat: 5 g
- Trans Fat: 0 g
- Carbohydrates: 26 g
- Fiber: 2 g
- Protein: 3 g
- Cholesterol: 55 mg


