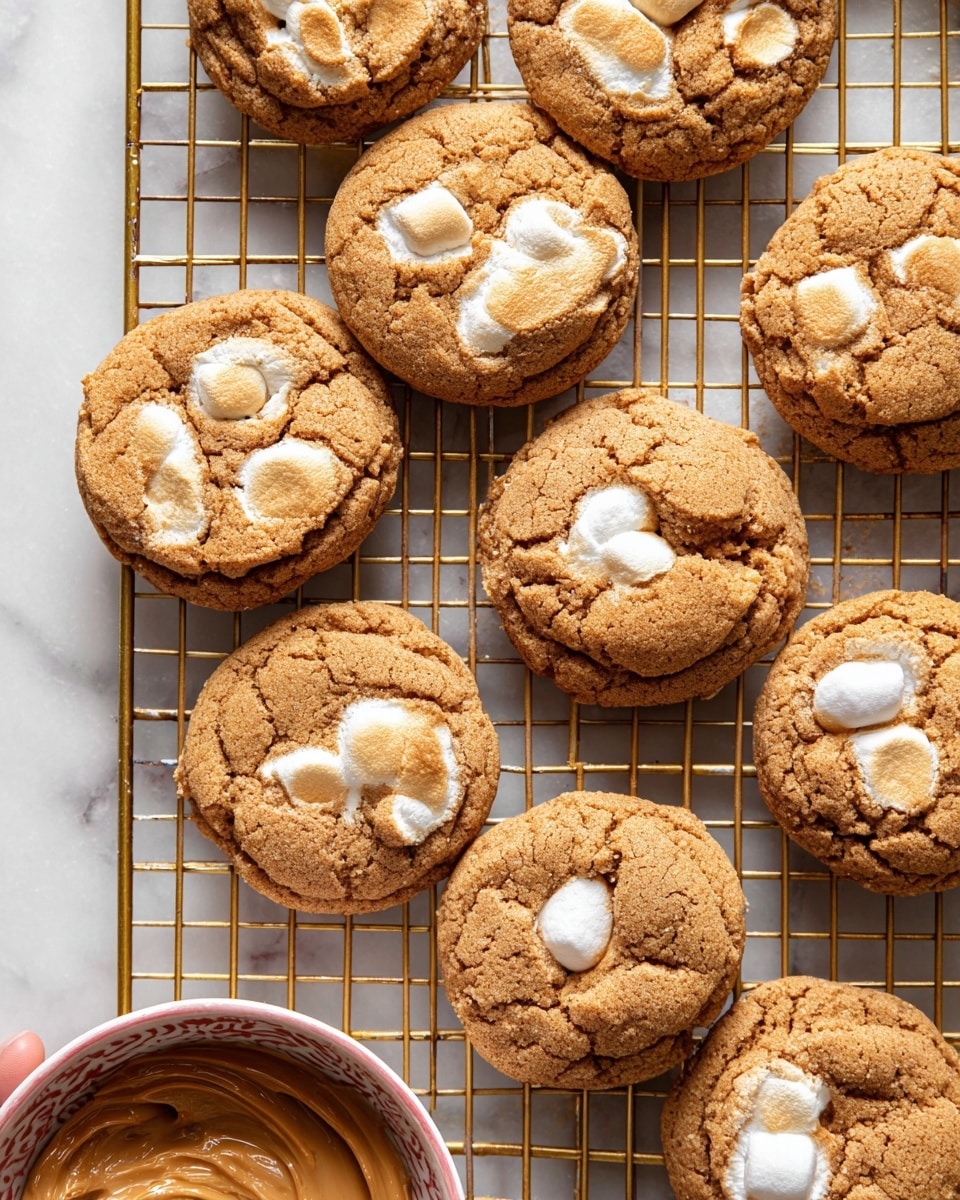
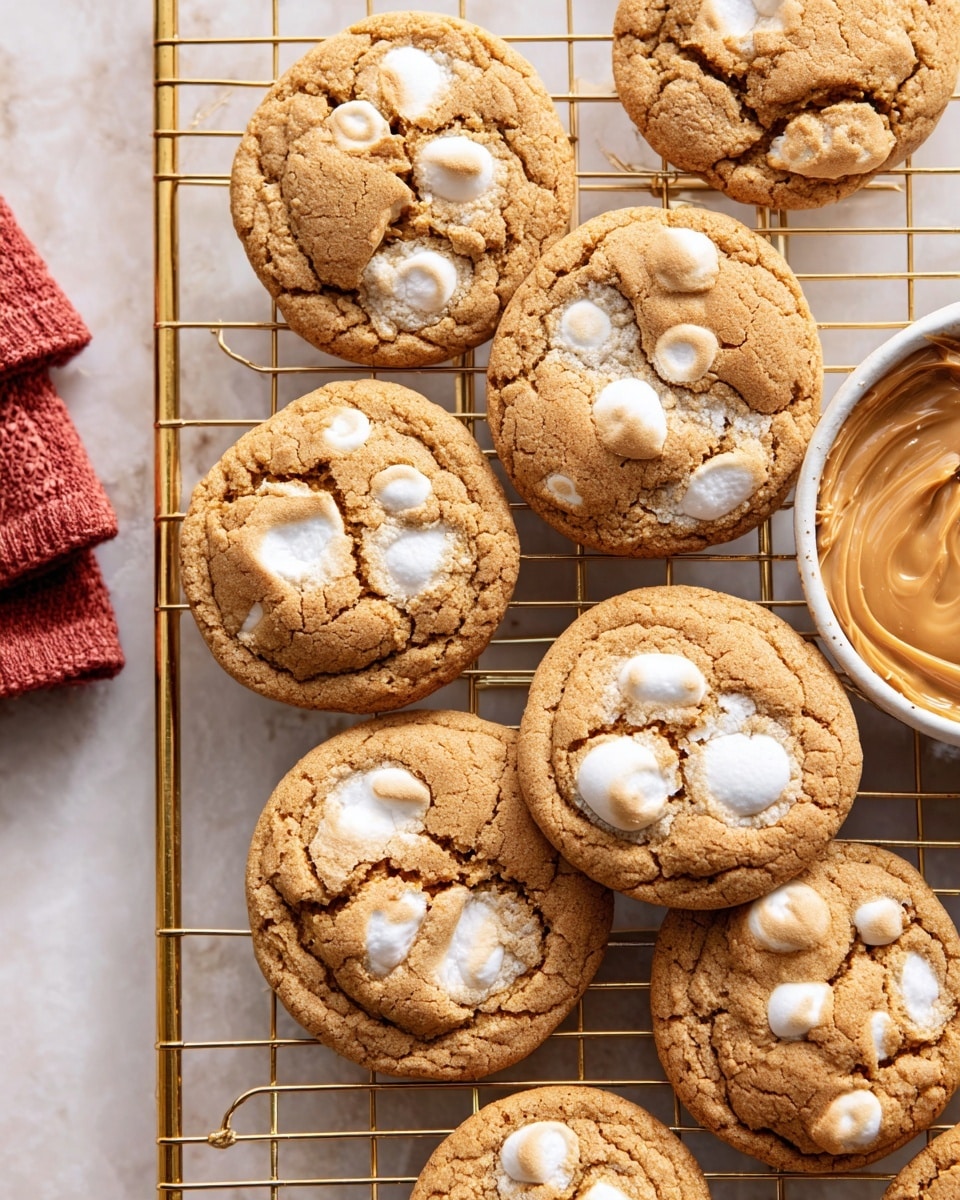
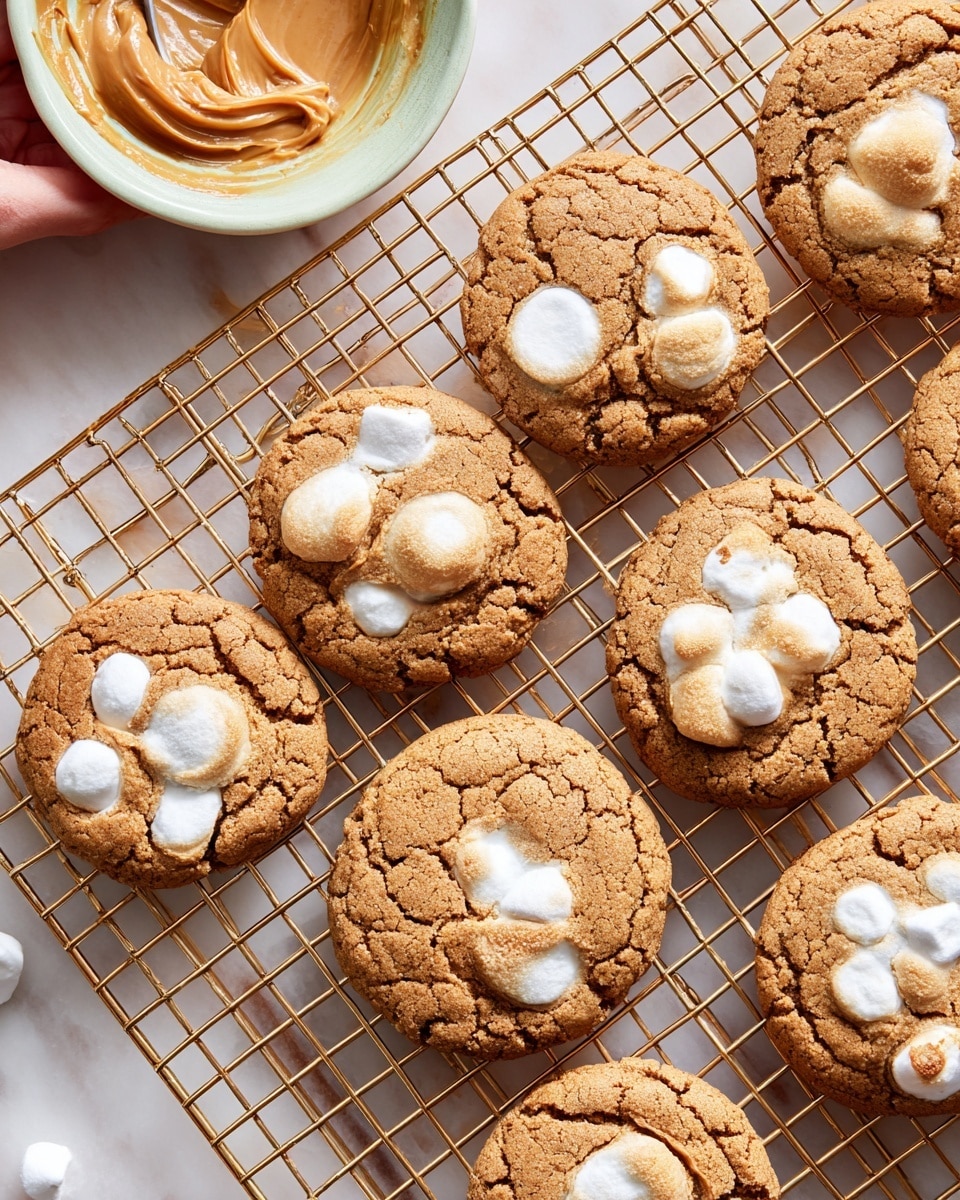
Oh, I just have to tell you about My Favorite Gluten-Free Peanut Butter Marshmallow Cookies Recipe—these are an absolute game-changer if you love a soft, chewy cookie with that perfect peanut butter flavor and gooey marshmallow surprises inside. When I first tried making these, I was amazed at how well the marshmallows stayed soft and melty, giving every bite a fun, comforting vibe that’s hard to beat.
You’ll find that this cookie is just right for everything from afternoon snacks to sharing at parties, and because it’s gluten-free, it fits perfectly for anyone avoiding gluten without sacrificing all those classic cookie comforts. Honestly, I love them best when fresh out of the oven, but they keep well enough to enjoy all week long.
Why You’ll Love This Recipe
- Gluten-Free with No Compromise: You get all the rich peanut butter flavor and chewy texture without gluten.
- Marshmallow Magic: Freezing the mini marshmallows keeps them soft and melty inside the cookie—no sticky mess!
- Simple Ingredients: Easy to find pantry staples make this recipe approachable for any home baker.
- Perfectly Portionable: Using a cookie scoop helps you make evenly sized cookies that bake consistently every time.
Ingredients You’ll Need
These ingredients work beautifully together to give you a cookie that’s soft, chewy, and bursting with peanut butter goodness and marshmallow softness. Buying gluten-free flour blends labeled for baking will help you nail the texture perfectly.
- Gluten-Free Flour: Use a blend designed for baking to ensure your cookies come out soft and tender—if you’re not gluten-free, all-purpose flour works just fine.
- Baking Soda: This gives your cookies a nice lift and helps them get that classic cookie crumb.
- Sea Salt: Just a pinch to balance sweetness and bring out that peanut butter flavor.
- Unsalted Butter: Softened butter creates rich flavor and contributes to the chewy texture.
- Granulated Sugar: Adds crunch and sweetness; I love pairing it with brown sugar for depth.
- Brown Sugar: Packed tightly, it brings moistness and a subtle caramel note.
- Creamy Peanut Butter: For that unmistakable peanut butter taste—skip the crunchy here to keep the cookie smooth.
- Egg: The binder that pulls everything together and adds richness.
- Vanilla Extract: A vanilla boost makes the flavors pop.
- Mini Marshmallows: Frozen to keep them from melting into the dough before baking, creating those little pockets of gooey delight.
Variations
I love putting my own little spin on this recipe depending on mood and occasion, and I encourage you to get creative too! Whether it’s swapping out peanut butter or playing with add-ins, these cookies are a great canvas.
- Nut Butter Swap: My friend who can’t do peanuts swears by almond butter here; it changes the flavor but keeps that creamy texture perfectly.
- Chocolate Chips: Adding a handful of dairy-free chocolate chips took these cookies to a whole new level—my family went crazy for them!
- Salted Topping: Sprinkle a tiny bit of flaky sea salt on top before baking for a salty-sweet twist that I adore.
- Mini Marshmallow Variations: You can try using regular-sized marshmallows chopped up, but I find the mini ones freeze and blend better in the dough.
How to Make My Favorite Gluten-Free Peanut Butter Marshmallow Cookies Recipe
Step 1: Freeze the Mini Marshmallows
This is the trick that makes all the difference. Toss your mini marshmallows into an airtight container and pop them in the freezer for at least a few hours before you bake. I discovered this method after my first attempts where the marshmallows melted right into the dough, leaving me with one big gooey mess instead of individual pockets of sweetness.
Step 2: Mix Dry Ingredients
While the marshmallows chill, whisk together your gluten-free flour, baking soda, and sea salt in a medium bowl. This combo gives your cookies the perfect rise and flavor balance. Setting this aside now makes mixing the wet ingredients smoother later on.
Step 3: Cream Butter and Sugars
In a larger bowl, whisk together softened butter, granulated sugar, and brown sugar using a hand mixer until the texture is light and fluffy—this usually takes 2-3 minutes. This step is important because it incorporates air that contributes to the cookie’s tender crumb.
Step 4: Add Wet Ingredients
Next, blend in the peanut butter, egg, and vanilla extract until everything is fully combined. The peanut butter should be creamy and well-mixed for an even flavor throughout your batter.
Step 5: Fold in the Frozen Mini Marshmallows
Grab those cold marshmallows from the freezer and fold them into your wet ingredients quickly—do this step just before mixing in the dry ingredients so the marshmallows stay firm and don’t melt into the dough.
Step 6: Combine Dry and Wet Ingredients
Add the flour mixture into the peanut butter batter and stir just until you get a well-formed dough. Be careful not to overmix here; gentle folding preserves that tender cookie texture.
Step 7: Scoop and Prepare for Baking
Line a baking sheet with parchment paper, then use a large cookie scoop (about 2-3 tablespoons) to portion out your dough into balls spaced about 1-2 inches apart. If you don’t have a scoop, a spoon works just fine—you just want uniform sizes so they bake evenly.
Step 8: Bake and Cool
Bake at 350°F for 10-11 minutes, just until the edges turn golden and the centers look set but still soft. Let the cookies cool on the sheet for 10 minutes before transferring—they’ll finish baking and firming up while cooling, giving you perfectly chewy cookies every time.
Pro Tips for Making My Favorite Gluten-Free Peanut Butter Marshmallow Cookies Recipe
- Freeze Those Marshmallows: Don’t skip this—we learned it’s the key to getting soft, melty pockets inside each cookie.
- Don’t Overmix: Mix the dry ingredients into the wet just until combined to keep your cookies tender.
- Use a Cookie Scoop: It helps with even baking and gives your cookies that bakery look without the fuss.
- Cool on the Baking Sheet: Letting cookies cool on the sheet allows carryover heat to finish baking gently, giving you that soft center.
How to Serve My Favorite Gluten-Free Peanut Butter Marshmallow Cookies Recipe
Garnishes
I usually keep it simple and sprinkle a tiny pinch of flaky sea salt on top before baking for a salty-sweet contrast I love. For a festive touch, sometimes I add a little powdered sugar dusting—especially around the holidays—it adds charm without extra fuss.
Side Dishes
These cookies pair beautifully with a classic cold glass of milk (or almond milk if you prefer). I also like serving them alongside fresh fruit or a scoop of dairy-free vanilla ice cream for an indulgent dessert experience.
Creative Ways to Present
For parties, I’ve arranged these cookies on a tiered tray with little bowls of extra mini marshmallows and peanut butter cups for guests to customize their treats. Wrapping them in clear cellophane with a festive ribbon also makes sweet gift-ready packages.
Make Ahead and Storage
Storing Leftovers
I store leftovers in an airtight container in the fridge; they stay soft and delicious for up to a week. Just bring them to room temperature before serving, or warm slightly in the microwave to bring back that fresh-baked feel.
Freezing
These cookies freeze surprisingly well. I pop them into a freezer-safe container lined with parchment paper between layers and pull out individual cookies whenever I want a treat. Just thaw at room temperature or warm in the microwave for 10-15 seconds for that fresh-baked softness.
Reheating
To reheat, I microwave a cookie for about 10 seconds, which softens the marshmallow pockets wonderfully without making the cookie too hot or crumbly. Oven reheating works too—wrap cookies in foil and warm at 300°F for 5 minutes to revive softness evenly.
FAQs
-
Can I make these cookies without peanut butter?
Absolutely! You can substitute almond butter, cashew butter, or even sunflower seed butter, depending on your preference or allergies. Each swap changes the flavor slightly but still yields a deliciously chewy cookie with marshmallow pockets.
-
Why do I need to freeze the mini marshmallows?
Freezing the mini marshmallows prevents them from melting too soon when mixed into the dough, preserving soft, gooey pockets inside your cookies rather than having the marshmallows dissolve entirely.
-
Can I make this recipe vegan?
Yes! Swap butter for a vegan alternative and use a flax egg (1 tablespoon flaxseed meal + 3 tablespoons water, mixed and rested) instead of the egg. Be sure to check your marshmallows as many brands are not vegan; look specifically for vegan mini marshmallows.
-
How do I know when the cookies are done baking?
Look for edges that are lightly golden and centers that appear set but still soft and slightly underbaked — the cooling time lets them finish baking gently for that perfect chewy texture.
Final Thoughts
Honestly, My Favorite Gluten-Free Peanut Butter Marshmallow Cookies Recipe holds a special place in my kitchen because it proves you don’t need gluten or complicated ingredients to make a cookie that feels indulgent and comforting. I hope you try making these soon—they’re easy, fun, and sure to become a cherished standby in your baking rotation just like they are in mine. Happy baking!
Print
My Favorite Gluten-Free Peanut Butter Marshmallow Cookies Recipe
- Prep Time: 15 minutes
- Cook Time: 11 minutes
- Total Time: 26 minutes
- Yield: 16 Cookies
- Category: Dessert
- Method: Baking
- Cuisine: American
- Diet: Gluten Free
Description
Delight in these gluten-free peanut butter marshmallow cookies that combine the rich creaminess of peanut butter with soft, melty mini marshmallows. Perfectly chewy and sweet, these cookies are an irresistible treat for any occasion, especially for those seeking a gluten-free dessert option.
Ingredients
Dry Ingredients
- 1 ¼ Cup Gluten-Free Flour (can substitute all-purpose flour)
- 1 Teaspoon Baking Soda
- ½ Teaspoon Sea Salt
Wet Ingredients
- ½ Cup Unsalted Butter, softened
- ½ Cup Granulated Sugar
- ¾ Cup Brown Sugar, packed
- ¾ Cup Creamy Peanut Butter
- 1 Large Egg
- 2 Teaspoons Vanilla Extract
Add-ins
- 1 ¼ Cups Mini Marshmallows, frozen
Instructions
- Freeze the Marshmallows: Place mini marshmallows into an airtight container and freeze for a few hours prior to baking to prevent excessive melting during baking.
- Preheat the Oven: Heat your oven to 350°F (175°C) so it’s ready for baking once the dough is prepared.
- Mix Dry Ingredients: In a medium bowl, whisk together gluten-free flour, baking soda, and sea salt to evenly distribute the leavening and seasoning throughout the dough.
- Cream Butter and Sugars: In a larger bowl, use a hand mixer to beat the softened butter, granulated sugar, and brown sugar until creamy and fully combined.
- Add Peanut Butter, Egg, and Vanilla: Add peanut butter, egg, and vanilla extract to the creamed mixture. Mix thoroughly until smooth and homogeneous.
- Fold in Frozen Marshmallows: Quickly fold the frozen mini marshmallows into the wet batter to prevent them from defrosting and melting prematurely.
- Combine Wet and Dry Mixtures: Gradually add the flour mixture into the wet ingredients and mix until a uniform cookie dough forms.
- Prepare Baking Sheet: Line a baking sheet with parchment paper for easy removal and cleanup.
- Scoop the Dough: Using a large cookie scoop (about 2-3 tablespoons), scoop balls of dough onto the prepared sheet, spacing them 1-2 inches apart to allow for spreading.
- Bake: Bake in the preheated oven for 10-11 minutes until the edges are set and lightly golden.
- Cool: Remove from oven and let the cookies cool on the baking sheet for 10 minutes to finish cooking and firm up.
- Serve and Store: Enjoy immediately or store leftovers in an airtight container in the refrigerator for up to one week.
Notes
- Freezing the marshmallows prevents them from melting too much while baking, retaining their shape and texture.
- You can substitute gluten-free flour with all-purpose flour if gluten is not a concern.
- Be sure to space the cookie dough balls properly to prevent them from sticking together during baking.
- Storing cookies in the fridge helps keep the marshmallows fresh and chewy.
- Use a cookie scoop for consistent cookie sizes and even baking.
Nutrition
- Serving Size: 1 cookie
- Calories: 180
- Sugar: 14g
- Sodium: 160mg
- Fat: 10g
- Saturated Fat: 4g
- Unsaturated Fat: 5g
- Trans Fat: 0g
- Carbohydrates: 18g
- Fiber: 1g
- Protein: 4g
- Cholesterol: 30mg

