

If you’re looking for a bread that’s both impressively rustic and wonderfully easy to make, this No-Knead Cranberry Walnut Bread Recipe is going to wow you. I absolutely love how the tart cranberries and crunchy walnuts balance perfectly against the hint of orange zest, all in a bread that requires zero kneading but delivers artisanal results. If you’ve ever been intimidated by homemade bread, trust me—this recipe is your new best friend.
Why You’ll Love This Recipe
- Effortless Baking: No kneading means you just mix, rest, and bake—perfect for busy folks or beginner bakers.
- Flavorful & Festive: The blend of cranberries, walnuts, honey, and orange zest turns simple bread into a celebration.
- Artisan Quality at Home: Baking in a Dutch oven creates a crisp crust and tender crumb rivaling bakery loaves.
- Flexible and Timely: The 18-hour rise fits into your schedule, and the results keep your kitchen smelling amazing.

Ingredients You’ll Need
The magic of this No-Knead Cranberry Walnut Bread Recipe starts with wholesome ingredients that bring wonderful texture and flavor together. I always look for good-quality dried cranberries and fresh walnuts because they really shine here, and using bread flour ensures the perfect chewy crumb.

- Active dry yeast: Vital for that slow fermentation that gives the bread its wonderful rise and flavor depth.
- Warm water: Needs to be about 110 to 115°F to activate the yeast without killing it.
- Granulated sugar: Feeds the yeast and adds a subtle sweetness that complements the cranberries.
- Kosher salt: Balances sweetness and enhances the overall flavor.
- Bread flour: Higher protein content means better gluten development for a great structure.
- Dried cranberries: Adds tart bursts that pair wonderfully with the walnuts.
- Dried walnuts: Roughly chopped for a crunchy texture contrast.
- Honey: Adds natural sweetness and helps create a tender crumb.
- Orange zest: Brightens the flavor with a fresh citrus note that I always find irresistible.
Variations
I love to mix things up with this No-Knead Cranberry Walnut Bread Recipe depending on the season or my mood. The base dough is so forgiving, it invites creativity without risk of disaster.
- Swap Nuts: Pecans or hazelnuts work beautifully if you want a different nuttiness; pecans give a buttery vibe that my family adores.
- Fresh Fruit Twist: Try adding fresh or frozen blueberries instead of cranberries for a juicy burst, though be mindful that this may make the dough slightly wetter.
- Gluten-Free Alternative: Using a gluten-free all-purpose flour blend works, but expect a denser crumb and shorter rise time.
- Spice it Up: A sprinkle of cinnamon or nutmeg can turn this bread into a cozy fall treat—one I add when the holidays roll around.
How to Make No-Knead Cranberry Walnut Bread Recipe
Step 1: Activate Your Yeast and Mix the Dough
Start by dissolving your yeast and sugar in the warm water. This is where you want to be patient—wait until the mixture gets foamy, about 10 minutes, which signals your yeast is alive and ready to work its magic. If you don’t see foam, discard and start fresh. While your yeast is blooming, whisk the bread flour and salt in a large bowl. Once ready, add the yeast mixture and honey. Stir gently but thoroughly until there aren’t any pockets of dry flour. This dough is meant to be wet and sticky, so don’t panic—that’s exactly how it should be.
Step 2: Add Your Cranberries, Walnuts, and Zest
Fold in the dried cranberries, chopped walnuts, and orange zest just until combined. I like to do this by hand with a sturdy spoon or spatula. The dough will feel luscious and really sticky. Now cover the bowl tightly with plastic wrap—don’t let it touch the dough—and let it hang out at room temperature on your counter for about 18 hours. This slow rise is what builds flavor and texture, so set a timer and try not to peek too much.
Step 3: Shape Your Dough Gently
After the long wait, your dough will have risen and be even wetter—don’t punch it down! Instead, generously flour your countertop and hands. Carefully pull the dough out, turning it to coat with flour, and gently fold the edges toward the center to form a round loaf. This is a delicate step; you want to keep those lovely air bubbles intact for that perfect crumb. Place your dough seam side down on a lightly floured sheet of parchment paper and cover loosely with plastic wrap. Let it rest for another 30 minutes while you preheat your oven.
Step 4: Preheat Your Dutch Oven and Score the Loaf
Place your Dutch oven with its lid inside your oven and preheat to 450°F for 30 minutes. When ready, use a sharp knife or razor blade to score an “X” or your favorite pattern on the top of the dough—this lets the bread expand gracefully as it bakes. Just a quick, confident slash works best.
Step 5: Bake to Golden Perfection
Carefully lift the parchment paper with the dough and transfer it into the hot Dutch oven. Immediately cover with the lid and bake for 30 minutes to trap steam, which is key for that crispy crust. Resist opening the lid during this time! After 30 minutes, remove the lid and bake an additional 8 to 10 minutes until the crust turns a gorgeous golden brown. Remove the pot from the oven, use the parchment paper to lift the bread out, and let it cool completely before slicing—if you can wait that long!
Pro Tips for Making No-Knead Cranberry Walnut Bread Recipe
- Be Patient with the Rise: The 18-hour rise is essential for flavor and texture; I once tried shortening it and ended up with dense bread—definitely worth the wait!
- Use a Thermometer for Water: I learned the hard way that water that’s too hot kills the yeast; keep it between 110-115°F for perfect activation.
- Don’t Over-Flour the Dough: Use just enough flour to handle the sticky dough; too much can make the bread heavy and dry.
- Dutch Oven Heat Safety: Always use oven mitts and handle your hot Dutch oven with care to avoid burns—it gets extremely hot, but the results are worth it!
How to Serve No-Knead Cranberry Walnut Bread Recipe

Garnishes
I love to serve this bread lightly toasted with a smear of good-quality butter or a drizzle of honey. Sometimes I sprinkle a little flaky sea salt on top of the butter—trust me, it takes it to another level. For festive occasions, a dollop of cream cheese mixed with orange zest is a hit in my house.
Side Dishes
This bread pairs wonderfully with creamy soups like butternut squash or tomato bisque. I also enjoy it alongside a fresh kale salad tossed with citrus vinaigrette—the tartness complements the bread’s fruity notes.
Creative Ways to Present
For holiday brunches, I’ve arranged slices of this bread in a circular pattern on a wooden board, garnished with fresh rosemary sprigs and whole cranberries for a festive touch. It makes for a warm, inviting centerpiece that guests always comment on—and it’s super easy to pull off.
Make Ahead and Storage
Storing Leftovers
I store leftover bread in a paper bag with the top folded loosely. This gives the bread enough air to keep the crust crisp without drying out the crumb. I’ve found that plastic bags trap moisture and make the crust soggy, which is no fun.
Freezing
If you want to save some for later, wrap the bread tightly in aluminum foil and pop it in a freezer bag. I’ve frozen loaves for up to three months, and it thaws beautifully at room temperature the day before I want it.
Reheating
To bring back that just-baked vibe, I like to warm slices in a toaster or oven at 350°F for about 8 minutes. If the crust softens, a quick toast fixes it right up. It’s almost like enjoying fresh bread again!
FAQs
-
Can I use regular all-purpose flour instead of bread flour?
You can substitute all-purpose flour, but since it has less protein, expect a slightly softer and less chewy crumb. The bread will still be delicious, just a bit different in texture.
-
Why does the dough need to rise for 18 hours?
The long rise allows natural fermentation which develops flavor and strength in the dough without kneading. Less time means denser bread with less flavor; trust me, the wait really pays off!
-
Do I have to use a Dutch oven?
Using a Dutch oven is key because it traps steam that gives the bread its signature crispy crust and tender inside. You can bake on a baking stone or sheet, but the crust won’t be quite the same.
-
Can I add fresh cranberries instead of dried?
Fresh cranberries add extra moisture, so you might need to reduce water slightly and keep an eye on dough hydration. They also create bigger pockets of tartness—very tasty but a different texture.
-
How do I know when the bread is done baking?
Look for a deep golden crust and a hollow sound when you tap the bottom of the loaf. An internal temperature of about 200°F is a sure sign it’s fully baked.
Final Thoughts
This No-Knead Cranberry Walnut Bread Recipe holds a special place in my kitchen—it’s like magic how such a simple process turns into something so flavorful and beautiful. Whether it’s for a cozy breakfast or a festive gathering, this bread never fails to impress and bring smiles. If you haven’t tried making bread at home before, this is the perfect place to start. Give it a go, and I promise you’ll be hooked just like I am!
Print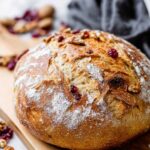
No-Knead Cranberry Walnut Bread Recipe
- Prep Time: 15 minutes
- Cook Time: 40 minutes
- Total Time: 19 hours 25 minutes
- Yield: 12 slices
- Category: Bread
- Method: Baking
- Cuisine: American
Description
This Thanksgiving Cranberry Walnut Bread is a no-knead artisan-style loaf bursting with tart dried cranberries, crunchy walnuts, and fresh orange zest. Baked in a Dutch oven for a perfect golden crust and tender crumb, this bread requires minimal hands-on time but benefits from a long, slow rise to develop deep flavors. It’s an elegant, festive addition to your holiday table or a delightful treat year-round.
Ingredients
Dry Ingredients
- 3 cups bread flour, plus 2 tablespoons, plus more for surface
- 2 teaspoons Kosher salt
- ½ teaspoon active dry yeast
- 1 teaspoon granulated sugar
- ¾ cup dried cranberries
- ½ cup dried walnuts, roughly chopped
Wet Ingredients
- 1 ½ cups warm water (110 to 115 degrees F)
- 1 tablespoon honey
- 1 tablespoon orange zest
Instructions
- Prepare yeast mixture: Dissolve the active dry yeast and granulated sugar in the warm water (110 to 115 degrees F). Let it sit for 10 minutes until it foams, indicating the yeast is active. If it doesn’t foam, discard and start over.
- Mix dough: In a large bowl, whisk together the bread flour and Kosher salt. Add the yeast mixture and honey, stirring just until the flour is fully incorporated without over-mixing. Stir in dried cranberries, chopped walnuts, and orange zest until just combined. Expect a very sticky, wet dough. Cover the bowl tightly with plastic wrap, ensuring it does not touch the dough.
- First rise: Let the dough rest at room temperature on your kitchen counter for 18 hours. During this time, the dough will ferment and develop flavor and structure naturally without kneading.
- Shape the dough: After 18 hours, the dough will be very wet and sticky. Do not punch down. Transfer it gently to a well-floured surface and coat it with flour. Flour your hands as well. Carefully fold the edges into the center to create a ball shape, preserving air bubbles inside. Turn the dough smooth side up and gently press sides to reshape if needed. Place the dough on a lightly floured parchment paper, smooth side up.
- Second rise: Cover the dough loosely with plastic wrap and let it rest for 30 minutes at room temperature without transferring back to the bowl.
- Preheat Dutch oven: Place a clean 5 to 6-quart Dutch oven with its lid inside your oven, and preheat the oven to 450 degrees F for 30 minutes to get the pot very hot.
- Score the dough: Using a sharp knife or razor blade, score an X or a preferred pattern on the top of the dough ball to allow controlled expansion during baking.
- Bake covered: Carefully remove the hot Dutch oven from the oven. Using the parchment paper, lift and transfer the dough into the Dutch oven. Cover with the lid tightly. Bake for 30 minutes at 450 degrees F without opening the lid to trap steam that will create a crispy crust.
- Bake uncovered: Remove the lid and continue baking for an additional 8 to 10 minutes until the crust turns golden brown and crisp.
- Cool and serve: Remove the bread from the Dutch oven by lifting the parchment paper. Allow the bread to cool completely on a wire rack before slicing and serving to ensure the texture sets properly. Enjoy your festive cranberry walnut artisan bread!
Notes
- Allow the dough to rise for a full 18 hours for best flavor and texture, though 16 to 18 hours is acceptable.
- The dough will be very sticky and wet both before and after rising, which is essential for steam creation in baking and a crisp crust.
- Use a Dutch oven to trap steam, which helps achieve a beautiful golden crust and tender crumb.
- Store your bread in a semi-open paper bag to keep the crust crusty, mimicking bakery storage.
- To freeze, wrap the bread tightly in aluminum foil, then place it in a freezer-safe resealable plastic bag for up to 3 months. Thaw at room temperature before slicing.
Nutrition
- Serving Size: 1 slice (approx. 75g)
- Calories: 210
- Sugar: 8g
- Sodium: 320mg
- Fat: 4.5g
- Saturated Fat: 0.5g
- Unsaturated Fat: 4g
- Trans Fat: 0g
- Carbohydrates: 39g
- Fiber: 3g
- Protein: 6g
- Cholesterol: 0mg


