
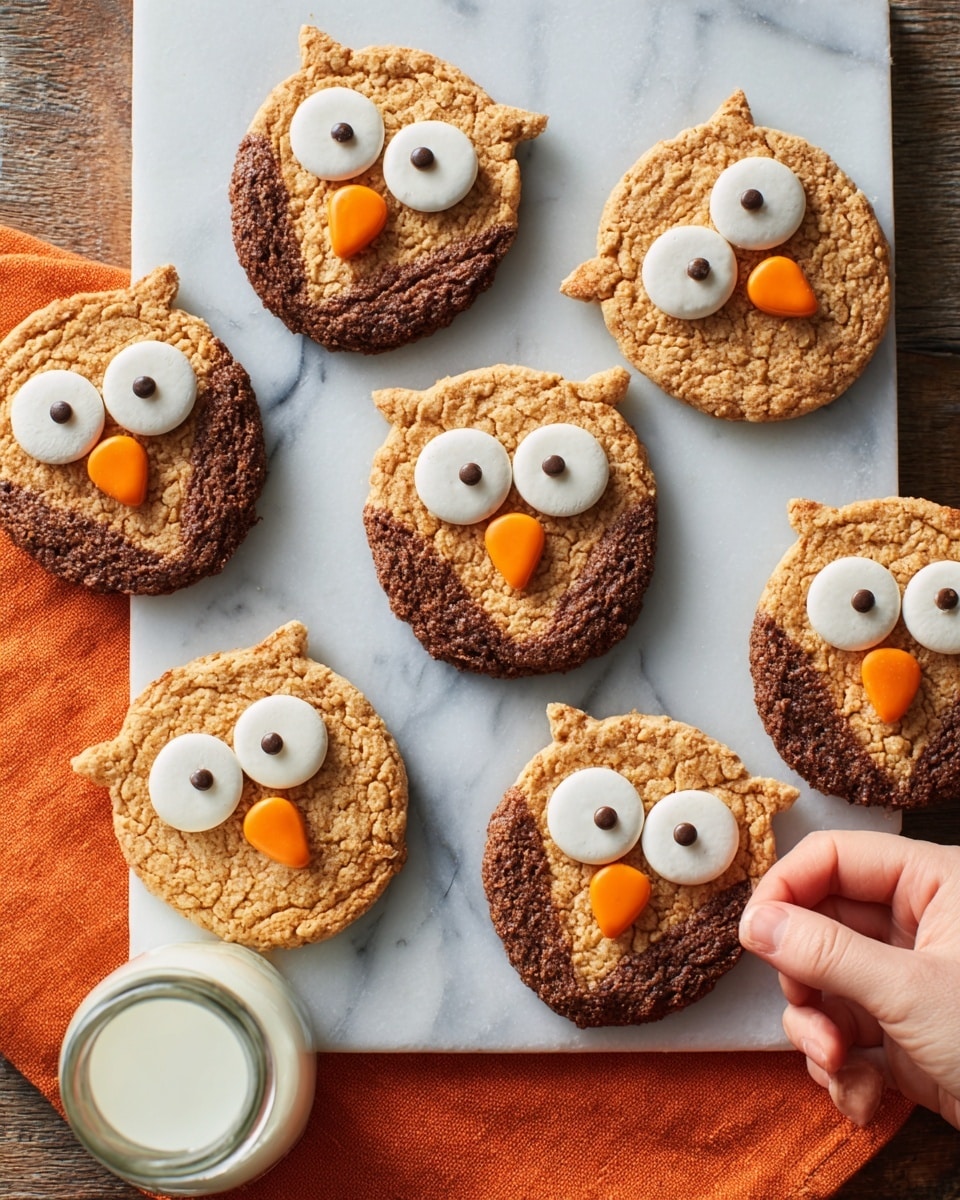
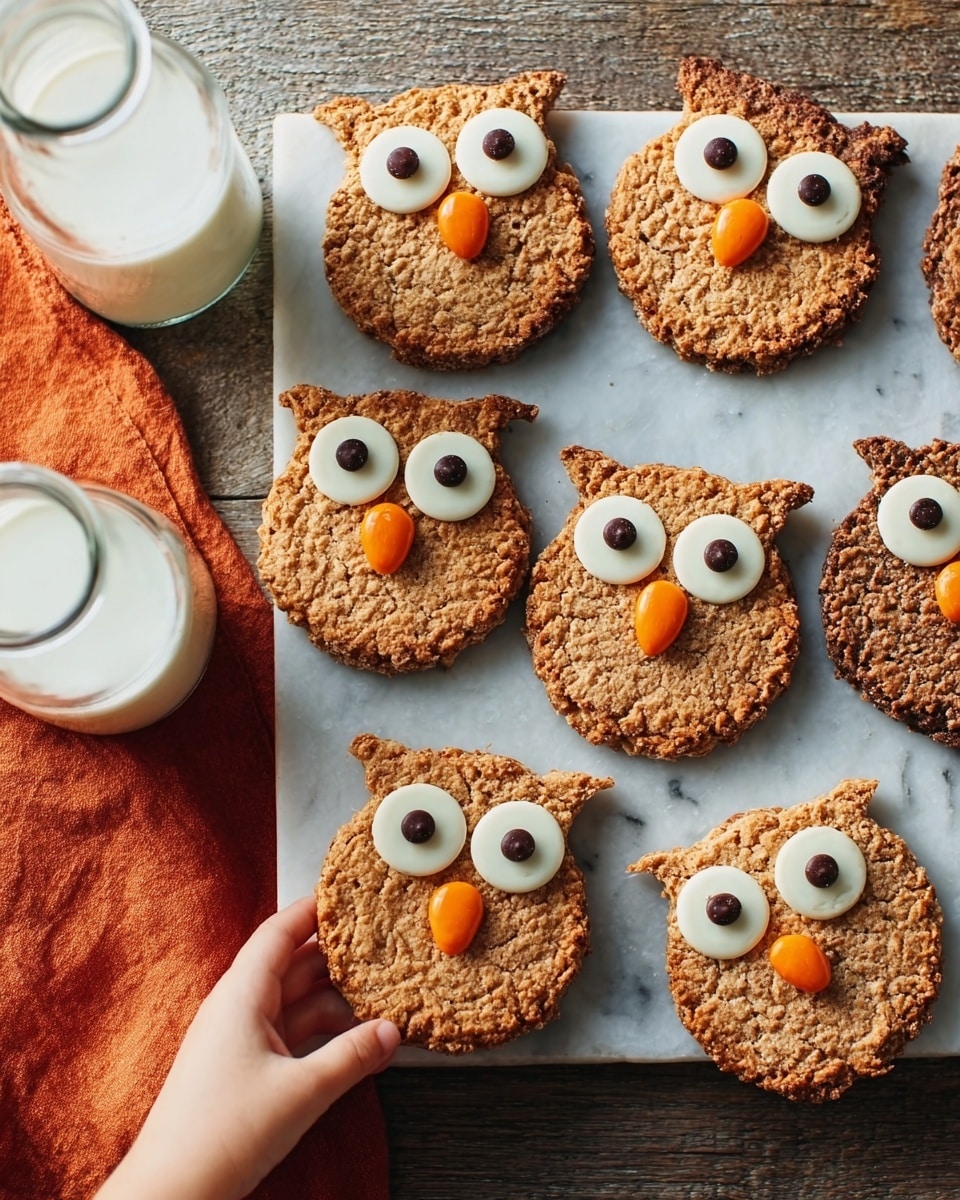
If you’re ready for a cookie that’s not just tasty but downright adorable, you’re going to love this Owl Cookies Recipe. I absolutely love how these cookies come together—not only do they have a rich peanut butter and chocolatey flavor, but they also turn into little owl masterpieces that are perfect for sharing (or sneaking a few extra). Keep reading and I’ll walk you through every step so your batch turns out picture-perfect and delicious.
Why You’ll Love This Recipe
- Playful Presentation: These owl-shaped cookies are as charming as they are delicious, making them a hit with kids and adults alike.
- Perfect Peanut Butter-Chocolate Combo: The blend of peanut butter dough and melted chocolate gives the cookies a rich, nutty flavor that you’ll crave.
- Great Make-Ahead Treat: The dough can be refrigerated ahead of time, making it a stress-free recipe for parties or last-minute guests.
- Easy to Customize: From swapping toppings to adjusting oats, this recipe adapts well to your kitchen creativity.

Ingredients You’ll Need
Each ingredient in this Owl Cookies Recipe plays a special role: the peanut butter brings that creamy nuttiness, oats add texture, and the chocolate elements create a beautifully layered flavor. I recommend using good quality peanut butter and fresh brown sugar for the best taste and texture.
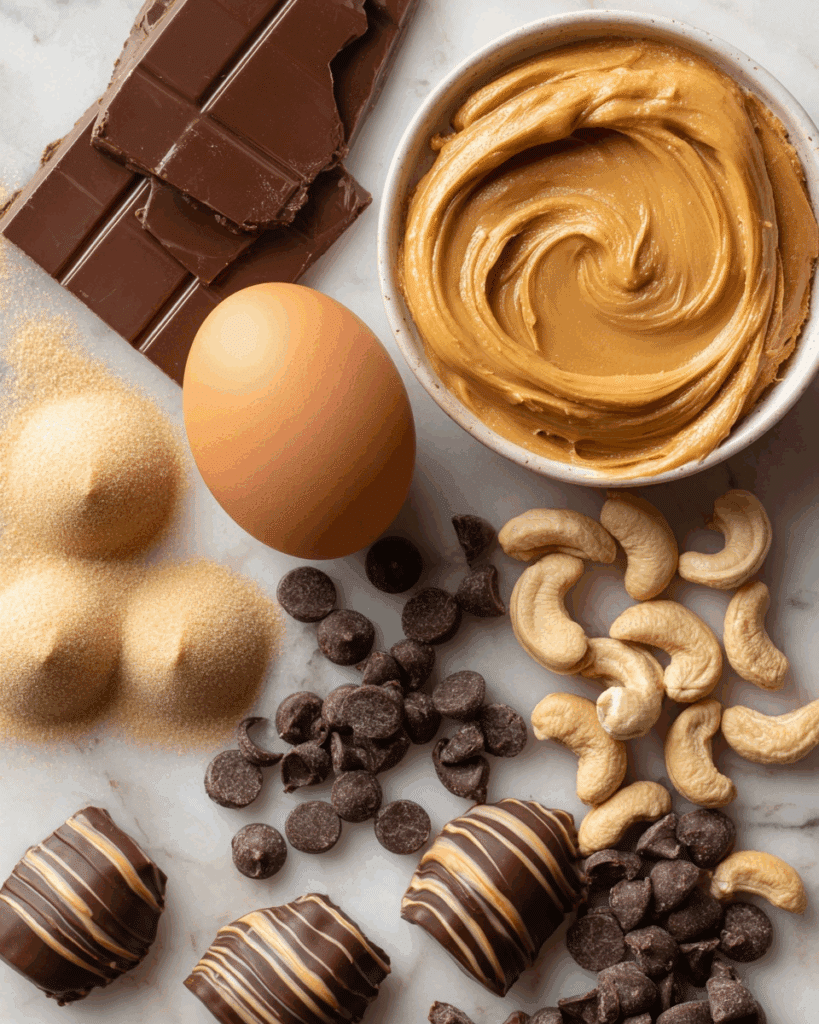
- Butter: Use softened, not melted, so you can easily cream it with peanut butter and sugar for smooth dough.
- Creamy peanut butter: Smooth peanut butter blends better in the dough, giving you that luscious peanut flavor throughout.
- Brown sugar: Adds moisture and a deeper caramel sweetness than white sugar.
- Egg: Helps bind everything together while keeping the cookies tender.
- Vanilla extract: A little goes a long way to enhance the overall flavor.
- All-purpose flour: Provides structure to the cookies.
- Quick-cooking oats: Brings that classic chewiness and rustic texture.
- Baking powder: Gives a slight lift without making the cookies too cakey.
- Salt: Balances the sweetness and heightens the flavors.
- Unsweetened chocolate (melted): Used to swirl and contrast the peanut butter dough for eye-catching owl designs.
- Whole cashews: Perfect as the owl’s beak—trust me, this little detail makes all the difference!
- Striped chocolate kisses (unwrapped): These become the eyes, melting just right to hold the chocolate chip pupils.
- Semisweet chocolate chips: Used as pupils, adding that final cute touch.
Variations
One of the best things about this Owl Cookies Recipe is how easy it is to make it your own. I’ve tried a few variations over time, and it’s fun to get creative here—whether you’re adapting it for dietary needs or just shaking things up for a festive twist.
- Nut-Free Version: I swapped peanut butter for sunflower seed butter once for a nut allergy friendly take, and the cookies still turned out wonderfully moist and delicious.
- Oats Substitution: If you want a softer cookie, try rolled oats instead of quick-cooking oats—the texture shifts a bit but still delicious.
- Chocolate Variations: I sometimes use dark chocolate instead of unsweetened for a sweeter but still rich swirled dough.
- Festive Toppings: For Halloween, adding candy eyeballs instead of chocolate kisses makes the owl look extra spooky (and easy to make!).
How to Make Owl Cookies Recipe
Step 1: Cream Together the Base Ingredients
Start by beating the softened butter, creamy peanut butter, and brown sugar in a large bowl until everything blends smoothly—this usually takes about 2-3 minutes with an electric mixer. When I first tried this recipe, I was tempted to rush this step, but taking your time here really makes the cookies tender and flavorful. Next, beat in the egg and vanilla extract until fully combined.
Step 2: Mix Dry Ingredients and Combine With Dough
In another bowl, mix the all-purpose flour, quick-cooking oats, baking powder, and salt. Gradually add this dry mixture into your creamed peanut butter mixture, beating slowly to combine. The dough will be thick and slightly sticky. If it feels too soft to shape, pop it in the fridge for about an hour—trust me, this chill time helps so much later on.
Step 3: Create the Owl Dough Layers
Divide the dough in half. Roll one half into an 8-inch long plain roll—that’s going to be the owl’s base. To the other half, stir in the melted unsweetened chocolate to create a chocolate dough. Roll this chocolate dough between two sheets of waxed paper into an 8-inch square. Then, place your plain dough roll on top of the chocolate square and carefully wrap the chocolate dough around it, pinching the seam to seal. Wrap everything tightly and refrigerate for at least 3 hours. This layering gives you the cool owl body design!
Step 4: Slice and Shape Your Owls
Preheat your oven to 350°F. Unwrap your chilled dough log and carefully slice it crosswise into 24 slices about 3/8 inch thick. To make your owls, place two slices side by side on an ungreased baking sheet. Pinch the top of each slice to form little owl ears (this is the fun part!). Then, press a whole cashew between the two slices for the beak. It’s such a satisfying step to see little owl faces start to form!
Step 5: Bake, Cool, and Decorate
Bake the shaped owls for 12-15 minutes, until they’re set but still soft around the edges. Let the cookies cool on the baking sheet for 5 minutes before transferring them to wire racks to cool completely. While the cookies are still warm, press two striped chocolate kisses, pointed side down, onto each cookie for eyes. The kisses will melt slightly and help the chocolate chips stick on as the pupils—place one semisweet chocolate chip on top of each kiss. Once cooled, your charming owl cookies are ready to wow!
Pro Tips for Making Owl Cookies Recipe
- Chill Time is Key: Don’t skip refrigerating the dough before shaping—it prevents spreading and keeps the owl shape strong.
- Use Room Temperature Eggs: This helps the dough bind better and ensures even mixing without toughening the cookies.
- Pinch the Ears Gently: Light pressure is enough to form ears without squishing the dough—practice makes perfect here!
- Apply Chocolate Eyes While Warm: Adding kisses and chips while the cookies are still warm makes the eyes stick perfectly without extra frosting.
How to Serve Owl Cookies Recipe
Garnishes
I like to keep it simple with garnishes—those chocolate kiss eyes are charming on their own! But sometimes I’ll sprinkle just a bit of powdered sugar for a snowy look or dust the edges lightly with cocoa powder for a rustic vibe. For kids’ parties, a small dollop of colored icing on the wings can add a festive pop of color.
Side Dishes
Owl Cookies pair beautifully with a cold glass of milk (classic choice!) or a mug of warm cocoa. For a brunch or afternoon tea spread, I like plating them alongside fresh fruit slices and simple cheese platters—the cookies add a fun sweet contrast without overpowering the table.
Creative Ways to Present
One year, I arranged a batch of Owl Cookies perched on small twig branches in a rustic basket for a fall-themed party—it was a big hit! You can also package these cookies in clear bags tied with ribbon as adorable edible gifts that bring smiles. For Halloween, toss in some candy pumpkin decorations for a cute seasonal touch.
Make Ahead and Storage
Storing Leftovers
I store leftover Owl Cookies in an airtight container at room temperature, layered between parchment paper to keep them from sticking. They usually stay fresh and soft for up to 5 days, which gives you plenty of time to enjoy them without rush.
Freezing
If you want to prepare these in advance, I recommend freezing the dough log wrapped tightly in plastic wrap and foil before slicing and baking. When you’re ready, just thaw for a bit to make slicing easier. You can also freeze fully baked cookies in a sealed bag for up to 2 months. I’ve found freezing doesn’t change the texture much, so it’s great for holiday baking.
Reheating
To bring frozen or leftover baked cookies back to fresh, pop them in a 300°F oven for 5-7 minutes—this warms them gently without drying. Alternatively, microwave for 10-15 seconds, but watch out as it can soften the edges too much. I prefer the oven method myself to maintain the perfect texture.
FAQs
-
Can I use crunchy peanut butter instead of creamy for this Owl Cookies Recipe?
Absolutely! Crunchy peanut butter will add a bit more texture to the cookies, which some people really enjoy. Just know that it might make the dough a bit chunkier, so the overall cookie texture will change slightly but still be delicious.
-
What if I don’t have striped chocolate kisses—can I substitute?
Yes! If you can’t find striped chocolate kisses, any small chocolate candies that melt well are great. Mini marshmallows or white chocolate buttons can also be fun to experiment with for the eyes.
-
Why do I need to refrigerate the dough before baking?
Chilling the dough firms it up, making it much easier to slice neatly and hold the owl shape while baking. It also prevents the cookies from spreading too much in the oven, which keeps your owls looking crisp and defined.
-
Can I make this recipe vegan or gluten-free?
With some ingredient swaps, yes! Use a vegan butter substitute and a flaxseed “egg” instead of the egg. For gluten-free, swap the flour for a gluten-free blend and make sure your oats are certified gluten-free. The texture will differ a bit, but it’s still delightful.
-
How do I keep the chocolate chips from sliding off after baking?
Press the chocolate kisses onto the warm cookies right after they come out of the oven. The residual heat softens the kisses just enough to act like glue. Then immediately add the chocolate chips on top while the kisses are still warm—this helps everything stick together nicely as they cool.
Final Thoughts
This Owl Cookies Recipe has quickly become one of my favorite treats to bake when I want to impress guests or just brighten up a regular day with something fun and delicious. They look impressive but are surprisingly straightforward to make, especially once you get the hang of shaping those cute little owls. Whether you’re baking for a holiday, a school party, or just because, these cookies will bring smiles and “wow”s all around. Give them a try—I promise you’ll be hooked as soon as the first batch comes out of the oven!
Print
Owl Cookies Recipe
- Prep Time: 35 minutes
- Cook Time: 15 minutes
- Total Time: 50 minutes
- Yield: 1 dozen (24 owl cookies)
- Category: Dessert
- Method: Baking
- Cuisine: American
- Diet: Vegetarian
Description
Delightfully creative Owl Cookies featuring a blend of peanut butter and chocolate doughs, decorated with cashews and chocolate pieces to resemble adorable owls. These soft, chewy cookies are perfect for festive occasions or a fun baking project with kids.
Ingredients
Cookie Dough
- 2/3 cup butter, softened
- 1 cup creamy peanut butter
- 1 cup packed brown sugar
- 1 large egg, room temperature
- 1 teaspoon vanilla extract
- 1-1/3 cups all-purpose flour
- 1 cup quick-cooking oats
- 1 teaspoon baking powder
- 1/2 teaspoon salt
- 1 ounce unsweetened chocolate, melted
Decorations
- 12 whole cashews
- 24 striped chocolate kisses, unwrapped
- 24 semisweet chocolate chips
Instructions
- Prepare dough base: In a large bowl, beat softened butter, creamy peanut butter, and packed brown sugar together until well blended. Then beat in the room temperature egg and vanilla extract until combined smoothly.
- Mix dry ingredients: In another bowl, combine all-purpose flour, quick-cooking oats, baking powder, and salt. Gradually add this mixture into the creamed butter mixture, beating well until dough forms evenly.
- Chill dough: If the dough feels too soft to handle, cover and refrigerate it for 1 hour or until firm enough to shape. Next, divide dough in half.
- Shape and layer dough: Shape one portion into an 8-inch-long roll. Mix melted unsweetened chocolate into the remaining dough. Roll this chocolate dough between two sheets of waxed paper into an 8-inch square. Place the plain roll on top of the chocolate dough square, wrap the chocolate dough around the plain dough, pinching the seam to seal completely. Wrap tightly and refrigerate for 3 hours or until firm.
- Preheat oven: Set oven to 350°F (175°C) to prepare for baking the cookies.
- Slice and form owls: Unwrap the dough and cut it crosswise into 24 slices about 3/8 inch thick. To assemble owl shapes, place two slices side by side on an ungreased baking sheet and pinch the top of each slice to create ears. Insert one whole cashew between the slices to form a beak. Repeat with all slices.
- Bake the cookies: Bake for 12 to 15 minutes or until the cookies are set but still soft. Remove from oven and cool on the baking sheets for 5 minutes before transferring to wire racks.
- Decorate the owls: While the cookies are still warm, place two striped chocolate kisses on each cookie for eyes, pointed side down. The kisses will melt slightly, helping them stick. Top each chocolate kiss with a semisweet chocolate chip to complete the eyes.
- Cool completely: Allow the decorated cookies to cool thoroughly on wire racks before serving or storing.
Notes
- For firmer dough, ensure chilling times are respected before shaping to make handling easier.
- Use room temperature egg and softened butter to blend ingredients smoothly and achieve better texture.
- Chocolate kisses may melt quickly; handle warm cookies gently when decorating.
- These cookies keep well in an airtight container for up to 5 days.
- Optional: Substitute creamy peanut butter for any nut or seed butter in case of allergies.
Nutrition
- Serving Size: 2 cookies
- Calories: 210
- Sugar: 14g
- Sodium: 130mg
- Fat: 14g
- Saturated Fat: 5g
- Unsaturated Fat: 7g
- Trans Fat: 0g
- Carbohydrates: 18g
- Fiber: 2g
- Protein: 5g
- Cholesterol: 30mg


