
If you’re looking for a festive, fun, and utterly delicious Halloween treat, you’re in for a real treat with this Peanut Butter Spider Cookies for Halloween Recipe. I absolutely love how these cookies bring together rich peanut butter goodness with a playful spooky twist that both kids and adults go crazy for. Whether you’re hosting a party or just want to make some themed goodies with the family, these spiders are the perfect mix of cute and tasty. Stick around, and I’ll walk you through everything you need to make these creepy-crawly delights turn out perfectly every time!
Why You’ll Love This Recipe
- Super Simple Ingredients: You won’t need anything fancy — just classic pantry staples that make the peanut butter flavor shine.
- Perfect for Kids and Adults: These cookies are adorable for little hands but packed with flavor for grown-ups too.
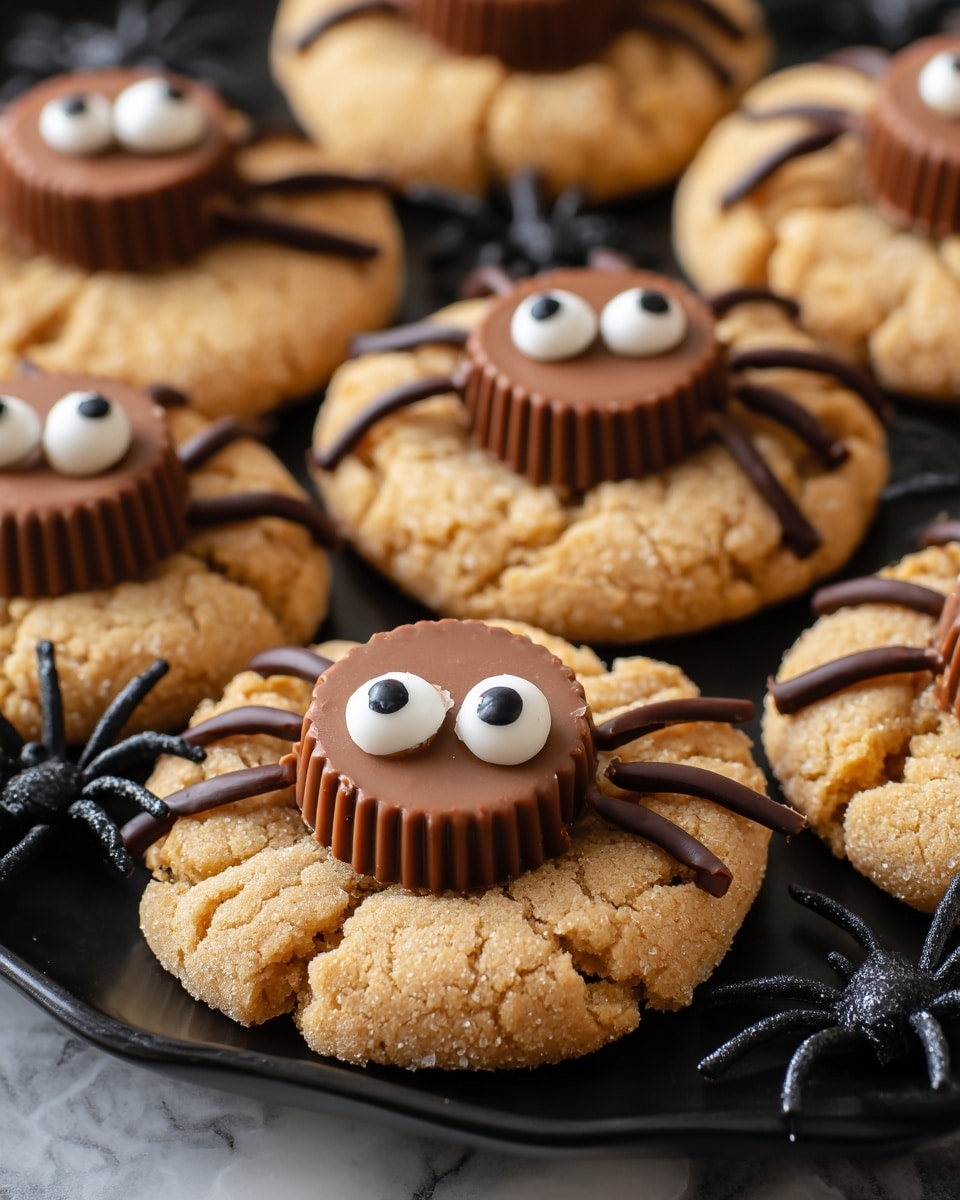
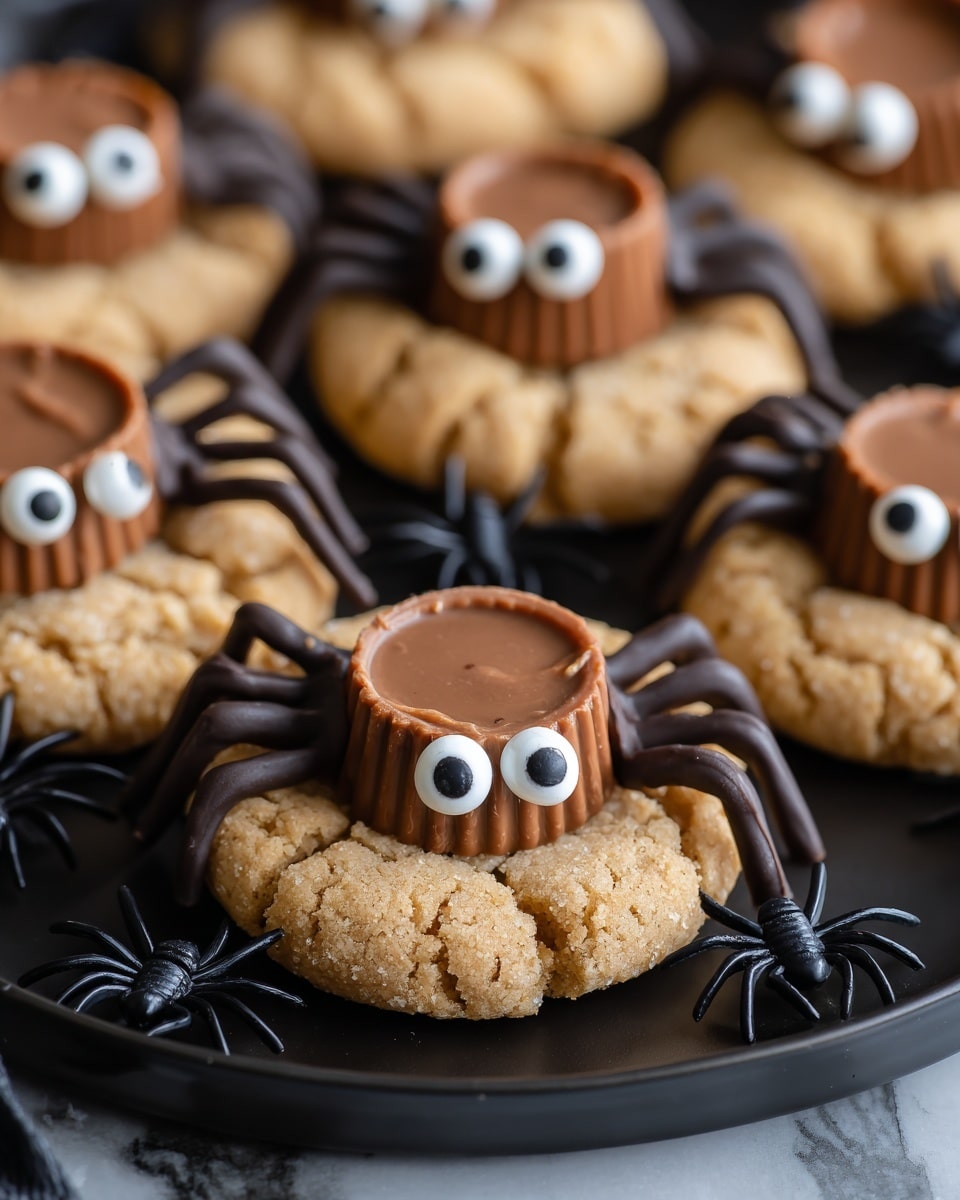
- Fun and Festive Presentation: The combination of mini Reese’s cups, candy eyeballs, and chocolate legs turns these cookies into spooky little works of art.
- Great Make-Ahead Snack: These cookies store well and freeze beautifully, so you can prepare early and enjoy later.

Ingredients You’ll Need
Gathering your ingredients ahead of time will make this Peanut Butter Spider Cookies for Halloween Recipe a breeze. The key is creamy peanut butter for that smooth, classic flavor, and those mini Reese’s cups that give the perfect peanut butter punch and help form the “body” of the spider.
- Unsalted butter: Room temperature butter is key to getting a fluffy cookie dough.
- Brown sugar: Adds moisture and a subtle caramel sweetness to balance the peanut butter.
- Granulated sugar: The sugar you use for rolling adds a nice little crunch and sparkle.
- Creamy peanut butter: I recommend the classic kind — it helps your cookies hold together better than natural peanut butter.
- Egg: Helps bind everything together and adds richness.
- Vanilla extract: Just a splash enhances all the flavors beautifully.
- All-purpose flour: Make sure to measure accurately to keep your cookies perfectly tender.
- Baking soda and baking powder: These give just the right rise and texture.
- Salt: A pinch to make the peanut butter pop.
- Mini Reese’s Peanut Butter Cups: Frozen before pressing into cookies — trust me, this keeps them from melting too fast.
- Semi-sweet chocolate chips: Melted for drawing spider legs and attaching candy eyeballs.
- Candy eyeballs: The fun, spooky finishing touch that brings your spider cookies to life.
Variations
I love making this Peanut Butter Spider Cookies for Halloween Recipe my own based on who I’m sharing them with. Don’t be afraid to switch things up a bit — it’s all about making the recipe work for you and your spooky celebration!
- Use crunchy peanut butter: If you like a bit more texture, crunchy peanut butter adds a lovely nutty bite.
- Try dark chocolate chips instead: I sometimes swap semi-sweet for dark chocolate — it’s a richer flavor that pairs perfectly with peanut butter.
- Make it vegan: Substitute the butter with coconut oil and an egg replacer, plus use dairy-free chocolate chips.
- Change up the eyes: You can use mini chocolate chips or colored sprinkles instead of candy eyeballs for a quick alternative.
How to Make Peanut Butter Spider Cookies for Halloween Recipe
Step 1: Prep the Mini Reese’s Cups
The first thing I do is unwrap about 24 mini Reese’s Peanut Butter Cups and pop them in the freezer. This little trick helps keep their shape when you press them into the warm cookies after baking. Trust me, it makes the difference between cute spider bodies and sad melted blobs!
Step 2: Cream Butter and Sugars
Using an electric mixer, beat the room temperature butter, brown sugar, and granulated sugar together for about a minute until the mixture is smooth and fluffy. This step is key—well-creamed butter and sugar give your cookies that soft, tender texture I love.
Step 3: Add Peanut Butter, Egg, and Vanilla
Next, mix in the creamy peanut butter, egg, and vanilla extract. Beat everything together just until combined—less than a minute here is perfect so you don’t overwork the dough. The peanut butter is the star here, so make sure it’s evenly blended for that rich flavor.
Step 4: Mix Dry Ingredients
Now, sift in the flour, baking soda, baking powder, and salt. Use the mixer on low or fold in with a spatula until just combined. Over mixing can make cookies tough, so stop when you no longer see streaks of flour.
Step 5: Form and Bake the Cookies
I like to use a small cookie scoop or just level tablespoons to make balls of dough. Roll each ball between your hands to make it smooth, then roll it in granulated sugar to give the cookies a sparkling texture after baking. Place them 2-3 inches apart on a silicone-lined baking sheet so they have room to spread. Bake at 350ºF for 8-11 minutes or until the edges crack and turn golden—you’ll know you’ve hit the sweet spot when they look slightly crispy around the edges but still soft in the center.
Step 6: Add Reese’s Cups and Cool
Right out of the oven, gently press a frozen mini Reese’s Peanut Butter Cup into the center of each cookie. Then, let the cookies cool on the baking sheet for 15-20 minutes to set. Moving them too soon can cause the chocolate to sink into the cookie, and you want those spider bodies to keep their shape!
Step 7: Create the Spider Legs and Eyes
While the cookies cool, melt the semi-sweet chocolate chips in a microwave-safe bowl, heating at 50% power in 1-minute intervals and stirring each time until smooth. Transfer the melted chocolate to a squeeze bottle or a sandwich bag with a tiny corner snipped off. Carefully pipe four legs on each side of the Reese’s cup to create spider legs. Use a dab of melted chocolate on the back of candy eyeballs to attach them to the tops of the Reese’s cups. Let the chocolate set fully before serving.
Pro Tips for Making Peanut Butter Spider Cookies for Halloween Recipe
- Freeze the Reese’s Cups: Freezing them before adding prevents melting and keeps your spider bodies intact and shapely.
- Don’t overmix the dough: Overworking flour can make cookies dense; mix just until the dry ingredients disappear.
- Roll in sugar for texture: This adds a subtle crunch and pretty sparkle that takes these cookies up a notch.
- Use a piping bag for spider legs: This makes decorating easier and results in neater legs that look more like spiders.
How to Serve Peanut Butter Spider Cookies for Halloween Recipe
Garnishes
I usually stick with classic candy eyeballs because they add so much personality, but I’ve also experimented with edible glitter or a tiny sprinkle of sea salt on the melted chocolate legs for a pretty contrast. If you want a little extra festive flair, you can also dust the cookies lightly with powdered sugar or cocoa powder for a spooky “dusty web” effect!
Side Dishes
If you’re serving these at a party, a cold glass of milk or a cup of hot chocolate pairs perfectly. I’ve also enjoyed them alongside some simple apple slices or a bowl of mixed nuts for a balanced snack spread that complements the rich peanut butter flavor without overwhelming your taste buds.
Creative Ways to Present
For Halloween parties, I love arranging the cookies on a platter in a creepy spider web shape using thin licorice strands or even on a black serving tray lined with faux spider webs. Kids especially get a kick out of “catching” the spider cookies from the web! You could also package a few cookies in small clear bags tied with orange and black ribbons for cute party favors.
Make Ahead and Storage
Storing Leftovers
Once cooled completely, I store these Peanut Butter Spider Cookies in an airtight container at room temperature for up to 4 days. If your kitchen is warm, a cool spot like the pantry works best — the chocolate won’t hold up well to heat and might soften too much.
Freezing
I’ve had great luck freezing the baked cookies without the decorations (Reese’s cups, legs, and eyes). Just freeze the plain cookies in a single layer on a baking sheet, then transfer to a zip-top bag for up to 3 months. When you want to serve, thaw fully, then add decorations fresh. This keeps the cookie texture and toppings looking their best.
Reheating
If you want that fresh-baked warm cookie feeling, gently heat them in the microwave for 10-15 seconds. Be careful not to overheat, or the peanut butter cups might melt too much. I prefer warming just before serving to keep the spider legs intact and the candy eyes in place.
FAQs
-
Can I use natural peanut butter for this recipe?
You can, but I recommend creamy, classic peanut butter because natural peanut butter usually contains more oil and can make the cookie dough crumbly or oily. If you must use natural, stir well and consider adding a bit more flour to balance the texture.
-
How do I prevent the Reese’s cups from melting too much?
Freezing the mini Reese’s cups before pressing them into the warm cookies is the best trick I’ve found. Also, allow the cookies to cool on the baking sheet for at least 15-20 minutes before moving them to a rack so the chocolate doesn’t soften and lose shape.
-
Can I make these cookies gluten-free?
Absolutely! Use a 1-to-1 gluten-free flour blend in place of all-purpose flour. Just be sure your baking powder and other ingredients are gluten-free certified.
-
What’s the best way to pipe the spider legs?
Use a squeeze bottle or a small zip-top bag with a tiny corner snipped off. This gives you control to draw thin, neat legs. If you don’t have either, a toothpick dipped in melted chocolate works for making legs one by one.
Final Thoughts
This Peanut Butter Spider Cookies for Halloween Recipe is one of those joyful kitchen moments where clever, simple ingredients come together to create something playful and delicious. I’ve made these every Halloween for years, and it’s become a family tradition that never fails to bring smiles. If you want a cookie that’s both fun to make and a guaranteed crowd-pleaser, this is it. So grab your spatula, get those Reese’s cups ready, and make some spooky spider magic in your kitchen!
Print
Peanut Butter Spider Cookies for Halloween Recipe
- Prep Time: 15 minutes
- Cook Time: 11 minutes
- Total Time: 26 minutes
- Yield: 24 cookies
- Category: Dessert
- Method: Baking
- Cuisine: American
Description
These Peanut Butter Spider Cookies are a spooky and delicious Halloween treat featuring a peanut butter cookie base, topped with mini Reese’s Peanut Butter Cups and decorated with melted chocolate legs and candy eyeballs to resemble spiders. Perfect for festive parties or a fun family baking activity.
Ingredients
Cookie Dough
- ½ cup (113g) unsalted butter, 1 stick, room temperature
- ½ cup (107g) brown sugar
- ⅓ cup (66g) granulated sugar
- ¾ cup (201g) creamy peanut butter, not natural
- 1 large egg
- 1 tsp vanilla extract
- 1 ½ cups (180g) all purpose flour
- 1 tsp baking soda
- ½ tsp baking powder
- ½ tsp salt
- Granulated sugar, for rolling the cookies
Toppings and Decoration
- About 24 mini Reese’s Peanut Butter Cups
- ½ cup (85g) semi-sweet chocolate chips, for melting
- Candy eyeballs
Instructions
- Freeze Reese’s Cups: Unwrap about 24 mini Reese’s Peanut Butter Cups, place them in a bowl, and put in the freezer to help maintain their shape during baking. Preheat the oven to 350ºF.
- Cream Butter and Sugars: In a mixing bowl, combine the room temperature butter, brown sugar, and granulated sugar. Beat with an electric mixer for 1 minute until smooth and fluffy.
- Add Wet Ingredients: Add peanut butter, egg, and vanilla extract to the butter and sugar mixture. Beat again for less than 1 minute until fully combined.
- Mix Dry Ingredients: In a separate bowl, whisk together the all-purpose flour, baking soda, baking powder, and salt.
- Combine Ingredients: Gradually add the dry ingredients to the wet mixture, mixing on low speed or folding with a spatula just until combined. Do not overmix to keep cookies tender.
- Form Cookie Balls: Use a small cookie scoop or tablespoon to form tablespoon-sized balls from the dough. Roll each ball between your hands to form a smooth, uniform shape, then roll in granulated sugar for a slight crunch.
- Bake Cookies: Place the sugared dough balls 2-3 inches apart on a silicone-lined baking sheet. Bake at 350ºF for 8-11 minutes or until edges begin to crack and turn golden.
- Add Reese’s Cups: Remove cookies from the oven and immediately press one frozen mini Reese’s Peanut Butter Cup into the center of each cookie. Let the cookies cool for 15-20 minutes on the baking sheet to prevent the candy from sinking.
- Melt Chocolate: Place semi-sweet chocolate chips in a microwave-safe bowl. Microwave at 50% power for 3 minutes, stirring after each minute until fully melted. Transfer melted chocolate into a squeeze bottle or sandwich bag with a small corner cut off.
- Decorate Legs: Using the melted chocolate, draw 4 legs on each side of the cookie to create spider legs.
- Attach Candy Eyes: Dab a small amount of melted chocolate on the back of candy eyeballs and stick them onto the Reese’s Peanut Butter Cup on each cookie. Allow chocolate to set before moving the cookies.
Notes
- Freezing the mini Reese’s Cups before baking helps them hold their shape and prevents melting into the cookie.
- Do not overmix the dough to keep the cookies soft and tender.
- Rolling the dough balls in granulated sugar adds a nice slight crunch to the outside of the cookies.
- Letting cookies cool on the baking sheet after adding the Reese’s cup helps prevent candy from sinking.
- Melt chocolate gently at 50% power to avoid burning.
- Use a squeeze bottle or plastic bag for precise chocolate leg decorations.
- These cookies can be stored in an airtight container at room temperature for up to 3 days.
Nutrition
- Serving Size: 1 cookie
- Calories: 180
- Sugar: 12g
- Sodium: 120mg
- Fat: 11g
- Saturated Fat: 4g
- Unsaturated Fat: 6g
- Trans Fat: 0g
- Carbohydrates: 17g
- Fiber: 1g
- Protein: 4g
- Cholesterol: 25mg


