
If you’ve been searching for that perfect festive treat that’s bursting with cool mint flavor and classic sweetness, you’re going to fall head over heels for this Peppermint Sugar Cookies Recipe. I absolutely love how these cookies come out tender with just the right crumb, and the peppermint royal icing is a game changer — bright, fresh, and gorgeous. When I first tried this recipe, it quickly became my family’s holiday staple, and I’m confident you’ll find it just as delightful!
Why You’ll Love This Recipe
- Classic Yet Festive: The peppermint twist transforms ordinary sugar cookies into holiday showstoppers.
- Perfect Texture: These cookies strike the right balance between tender and sturdy, making decorating super easy.
- Fun Decorating: The royal icing lets you get creative without fuss, with smooth flood and peppermint swirl designs.
- Family Favorite: My loved ones beg for these every winter — you’ll impress your guests, guaranteed.

Ingredients You’ll Need
Every ingredient here plays a key role: from the cold butter that gives your cookies a tender crumb to the peppermint extract that adds that unmistakable cooling touch. When shopping, I prefer unbleached all-purpose flour for the best texture and meringue powder for that reliable royal icing structure.
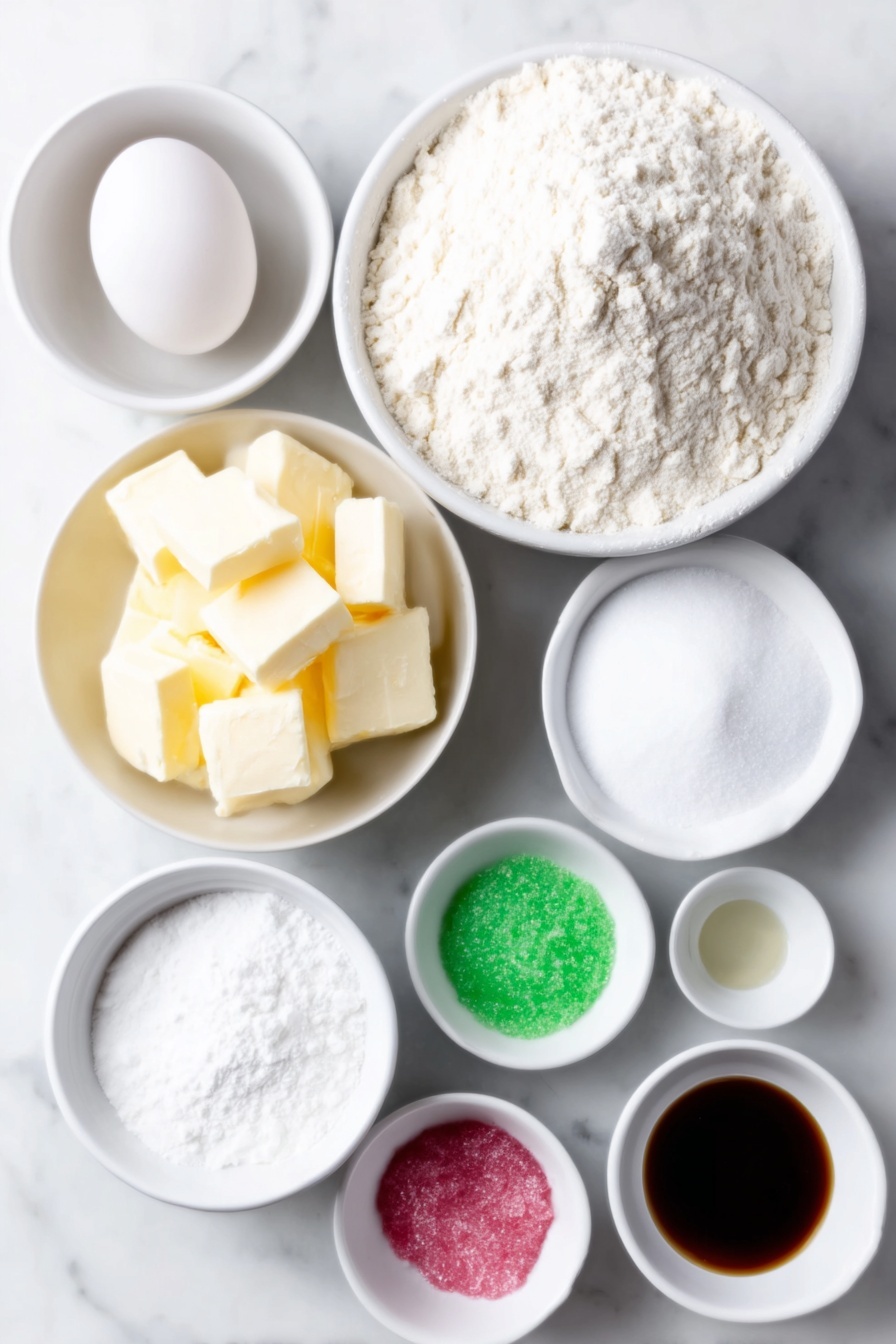
- All-purpose flour: Use unbleached for a slightly better flavor and texture.
- Baking powder: Helps these cookies rise just enough without being cakey.
- Salted butter: I like my butter cold and cubed to ensure the dough gains perfect crumbly consistency.
- Sugar: Regular granulated sugar works great to add sweetness and texture.
- Egg: Adds richness and binds the cookie dough.
- Vanilla extract: Use pure for the best depth of flavor.
- Almond extract: Just a touch—it brings a lovely subtle nuttiness.
- Meringue powder: Essential for making royal icing that stiffens properly.
- Powdered sugar: The soft base for a perfectly smooth royal icing.
- Light corn syrup: Keeps the icing shiny and flexible.
- Peppermint extract: Adds that refreshing peppermint flavor—feel free to make it stronger or milder!
- Gel icing colors: White for a clean base, and pink/red/green to get in the holiday spirit.
- Additional tools: Small squeeze bottles and toothpicks make decorating so much easier.
Variations
I love how versatile this Peppermint Sugar Cookies Recipe is—it’s like a blank canvas. I’ve played around with the peppermint intensity and colors, and you can definitely swap extracts or nix the almond if it’s not your thing. Plus, this recipe is forgiving enough that you can tweak it for different occasions easily.
- Extra Minty: Once, I doubled the peppermint extract to really punch up that cool flavor — perfect if you’re a peppermint fanatic!
- Seasonal Colors: For Christmas, I love red and green icing; for Valentine’s, pink and white look so pretty and sweet.
- Almond-Free: If nuts aren’t your favorite, simply skip the almond extract without sacrificing much flavor.
- Gluten-Free Option: Though I haven’t tried this myself yet, swapping in a 1:1 gluten-free baking flour could work with a bit of experimentation.
How to Make Peppermint Sugar Cookies Recipe
Step 1: Prep and Mix the Dough
Start by preheating your oven to 350°F and lining your baking sheets with parchment paper—that’s going to save you a world of cleanup. Whisk together the flour and baking powder in a bowl and set it aside. Now cream your cold cubed butter with sugar until fluffy—that light and airy texture is key to tender cookies. Beat in the egg, vanilla, and almond extracts until everything comes together. Add your flour mixture gradually, mixing on low; by the end, your dough will be thick and a little crumbly. This is perfectly normal and exactly what you want.
Step 2: Rolling and Cutting
Here’s the trick I discovered: line your rolling surface with wax paper and dust it well with flour, including your rolling pin. Roll the dough out to about 1/4 inch thick, and dip your cutter in flour each time—this keeps your cookies from sticking and looking messy. Cut out as many rounds as you can, re-kneading scraps gently and rolling again. I like to roll the dough directly onto parchment paper on the baking sheet sometimes—it really simplifies transferring delicate cookies.
Step 3: Chilling and Baking
Pop your cookie sheets in the freezer for about 10 minutes before baking. This step helps the cookies hold their shape so beautifully while baking. Then bake for 9-12 minutes until the edges just start to turn golden—watch closely because you don’t want them to overbake. Let them cool on the baking sheet for a couple of minutes before trimming with the cutter again if you want perfectly round edges. Then transfer to a wire rack to cool completely before icing.
Step 4: Making the Peppermint Royal Icing
Once your cookies are fully cooled, it’s time for the magic: the peppermint royal icing. Beat the meringue powder with peppermint extract and water until foamy, then sift in powdered sugar and add corn syrup. Mix on low to incorporate, scraping the bowl, then beat on medium-low for 5 minutes before increasing speed until glossy peaks form. Trust me, that beat time makes all the difference! Tint a portion pink and leave some bright white for classic peppermint contrast.
Step 5: Decorating Like a Pro
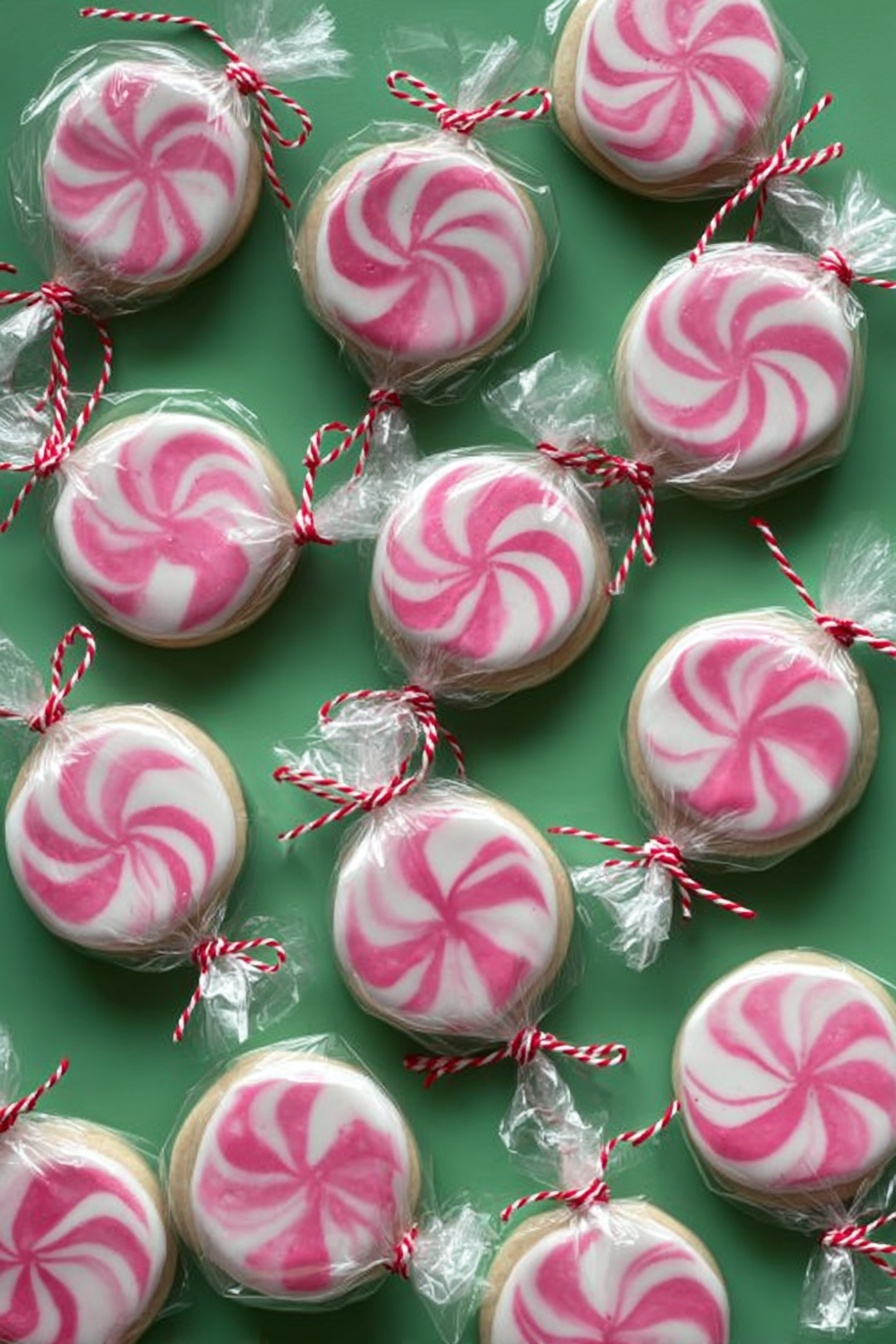
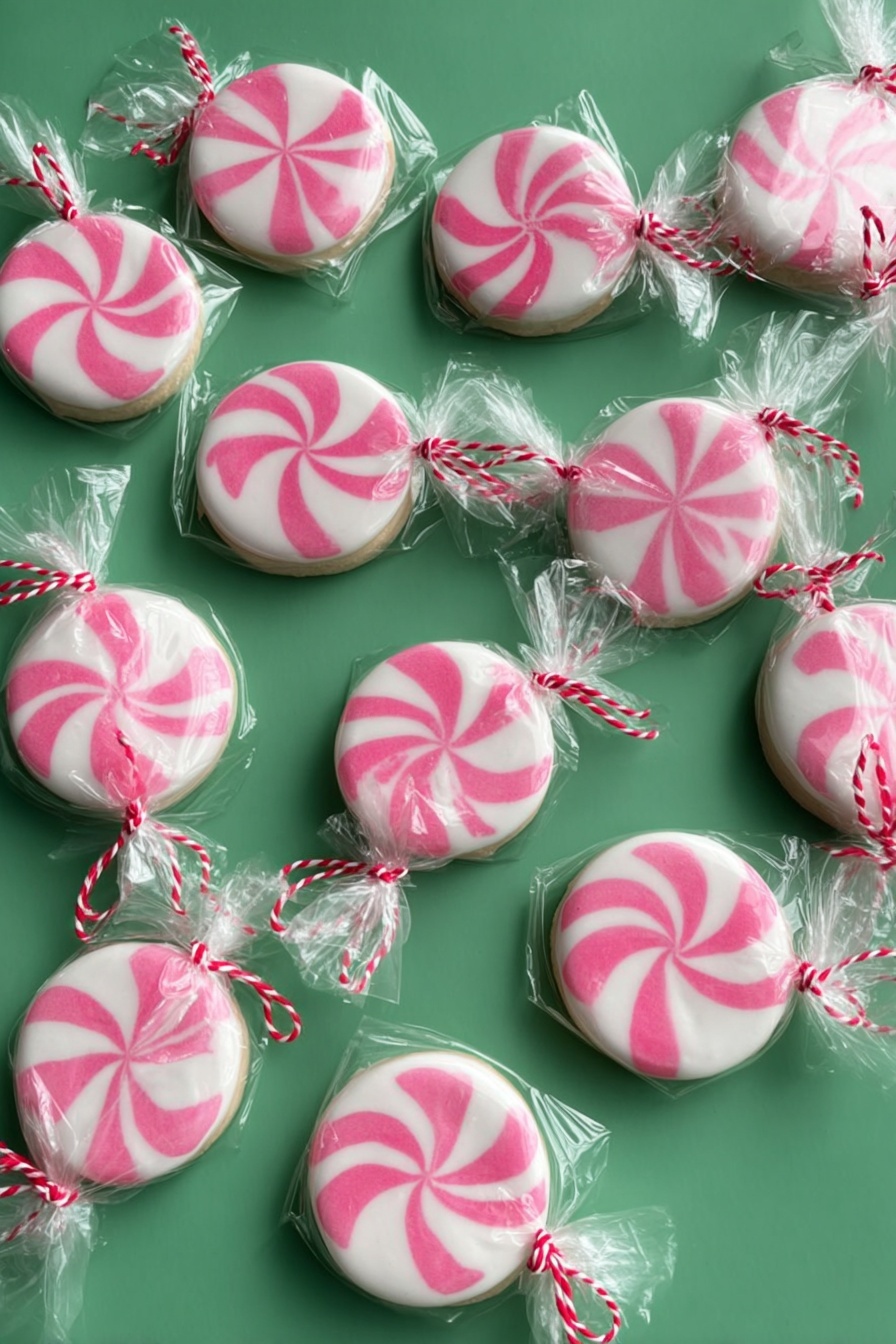
Use squeeze bottles to pipe an outline of white icing around your cookie edges first. Next, thin some white icing with a few drops of water until it flows like thick syrup for flooding inside the borders. Fill the centers with white flood icing, then pipe little pink dots around the perimeter. Here’s the fun part: use a toothpick to drag those pink dots inward to create that classic peppermint swirl pattern. Let your creativity flow and repeat with remaining cookies. Letting the icing dry fully—around 24 hours—is key to getting that perfect finish.
Pro Tips for Making Peppermint Sugar Cookies Recipe
- Keep Butter Cold: Cold butter helps create that tender, crumbly dough instead of greasy cookies.
- Freeze Before Baking: The chilling step guarantees crisp edges and prevents spreading too much.
- Slow Royal Icing Mixing: I learned the long mixing time yields the glossiest finish with perfect pipeability.
- Thin Icing Gradually: Thin your flood icing drop by drop to avoid it running off the cookie surface.
How to Serve Peppermint Sugar Cookies Recipe
Garnishes
I usually keep garnishes simple to highlight the peppermint swirl—sometimes adding a few crushed candy canes on top right before the icing sets for extra texture and sparkle. For casual gatherings, sprinkles in matching colors also add festive flair without overpowering the classic look.
Side Dishes
These cookies pair effortlessly with warm drinks like hot cocoa or peppermint-spiked coffee. I’ve also served them alongside simple fruit platters or cheese boards during holiday parties—they add a sweet contrast that’s just irresistible.
Creative Ways to Present
For gifting, I love packaging these cookies in 3×4 treat bags tied with twine or festive ribbon—you can even layer different colored cookies for a whimsical touch. For parties, displaying them on tiered trays or in holiday-themed tins really amps up the seasonal vibe and makes grabbing a cookie feel extra special.
Make Ahead and Storage
Storing Leftovers
After the icing is completely dry, I store leftover cookies in an airtight container at room temperature. They stay fresh and chewy for up to a week, though in my house that rarely happens because everyone sneaks in for a nibble!
Freezing
I’ve had great success freezing these cookies without icing—just flash-freeze them on a baking sheet and then transfer to a sealed container. When you want to decorate, thaw fully and then apply the royal icing fresh for the best look and taste. This trick really helps when you want to bake ahead of time.
Reheating
Since these cookies are best enjoyed at room temperature, I usually skip reheating altogether. But if you do want them warm, a quick 10-second zap in the microwave works wonders without melting the icing—just watch them carefully!
FAQs
-
Can I make these peppermint sugar cookies without royal icing?
Absolutely! While the royal icing adds that festive peppermint swirl and a lovely texture, you can enjoy these cookies plain or simply dusted with powdered sugar. Another option is to dip them in melted chocolate with crushed peppermint on top for a different but delicious finish.
-
What if I don’t have meringue powder for the icing?
Meringue powder stabilizes the royal icing, but if you’re in a pinch, you can try using egg whites (pasteurized is safest). Just be aware that egg whites might change the texture and shelf life slightly. Meringue powder is affordable and stores well, so it’s worth having if you plan to decorate often.
-
How thin should I roll the cookie dough?
I recommend rolling the dough about 1/4 inch thick for these peppermint sugar cookies. This thickness gives you tender but sturdy cookies that hold their shape perfectly during baking and decorating.
-
Can I use regular peppermint flavoring instead of peppermint extract?
Regular peppermint flavoring can work, but peppermint extract is stronger and purer, giving that bright, authentic mint flavor I love in this recipe. If you use flavoring, add a little at a time and taste to avoid overpowering the dough or icing.
Final Thoughts
This Peppermint Sugar Cookies Recipe is truly one I hold dear, especially during the holiday season. It brings together wonderful flavors, fun decorating, and memories with family and friends all in one bite. I encourage you to try making these yourself—you’ll love how much joy it brings to your kitchen and your gatherings. Whether you’re baking for the holidays or just because, these cookies are sure to become a treasured favorite.
Print
Peppermint Sugar Cookies Recipe
- Prep Time: 25 minutes
- Cook Time: 10 minutes
- Total Time: 35 minutes plus 24 hours drying time
- Yield: 5 dozen 1.5-inch cookies
- Category: Dessert
- Method: Baking
- Cuisine: American
- Diet: Halal
Description
These Peppermint Candy Sugar Cookies are festive, buttery, and perfectly soft with a crisp edge. Rolled out 1.5-inch sugar cookies are decorated with vibrant royal icing featuring a classic peppermint swirl design. Ideal for holiday celebrations, these cookies combine a tender crumb with a smooth and colorful icing finish that adds a fun and elegant touch.
Ingredients
Sugar Cookies
- 3 cups unbleached, all-purpose flour
- 2 teaspoons baking powder
- 1 cup (2 sticks) salted butter, cold and cut into cubes
- 1 cup sugar
- 1 egg
- 3/4 teaspoon pure vanilla extract
- 1/2 teaspoon almond extract
- 1.5 inch round cutter
Royal Icing
- 1/2 cup meringue powder
- 1 scant cup (almost full) water
- 2 pounds (32 ounces) powdered sugar
- 2 teaspoons light corn syrup
- 1 teaspoon peppermint extract (optional)
- Super white gel icing color
- Pink, red or green icing color
- Small squeeze bottles
- Toothpicks
- 3X4 Treat bags
- Twine or twist ties
Instructions
- Prepare the Dough: Preheat the oven to 350°F (175°C) and line baking sheets with parchment paper. In a medium bowl, whisk together the flour and baking powder; set aside. In the bowl of a stand mixer fitted with a paddle attachment, cream the cold cubed butter and sugar until light and fluffy. Beat in the egg along with the vanilla and almond extracts until well combined. Gradually add the flour mixture one cup at a time on low speed until just combined, scraping down the bowl as needed. The dough will be thick and somewhat crumbly.
- Roll and Cut Cookies: Line your rolling surface with wax paper and dust it along with your rolling pin with flour. Roll a portion of the dough on the floured surface, kneading it gently until smooth, and then roll it out to about 1/4 inch thickness. Dip the 1.5-inch round cutter in flour and cut as many circles as possible. Gather scraps, re-knead, re-flour the surface, and repeat the process until all dough is used.
- Freeze and Bake: Transfer the cut cookies to the prepared baking sheets. Optionally, you can roll the dough directly on parchment and transfer it with the paper to the baking sheet. Freeze the cookies for about 10 minutes to help them hold their shape. Bake in the preheated oven for 9 to 12 minutes until the edges are set. Remove from the oven and allow the cookies to cool for a few minutes on the baking sheet. If needed, use the cookie cutter to trim edges for perfect shape, then transfer cookies to wire racks to cool completely.
- Make Royal Icing: In a large bowl of a stand mixer fitted with the paddle attachment, combine meringue powder, peppermint extract (optional), and water. Beat until foamy and combined. Sift in powdered sugar and add corn syrup, mixing on low until incorporated. Scrape down the sides of the bowl, then beat on medium-low for 5 minutes. Increase speed to medium-high and continue beating until the icing is glossy and forms stiff peaks. Tint a small portion of the icing pink using pink gel color and add a few drops of white gel color to the remaining white icing.
- Decorate the Cookies: Using a squeeze bottle, pipe and outline each cookie with the white icing. Thin the remaining white icing by adding a few drops of water at a time until it reaches flood consistency, similar to thick syrup. Flood the center of the outlined cookie with the thinned white icing. Pipe dots of pink icing around the edge of the cookie, then use a toothpick to drag the pink dots toward the center to create a peppermint swirl pattern. Repeat decoration for all cookies. Allow the icing to dry completely for 24 hours.
Notes
- Using cold butter and chilling the cookies before baking helps them maintain their shape and prevents excessive spreading.
- Adjust the icing consistency carefully; flood icing should flow smoothly but not be too runny to avoid colors bleeding.
- If pink icing sits on top of white icing without sinking in, gradually thin both icings more with water for better blending.
- Store decorated cookies in an airtight container at room temperature for up to one week.
- If desired, peppermint extract is optional in the royal icing for subtle flavor enhancement.
- For perfect cut-outs, rolling the dough on parchment and baking with the parchment paper transfers the cookies easily.
Nutrition
- Serving Size: 1 cookie (about 20g)
- Calories: 90
- Sugar: 8g
- Sodium: 35mg
- Fat: 4.5g
- Saturated Fat: 2.8g
- Unsaturated Fat: 1.5g
- Trans Fat: 0g
- Carbohydrates: 12g
- Fiber: 0.2g
- Protein: 1g
- Cholesterol: 15mg

