
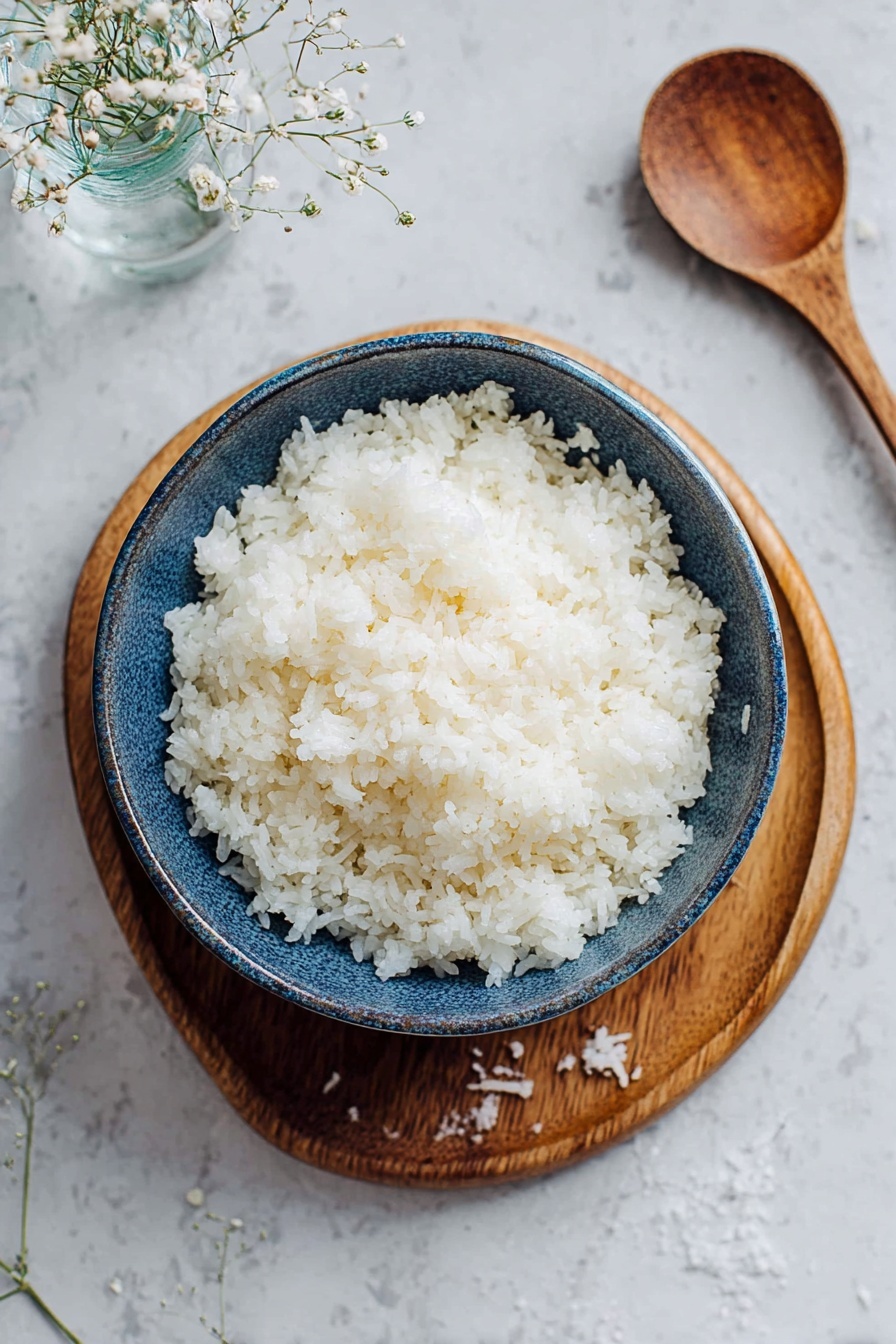
If you’ve ever struggled with sticky, soggy sushi rice or that frustrating, underwhelming blandness, you’re going to love this. I’m sharing the Perfect Sushi Rice Recipe that’s foolproof, simple, and absolutely delicious — one that I actually use every time I make sushi at home. Whether you’re rolling California rolls or just serving rice bowls, this recipe nails the texture and flavor every single time.
Why You’ll Love This Recipe
- Consistent Results Every Time: I’ve tested this method over and over and it never disappoints – perfectly sticky but not mushy.
- Simple Ingredients: You only need a few pantry staples like sushi rice, rice vinegar, sugar, and salt to get started.
- Works with Rice Cooker or Stove: Whether you have a rice cooker or just a pot, this recipe adapts beautifully.
- Great for Any Sushi Style: This rice forms the perfect base for rolls, nigiri, or even poke bowls.

Ingredients You’ll Need
Getting your ingredients right is key to a perfect sushi rice base. I always recommend using authentic Japanese sushi rice if possible — the texture is a game-changer. Plus, the sushi vinegar mix brings that essential balance of tang and sweetness.

- Sushi Rice: Short-grain rice is essential because it gets nice and sticky when cooked but stays tender.
- Water: The exact amount depends on your cooking method, so it’s worth measuring carefully for consistent texture.
- Rice Vinegar: Use Japanese rice vinegar for authenticity; it’s milder and less acidic than other types.
- Sugar: Adds just the right touch of sweetness to balance the vinegar.
- Salt: Enhances the flavor and rounds out the seasoning perfectly.
Variations
I love making this recipe my own depending on the occasion and what I have on hand. Feel free to tweak things here and there to suit your taste or dietary needs — sushi rice is surprisingly versatile!
- Brown Sushi Rice: For a nuttier twist, try substituting half the sushi rice with brown short-grain rice — just remember it needs longer soaking and cooking times.
- Vinegar Mix Variations: Sometimes I add a splash of mirin or a tiny bit of kombu seaweed to the vinegar for an extra layer of umami flavor.
- Low-Sugar Option: You can reduce the sugar slightly if you prefer a less sweet rice, though it won’t be quite traditional.
- Vegan Friendly: This recipe is naturally vegan and gluten-free, perfect for inclusive meals!
How to Make Perfect Sushi Rice Recipe
Step 1: Rinse the Rice Until the Water Runs Clear
This is a step you don’t want to skip. I used to rush it, but I learned that rinsing the sushi rice thoroughly removes excess starch and prevents gummy clumps. Use your hand to gently stir the rice under cold running water in a large bowl — keep going until the water is nearly clear (usually about 4-5 rinses). This simple step helped me get that perfect non-sticky but clingy texture every time.
Step 2: Drain and Soak the Rice
After draining the rinsed rice in a sieve or colander, soak it in just-measured water for 30 minutes. I’ve found this soaking step allows the grains to absorb water evenly, resulting in fluffier rice. Skipping this can lead to uneven cooking — and that’s no fun when you’re trying to roll sushi!
Step 3: Cook the Rice (Rice Cooker or Stove Method)
If you have a rice cooker, this step is effortless — just add the soaked rice with 1 ½ cups plus 1 tablespoon water, choose the “sushi rice” mode if it has one, and let it work its magic. When the cooking is done, resist the urge to lift the lid for 10-15 minutes — this steaming time finishes the rice perfectly.
If you’re cooking on the stove, place soaked rice and 1 ⅜ cups of water into a pot with a tight-fitting lid. Bring it to a boil, then reduce the heat to low and let it simmer without opening the lid for 8 minutes. After that, remove from heat and let it steam with the lid on for another 10-15 minutes. This hands-off approach is what I learned to trust for perfect texture on the stove.
Step 4: Prepare the Sushi Vinegar
While the rice cooks, mix your sushi vinegar ingredients: rice vinegar, sugar, and salt. Heat gently in a small saucepan, stirring until the sugar and salt dissolve fully, then turn off the heat. The warm vinegar mixture melds beautifully with the rice, giving it that signature tangy-sweet flavor.
Step 5: Season and Cool the Rice
Transfer the hot rice to a large bowl (a wooden sushi oke if you have one). Pour the warm sushi vinegar evenly over the rice and gently fold it in using a slicing motion with a wooden spatula or rice paddle — avoid smashing the grains! I discovered that fanning the rice as you mix helps it cool down quickly and gives it that slight glossy finish.
Cover the bowl with a damp tea towel to keep the rice moist. Let it cool to room temperature before using it for sushi or bowls — this prevents soggy sushi and ensures the rice holds together just right.
Pro Tips for Making Perfect Sushi Rice Recipe
- Don’t Skip the Soak: When I started soaking my rice, the texture totally changed — no more crunchy or uneven bits.
- Balance Your Water Ratio: I once ignored rice cooker instructions and ended up with mush, so always adjust water to your cooker’s guidelines.
- Gentle Folding: Mixing with a slicing motion keeps each grain intact, which is key to beautiful sushi rice.
- Use a Damp Towel: Covering the rice keeps it moist but cool — a trick I swear by to prevent dried-out rice.
How to Serve Perfect Sushi Rice Recipe

Garnishes
I usually keep it traditional with a sprinkle of toasted sesame seeds and finely chopped scallions, which add a subtle crunch and fresh flavor. Sometimes, I add tiny flecks of toasted nori or furikake seasoning for an extra umami punch. These little touches really make the sushi rice pop.
Side Dishes
When serving sushi rice, I love pairing it with simple sides like pickled ginger, wasabi, and soy sauce for dipping. For a full meal, steamed edamame or miso soup complement the rice beautifully and round out the Japanese-inspired feast perfectly.
Creative Ways to Present
For special occasions, I’ve rolled sushi rice into cute bite-sized nigiri and topped each piece with fresh fish or avocado. I’ve also shaped the rice into small bowls and layered ingredients for poke bowls, which always wow guests. Presentation is half the fun — colorful garnishes and neat shapes make this dish feel like a celebration.
Make Ahead and Storage
Storing Leftovers
I learned the hard way that freshly cooked sushi rice is best for sushi — leftover rice gets hard and loses that perfect texture. However, if you do have leftovers, store them in an airtight container in the fridge and use within three days for dishes like fried rice or poke bowls rather than sushi rolls.
Freezing
Freezing sushi rice isn’t something I usually recommend because it changes the texture quite a bit, but if you must, spread it thinly in an airtight container and thaw gently in the fridge. Use thawed rice for cooked dishes rather than raw sushi to maintain the best eating experience.
Reheating
If you want to reheat leftover rice for fried rice or rice bowls, sprinkle a bit of water over it, cover with a damp paper towel, and microwave in short bursts to bring back some moisture. Stir it occasionally to heat evenly without drying it out.
FAQs
-
Can I use regular long-grain rice instead of sushi rice?
Regular long-grain rice isn’t ideal because it doesn’t stick together well, which is essential for sushi. Sushi rice is short-grain and has more surface starch that helps it stick, making rolls and nigiri hold their shape.
-
Do I have to use a rice cooker for the perfect sushi rice recipe?
Not at all! While rice cookers are convenient and can help beginners achieve consistent results, the stovetop method works great too — just follow the water ratios and cooking times carefully.
-
Why do I need to let the rice cool before making sushi?
Cooling the rice to room temperature allows it to firm up slightly and prevents sogginess when rolling sushi. Plus, hot rice can make your seaweed sheets soggy and harder to handle.
-
How long does sushi rice stay good after cooking?
Sushi rice tastes best fresh and should ideally be used within hours. If kept in an airtight container, leftovers can last up to three days in the refrigerator but are better suited for dishes like fried rice rather than sushi rolls.
Final Thoughts
I absolutely love how this Perfect Sushi Rice Recipe comes together every time — it’s simple enough for weeknight sushi but impressive enough for guests. When I first tried it, I felt so proud to make authentic tasting sushi rice at home without the hassle. I hope you’ll find the same joy and success with it. Grab your rice, give these steps a try, and impress your friends with the best sushi rice ever — I promise, once you get it right, you’ll never want to go back!
Print
Perfect Sushi Rice Recipe
- Prep Time: 40 minutes
- Cook Time: 10 minutes
- Total Time: 1 hour 50 minutes
- Yield: 4 servings (4-8 sushi rolls)
- Category: Side Dish
- Method: Rice Cooker and Stovetop
- Cuisine: Japanese
Description
Learn how to make perfect sushi rice every time with this detailed guide. Whether using a rice cooker or stovetop, this recipe ensures flavorful, sticky rice ideal for sushi rolls or poke bowls. The sushi rice is seasoned with a delicate balance of rice vinegar, sugar, and salt for authentic taste and texture.
Ingredients
Sushi Rice
- 1 1/2 cups sushi rice
- 1 1/2 cups + 1 tbsp water (if using rice cooker method)
- 1 3/8 cups (330 ml) water (if using stovetop method)
Sushi Vinegar
- 1/4 cup rice vinegar
- 2 tablespoons sugar
- 1 teaspoon salt
Instructions
- Rinse Rice: Place the sushi rice in a large bowl and wash it under running cold water, moving the rice in a circular motion with your hand until the water runs clear to remove excess starch.
- Drain Rice: Carefully discard the rinse water using a sieve or by pouring it off.
- Cook Sushi Rice in a Rice Cooker: Place the washed rice with 1 ½ cups plus 1 tablespoon of water in the rice cooker bowl. Let it soak for 30 minutes. Start cooking using the sushi rice setting if available. After cooking, switch off and let the rice sit undisturbed for 10-15 minutes with the lid closed.
- Cook Sushi Rice on Stovetop: Place washed rice with 1 ⅜ cups water in a pot and soak for 30 minutes. With the lid on, bring to a boil, then reduce heat to low and cook for 8 minutes. Do not open the lid during cooking. Remove from heat and let the rice steam with the lid on for another 10-15 minutes.
- Make Sushi Vinegar: In a small saucepan, combine rice vinegar, sugar, and salt. Bring to a boil, then turn off the heat and stir until the sugar dissolves completely.
- Season Rice: Transfer the hot cooked rice to a large bowl and pour over the hot vinegar mixture. Toss gently but thoroughly until the rice is evenly coated.
- Cool: Cover the bowl with a damp tea towel to prevent drying and let the sushi rice cool to room temperature on the counter.
- Serve: Use the prepared sushi rice to make your favorite sushi rolls or poke bowls.
Notes
- For beginners, the rice cooker method is recommended for consistent results.
- The rice-to-water ratio for stovetop cooking is approximately 1:1.1 (US cups), while for rice cookers it is about 1:1.25 but may vary by model. Consult your cooker manual to adjust accordingly.
- 1 ½ cups (300g) uncooked sushi rice yields enough for 4-5 thick California rolls or 7-8 medium maki rolls, serving about 2-4 people depending on appetite.
- Use freshly cooked sushi rice for sushi; refrigerated leftovers will harden and are better suited for poke bowls or fried rice.
- Store leftover cooked rice in an airtight container in the refrigerator for up to three days.
Nutrition
- Serving Size: 1/4 of prepared sushi rice (approximately 150g)
- Calories: 180 kcal
- Sugar: 3.5 g
- Sodium: 180 mg
- Fat: 0.3 g
- Saturated Fat: 0.0 g
- Unsaturated Fat: 0.3 g
- Trans Fat: 0 g
- Carbohydrates: 40 g
- Fiber: 1 g
- Protein: 3.5 g
- Cholesterol: 0 mg

