
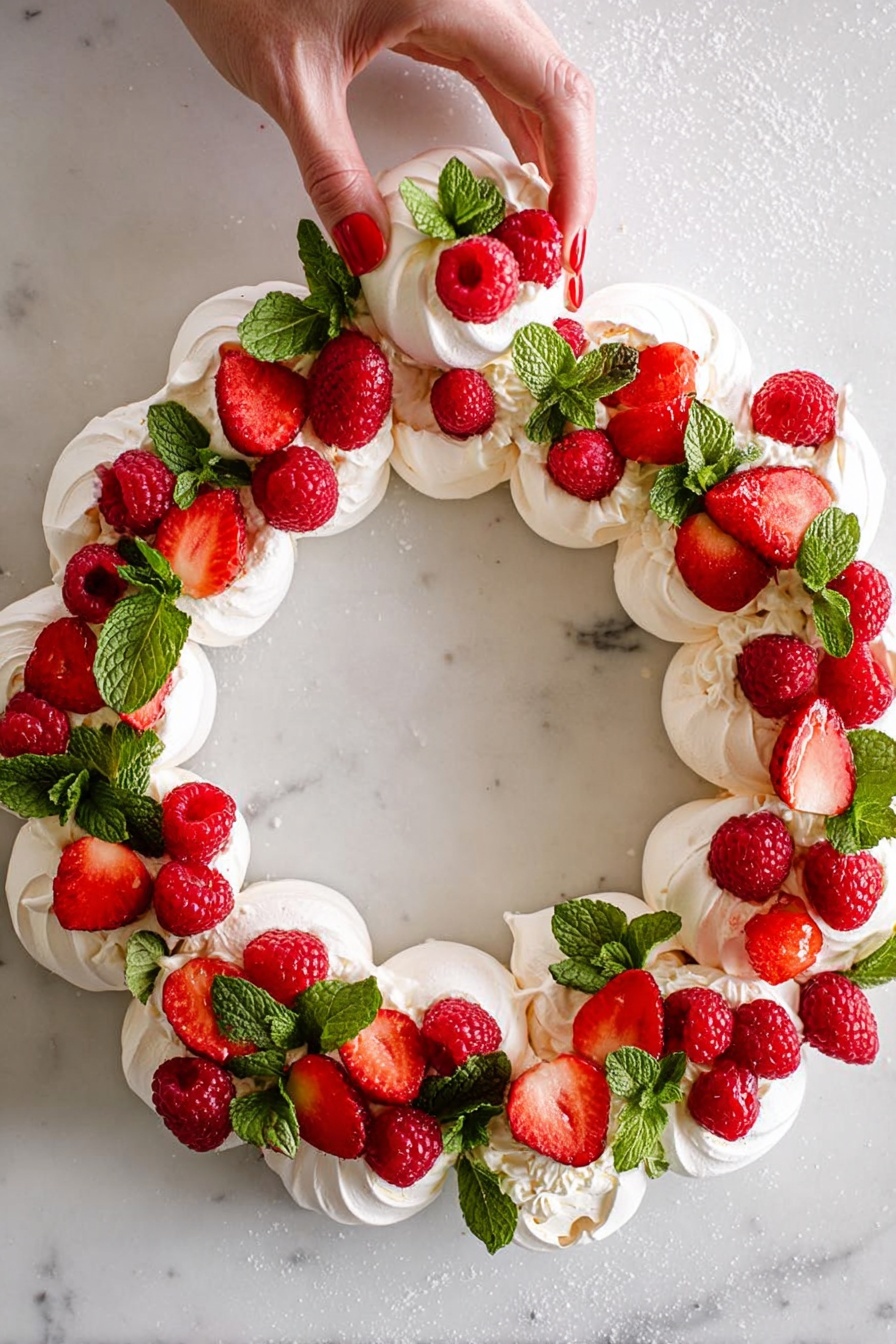
If you’re anything like me and love desserts that wow without being fussy, then this Pull Apart Pavlova Wreath with Fresh Fruit Recipe is going to be your new best friend. I absolutely love how this delicate yet stunning pavlova wreath comes together — it’s like a little edible celebration that you can share with friends and family. Plus, the fresh fruit topping adds that perfect pop of color and flavor, making every bite something special. Stick with me and I’ll share all my tips and tricks so you can nail this at home!
Why You’ll Love This Recipe
- Impressive Presentation: It looks absolutely stunning as a centerpiece and guests always ask for the recipe.
- Simple Techniques: Despite the elegant look, the meringues are actually easy to make with a few key tips.
- Customizable Toppings: You can switch up the fresh fruit and herbs depending on the season or your mood.
- Shareable Fun: The pull apart style makes it interactive and fun to eat, perfect for gatherings.

Ingredients You’ll Need
Every ingredient in this Pull Apart Pavlova Wreath with Fresh Fruit Recipe has a purpose to deliver that melt-in-your-mouth texture and sweet freshness. I always make sure to use the freshest eggs and high-quality cream since those make a huge difference in the final flavor and texture.

- Extra-large egg whites: Room temperature egg whites whip up better for that airy meringue structure.
- Icing sugar / powdered sugar: Sifting it helps avoid lumps and ensures a silky smooth pavlova shell.
- Cornstarch: This tiny addition helps keep the meringue crisp on the outside and marshmallowy inside.
- Vanilla extract: Pure vanilla boosts the sweetness without overpowering the flavor.
- Heavy cream or whipping cream: Make sure it’s cold so it whips up into fluffy peaks quickly.
- Fresh fruit (berries): I love a mix of strawberries, blueberries, and raspberries for both color and contrast.
- Fresh mint: Adds a refreshing herbal note and looks gorgeous as a garnish.
Variations
I love experimenting with this Pull Apart Pavlova Wreath with Fresh Fruit Recipe depending on the occasion or what I have on hand—trust me, you’ll find so many ways to make it your own!
- Different Fruits: I once swapped the berries for tropical fruits like kiwi, mango, and passionfruit, which gave the wreath an exotic twist my family adored.
- Dairy-Free Version: Use coconut whipped cream instead of heavy cream for a luscious, dairy-free option that still tastes incredible.
- Chocolate Drizzle: When I wanted a richer dessert, I drizzled melted dark chocolate over the pavlova mounds just before serving—it added a lovely bittersweet edge.
- Mini Wreaths: For individual servings, try piping smaller pavlova circles into mini wreaths—perfect for parties or lunchboxes.
How to Make Pull Apart Pavlova Wreath with Fresh Fruit Recipe
Step 1: Prepare Your Oven and Meringue Base
First things first, preheat your oven to a low 90°C (195°F) and line two baking sheets with parchment paper. This low-and-slow baking is key to getting that crisp shell while keeping the inside soft. When I first tried making pavlova, I made the mistake of baking at too high a temperature and ended up with cracks. Patience is your ally here!
Step 2: Whip Your Egg Whites to Stiff Peaks
In your stand mixer (or with a hand mixer), start beating the egg whites until foamy. Now add the sifted icing sugar gradually, then keep whisking until the mixture turns bright white and stiff peaks form – this could take up to 8 minutes. I discovered this trick the hard way: adding sugar too fast means under-whipped meringue, so slow and steady wins the race!
Step 3: Fold in Cornstarch and Vanilla
Once you have stiff peaks, gently fold in cornstarch and vanilla extract to keep that glossy, stable texture. This little step makes the difference between a pavlova that holds its shape beautifully and one that deflates.
Step 4: Pipe or Spoon Your Meringue Circles
Pipe or spoon the meringue into small mounds about 5 cm in diameter, spaced 5 cm apart on your baking sheets. I like using a piping bag with a plain round tip for uniform shapes but a spoon works just as well! Then, use the back of a teaspoon to make a little dent in the center of each, perfect for holding the cream later.
Step 5: Bake Slowly and Cool Completely
Bake for 60 minutes then turn off the oven—here’s the beauty: leave the pavlovas inside as the oven cools down for about 2 hours. This slow cooling prevents cracking and lets your pavlova develop the perfect texture. I used to rush this part, and the cracks reminded me why patience is so important!
Step 6: Whip Cream and Assemble the Wreath
While the meringues cool, whip together heavy cream, sifted icing sugar, and vanilla until you get medium-stiff peaks—this cream should be thick but still spreadable. Arrange your cooled meringue circles on a large platter in a wreath shape, dollop cream onto each, then adorn with fresh fruit and sprigs of mint. The visual impact here is so satisfying, and my family always goes crazy for this fresh, light combo.
Pro Tips for Making Pull Apart Pavlova Wreath with Fresh Fruit Recipe
- Use Room Temperature Egg Whites: This helps them whip up faster and to greater volume.
- Sift Your Sugar: Removing any lumps leads to a smoother meringue and prevents graininess.
- Slow Cooling Is Key: Don’t rush removing your pavlovas from the oven to avoid cracks—trust me, it makes all the difference.
- Pipe with Confidence: Make the dent in each meringue circle before baking—it’s easier when raw and holds cream beautifully.
How to Serve Pull Apart Pavlova Wreath with Fresh Fruit Recipe

Garnishes
I’m a big fan of layering fresh mint leaves on top—it adds a burst of color and a lovely fresh flavor that balances the sweetness perfectly. Sometimes, I’ll lightly dust some extra icing sugar just before serving for that elegant snowy effect.
Side Dishes
This pavlova wreath is a showstopper dessert, so I usually keep side dishes light—think a sparkling fruit punch or a refreshing herbal iced tea. It pairs beautifully with a squeeze of fresh lemon on the fruit for a tart contrast.
Creative Ways to Present
For holidays or celebrations, I’ve arranged the meringue circles in the shape of a holiday wreath with red berries and rosemary sprigs for a festive vibe. And for birthdays, adding edible flowers to the fruit topping makes it look almost too pretty to eat (almost!).
Make Ahead and Storage
Storing Leftovers
If you have leftovers (rare in my house!), store the assembled wreath in the fridge loosely covered with plastic wrap to keep the meringue crisp as long as possible. Just know that the cream will soften the meringue over time, so it’s best enjoyed fresh.
Freezing
I usually freeze the baked meringue circles before assembling, storing them in an airtight container for up to a month. When you’re ready, just thaw them at room temperature for 30 minutes before adding your cream and fruit—a total game changer for quick entertaining.
Reheating
Reheating isn’t really recommended since pavlova is best served fresh, but if you want to warm meringue, briefly place it in a low oven (around 100°C/210°F) for 5 minutes to refresh crispness—just don’t add cream until serving!
FAQs
-
Can I make the meringue ahead of time for the Pull Apart Pavlova Wreath with Fresh Fruit Recipe?
Absolutely! The meringue circles can be baked and stored in an airtight container at room temperature for up to 2 days or frozen for longer storage. This makes day-of assembly a breeze and keeps the pavlova fresh and crisp.
-
What fruits work best on the Pull Apart Pavlova Wreath with Fresh Fruit Recipe?
I love using a mix of berries—strawberries, raspberries, blueberries—but feel free to use seasonal fruits like kiwi, passionfruit, or stone fruits. Just pick fruits that are juicy but not so soft that they will make the meringue soggy quickly.
-
How do I prevent the pavlova from cracking?
Cracking usually happens when pavlova cools too quickly. The key is to bake at low temperature and leave the pavlova in the turned-off oven to cool for about two hours. This slow cooling helps avoid cracks and keeps the inside soft.
-
Can I use a hand mixer instead of a stand mixer?
Yes! While a stand mixer is easier for whipping egg whites to stiff peaks, you can definitely use a hand mixer—just be patient and make sure your bowl and whisk are clean and free of any grease.
-
Is this recipe gluten-free?
Yes, this Pull Apart Pavlova Wreath with Fresh Fruit Recipe is naturally gluten-free, making it a perfect dessert option for guests with gluten sensitivities.
Final Thoughts
I can’t recommend this Pull Apart Pavlova Wreath with Fresh Fruit Recipe enough—it’s one of those desserts that feels fancy but is surprisingly easy once you get the hang of it. Every time I bring it to a gathering, people are impressed by both how it looks and tastes. So next time you want to treat yourself or your loved ones to something unique and delightful, give this recipe a try—I promise it’s worth the love and patience it takes to make. Happy baking!
Print
Pull Apart Pavlova Wreath with Fresh Fruit Recipe
- Prep Time: 25 minutes
- Cook Time: 1 hour
- Total Time: 3 hours 25 minutes
- Yield: 15 servings
- Category: Dessert
- Method: Baking
- Cuisine: Australian
Description
This Pull Apart Pavlova Wreath is a stunning dessert featuring delicate, crisp meringue nests baked to perfection, topped with whipped cream and fresh berries. It’s perfect for special occasions or gatherings, combining light, airy textures with vibrant fresh fruit and a hint of mint for a refreshing finish.
Ingredients
For the Meringue
- 6 extra-large egg whites
- 2 cups icing sugar / powdered sugar, sifted
- 2 tbsp cornstarch
- 1 tsp vanilla extract
For the Pavlova Wreath
- 3 cups heavy cream / whipping cream
- 1 cup icing sugar / powdered sugar, sifted
- 1 tsp vanilla extract
- fresh fruit (berries such as strawberries, blueberries, raspberries)
- fresh mint leaves for garnish
Instructions
- Preheat Oven and Prepare Baking Sheets: Preheat the oven to 90°C (195°F) and line two baking sheets with parchment paper to prevent the meringues from sticking.
- Beat Egg Whites: In the bowl of a stand mixer fitted with the whisk attachment, beat the egg whites until foamy to start developing structure.
- Add Icing Sugar and Whip: Gradually add the sifted icing sugar while continuing to beat until the egg whites become bright white, voluminous, and form stiff peaks when you lift the beaters, which may take up to 8 minutes.
- Incorporate Cornstarch and Vanilla: Add the cornstarch and vanilla extract to the meringue mixture and gently whip until fully combined, which helps stabilize the meringue texture.
- Shape Meringues: Pipe or spoon small mounds of the meringue mixture about 5cm in diameter onto the prepared baking sheets, spacing them about 5cm apart to allow room for expansion.
- Create Indents: Use a teaspoon to make a small dent in the center of each meringue mound to hold the whipped cream and toppings later.
- Bake Meringues: Place the baking sheets in the oven and bake for 60 minutes. Afterward, turn off the oven and allow the meringues to cool inside for approximately 2 hours, which ensures they dry out without cracking.
- Arrange Meringues in a Wreath: Once the meringues are completely cool, carefully remove them from the parchment and arrange them in a circular wreath shape on a large serving platter or board.
- Whip Cream: Whip the heavy cream with the icing sugar and vanilla extract until medium-stiff peaks form, providing a light and fluffy cream topping.
- Assemble and Decorate: Spoon dollops of whipped cream onto each meringue, then decorate generously with fresh berries and fresh mint leaves for added color and flavor.
- Serve: Serve immediately for best texture and freshness, allowing guests to pull apart pieces from the wreath.
Notes
- Ensure egg whites are at room temperature for better volume.
- Sift icing sugar and cornstarch to avoid lumps in the meringue.
- Do not open the oven during baking or cooling to prevent cracking.
- Use fresh, ripe berries for the best flavor impact.
- Can be assembled shortly before serving to maintain crispness of meringue.
Nutrition
- Serving Size: 1 slice (approx. 1/15th of wreath)
- Calories: 210 kcal
- Sugar: 25 g
- Sodium: 15 mg
- Fat: 9 g
- Saturated Fat: 5.5 g
- Unsaturated Fat: 2 g
- Trans Fat: 0 g
- Carbohydrates: 28 g
- Fiber: 1 g
- Protein: 3 g
- Cholesterol: 35 mg


