
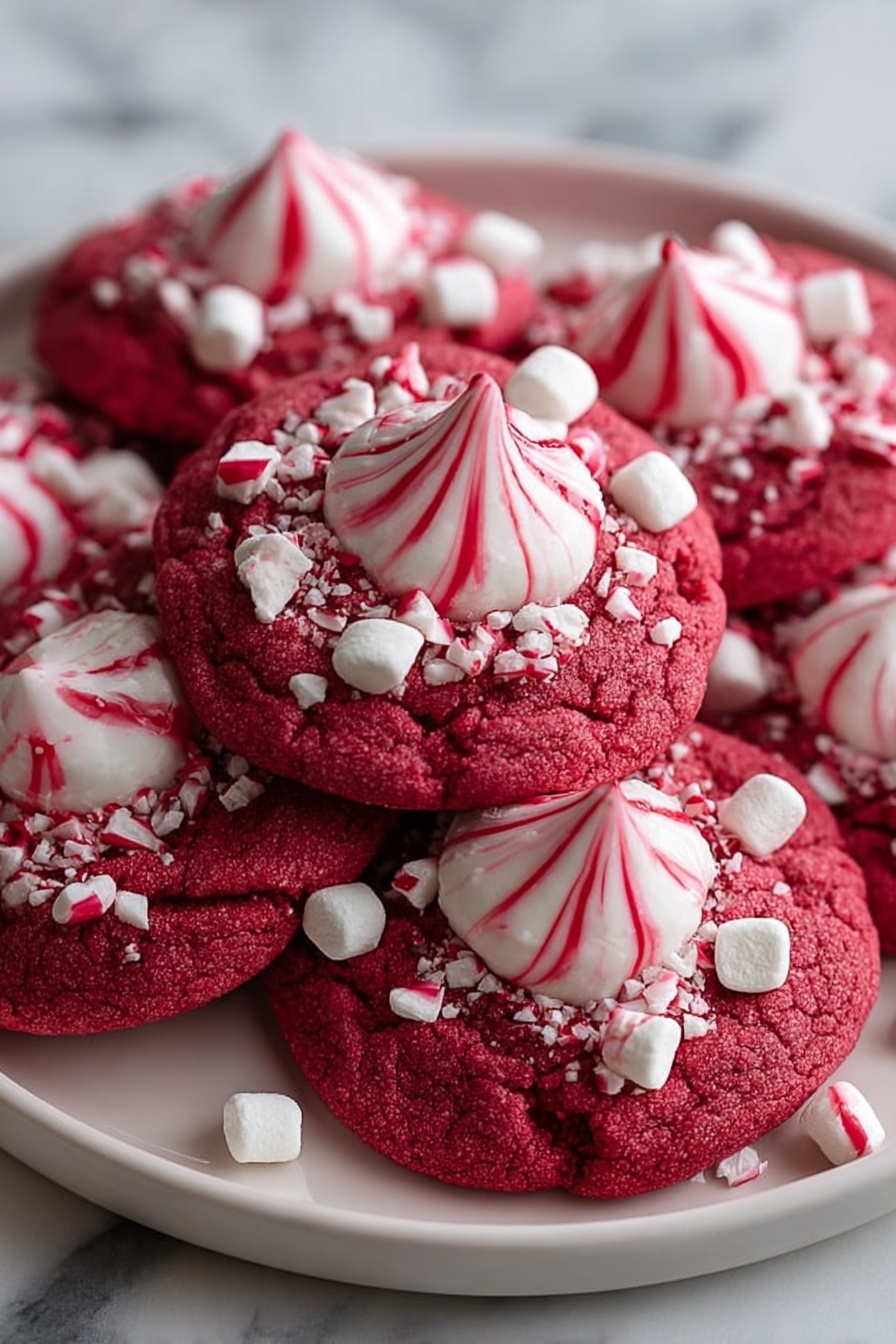
If you’re on the hunt for a festive, show-stopping treat that’s packed with holiday cheer, you absolutely need to try my Red Velvet Peppermint Cookies Recipe. These little delights combine the classic rich, tender crumb of red velvet with a refreshing peppermint twist that instantly brightens up any cookie tray. I absolutely love how they bring that cozy Christmas vibe to my kitchen, and every year my family goes crazy for them. Stick around and I’ll share all the tips and tricks I’ve learned to help you nail these cookies perfectly on your first try!
Why You’ll Love This Recipe
- Festive Flavor Combo: The classic rich red velvet paired with refreshing peppermint makes these cookies a holiday favorite.
- Simple Yet Impressive: You don’t need fancy ingredients or techniques, just a little patience and love.
- Perfect Texture: Soft, tender cookies with a crisp edge that hold peppermint kisses perfectly in place.
- Great for Gifting: They look stunning on cookie trays and in holiday tins, making gift-giving a breeze.

Ingredients You’ll Need
I always marvel at how just a handful of pantry staples come together to create these festive jewels. The trick is using quality ingredients, especially when it comes to the cocoa and peppermint candies. Using gel food coloring gives a vibrant pop without affecting the dough texture. Here’s a quick rundown to prepare you for holiday baking success:
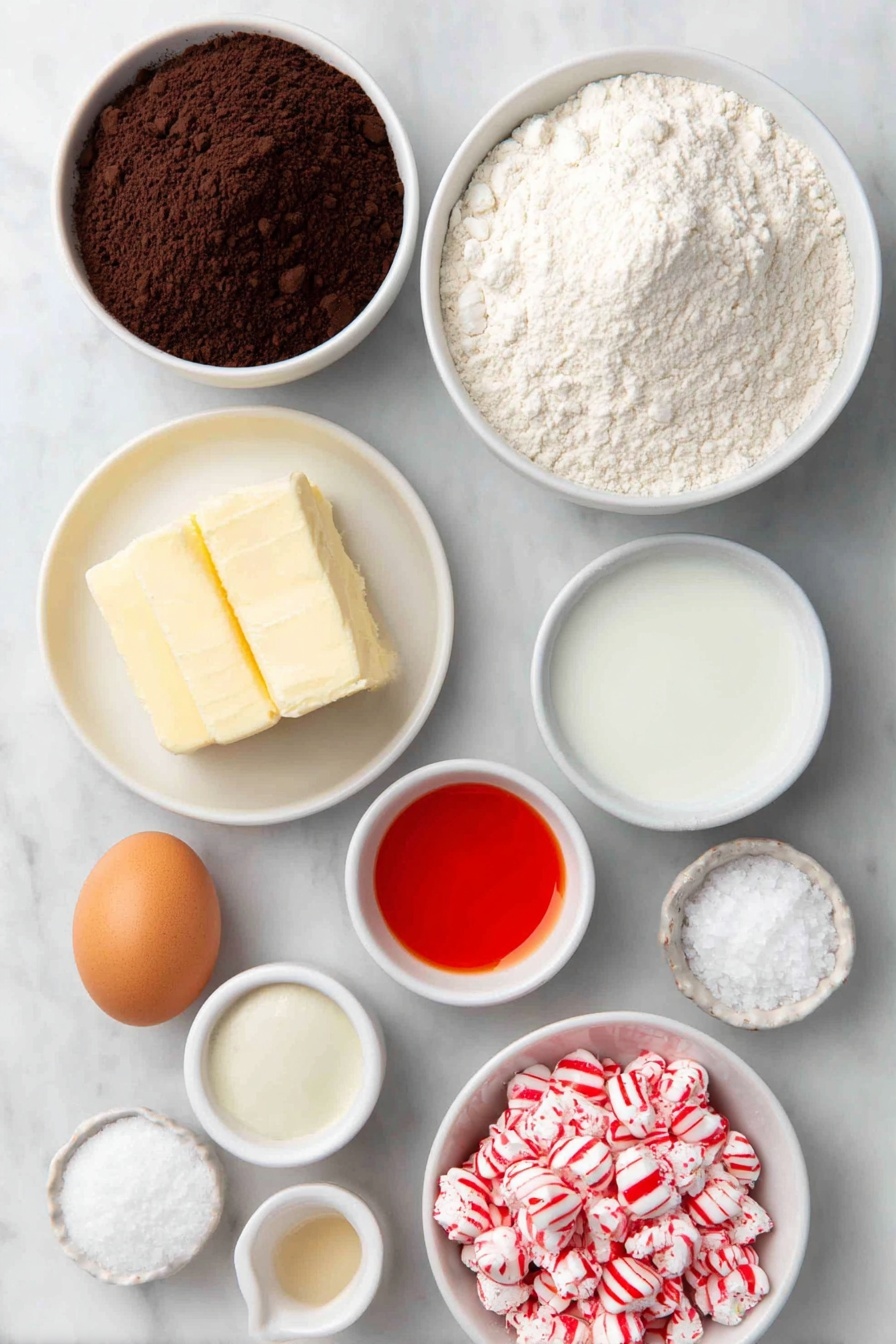
- All-purpose flour: The backbone of your cookie, providing structure and chewiness—you want to measure it properly to avoid dense cookies.
- Unsweetened cocoa powder: Adds depth and the iconic red velvet flavor; I prefer Dutch-processed for its smooth, mellow taste.
- Baking powder & baking soda: Both work in tandem to provide lift and a soft crumb—don’t skip or substitute.
- Salt: Enhances flavor and balances the sweetness; even a pinch makes a difference.
- Unsalted butter: Softened is key here for fluffiness—never melted! I like using European-style butter for extra richness.
- Granulated sugar: Sweetens and helps create that soft yet slightly crisp texture.
- Large egg: The binder that holds everything together while adding moisture.
- Vanilla extract: A small splash amps up the overall flavor profile.
- Red food coloring (gel preferred): Gel colors give you brighter hues without watering down your dough.
- Buttermilk: Reacts with baking soda to tenderize and add subtle tang that’s signature to red velvet.
- Peppermint candy kisses (unwrapped): The magic topper; they melt slightly and add just the right hint of mint.
- Crushed candy canes or peppermint candies: For garnish and extra festive crunch.
Variations
One of the things I love most about this Red Velvet Peppermint Cookies Recipe is how easy it is to riff on it to suit your preferences or dietary needs. Whether you want to dial up the mint or make them gluten-free, there’s room to make this recipe your own.
- Mint Lovers’ Dream: I sometimes swap the peppermint kisses for mint chocolate chips to amp up the cooling flavor.
- Gluten-Free Twist: Substitute all-purpose flour with a gluten-free blend—just make sure it has xanthan gum for texture.
- White Chocolate Variation: I once replaced peppermint kisses with white chocolate chips and crushed pink peppercorns for a more subtle holiday treat.
- Vegan Adaptation: Use vegan butter and a flax egg; I recommend trying a small batch first to tweak baking times.
How to Make Red Velvet Peppermint Cookies Recipe
Step 1: Whisk Together the Dry Ingredients
Start by combining the all-purpose flour, cocoa powder, baking powder, baking soda, and salt in a medium bowl. I like to give everything a good whisk to ensure the leaveners and cocoa powder are evenly distributed, which really helps when mixing into the wet ingredients later. Set this mixture aside while you move on to creaming your butter and sugar.
Step 2: Cream Butter and Sugar Until Fluffy
In a large bowl, beat your softened butter and granulated sugar together with a mixer on medium speed. This usually takes around 2-3 minutes until the mixture is light and fluffy. Trust me, this step is crucial for giving your cookies a tender texture. Then add in the egg and vanilla extract, mixing just until combined. I discovered that overmixing here can make cookies tough, so stop once things look evenly blended.
Step 3: Add the Red Velvet Magic
Turn your mixer to low and add in the red food coloring and buttermilk. I prefer gel food coloring because the color stays vibrant without changing the dough’s consistency. Stir until the dough reaches that beautiful, deep red shade that screams holiday. Now gradually add your dry ingredients, mixing just until everything comes together. The dough will feel soft and a bit sticky, which is perfect.
Step 4: Chill the Dough
Cover the cookie dough tightly with plastic wrap and pop it in the fridge for at least 30 minutes. I learned this trick after struggling with cookies that spread too much in the oven. Chilling firms up the dough and helps the cookies hold their shape, plus it gives the flavors a chance to meld.
Step 5: Prep Your Oven and Baking Sheets
Preheat your oven to 350°F (175°C). Line two baking sheets with parchment paper or silicone mats to prevent sticking. I like to have everything ready so I can move quickly when the dough is chilled and ready to shape.
Step 6: Shape and Bake the Cookies
Roll the dough into 1-inch balls—try to keep them uniform so they bake evenly—and place them about 2 inches apart on your prepared sheets. Gently flatten each ball with the palm of your hand. Bake for 10-12 minutes until the edges look set but the centers are still soft. They’ll firm up as they cool, so don’t overbake! This is usually when my kitchen starts smelling like Christmas magic.
Step 7: Top With Peppermint Kisses
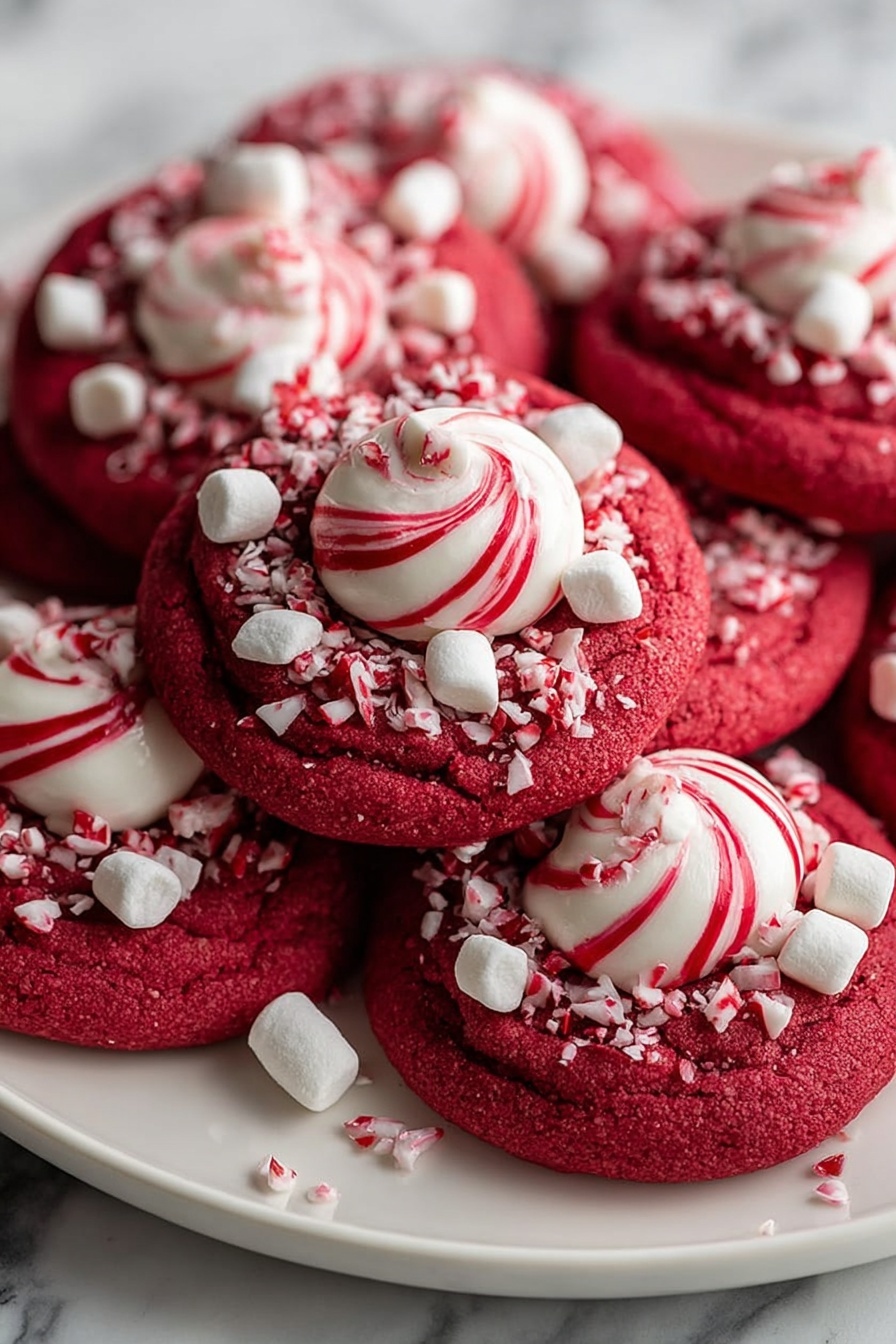
The best part: once the cookies come out of the oven, immediately press a peppermint candy kiss into the center of each one. While the cookies are still warm, sprinkle crushed candy canes or peppermint candies around the kiss so they stick beautifully. The heat softens the kiss slightly, making a perfect melty candy center that anyone will adore.
Step 8: Cool Completely
Allow your cookies to rest on the baking sheet for about 5 minutes after baking, so they firm up a bit without the peppermint candy hardening too much. Then, carefully transfer them to a wire rack to cool completely. This helps avoid them becoming soggy underneath and keeps your peppermint kiss topping perfectly intact.
Pro Tips for Making Red Velvet Peppermint Cookies Recipe
- Proper Butter Softening: I always soften my butter at room temperature but never melt it—this keeps the texture just right for creaming.
- Don’t Skip Chilling: Chilling the dough prevents the cookies from spreading too thin and keeps the peppermint kisses sitting pretty on top.
- Use Gel Food Coloring: It provides vivid color without thinning your dough, unlike liquid food coloring.
- Add Peppermint Kiss Right Away: Press them into the cookies as soon as they come out of the oven while still warm for that perfect melty top.
How to Serve Red Velvet Peppermint Cookies Recipe
Garnishes
I love adding a sprinkle of finely crushed candy canes or peppermint candies on top of each cookie right after baking. It adds extra crunch and visually signals that festive peppermint flavor inside. For an extra touch, dust with a light snowfall of powdered sugar for a wintery look.
Side Dishes
These cookies pair wonderfully with a warm cup of hot cocoa topped with whipped cream or a peppermint mocha for a double hit of minty goodness. I also enjoy them alongside a simple glass of cold milk—the classic combo never gets old!
Creative Ways to Present
When I make these for holiday parties, I like arranging them on a festive platter with sprigs of fresh evergreen and red berries for color contrast. You can also stack them in cellophane bags tied with a red or green ribbon for delightful edible gifts. Individually wrapping them on a pretty plate adds a touch of elegance if you’re hosting a cookie exchange.
Make Ahead and Storage
Storing Leftovers
I keep leftover Red Velvet Peppermint Cookies in an airtight container at room temperature, layered between parchment paper to prevent sticking. They stay soft and flavorful for up to a week, which means you can bake ahead for gatherings without worrying about freshness.
Freezing
Freezing these cookies works beautifully—either freeze the unbaked dough balls on a tray, then transfer to a sealed bag, or freeze the baked cookies in airtight containers. When you thaw them, the texture remains just right, and the peppermint stays deliciously intact. I usually thaw baked cookies at room temperature for an hour before serving.
Reheating
To bring back that just-baked warmth, I gently warm cookies in the oven at 300°F (148°C) for 3-4 minutes. This softens the peppermint kiss topping and restores their tender texture without drying them out. Avoid microwaving—they tend to get chewy or tough that way.
FAQs
-
Can I use liquid food coloring instead of gel for the Red Velvet Peppermint Cookies Recipe?
You can use liquid food coloring, but gel is preferred because it gives a more vibrant color without adding extra liquid to the dough. Too much liquid can change cookie texture and cause spreading. If you do use liquid, start with less and add gradually.
-
What can I substitute for buttermilk in this recipe?
If you don’t have buttermilk on hand, you can make a quick substitute by adding 1 tablespoon of lemon juice or white vinegar to 1 cup of milk. Let it sit for 5 minutes until it curdles slightly. Use this in place of buttermilk for the recipe.
-
How do I prevent the peppermint kisses from melting too much?
Press the peppermint kisses into the cookies immediately after baking while the cookies are still warm but not hot enough to make them completely melt. Letting cookies cool for too long makes it hard for the kisses to stick, but too much heat will cause excessive melting. Aim for a gentle press right out of the oven.
-
Can I make these cookies ahead of time for a party?
Absolutely! You can prepare the dough and chill it up to 48 hours in advance or freeze shaped dough balls. Bake fresh the day of your event for the best texture and appearance. Baked cookies stored in an airtight container will last several days and stay tasty.
Final Thoughts
Honestly, this Red Velvet Peppermint Cookies Recipe has become one of my absolute favorites to bake during the holidays. The combination of soft red velvet texture with that crisp peppermint kiss topping feels like a warm hug on a chilly day. Once you make them, you’ll see how simple ingredients and a little attention to detail come together to create something truly special. I can’t recommend them enough for sharing at holiday gatherings or cozy nights in. So, grab your mixing bowl and peppermint kisses—let’s bake up some festive magic together!
Print
Red Velvet Peppermint Cookies Recipe
- Prep Time: 15 minutes
- Cook Time: 10-12 minutes
- Total Time: 40-45 minutes
- Yield: 18-20 cookies
- Category: Dessert
- Method: Baking
- Cuisine: American
Description
Celebrate the holidays with these festive Christmas Peppermint Red Velvet Blossoms. Soft and vibrant red velvet cookies are topped with melting peppermint candy kisses and sprinkled with crushed candy canes for a delightful peppermint twist. Perfect for sharing at holiday gatherings or gifting to friends and family.
Ingredients
For the Cookies:
- 1 ¼ cups all-purpose flour
- ¼ cup unsweetened cocoa powder
- 1 tsp baking powder
- ½ tsp baking soda
- ¼ tsp salt
- ½ cup unsalted butter, softened
- ¾ cup granulated sugar
- 1 large egg
- 1 tsp vanilla extract
- 1 tbsp red food coloring (gel preferred for vibrant color)
- 1 tbsp buttermilk
- 18-20 peppermint candy kisses (unwrapped)
- Crushed candy canes or peppermint candies for garnish
Instructions
- Prepare the dry ingredients: In a medium bowl, whisk together the flour, cocoa powder, baking powder, baking soda, and salt. Set aside.
- Cream the butter and sugar: In a large bowl, using a hand mixer or stand mixer, cream together the softened butter and sugar until light and fluffy, about 2-3 minutes. Beat in the egg and vanilla extract, mixing until combined.
- Add the red velvet magic: With the mixer on low, add the red food coloring and buttermilk to the wet ingredients, and mix until you achieve a vibrant red color. Gradually add the dry ingredients, mixing just until the dough comes together. The dough will be soft but slightly sticky.
- Chill the dough: Cover the dough with plastic wrap and refrigerate for at least 30 minutes. Chilling helps the cookies maintain their shape while baking.
- Preheat and prep: Preheat the oven to 350°F (175°C). Line two baking sheets with parchment paper.
- Shape and bake the cookies: Roll the chilled dough into 1-inch balls and place them 2 inches apart on the prepared baking sheets. Lightly flatten each ball with the palm of your hand. Bake for 10-12 minutes, or until the cookies have set around the edges but are still soft in the center.
- Top with peppermint kisses: As soon as the cookies come out of the oven, gently press a peppermint kiss into the center of each one. Immediately sprinkle crushed peppermint candies around the base of the kiss while the cookies are still warm so that the pieces stick to the surface.
- Cool completely: Allow the cookies to cool on the baking sheet for 5 minutes, then transfer them to a wire rack to cool completely. The peppermint kisses will soften from the heat of the cookies but will firm up as they cool.
Notes
- For best color, use gel food coloring instead of liquid.
- Chilling the dough is important to prevent spreading during baking.
- Be careful not to overbake; cookies should be soft in the center when removed from the oven.
- Store cookies in an airtight container to keep them fresh for several days.
- Crushed peppermint candies can be substituted with crushed candy canes if desired.
Nutrition
- Serving Size: 1 cookie
- Calories: 130
- Sugar: 12g
- Sodium: 90mg
- Fat: 6g
- Saturated Fat: 3.5g
- Unsaturated Fat: 2g
- Trans Fat: 0g
- Carbohydrates: 18g
- Fiber: 1g
- Protein: 1.5g
- Cholesterol: 25mg


