
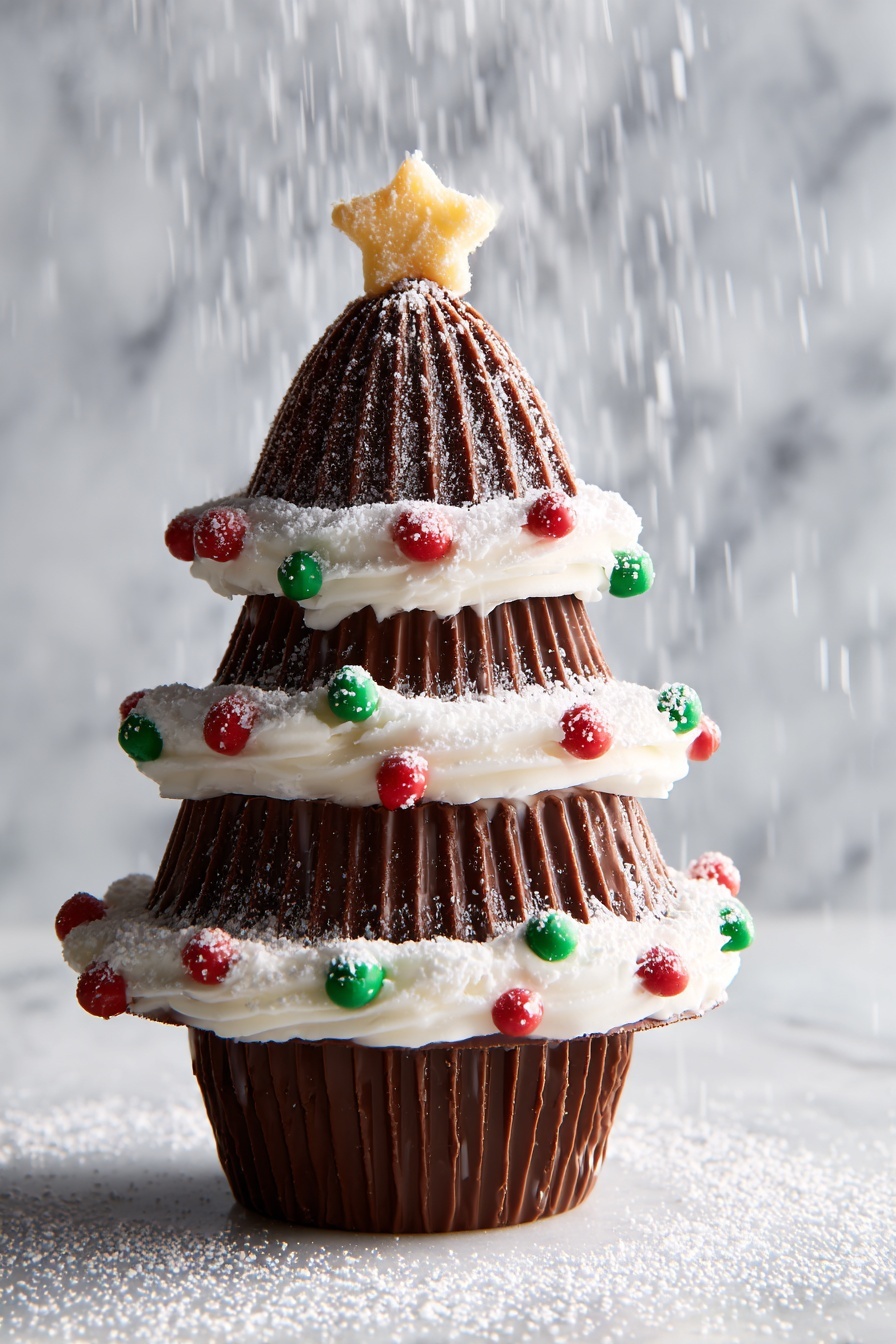
If you’re looking for a fun, festive treat that’s as cute as it is delicious, you’re going to love this one! The Reese’s Tree Chocolate Candies Recipe is one of those delightful little gems I discovered that makes holiday gatherings infinitely sweeter. It’s simple to make, requires minimal ingredients, and looks like you spent hours crafting each piece. Once you try it, I promise you’ll understand why my family goes a little crazy whenever these Reese’s trees appear on the dessert table.
Why You’ll Love This Recipe
- Easy and Quick: You can whip up these festive Reese’s trees in about ten minutes—perfect for last-minute holiday prep.
- Minimal Ingredients: Using just a few favorite chocolate candies means no complicated shopping trips.
- Visually Stunning: These candies make a charming centerpiece and are almost too pretty to eat (almost!).
- Family Favorite: Both kids and adults adore these, and they’re fun to make together, creating sweet holiday memories.

Ingredients You’ll Need
What makes this Reese’s Tree Chocolate Candies Recipe stand out is the combination of different-sized Reese’s cups and Hershey’s kisses—classic candies that blend perfectly in shape and flavor. Plus, the addition of decorating icing and sprinkles lets you get creative and festive with your presentation.
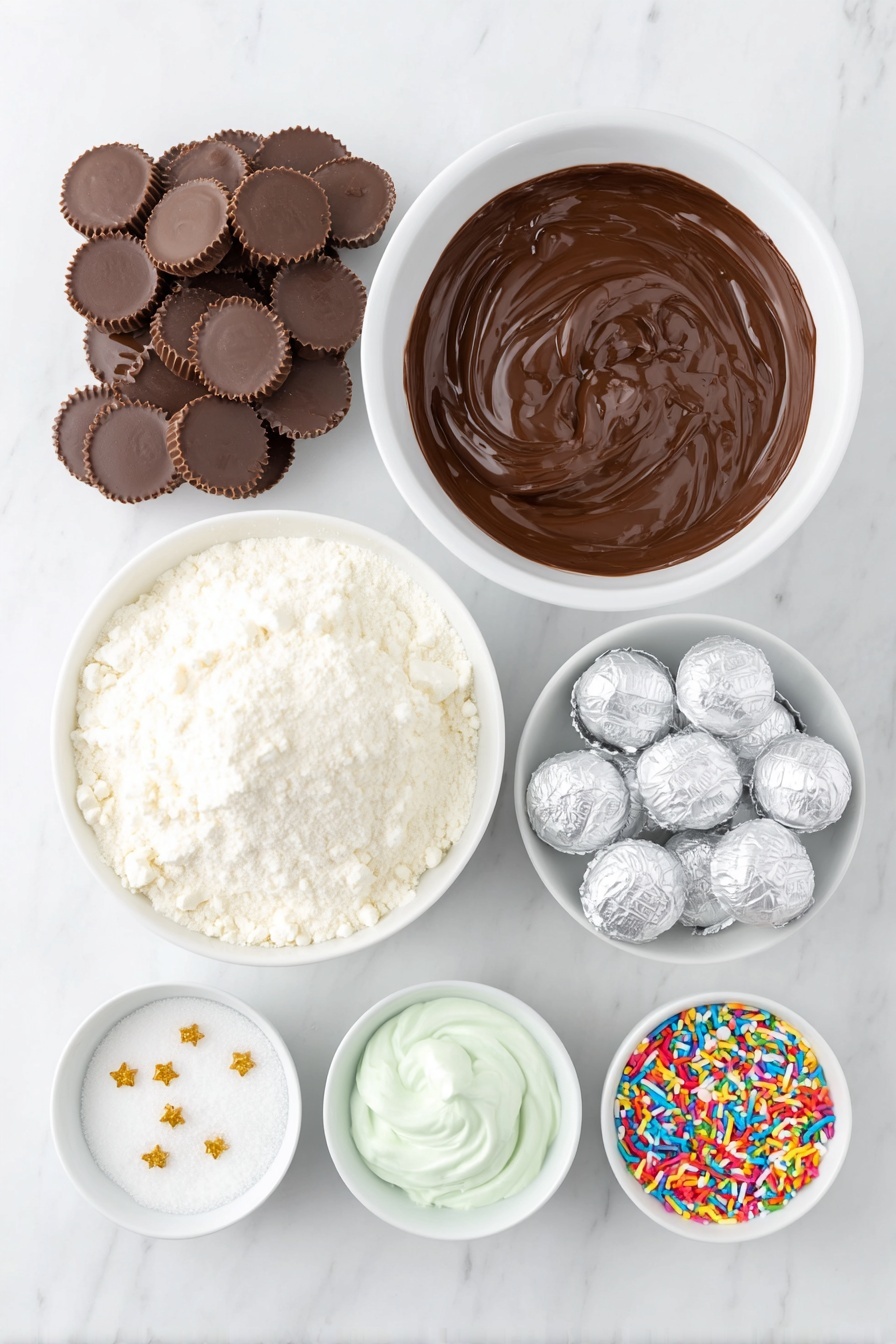
- Chocolate chips: Use good-quality semi-sweet chips for melting; they’ll hold the tree layers together beautifully.
- Mini Reese’s cups: These form the base and the little branches—don’t swap them for the standard size or it won’t stack right.
- Regular Reese’s cups: The perfect “trunk” of the tree; their size adds balance.
- Hershey kisses: Topping the tree, these add that iconic cone shape and a lovely chocolate finish.
- White and green decorating icing: For piping garlands and adding festive charm—you can find these in most grocery stores during the holidays.
- Sprinkles and gold stars: Adds sparkle and whimsy to your candy trees; think holiday magic on each one.
- Confectioners’ sugar (optional): A light dusting creates a snowy effect if you want an extra wintery touch.
Variations
One of my favorite things about the Reese’s Tree Chocolate Candies Recipe is how easy it is to personalize. Whether you want to tone it down or step it up for a special occasion, there are plenty of ways to make these candy trees your own.
- Nut-free variation: Swap out Hershey’s kisses for a nut-free chocolate alternative if peanut butter isn’t an option in your household.
- Holiday color themes: Use different colored sprinkles or icing to match your holiday décor—from classic red and green to winter whites and golds.
- Miniature peppermint candies: Add some crushed peppermint on the icing garlands to give your trees a refreshing twist.
- Gluten-free option: This recipe is naturally gluten-free, but double-check your icing and sprinkles to be safe.
How to Make Reese’s Tree Chocolate Candies Recipe
Step 1: Prepare your chocolate glue and base
Start by melting about half a cup of chocolate chips—either in a microwave-safe bowl in 30-second intervals or over a double boiler. Stir gently until smooth. This melted chocolate acts as your “glue,” so it’s important it isn’t too hot or too cold; I found room temperature is just right to avoid melting the candy shells too much while still keeping them stuck together firmly.
Step 2: Build the tree layers carefully
Place a tiny dollop of melted chocolate on the bottom of a mini Reese’s cup—it’s your base. Then, carefully press a regular-sized Reese’s cup upside down on top. Add another small smear of melted chocolate on the bottom of a mini Reese’s cup and place it upside down on top of the regular-sized one to form the branches. This layered stacking is the trickiest part; taking your time here pays off. It might wobble at first, but a gentle press and a bit of patience to let the chocolate set helps keep everything stable.
Step 3: Crown your tree with a kiss
Finally, dab a bit of melted chocolate on the flat side of a Hershey’s kiss, then gently place it on top of your mini Reese’s cup layer. This makes the iconic tree “star” shape. Let your assembled trees sit on parchment paper while you prepare the icing decorations.
Step 4: Decorate your candy trees
Use your green and white icing to pipe fun garlands around the tree—think little loops or swags, whatever feels festive to you! While the icing is still wet, sprinkle on colorful holiday sprinkles for that magical sparkle. Don’t forget to add a tiny gold star on top of each Hershey’s kiss; it’s that charming detail that completes your Reese’s tree. If you want to create a snowy vibe, lightly dust with confectioners’ sugar once the icing is set. I love this final touch because it makes them look like they’ve just come out of a winter wonderland.
Pro Tips for Making Reese’s Tree Chocolate Candies Recipe
- Temper your melted chocolate: If you overheat it, the chocolate gets grainy and won’t set properly—warm it slowly and stir often for the best consistency.
- Use parchment paper: Always assemble your Reese’s trees on parchment to avoid sticking and make cleanup a breeze.
- Let chocolate set between layers: Waiting a minute or two between stacking layers helps the trees stand firm instead of toppling over.
- Pipe icing with a steady hand: I found that using a small piping tip or even a zip-top bag with a tiny corner snipped off offers the best control for neat garlands.
How to Serve Reese’s Tree Chocolate Candies Recipe

Garnishes
I usually stick with the classic green garland icing and sprinkle combo because it’s festive and colorful, but my kids love when I add edible glitter and tiny candy pearls too. It adds an upscale touch that turns these candies from everyday treats into holiday showstoppers.
Side Dishes
These candy trees pair wonderfully with a simple cup of hot cocoa or a glass of cold milk—perfect for cozy holiday nights. They’re also a sweet complement alongside other cookies and treats if you’re assembling a holiday dessert platter.
Creative Ways to Present
For gift-giving, I like to arrange these in decorative boxes lined with tissue paper so they arrive safely and look irresistible. Another fun idea is setting them up on a holiday-themed cake stand or even placing each candy tree in a mini cupcake liner to make handing them out at parties easy.
Make Ahead and Storage
Storing Leftovers
I store leftover Reese’s tree candies in an airtight container at room temperature, preferably somewhere cool and dry. They stay fresh for up to a week this way, which is great because they never last that long at my house!
Freezing
Freezing these candies isn’t my go-to because the texture of the chocolate can change, and condensation might make the sprinkles a little soggy. However, if you need to freeze them, wrap each one individually in plastic wrap and freeze in an airtight container. Thaw at room temperature before serving.
Reheating
Since these are chocolate candies, reheating isn’t really necessary or recommended—you want to keep that perfect glossy chocolate finish. If the chocolate looks dull, just let the candies sit at room temperature for a bit to regain their shine naturally.
FAQs
-
Can I use other types of chocolate candies for this Reese’s Tree Chocolate Candies Recipe?
Definitely! While mini and regular-sized Reese’s cups and Hershey’s kisses create the classic structure and taste, you can experiment with similar-shaped peanut butter or chocolate candies. Just make sure the sizes stack well to avoid instability.
-
How long does it take for the candies to set properly?
Usually, letting each layer set for 1-2 minutes before adding the next helps maintain stability, and final decorations ideally dry for about 10-15 minutes. Placing them in the fridge can speed this up, but watch out for condensation forming.
-
What if my chocolate won’t melt smoothly?
Try microwaving in short 20-30 second bursts, stirring well after each. Avoid overheating, which causes the chocolate to seize. Adding a tiny bit of vegetable oil can help if your chocolate is thick.
-
Are these Reese’s trees kid-friendly to make?
Absolutely! Kids enjoy stacking the candies and decorating with icing and sprinkles. Just supervise the melting chocolate part since it involves heat.
Final Thoughts
This Reese’s Tree Chocolate Candies Recipe holds a special place in my holiday heart because it’s so simple yet festive and fun. It’s one of those recipes I pull out when I want to show up with a sweet treat that feels homemade but impressively adorable. Give it a try—you’ll be amazed at how these little candy trees can light up your dessert table and bring everyone together for a few joyful, chocolaty moments.
Print
Reese’s Tree Chocolate Candies Recipe
- Prep Time: 10 mins
- Cook Time: 0 mins
- Total Time: 10 mins
- Yield: 24 trees
- Category: Dessert
- Method: No-Cook
- Cuisine: American
Description
These delightful Reese’s Trees are a festive, no-bake treat made by stacking mini Reese’s cups, regular Reese’s cups, and Hershey’s Kisses, then decorating with icing, sprinkles, and stars. Perfect for holiday parties or a fun dessert, they are quick to assemble and visually charming.
Ingredients
Main Ingredients
- 1/2 cup chocolate chips, melted
- 24 mini Reese’s cups
- 12 regular Reese’s cups
- 12 Hershey’s kisses
Decorations
- White and green decorating icing
- Sprinkles
- Gold stars
- Confectioners’ sugar, for dusting (optional)
Instructions
- Assemble the base layer: Place a small amount of melted chocolate on the bottom of a mini Reese’s cup. Arrange a regular-size Reese’s cup upside down on top of the mini cup. Add another small drop of melted chocolate on top of the regular Reese’s cup.
- Add the top mini cup and Hershey’s kiss: Place another mini Reese’s cup upside down on top of the melted chocolate. Dab more melted chocolate on top and then place a Hershey’s kiss to form the tree pinnacle.
- Decorate the trees: Using white and green decorating icing, pipe garlands around the stack to mimic tree decorations. Sprinkle with colorful sprinkles for added holiday flair.
- Finish with a star top: Add a dab of frosting to the top of the Hershey’s kiss and adhere a gold star to complete the tree look.
- Optional snow dusting: Lightly dust the assembled trees with confectioners’ sugar to give the appearance of fresh snow.
Notes
- Use melted chocolate as a sturdy adhesive to keep the tree layers in place.
- Decorate with any colors of icing or sprinkles to match your holiday theme.
- Make sure the melted chocolate is cool enough so it doesn’t melt the candies while assembling.
- These treats are best served the same day for freshness.
- Store leftovers in a cool, dry place to prevent melting.
Nutrition
- Serving Size: 1 tree
- Calories: 150
- Sugar: 18g
- Sodium: 50mg
- Fat: 9g
- Saturated Fat: 5g
- Unsaturated Fat: 3g
- Trans Fat: 0g
- Carbohydrates: 18g
- Fiber: 1g
- Protein: 2g
- Cholesterol: 5mg


